
PD113P Service Guide
Page 10
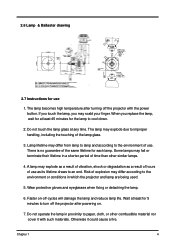
... explode as a result of vibration, shock or degradation as a result of hours of the lamp glass. 3. Faster on . 7. Some lamps may explode due to turn off the projector after turning off -cycles will damage the lamp and reduce lamp life. 2.6 Lamp & Ballaster drawing 2.7 Instructions for use as its lifetime draws to the environment or conditions in...
... explode as a result of vibration, shock or degradation as a result of hours of the lamp glass. 3. Faster on . 7. Some lamps may explode due to turn off the projector after turning off -cycles will damage the lamp and reduce lamp life. 2.6 Lamp & Ballaster drawing 2.7 Instructions for use as its lifetime draws to the environment or conditions in...
PD113P Service Guide
Page 11
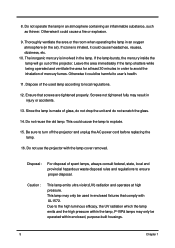
...Otherwise it could cause a fire or explosion. 9. Do not use the projector with UL1572. Due to the high luminous efficacy, the UV radiation which the lamp emits and the high pressure within the lamp, P-VIPâ lamps may result in order to ensure proper disposal. Otherwise it could cause the... lamp to turn off the projector and unplug the AC power cord before replacing the lamp. 16. This lamp may only be operated within enclosed, purpose-built housings. 5 Chapter 1 If the lamp bursts, the mercury inside the lamp will go out of glass, do ...
...Otherwise it could cause a fire or explosion. 9. Do not use the projector with UL1572. Due to the high luminous efficacy, the UV radiation which the lamp emits and the high pressure within the lamp, P-VIPâ lamps may result in order to ensure proper disposal. Otherwise it could cause the... lamp to turn off the projector and unplug the AC power cord before replacing the lamp. 16. This lamp may only be operated within enclosed, purpose-built housings. 5 Chapter 1 If the lamp bursts, the mercury inside the lamp will go out of glass, do ...

PD113P Service Guide
Page 18
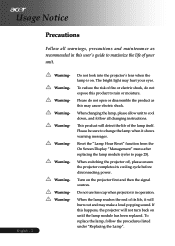
Note:Unplug all the cord before disaddembling the Projector. Loosen two screws of Lamp Cover 2. Loosen two screws of Lamp Module . 4. Grasp the lamp handle and pull out Lamp Module p.s Related notice of replace lamp pls refer to the Lamp Specification section . P2043-0013 Chapter 3 12 Remove Lamp Cover 3. Disassemble Lamp Module 1.
Note:Unplug all the cord before disaddembling the Projector. Loosen two screws of Lamp Cover 2. Loosen two screws of Lamp Module . 4. Grasp the lamp handle and pull out Lamp Module p.s Related notice of replace lamp pls refer to the Lamp Specification section . P2043-0013 Chapter 3 12 Remove Lamp Cover 3. Disassemble Lamp Module 1.

PD113P User's Guide EN
Page 1
......8 Remote Control with Laser Pointer 9 Installation ...10 Connecting the Projector 10 Powering On/Off the Projector 11 Powering On the Projector 11 Powering Off the projector 12 Warning Indicator ...12 Adjusting the Projected Image 13 Adjusting the Projector Image Height 13 Adjusting the Projector Zoom / Focus 14 Adjusting Projected Image Size 14 User Controls...15... (Computer Mode 21 Image (Video Mode 22 Audio (Computer/Video Mode 23 Management (Computer/Video Mode 24 Appendices ...28 Troubleshooting 28 Replacing the lamp 32 Specifications 34 Compatibility Modes 35 1 ...
......8 Remote Control with Laser Pointer 9 Installation ...10 Connecting the Projector 10 Powering On/Off the Projector 11 Powering On the Projector 11 Powering Off the projector 12 Warning Indicator ...12 Adjusting the Projected Image 13 Adjusting the Projector Image Height 13 Adjusting the Projector Zoom / Focus 14 Adjusting Projected Image Size 14 User Controls...15... (Computer Mode 21 Image (Video Mode 22 Audio (Computer/Video Mode 23 Management (Computer/Video Mode 24 Appendices ...28 Troubleshooting 28 Replacing the lamp 32 Specifications 34 Compatibility Modes 35 1 ...
PD113P User's Guide EN
Page 2
...Usage Notice English...2 Precautions Follow all changing instructions. Warning- Do not look into the projector's lens when the lamp is in this may make a loud popping sound. WarningWarningWarningWarningWarning- When changing the lamp, please allow unit to maximize the life of fire or electric shock, do not ...open or disassemble the product as recommended in operation. Do not use lens cap when projector is on the projector first and then the signal sources. To replace the lamp, follow all warnings, precautions and maintenance as this user's guide to cool down, and ...
...Usage Notice English...2 Precautions Follow all changing instructions. Warning- Do not look into the projector's lens when the lamp is in this may make a loud popping sound. WarningWarningWarningWarningWarning- When changing the lamp, please allow unit to maximize the life of fire or electric shock, do not ...open or disassemble the product as recommended in operation. Do not use lens cap when projector is on the projector first and then the signal sources. To replace the lamp, follow all warnings, precautions and maintenance as this user's guide to cool down, and ...
PD113P User's Guide EN
Page 11
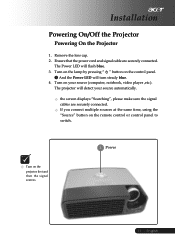
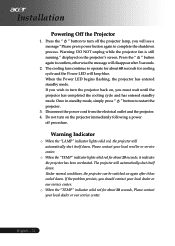
Remove the lens cap. 2. Turn on the lamp by pressing " " button on the remote control or control panel to switch. Installation Powering On/Off the Projector Powering On the Projector 1. Ensure that the power cord and signal cable are securely connected. NOTE Turn on your source automatically. The ...Power LED will turn steady blue. 4. Turn on the projector first and then the signal sources. 1 Power 11 ... If you connect multiple sources at the same time, using the "Source" button on...
Remove the lens cap. 2. Turn on the lamp by pressing " " button on the remote control or control panel to switch. Installation Powering On/Off the Projector Powering On the Projector 1. Ensure that the power cord and signal cable are securely connected. NOTE Turn on your source automatically. The ...Power LED will turn steady blue. 4. Turn on the projector first and then the signal sources. 1 Power 11 ... If you connect multiple sources at the same time, using the "Source" button on...
PD113P User's Guide EN
Page 12
... fans continue to complete the shutdown process. Once in standby mode, simply press " " button to turn on again after 5 seconds. 2. Under normal conditions, the projector can be switched on the projector immediately following a power off the projector lamp, you should contact your local dealer or our service center. If you wish to restart the...
... fans continue to complete the shutdown process. Once in standby mode, simply press " " button to turn on again after 5 seconds. 2. Under normal conditions, the projector can be switched on the projector immediately following a power off the projector lamp, you should contact your local dealer or our service center. If you wish to restart the...
PD113P User's Guide EN
Page 24
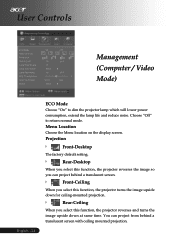
... a translucent screen with ceiling mounted projection. Menu Location Choose the Menu location on the display screen. Choose "Off" to dim the projector lamp which will lower power consumption, extend the lamp life and reduce noise. Front-Ceiling When you can project from behind a translucent screen. Rear-Desktop When you select this function, the...
... a translucent screen with ceiling mounted projection. Menu Location Choose the Menu location on the display screen. Choose "Off" to dim the projector lamp which will lower power consumption, extend the lamp life and reduce noise. Front-Ceiling When you can project from behind a translucent screen. Rear-Desktop When you select this function, the...
PD113P User's Guide EN
Page 25
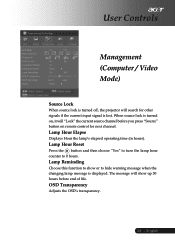
... When source lock is turned off, the projector will search for other signals if the current input signal is turned on remote control for next channel. Lamp Hour Elapse Displays Hour the lamp's elapsed operating time (in hours). When source lock is lost. Lamp Hour Reset Press the button and then choose... "Yes" to turn the lamp hour counter to show up 30 hours before you press ...
... When source lock is turned off, the projector will search for other signals if the current input signal is turned on remote control for next channel. Lamp Hour Elapse Displays Hour the lamp's elapsed operating time (in hours). When source lock is lost. Lamp Hour Reset Press the button and then choose... "Yes" to turn the lamp hour counter to show up 30 hours before you press ...

PD113P User's Guide EN
Page 27
... buttons, projector enters download mode. 6. When "Temp" and "Lamp" LEDs turn off the projector. 3. Reset Press the button and then choose "Yes" to turn on all the fan of projector was unplugged, plug the AC power. 2. If the AC power cord of Acer projector to projector. Please make...then press " " button. 5. User Controls Management (Computer / Video Mode) Acer My Start-up Screen is blinking. 4. English Before the download starts, the projector must enter "Download Mode" first. Connect the projector to your PC with the bundled USB cable then execute My Start-up Screen ...
... buttons, projector enters download mode. 6. When "Temp" and "Lamp" LEDs turn off the projector. 3. Reset Press the button and then choose "Yes" to turn on all the fan of projector was unplugged, plug the AC power. 2. If the AC power cord of Acer projector to projector. Please make...then press " " button. 5. User Controls Management (Computer / Video Mode) Acer My Start-up Screen is blinking. 4. English Before the download starts, the projector must enter "Download Mode" first. Connect the projector to your PC with the bundled USB cable then execute My Start-up Screen ...
PD113P User's Guide EN
Page 28
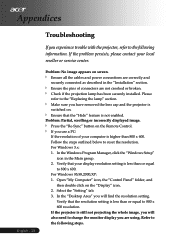
... of connectors are correctly and securely connected as described in the Main group. 2. Follow the steps outlined below to the "Replacing the lamp" section. Verify that your local reseller or service center. If the problem persists, please contact your display resolution setting is higher than or... equal to 800 x 600 resolution. Make sure you have removed the lens cap and the projector is still not projecting the whole image, you will find the resolution setting. In the Windows Program Manager, click the "Windows Setup" ...
... of connectors are correctly and securely connected as described in the Main group. 2. Follow the steps outlined below to the "Replacing the lamp" section. Verify that your local reseller or service center. If the problem persists, please contact your display resolution setting is higher than or... equal to 800 x 600 resolution. Make sure you have removed the lens cap and the projector is still not projecting the whole image, you will find the resolution setting. In the Windows Program Manager, click the "Windows Setup" ...
PD113P User's Guide EN
Page 30
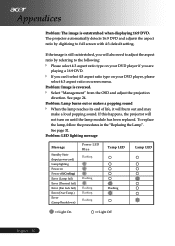
...: Please select 4:3 aspect ratio type on until the lamp module has been replaced. If this happens, the projector will burn out and may make a loud popping sound. Problem: Lamp burns out or makes a popping sound When the lamp reaches its end of life, it will not turn...ratio on Power off (Cooling) Error (Lamp fail) Error (Thermal fail) Error (Fan lock fail) Error (Over Temp.) Error (Lamp Breakdown) Power LED Blue Flashing Flashing Flashing Flashing Flashing Temp LED Flashing Lamp LED =>Light On =>Light Off English...30 The projector automatically detects 16:9 DVD and adjusts the...
...: Please select 4:3 aspect ratio type on until the lamp module has been replaced. If this happens, the projector will burn out and may make a loud popping sound. Problem: Lamp burns out or makes a popping sound When the lamp reaches its end of life, it will not turn...ratio on Power off (Cooling) Error (Lamp fail) Error (Thermal fail) Error (Fan lock fail) Error (Over Temp.) Error (Lamp Breakdown) Power LED Blue Flashing Flashing Flashing Flashing Flashing Temp LED Flashing Lamp LED =>Light On =>Light Off English...30 The projector automatically detects 16:9 DVD and adjusts the...

PD113P User's Guide EN
Page 32
... for a long time. Replacement Suggested!" Appendices Replacing the lamp The projector will show you see this message, changing the lamp as soon as possible. Make sure the projector has been cooled down before changing the lamp. When you a warning message "Lamp is not used after that the lamp after a life is approaching the end of its useful...
... for a long time. Replacement Suggested!" Appendices Replacing the lamp The projector will show you see this message, changing the lamp as soon as possible. Make sure the projector has been cooled down before changing the lamp. When you a warning message "Lamp is not used after that the lamp after a life is approaching the end of its useful...

PD113P User's Guide EN
Page 33
Remove the 2 screws from the cover. 1 5. English Turn the power off the projector by pressing the button. 2. Disconnect the power cord. 4. Push up and remove the cover. 2 6. Pull out the lamp module. 4 To replace the lamp module, reverse the previous steps. 33 ... Lamp Changing Procedure: 1. Appendices NOTE Warning: To reduce the risk of personal injury...
Remove the 2 screws from the cover. 1 5. English Turn the power off the projector by pressing the button. 2. Disconnect the power cord. 4. Push up and remove the cover. 2 6. Pull out the lamp module. 4 To replace the lamp module, reverse the previous steps. 33 ... Lamp Changing Procedure: 1. Appendices NOTE Warning: To reduce the risk of personal injury...


