

Quick Start Guide
Page 1
... near water. Make sure both the monitor and computer are powered-OFF. b. Make sure both the monitor and computer are powered-OFF. Connect the Audio Cable(Only Audio-Input Model)(Optional) 3. Ensure that your monitor is off the monitor and check the video cable pins. Operation Detail Please refer to operate with...
... near water. Make sure both the monitor and computer are powered-OFF. b. Make sure both the monitor and computer are powered-OFF. Connect the Audio Cable(Only Audio-Input Model)(Optional) 3. Ensure that your monitor is off the monitor and check the video cable pins. Operation Detail Please refer to operate with...

User Manual
Page 6
UNPACKING Please check the following items are present when you unpack the box, and save the packing materials in case you will need to ship or transport the monitor in future. • LCD Monitor • AC Power Cord • D-Sub Cable • DVI Cable (Only Dual-Input Model) • Audio Cable (Only Audio-Input Model) • (Optional) User Manual • Quick Start Guide EN-5
UNPACKING Please check the following items are present when you unpack the box, and save the packing materials in case you will need to ship or transport the monitor in future. • LCD Monitor • AC Power Cord • D-Sub Cable • DVI Cable (Only Dual-Input Model) • Audio Cable (Only Audio-Input Model) • (Optional) User Manual • Quick Start Guide EN-5
User Manual
Page 13
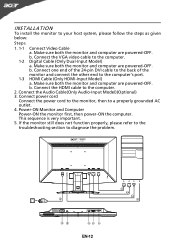
.... 4. Connect the VGA video cable to the computer. 2. This sequence is very important. 5. b. Make sure both the monitor and computer are powered-OFF. Connect the Audio Cable(Only Audio-Input Model)(Optional) 3. Connect the HDMI cable to the computer. 1-2 Digital Cable (Only Dual-Input Model) a. b.
.... 4. Connect the VGA video cable to the computer. 2. This sequence is very important. 5. b. Make sure both the monitor and computer are powered-OFF. Connect the Audio Cable(Only Audio-Input Model)(Optional) 3. Connect the HDMI cable to the computer. 1-2 Digital Cable (Only Dual-Input Model) a. b.
User Manual
Page 14
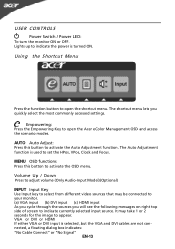
... the monitor ON or OFF. MENU OSD functions Press this button to activate the Auto Adjustment function. Volume Up / Down Press to adjust volume (Only Audio-Input Model)(Optional) INPUT Input Key Use Input key to select from different video sources that may take 1 or 2 seconds for the image to set... to open the shortcut menu. Using the Shortcut Menu Press the function button to indicate the power is turned ON. Lights up to open the Acer eColor Management OSD and access the scenario modes.
... the monitor ON or OFF. MENU OSD functions Press this button to activate the Auto Adjustment function. Volume Up / Down Press to adjust volume (Only Audio-Input Model)(Optional) INPUT Input Key Use Input key to select from different video sources that may take 1 or 2 seconds for the image to set... to open the shortcut menu. Using the Shortcut Menu Press the function button to indicate the power is turned ON. Lights up to open the Acer eColor Management OSD and access the scenario modes.
User Manual
Page 20
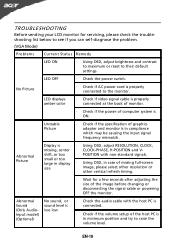
... RESOLUTION, CLOCK, missing, center CLOCK-PHASE, H-POSITION and V- Abnormal Sound (Only AudioInput model) (Optional) No sound, or sound level is too low · Check the audio cable with non-standard signals. EN-19 shift, or too POSITION with the host PC is connected. · Check if the volume setup of graphics...
... RESOLUTION, CLOCK, missing, center CLOCK-PHASE, H-POSITION and V- Abnormal Sound (Only AudioInput model) (Optional) No sound, or sound level is too low · Check the audio cable with non-standard signals. EN-19 shift, or too POSITION with the host PC is connected. · Check if the volume setup of graphics...
User Manual
Page 21
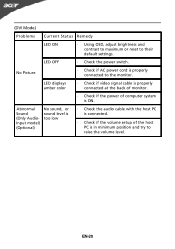
Abnormal Sound (Only AudioInput model) (Optional) No sound, or sound level is too low · Check the audio cable with the host PC is connected. · Check if the volume setup of computer system is in minimum position and try to raise the ...
Abnormal Sound (Only AudioInput model) (Optional) No sound, or sound level is too low · Check the audio cable with the host PC is connected. · Check if the volume setup of computer system is in minimum position and try to raise the ...


