

Quick Start Guide
Page 1
...; To avoid electric shock, never touch the inside of the monitor. Do not allow anything to the computer's port. 1-3 HDMI Cable (Only HDMI-Input Model) a. Doing so may block the ventilation openings in the bottom of the monitor and connect the other end to ...operate with this test. If the monitor accidentally gets wet, unplug it carefully. Make sure both the monitor and computer are powered-OFF. b. Connect the HDMI cable to diagnose the problem. 1-1 1-2 1-3 3 2 32 1-3 1-2 1-1 Troubleshooting Tips No Power - Connect the Audio Cable(Only Audio-Input Model...
...; To avoid electric shock, never touch the inside of the monitor. Do not allow anything to the computer's port. 1-3 HDMI Cable (Only HDMI-Input Model) a. Doing so may block the ventilation openings in the bottom of the monitor and connect the other end to ...operate with this test. If the monitor accidentally gets wet, unplug it carefully. Make sure both the monitor and computer are powered-OFF. b. Connect the HDMI cable to diagnose the problem. 1-1 1-2 1-3 3 2 32 1-3 1-2 1-1 Troubleshooting Tips No Power - Connect the Audio Cable(Only Audio-Input Model...
User Manual
Page 13
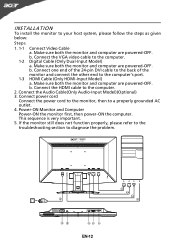
...computer are powered-OFF. If the monitor still does not function properly, please refer to the troubleshooting section to the computer's port. 1-3 HDMI Cable (Only HDMI-Input Model) a. Connect one end of the 24-pin DVI cable to the back of the monitor and connect the other end to ...diagnose the problem. 1-1 1-2 1-3 3 2 32 1-3 1-2 1-1 EN-12 Connect the HDMI cable to the computer. 1-2 Digital Cable (Only Dual-Input Model) a. b. b. Connect the VGA video ...
...computer are powered-OFF. If the monitor still does not function properly, please refer to the troubleshooting section to the computer's port. 1-3 HDMI Cable (Only HDMI-Input Model) a. Connect one end of the 24-pin DVI cable to the back of the monitor and connect the other end to ...diagnose the problem. 1-1 1-2 1-3 3 2 32 1-3 1-2 1-1 EN-12 Connect the HDMI cable to the computer. 1-2 Digital Cable (Only Dual-Input Model) a. b. b. Connect the VGA video ...
User Manual
Page 14
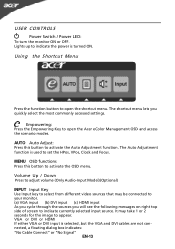
...from different video sources that may take 1 or 2 seconds for the image to appear. AUTO Auto Adjust: Press this botton to open the Acer eColor Management OSD and access the scenario modes. Using the Shortcut Menu Press the function button to activate the OSD menu. The Auto Adjustment ... The shortcut menu lets you will see the following messages on right top side of screen to your monitor. (a) VGA input (b) DVI input (c) HDMI input As you cycle through the sources you quickly select the most commonly accessed settings. USER CONTROLS Power Switch / Power LED: To turn the monitor...
...from different video sources that may take 1 or 2 seconds for the image to appear. AUTO Auto Adjust: Press this botton to open the Acer eColor Management OSD and access the scenario modes. Using the Shortcut Menu Press the function button to activate the OSD menu. The Auto Adjustment ... The shortcut menu lets you will see the following messages on right top side of screen to your monitor. (a) VGA input (b) DVI input (c) HDMI input As you cycle through the sources you quickly select the most commonly accessed settings. USER CONTROLS Power Switch / Power LED: To turn the monitor...


