

User Manual
Page 4
... the volume to block out noisy surroundings. • Turn the volume down if you can hear it clearly and comfortably and without distortion. • After setting the volume level, do not place the product on a vibrating surface. • Never use this product through cabinet slots as possible. The openings should never...
... the volume to block out noisy surroundings. • Turn the volume down if you can hear it clearly and comfortably and without distortion. • After setting the volume level, do not place the product on a vibrating surface. • Never use this product through cabinet slots as possible. The openings should never...

User Manual
Page 5
... from the wall outlet and refer servicing to qualified service personnel. The grounding pin is equipped with the supplied power supply cord set , make sure that the new power cord meets the following the operating instructions Unplug this product yourself, as opening or removing ...a grounded power outlet. Make sure the power outlet is damaged, cut or frayed • liquid was exposed to replace the power cord set . Product servicing Do not attempt to service this product from unexpected noise produced by plugging in performance, indicating a need to rain or water...
... from the wall outlet and refer servicing to qualified service personnel. The grounding pin is equipped with the supplied power supply cord set , make sure that the new power cord meets the following the operating instructions Unplug this product yourself, as opening or removing ...a grounded power outlet. Make sure the power outlet is damaged, cut or frayed • liquid was exposed to replace the power cord set . Product servicing Do not attempt to service this product from unexpected noise produced by plugging in performance, indicating a need to rain or water...

User Manual
Page 7
... a government program (public/private partnership) that earn the ENERGY STAR prevent greenhouse gas emissions by meeting strict energy efficiency guidelines set by the US Environmental Protection Agency (EPA) and the US Department of according to 50% less energy than conventional equipment. ...precision manufacturing techniques. This has no effect on the Waste from Electrical and Electronics Equipment (WEEE) regulations, visit http://global.acer.com/about/sustainability.htm Mercury advisory For projectors or electronic products containing an LCD/CRT monitor or display: lamp(s) inside this...
... a government program (public/private partnership) that earn the ENERGY STAR prevent greenhouse gas emissions by meeting strict energy efficiency guidelines set by the US Environmental Protection Agency (EPA) and the US Department of according to 50% less energy than conventional equipment. ...precision manufacturing techniques. This has no effect on the Waste from Electrical and Electronics Equipment (WEEE) regulations, visit http://global.acer.com/about/sustainability.htm Mercury advisory For projectors or electronic products containing an LCD/CRT monitor or display: lamp(s) inside this...
User Manual
Page 13
... Screen position adjustment Connecting the power cord Power saving Display Data Channel (DDC) Connector pin assignment Standard timing table Installation User controls How to adjust a setting Acer eColor Management User Troubleshooting VGA mode DVI mode 1 iii iii iii iii iii iv iv iv iv v vi vi vii vii viii xi 1 2 3 5 5 5 6 8 9 10 11...
... Screen position adjustment Connecting the power cord Power saving Display Data Channel (DDC) Connector pin assignment Standard timing table Installation User controls How to adjust a setting Acer eColor Management User Troubleshooting VGA mode DVI mode 1 iii iii iii iii iii iv iv iv iv v vi vi vii vii viii xi 1 2 3 5 5 5 6 8 9 10 11...
User Manual
Page 19
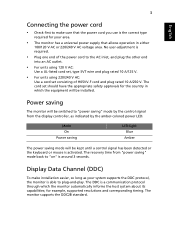
... by the control signal from "power saving" mode back to "on" is the correct type required for example, supported resolutions and corresponding timing. The cord set consisting of the power cord to plug-and-play. Mode On Power saving LED light Blue Amber The power saving mode will be kept until... other end into an AC outlet. • For units using 120 V AC: Use a UL-listed cord set, type SVT wire and plug rated 10 A/125 V. • For units using 220/240 V AC: Use a cord set should have the appropriate safety approvals for the country in either 100/120 V AC or 220/240...
... by the control signal from "power saving" mode back to "on" is the correct type required for example, supported resolutions and corresponding timing. The cord set consisting of the power cord to plug-and-play. Mode On Power saving LED light Blue Amber The power saving mode will be kept until... other end into an AC outlet. • For units using 120 V AC: Use a UL-listed cord set, type SVT wire and plug rated 10 A/125 V. • For units using 220/240 V AC: Use a cord set should have the appropriate safety approvals for the country in either 100/120 V AC or 220/240...

User Manual
Page 24
When the OSD menu is used to set the HPos, VPos, Clock and Focus. 7 /Exit: a. The Auto Adjustment function is active, this button to select scenario mode. b. English 8 User controls 76 5 4 3 21 Front ... OSD menu). b. When the OSD menu is inactive, press this button will act as the exit key (exit OSD menu). Press < or > to change the settings of the current function. 5 Menu/Enter: Activate the OSD menu when the OSD is off or activate / deactivate the adjustment function when the OSD is...
When the OSD menu is used to set the HPos, VPos, Clock and Focus. 7 /Exit: a. The Auto Adjustment function is active, this button to select scenario mode. b. English 8 User controls 76 5 4 3 21 Front ... OSD menu). b. When the OSD menu is inactive, press this button will act as the exit key (exit OSD menu). Press < or > to change the settings of the current function. 5 Menu/Enter: Activate the OSD menu when the OSD is off or activate / deactivate the adjustment function when the OSD is...

User Manual
Page 25
... the current function. 5 To exit and save, select the exit function. B. Only digital-input mode English 9 How to adjust a setting 1 Press the Menu button to activate the OSD window. 2 Press < or > to select the desired function. 3 Press the Menu button again to select the function ...that you want to adjust. 4 Press < or > to 4. User: If "User" is selected, the Acer eColor Management OSD will appear. Acer eColor Management: If "Acer eColor Management" is selected, the standard OSD will appear.
... the current function. 5 To exit and save, select the exit function. B. Only digital-input mode English 9 How to adjust a setting 1 Press the Menu button to activate the OSD window. 2 Press < or > to select the desired function. 3 Press the Menu button again to select the function ...that you want to adjust. 4 Press < or > to 4. User: If "User" is selected, the Acer eColor Management OSD will appear. Acer eColor Management: If "Acer eColor Management" is selected, the standard OSD will appear.
User Manual
Page 26
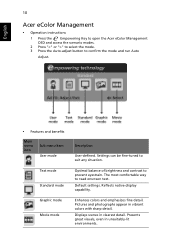
... colors and emphasizes fine detail. Presents great visuals, even in unsuitably-lit environments. English 10 Acer eColor Management • Operation instructions 1 Press the Empowering Key to open the Acer eColor Management OSD and access the scenario modes. 2 Press "" to select the mode. 3... Press the Auto-adjust button to read onscreen text. Settings can be fine-tuned to prevent eyestrain. Default settings. Reflects native display capability. Optimal ...
... colors and emphasizes fine detail. Presents great visuals, even in unsuitably-lit environments. English 10 Acer eColor Management • Operation instructions 1 Press the Empowering Key to open the Acer eColor Management OSD and access the scenario modes. 2 Press "" to select the mode. 3... Press the Auto-adjust button to read onscreen text. Settings can be fine-tuned to prevent eyestrain. Default settings. Reflects native display capability. Optimal ...

User Manual
Page 27
...screen image. Clock Adjusts the picture clock (available in analog mode only). Position Adjusts the vertical position (available in analog mode only). V. Sets the color temperature to warm white. User/green Adjusts green intensity. Adjusts the background brightness of the screen image. ACM ACM (Adaptive Contrast ...Management) ACM On/Off switch, default Off. Focus Adjusts picture focus (available in analog mode only). N/A Warm N/A Cool User/red Sets the color temperature to cool white. Adjusts red intensity. User/blue Adjusts blue intensity. H.
...screen image. Clock Adjusts the picture clock (available in analog mode only). Position Adjusts the vertical position (available in analog mode only). V. Sets the color temperature to warm white. User/green Adjusts green intensity. Adjusts the background brightness of the screen image. ACM ACM (Adaptive Contrast ...Management) ACM On/Off switch, default Off. Focus Adjusts picture focus (available in analog mode only). N/A Warm N/A Cool User/red Sets the color temperature to cool white. Adjusts red intensity. User/blue Adjusts blue intensity. H.
User Manual
Page 29
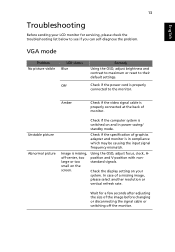
... of the image before changing or disconnecting the signal cable or switching off -center, too large or too small on the screen. Check the display setting on and in compliance which may be causing the input signal frequency mismatch. Unstable picture Abnormal picture Check if the computer system is properly connected...
... of the image before changing or disconnecting the signal cable or switching off -center, too large or too small on the screen. Check the display setting on and in compliance which may be causing the input signal frequency mismatch. Unstable picture Abnormal picture Check if the computer system is properly connected...

User Manual
Page 30
Check that the computer system is properly connected at the back of monitor. Amber Check if the video signal cable is switched on and in power saving/ standby mode. English 14 DVI mode Problem No picture visible LED status Blue Remedy Using the OSD, adjust brightness and contrast to maximum or reset to the monitor. Off Check if the AC power cord is properly connected to their default settings.
Check that the computer system is properly connected at the back of monitor. Amber Check if the video signal cable is switched on and in power saving/ standby mode. English 14 DVI mode Problem No picture visible LED status Blue Remedy Using the OSD, adjust brightness and contrast to maximum or reset to the monitor. Off Check if the AC power cord is properly connected to their default settings.


