
Quick Start Guide
Page 1
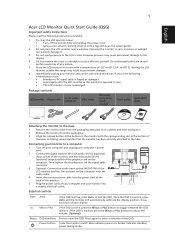
... the LCD monitor in a room with the audio cable. 4 Insert the monitor power cable into a nearby electrical outlet. Amber indicates standby/ power saving mode. Package contents LCD monitor Power cord Audio cable (optional) VGA cable DVI cable (only dualinput models) User's guide Quick start guide Attaching the monitor to the base 1 Remove the monitor base from the packaging. 3 Align the release button at the buttom of the monitor with the corresponding slot at the back of the monitor. 5 Plug the power cords of the base. Exposing the monitor to...
... the LCD monitor in a room with the audio cable. 4 Insert the monitor power cable into a nearby electrical outlet. Amber indicates standby/ power saving mode. Package contents LCD monitor Power cord Audio cable (optional) VGA cable DVI cable (only dualinput models) User's guide Quick start guide Attaching the monitor to the base 1 Remove the monitor base from the packaging. 3 Align the release button at the buttom of the monitor with the corresponding slot at the back of the monitor. 5 Plug the power cords of the base. Exposing the monitor to...
Quick Start Guide
Page 2
... this button will not occur in a residential installation. Operation conditions This device complies with Part 15 of with your waste equipment by one or more information abut where you purchased the product. When the OSD menu is connected. • Consult the dealer or an experienced radio/television technician for a Class B digital device pursuant to select scenario mode. This...
... this button will not occur in a residential installation. Operation conditions This device complies with Part 15 of with your waste equipment by one or more information abut where you purchased the product. When the OSD menu is connected. • Consult the dealer or an experienced radio/television technician for a Class B digital device pursuant to select scenario mode. This...

User Manual
Page 3
... by unplugging all power cords from the LCD monitor: • Make sure the monitor is displayed for your monitor Please carefully follow these instructions carefully. Connecting/disconnecting the device Observe the following are turned off the power switch for future reference. It may remain after switching the image, when the same image is attached to its base before cleaning. • Use a soft cloth to wipe the screen and cabinet front...
... by unplugging all power cords from the LCD monitor: • Make sure the monitor is displayed for your monitor Please carefully follow these instructions carefully. Connecting/disconnecting the device Observe the following are turned off the power switch for future reference. It may remain after switching the image, when the same image is attached to its base before cleaning. • Use a soft cloth to wipe the screen and cabinet front...

User Manual
Page 4
... unstable cart, stand or table. This product should be sure to the equipment operator as possible. iv Accessibility Be sure that the power outlet you plug the power cord into is easily accessible and located as close to unplug the power cord from the electrical outlet. When you need to block out noisy surroundings. • Turn the volume down if...
... unstable cart, stand or table. This product should be sure to the equipment operator as possible. iv Accessibility Be sure that the power outlet you plug the power cord into is easily accessible and located as close to unplug the power cord from the electrical outlet. When you need to block out noisy surroundings. • Turn the volume down if...

User Manual
Page 5
... good protection from the wall outlet and refer servicing to replace the power cord set . Product servicing Do not attempt to service this product yourself, as opening or removing covers may expose you need for details. Unplug this product. • Use the product only with a three-wire grounded plug. Warning! The grounding pin is properly grounded before inserting the power cord plug. The plug only fits in electric...
... good protection from the wall outlet and refer servicing to replace the power cord set . Product servicing Do not attempt to service this product yourself, as opening or removing covers may expose you need for details. Unplug this product. • Use the product only with a three-wire grounded plug. Warning! The grounding pin is properly grounded before inserting the power cord plug. The plug only fits in electric...

User Manual
Page 6
...area with a potentially explosive atmosphere are covered by a qualified technician to restore the product to environmental protection and views recycling, in minimizing the burden placed on boats, chemical transfer or storage facilities, vehicles using liquefied petroleum gas (such as propane ...global.acer.com for further information on the use of our other controls may contain small parts. For more information and help when recycling, please go to turn off your device in damage and will often require extensive work by the operating instructions, since improper adjustment of...
...area with a potentially explosive atmosphere are covered by a qualified technician to restore the product to environmental protection and views recycling, in minimizing the burden placed on boats, chemical transfer or storage facilities, vehicles using liquefied petroleum gas (such as propane ...global.acer.com for further information on the use of our other controls may contain small parts. For more information and help when recycling, please go to turn off your device in damage and will often require extensive work by the operating instructions, since improper adjustment of...

User Manual
Page 7
...-specific disposal information, check www.lamprecycle.org. This has no effect on the Waste from Electrical and Electronics Equipment (WEEE) regulations, visit http://global.acer.com/about/sustainability.htm Mercury advisory For projectors or electronic products containing an LCD/CRT monitor or display: lamp(s) inside this electronic device into the trash when discarding. ENERGY STAR (for selected models...
...-specific disposal information, check www.lamprecycle.org. This has no effect on the Waste from Electrical and Electronics Equipment (WEEE) regulations, visit http://global.acer.com/about/sustainability.htm Mercury advisory For projectors or electronic products containing an LCD/CRT monitor or display: lamp(s) inside this electronic device into the trash when discarding. ENERGY STAR (for selected models...
User Manual
Page 8
... long in front of the monitor, using a footrest, or raising your leg muscles Long work periods, bad posture, poor work habits, stress, inadequate working in one fixed posture • avoid slouching forward and/or leaning backward • stand up and walk around regularly to remove the strain on your sitting height to computer use Computer users may appear in the hands...
... long in front of the monitor, using a footrest, or raising your leg muscles Long work periods, bad posture, poor work habits, stress, inadequate working in one fixed posture • avoid slouching forward and/or leaning backward • stand up and walk around regularly to remove the strain on your sitting height to computer use Computer users may appear in the hands...

User Manual
Page 9
...; changing the display's viewing angle • using a glare-reduction filter • using a display visor, such as a piece of cardboard extended from the display's top front edge • Avoid adjusting your display in such a way that the side faces the window or any light source • minimizing room light by looking at bright light sources, such as possible. • Exercise regularly and maintain a healthy body. The following work...
...; changing the display's viewing angle • using a glare-reduction filter • using a display visor, such as a piece of cardboard extended from the display's top front edge • Avoid adjusting your display in such a way that the side faces the window or any light source • minimizing room light by looking at bright light sources, such as possible. • Exercise regularly and maintain a healthy body. The following work...
User Manual
Page 13
... Accessibility Safe listening Warnings Using electrical power Product servicing Additional safety information IT equipment recycling information Disposal instructions LCD pixel statement Tips and information for comfortable use Federal Communications Commission Declaration of Conformity Unpacking Attaching/removing the base Screen position adjustment Connecting the power cord Power saving Display Data Channel (DDC) Connector pin assignment Standard timing table Installation User controls How to adjust a setting Acer eColor Management User Troubleshooting VGA mode DVI mode 1 iii iii iii iii...
... Accessibility Safe listening Warnings Using electrical power Product servicing Additional safety information IT equipment recycling information Disposal instructions LCD pixel statement Tips and information for comfortable use Federal Communications Commission Declaration of Conformity Unpacking Attaching/removing the base Screen position adjustment Connecting the power cord Power saving Display Data Channel (DDC) Connector pin assignment Standard timing table Installation User controls How to adjust a setting Acer eColor Management User Troubleshooting VGA mode DVI mode 1 iii iii iii iii...

User Manual
Page 17
English 3 SCREEN POSITION ADJUSTMENT In oder to optimize the best viewing position, you can adjust the height/tilt/ swivel/pivot of the monitor. • Height Adjustment After pressing the top of the monitor, push the lock button towards right, then you can adjust the height of the monitor. 80 • Tilt Please see the illustration below for an example of the tilt range. 5o 15o
English 3 SCREEN POSITION ADJUSTMENT In oder to optimize the best viewing position, you can adjust the height/tilt/ swivel/pivot of the monitor. • Height Adjustment After pressing the top of the monitor, push the lock button towards right, then you can adjust the height of the monitor. 80 • Tilt Please see the illustration below for an example of the tilt range. 5o 15o
User Manual
Page 19
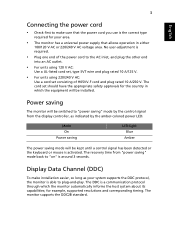
... monitor will be switched to "power saving" mode by the control signal from "power saving" mode back to the AC inlet, and plug the other end into an AC outlet. • For units using 120 V AC: Use a UL-listed cord set, type SVT wire and plug rated 10 A/125 V. • For units using 220/240 V AC: Use a cord set should have the appropriate safety approvals for example, supported resolutions and corresponding timing. Mode On Power saving LED light Blue...
... monitor will be switched to "power saving" mode by the control signal from "power saving" mode back to the AC inlet, and plug the other end into an AC outlet. • For units using 120 V AC: Use a UL-listed cord set, type SVT wire and plug rated 10 A/125 V. • For units using 220/240 V AC: Use a cord set should have the appropriate safety approvals for example, supported resolutions and corresponding timing. Mode On Power saving LED light Blue...

User Manual
Page 23
DVI D-Sub 2 1-1 1-2 2 1-2 1-1 English 7 Installation To install the monitor on the monitor first, then the computer. c Connect the digital cable (only for dual-input models). (1) Make sure both the monitor and computer are switched off . (2) Connect one end of the 24-pin DVI cable to the back of the monitor and the other end to the computer's port. 2 Connect the power cord Connect the power cord to the monitor, then to a properly grounded AC outlet. 3 Turn on the monitor and...
DVI D-Sub 2 1-1 1-2 2 1-2 1-1 English 7 Installation To install the monitor on the monitor first, then the computer. c Connect the digital cable (only for dual-input models). (1) Make sure both the monitor and computer are switched off . (2) Connect one end of the 24-pin DVI cable to the back of the monitor and the other end to the computer's port. 2 Connect the power cord Connect the power cord to the monitor, then to a properly grounded AC outlet. 3 Turn on the monitor and...

User Manual
Page 24
... the OSD is off or activate / deactivate the adjustment function when the OSD is on or off. 3.4 < / > : Press < or > to navigate to the desired function, press Enter to select the function. The Auto Adjustment function is used to set the HPos, VPos, Clock and Focus. 7 /Exit: a. English 8 User controls 76 5 4 3 21 Front panel controls 1 Power LED: Lights up to indicate the power is turned on. 2 Power Switch: Turn the power on . 6 Auto adjust button...
... the OSD is off or activate / deactivate the adjustment function when the OSD is on or off. 3.4 < / > : Press < or > to navigate to the desired function, press Enter to select the function. The Auto Adjustment function is used to set the HPos, VPos, Clock and Focus. 7 /Exit: a. English 8 User controls 76 5 4 3 21 Front panel controls 1 Power LED: Lights up to indicate the power is turned on. 2 Power Switch: Turn the power on . 6 Auto adjust button...

User Manual
Page 25
Only digital-input mode B. A. I. Acer eColor Management: If "Acer eColor Management" is selected, the standard OSD will appear. User: If "User" is selected, the Acer eColor Management OSD will appear. Only analog-input mode II. English 9 How to adjust a setting 1 Press the Menu button to activate the OSD window. 2 Press < or > to select the desired function. 3 Press the Menu button again to select the function that you want to adjust. 4 Press < or > to 4. If...
Only digital-input mode B. A. I. Acer eColor Management: If "Acer eColor Management" is selected, the standard OSD will appear. User: If "User" is selected, the Acer eColor Management OSD will appear. Only analog-input mode II. English 9 How to adjust a setting 1 Press the Menu button to activate the OSD window. 2 Press < or > to select the desired function. 3 Press the Menu button again to select the function that you want to adjust. 4 Press < or > to 4. If...
User Manual
Page 26
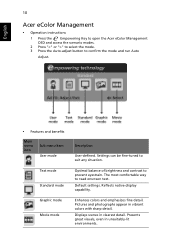
... onscreen text. Optimal balance of brightness and contrast to confirm the mode and run Auto Adjust. • Features and benefits Main menu icon Sub menu item User mode Text mode Standard mode Graphic mode Movie mode Description User-defined. Default settings. English 10 Acer eColor Management • Operation instructions 1 Press the Empowering Key to open the Acer eColor Management OSD and access the scenario modes. 2 Press "" to select the mode. 3 Press the Auto-adjust button to prevent eyestrain...
... onscreen text. Optimal balance of brightness and contrast to confirm the mode and run Auto Adjust. • Features and benefits Main menu icon Sub menu item User mode Text mode Standard mode Graphic mode Movie mode Description User-defined. Default settings. English 10 Acer eColor Management • Operation instructions 1 Press the Empowering Key to open the Acer eColor Management OSD and access the scenario modes. 2 Press "" to select the mode. 3 Press the Auto-adjust button to prevent eyestrain...

User Manual
Page 27
... Adjusts the horizontal position (available in analog mode only). V. N/A Warm N/A Cool User/red Sets the color temperature to cool white. Adjusts red intensity. Position Adjusts the vertical position (available in analog mode only). Clock Adjusts the picture clock (available in analog mode only). User/blue Adjusts blue intensity. ACM ACM (Adaptive Contrast Management) ACM On/Off switch, default Off. English 11 User Main Sub menu menu icon icon Sub menu item Contrast Brightness Description Adjusts the contrast between the foreground and background of the screen image...
... Adjusts the horizontal position (available in analog mode only). V. N/A Warm N/A Cool User/red Sets the color temperature to cool white. Adjusts red intensity. Position Adjusts the vertical position (available in analog mode only). Clock Adjusts the picture clock (available in analog mode only). User/blue Adjusts blue intensity. ACM ACM (Adaptive Contrast Management) ACM On/Off switch, default Off. English 11 User Main Sub menu menu icon icon Sub menu item Contrast Brightness Description Adjusts the contrast between the foreground and background of the screen image...
User Manual
Page 28
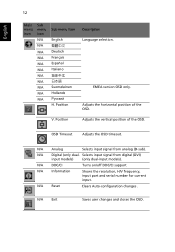
...version OSD only. Position Adjusts the vertical position of the OSD. N/A Reset Clears Auto-configuration changes . N/A Digital (only dual- Selects input signal from analog (D-sub). N/A Analog Selects input signal from digital (DVI) input models) (only dual-input models). N/A Exit Saves user changes and closes the OSD. N/A DDC/CI Turns on/off DDC/CI support N/A Information Shows the resolution, H/V frequency, input port and serial number for current input. Adjusts the horizontal position of the OSD. OSD Timeout Adjusts the OSD timeout. V. English 12...
...version OSD only. Position Adjusts the vertical position of the OSD. N/A Reset Clears Auto-configuration changes . N/A Digital (only dual- Selects input signal from analog (D-sub). N/A Analog Selects input signal from digital (DVI) input models) (only dual-input models). N/A Exit Saves user changes and closes the OSD. N/A DDC/CI Turns on/off DDC/CI support N/A Information Shows the resolution, H/V frequency, input port and serial number for current input. Adjusts the horizontal position of the OSD. OSD Timeout Adjusts the OSD timeout. V. English 12...
User Manual
Page 29
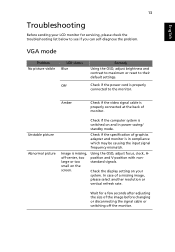
...signals. Check the display setting on your LCD monitor for a few seconds after adjusting the size of a missing image, please select another resolution or vertical refresh rate. Amber Check if the video signal cable is properly connected at the back of graphics adapter and monitor is missing, off the monitor. Image is in power saving/ standby mode. Check if the power cord is switched on the screen. Check if the specification of monitor. VGA mode Problem No picture visible LED status Blue Off Remedy Using the OSD, adjust brightness and contrast to maximum or reset...
...signals. Check the display setting on your LCD monitor for a few seconds after adjusting the size of a missing image, please select another resolution or vertical refresh rate. Amber Check if the video signal cable is properly connected at the back of graphics adapter and monitor is missing, off the monitor. Image is in power saving/ standby mode. Check if the power cord is switched on the screen. Check if the specification of monitor. VGA mode Problem No picture visible LED status Blue Off Remedy Using the OSD, adjust brightness and contrast to maximum or reset...

User Manual
Page 30
Amber Check if the video signal cable is switched on and in power saving/ standby mode. Check that the computer system is properly connected at the back of monitor. English 14 DVI mode Problem No picture visible LED status Blue Remedy Using the OSD, adjust brightness and contrast to maximum or reset to the monitor. Off Check if the AC power cord is properly connected to their default settings.
Amber Check if the video signal cable is switched on and in power saving/ standby mode. Check that the computer system is properly connected at the back of monitor. English 14 DVI mode Problem No picture visible LED status Blue Remedy Using the OSD, adjust brightness and contrast to maximum or reset to the monitor. Off Check if the AC power cord is properly connected to their default settings.

