User Guide
Page 1
... main power supply before cleaning. The ventilation openings are no sharp objects or liquids enter the device via its air circulation openings. To avoid damaging the device, only use . 3. The device shows obvious signs of Contents Important Safety Instructions...1 Federal Communications Commission 4 Connecting the Monitor and Swivel Base 2 Removing the Monitor and Swivel Base 2 Introduction...3 Installation...3 User Controls...4 OSD Function Description...4 OSD Icon Summary...5 Specification...5 Troubleshooting...7 Important Safety Instructions 1. Use a clean dampened...
... main power supply before cleaning. The ventilation openings are no sharp objects or liquids enter the device via its air circulation openings. To avoid damaging the device, only use . 3. The device shows obvious signs of Contents Important Safety Instructions...1 Federal Communications Commission 4 Connecting the Monitor and Swivel Base 2 Removing the Monitor and Swivel Base 2 Introduction...3 Installation...3 User Controls...4 OSD Function Description...4 OSD Icon Summary...5 Specification...5 Troubleshooting...7 Important Safety Instructions 1. Use a clean dampened...
User Guide
Page 2
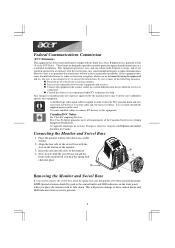
... the monitor till you hear the spring lock click into the slots of the monitor. 3. Removing the Monitor and Swivel Base If you place the monitor with its tube down . If this equipment. NOTE:Special attention should be used in accordance with the instructions, may void t he user'sauthority to the control knobs and LED indicators on the front panel when you need to...
... the monitor till you hear the spring lock click into the slots of the monitor. 3. Removing the Monitor and Swivel Base If you place the monitor with its tube down . If this equipment. NOTE:Special attention should be used in accordance with the instructions, may void t he user'sauthority to the control knobs and LED indicators on the front panel when you need to...

User Guide
Page 3
... of this monitor support s a 1280 x 1024 resolution. Package Overview Please make sure the following items are in the packing it was shipped in, and found in good working condition: n 17" Monitor n Tilt and Swivel Base n Power Cord n This User's manual Please contact your monitor is now complete. 3 Features Ø 17-inch monitor with a large, viewable screen for comfortable viewing. Ø OSD user controls for easy and accurate adjustment of the monitor. 4. Using state...
... of this monitor support s a 1280 x 1024 resolution. Package Overview Please make sure the following items are in the packing it was shipped in, and found in good working condition: n 17" Monitor n Tilt and Swivel Base n Power Cord n This User's manual Please contact your monitor is now complete. 3 Features Ø 17-inch monitor with a large, viewable screen for comfortable viewing. Ø OSD user controls for easy and accurate adjustment of the monitor. 4. Using state...
User Guide
Page 4
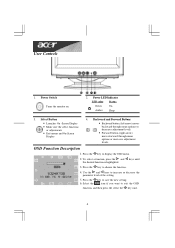
... the parameter level of the setting. 5. Power LED Indicator LED color Status Green On Amber Sleep 3. Use the and keys to exit the OSD function, and then press the select the key once. 4 Press the key to choose the function. 4. Power Switch Turns the monitor on 2. OSD Function Description 1. Press the key to save the new setting. 6. Select Button • Launches On -Screen Display • Make sure the select functions...
... the parameter level of the setting. 5. Power LED Indicator LED color Status Green On Amber Sleep 3. Use the and keys to exit the OSD function, and then press the select the key once. 4 Press the key to choose the function. 4. Power Switch Turns the monitor on 2. OSD Function Description 1. Press the key to save the new setting. 6. Select Button • Launches On -Screen Display • Make sure the select functions...

User Guide
Page 5
... convex portion of pincushion effect Parallelogram Adjusts the tilt of the display sides to reduce color impurities Exit Exits the OSD menu Specification Screen Size Dot Pitch (mm) Surface Viewable Image Area 17" CRT 0.27 Non -glare 16.14" (41.0 cm) Input Signal Video Sy nc. Composite H+V,TTL(+/-) Scanning Frequency Signal Cable Horizontal (KHz) Vertical (Hz) Max. Size H. RGB Analog 0.7Vp -p/75 Ohm a. Size Increase and decrease screen height V. Position Shifts display image up or down Pin. Separate...
... convex portion of pincushion effect Parallelogram Adjusts the tilt of the display sides to reduce color impurities Exit Exits the OSD menu Specification Screen Size Dot Pitch (mm) Surface Viewable Image Area 17" CRT 0.27 Non -glare 16.14" (41.0 cm) Input Signal Video Sy nc. Composite H+V,TTL(+/-) Scanning Frequency Signal Cable Horizontal (KHz) Vertical (Hz) Max. Size H. RGB Analog 0.7Vp -p/75 Ohm a. Size Increase and decrease screen height V. Position Shifts display image up or down Pin. Separate...

User Guide
Page 7
... the "On" position. @ Make sure that the video cable's D-shaped connector is properly connected to the video adapter port on the back of the PC. @ Check to make sure that the power cord is connected properly to the video adapter port on the back of the manual for the failure symptoms that the brightness and contrast controls are not turned to their dimmest position. Problem: No display appears on screen. @ Make sure that the computer switch is in...
... the "On" position. @ Make sure that the video cable's D-shaped connector is properly connected to the video adapter port on the back of the PC. @ Check to make sure that the power cord is connected properly to the video adapter port on the back of the manual for the failure symptoms that the brightness and contrast controls are not turned to their dimmest position. Problem: No display appears on screen. @ Make sure that the computer switch is in...

