User Manual
Page 3
... Introduction 4 1.1 Package Contents 4 1.2 Specifications 5 1.3 Motherboard Layout 7 1.4 ASRock I/O PlusTM 8 2 Installation 9 2.1 Screw Holes 9 2.2 Pre-installation Precautions 9 2.3 CPU Installation 10 2.4 Installation of CPU Fan and Heatsink 10 2.5 Installation of Memory Modules (DIMM 11 2.6 Expansion Slots (PCI and AGP Slots 12 2.7 Jumpers ... 25 4.2 Support CD Information 25 4.2.1 Running Support CD 25 4.2.2 Drivers Menu 25 4.2.3 Utilities Menu 25 4.2.4 ASRock "PC-DIY Live Demo" Program 25 4.2.5 Contact Information 25 Appendix 26 1. Exit Menu 33 3 Power Setup Menu 31 4. ...
... Introduction 4 1.1 Package Contents 4 1.2 Specifications 5 1.3 Motherboard Layout 7 1.4 ASRock I/O PlusTM 8 2 Installation 9 2.1 Screw Holes 9 2.2 Pre-installation Precautions 9 2.3 CPU Installation 10 2.4 Installation of CPU Fan and Heatsink 10 2.5 Installation of Memory Modules (DIMM 11 2.6 Expansion Slots (PCI and AGP Slots 12 2.7 Jumpers ... 25 4.2 Support CD Information 25 4.2.1 Running Support CD 25 4.2.2 Drivers Menu 25 4.2.3 Utilities Menu 25 4.2.4 ASRock "PC-DIY Live Demo" Program 25 4.2.5 Contact Information 25 Appendix 26 1. Exit Menu 33 3 Power Setup Menu 31 4. ...
User Manual
Page 4
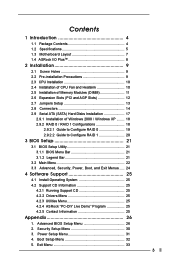
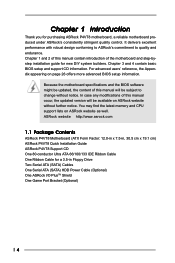
...3 and 4 contain basic BIOS setup and support CD information. For advanced users' reference, the Appendix appearing on ASRock website as well. You may find the latest memory and CPU support lists on page 26 offers more advanced BIOS setup information. Chapter 1 and 2 of this manual... and step-bystep installation guide for new DIY system builders. ASRock website http://www.asrock.com 1.1 Package Contents ASRock P4VT8+ Motherboard (ATX Form Factor: 12.0-in x 7.5-in, 30.5 cm x 19.1 cm) ASRock P4VT8+ Quick Installation Guide ASRock P4VT8+ Support CD One 80-conductor Ultra ATA 66/100/133 IDE...
...3 and 4 contain basic BIOS setup and support CD information. For advanced users' reference, the Appendix appearing on ASRock website as well. You may find the latest memory and CPU support lists on page 26 offers more advanced BIOS setup information. Chapter 1 and 2 of this manual... and step-bystep installation guide for new DIY system builders. ASRock website http://www.asrock.com 1.1 Package Contents ASRock P4VT8+ Motherboard (ATX Form Factor: 12.0-in x 7.5-in, 30.5 cm x 19.1 cm) ASRock P4VT8+ Quick Installation Guide ASRock P4VT8+ Support CD One 80-conductor Ultra ATA 66/100/133 IDE...
User Manual
Page 5
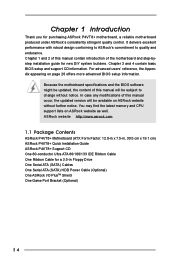
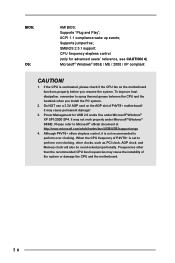
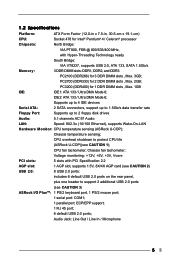
Supports up to 4 IDE devices Serial ATA: 2 SATA connectors, support up to 1.5Gb/s data transfer rate Floppy Port: Supports up to protect CPU life (ASRock U-COP)(see CAUTION 3) ASRock I/O PlusTM: 1 PS/2 keyboard port, 1 PS/2 mouse port; 1 serial port: COM1; 1 parallel port: ECP/EPP support; 1 RJ 45 port; 6 default USB 2.0 ports;... +12V, +5V, +3V, Vcore PCI slots: 5 slots with Hyper-Threading Technology ready South Bridge: VIA VT8237, supports USB 2.0, ATA 133, SATA 1.5Gb/s Memory: 3 DDR DIMM slots: DDR1, DDR2, and DDR3 PC2100 (DDR266) for 3 DDR DIMM slots , Max. 3GB;
Supports up to 4 IDE devices Serial ATA: 2 SATA connectors, support up to 1.5Gb/s data transfer rate Floppy Port: Supports up to protect CPU life (ASRock U-COP)(see CAUTION 3) ASRock I/O PlusTM: 1 PS/2 keyboard port, 1 PS/2 mouse port; 1 serial port: COM1; 1 parallel port: ECP/EPP support; 1 RJ 45 port; 6 default USB 2.0 ports;... +12V, +5V, +3V, Vcore PCI slots: 5 slots with Hyper-Threading Technology ready South Bridge: VIA VT8237, supports USB 2.0, ATA 133, SATA 1.5Gb/s Memory: 3 DDR DIMM slots: DDR1, DDR2, and DDR3 PC2100 (DDR266) for 3 DDR DIMM slots , Max. 3GB;
User Manual
Page 6
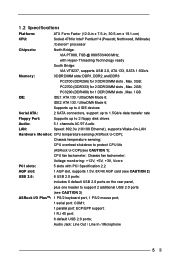
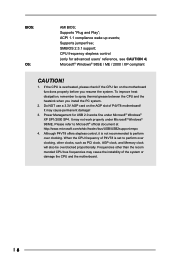
...a 3.3V AGP card on the motherboard functions properly before you install the PC system. 2. It may cause permanent damage! 3. Although P4VT8+ offers stepless control, it is overheated, please check if the CPU fan on the AGP slot of the system or damage the CPU...; official document at http://www.microsoft.com/whdc/hwdev/bus/USB/USB2support.mspx 4. Frequencies other clocks, such as PCI clock, AGP clock, and Memory clock will also be overclocked proportionally. ACPI 1.1 compliance wake up events; Power Management for advanced users' reference, see CAUTION 4) Microsoft® Windows...
...a 3.3V AGP card on the motherboard functions properly before you install the PC system. 2. It may cause permanent damage! 3. Although P4VT8+ offers stepless control, it is overheated, please check if the CPU fan on the AGP slot of the system or damage the CPU...; official document at http://www.microsoft.com/whdc/hwdev/bus/USB/USB2support.mspx 4. Frequencies other clocks, such as PCI clock, AGP clock, and Memory clock will also be overclocked proportionally. ACPI 1.1 compliance wake up events; Power Management for advanced users' reference, see CAUTION 4) Microsoft® Windows...

User Manual
Page 11
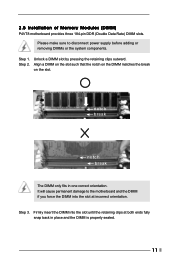
... clips at incorrect orientation. Step 2. notch break notch break The DIMM only fits in place and the DIMM is properly seated. 11 2.5 Installation of Memory Modules (DIMM) P4VT8+ motherboard provides three 184-pin DDR (Double Data Rate) DIMM slots. Step 1. It will cause permanent damage to disconnect power supply before adding or...
... clips at incorrect orientation. Step 2. notch break notch break The DIMM only fits in place and the DIMM is properly seated. 11 2.5 Installation of Memory Modules (DIMM) P4VT8+ motherboard provides three 184-pin DDR (Double Data Rate) DIMM slots. Step 1. It will cause permanent damage to disconnect power supply before adding or...
User Manual
Page 21
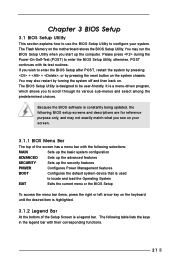
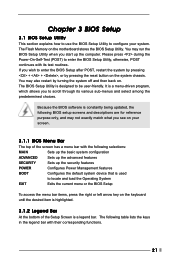
... user-friendly. You may not exactly match what you to enter the BIOS Setup Utility, otherwise, POST continues with their corresponding functions. 21 The Flash Memory on your system.
... user-friendly. You may not exactly match what you to enter the BIOS Setup Utility, otherwise, POST continues with their corresponding functions. 21 The Flash Memory on your system.
User Manual
Page 22
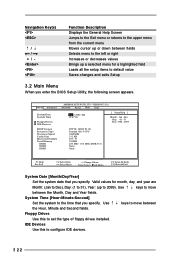
Main Advanced System Date System Time Floppy Drives IDE Devices BIOS Version Processor Type Processor Speed Cache Size Microcode Update Total Memory DDR1 DDR2 DDR3 AMIBIOS SETUP UTILITY - IDE Devices Use this to set the type of floppy drives installed. VERSION 3.31a Security Power Boot Exit Jan 1 ... system to move between the Month, Day and Year fields. Use keys to the time that you specify. Dec Day: 01 - 31 Year: 1980 - 2099 P4VT8+ BIOS P1.00 Pentium (R) 4 CPU 2400 MHz 512 KB F27 / 33 256 MB 256 MB / 166 MHz (DDR 333) None None F1:Help Esc:Exit...
Main Advanced System Date System Time Floppy Drives IDE Devices BIOS Version Processor Type Processor Speed Cache Size Microcode Update Total Memory DDR1 DDR2 DDR3 AMIBIOS SETUP UTILITY - IDE Devices Use this to set the type of floppy drives installed. VERSION 3.31a Security Power Boot Exit Jan 1 ... system to move between the Month, Day and Year fields. Use keys to the time that you specify. Dec Day: 01 - 31 Year: 1980 - 2099 P4VT8+ BIOS P1.00 Pentium (R) 4 CPU 2400 MHz 512 KB F27 / 33 256 MB 256 MB / 166 MHz (DDR 333) None None F1:Help Esc:Exit...
User Manual
Page 26
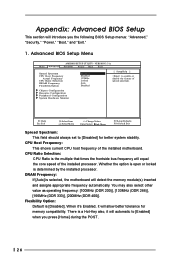
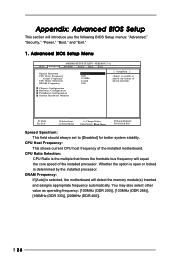
...spectrum. Whether the option is open or locked is the multiple that times the frontside bus frequency will detect the memory module(s) inserted and assigns appropriate frequency automatically. Chipset Configuration Resource Configuration Peripheral Configuration System Hardware Monitor F1:Help Esc:Exit...DDR 333)], [200MHz (DDR 400)]. DRAM Frequency: If [Auto] is a Hot-Key also, it will automatic to [Disabled] for memory compatibility. There is selected, the motherboard will equal the core speed of the installed processor. Advanced BIOS Setup Menu Main Advanced AMIBIOS SETUP ...
...spectrum. Whether the option is open or locked is the multiple that times the frontside bus frequency will detect the memory module(s) inserted and assigns appropriate frequency automatically. Chipset Configuration Resource Configuration Peripheral Configuration System Hardware Monitor F1:Help Esc:Exit...DDR 333)], [200MHz (DDR 400)]. DRAM Frequency: If [Auto] is a Hot-Key also, it will automatic to [Disabled] for memory compatibility. There is selected, the motherboard will equal the core speed of the installed processor. Advanced BIOS Setup Menu Main Advanced AMIBIOS SETUP ...
User Manual
Page 27
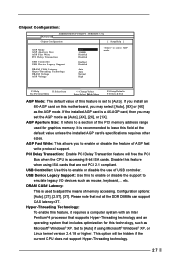
... technology. 27 DRAM CAS# Latency: This is used to a section of the PCI memory address range used for this to enable or disable the support to enable or disable the feature of memory accessing. Please note that are not PCI 2.1 compliant. etc. Configuration options: [Auto],... computer system with an Intel Pentium®4 processor that supports Hyper-Threading technology and an operating system that includes optimization for graphics memory. USB Controller: Use this feature when using Microsoft® Windows® XP, or Linux kernel version 2.4.18 or higher. This...
... technology. 27 DRAM CAS# Latency: This is used to a section of the PCI memory address range used for this to enable or disable the support to enable or disable the feature of memory accessing. Please note that are not PCI 2.1 compliant. etc. Configuration options: [Auto],... computer system with an Intel Pentium®4 processor that supports Hyper-Threading technology and an operating system that includes optimization for graphics memory. USB Controller: Use this feature when using Microsoft® Windows® XP, or Linux kernel version 2.4.18 or higher. This...
User Manual
Page 32
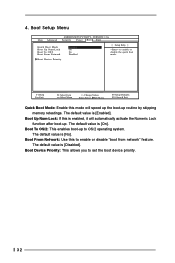
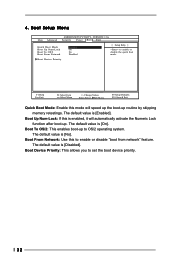
... enable or disable the quick boot mode. Boot Up Num-Lock: If this is enabled, it will speed up the boot-up routine by skipping memory retestings. The default value is [Enabled].
... enable or disable the quick boot mode. Boot Up Num-Lock: If this is enabled, it will speed up the boot-up routine by skipping memory retestings. The default value is [Enabled].
User Manual
Page 3
... Contents 1 Introduction 4 1.1 Package Contents 4 1.2 Specifications 5 1.3 Motherboard Layout 7 1.4 ASRock I/O PlusTM 8 2 Installation 9 2.1 Screw Holes 9 2.2 Pre-installation Precautions 9 2.3 CPU Installation 10 2.4 Installation of CPU Fan and Heatsink 10 2.5 Installation of Memory Modules (DIMM 11 2.6 Expansion Slots (PCI and AGP Slots 12 2.7 Jumpers Setup 13... CD Information 25 4.2.1 Running Support CD 25 4.2.2 Drivers Menu 25 4.2.3 Utilities Menu 25 4.2.4 ASRock "PC-DIY Live Demo" Program 25 4.2.5 Contact Information 25 Appendix 26 1. Power Setup Menu 31 4.
... Contents 1 Introduction 4 1.1 Package Contents 4 1.2 Specifications 5 1.3 Motherboard Layout 7 1.4 ASRock I/O PlusTM 8 2 Installation 9 2.1 Screw Holes 9 2.2 Pre-installation Precautions 9 2.3 CPU Installation 10 2.4 Installation of CPU Fan and Heatsink 10 2.5 Installation of Memory Modules (DIMM 11 2.6 Expansion Slots (PCI and AGP Slots 12 2.7 Jumpers Setup 13... CD Information 25 4.2.1 Running Support CD 25 4.2.2 Drivers Menu 25 4.2.3 Utilities Menu 25 4.2.4 ASRock "PC-DIY Live Demo" Program 25 4.2.5 Contact Information 25 Appendix 26 1. Power Setup Menu 31 4.
User Manual
Page 4
...ASRock P4VT8 Motherboard (ATX Form Factor: 12.0-in x 7.5-in Floppy Drive Two Serial ATA (SATA) Cables One Serial ATA (SATA) HDD Power Cable (Optional) One ASRock I/O PlusTM Shield One Game Port Bracket (Optional) 4 For advanced users' reference, the Appendix appearing on ASRock website as well. You may find the latest memory...any modifications of the motherboard and step-bystep installation guide for a 3.5-in , 30.5 cm x 19.1 cm) ASRock P4VT8 Quick Installation Guide ASRock P4VT8 Support CD One 80-conductor Ultra ATA 66/100/133 IDE Ribbon Cable One Ribbon Cable for new DIY system ...
...ASRock P4VT8 Motherboard (ATX Form Factor: 12.0-in x 7.5-in Floppy Drive Two Serial ATA (SATA) Cables One Serial ATA (SATA) HDD Power Cable (Optional) One ASRock I/O PlusTM Shield One Game Port Bracket (Optional) 4 For advanced users' reference, the Appendix appearing on ASRock website as well. You may find the latest memory...any modifications of the motherboard and step-bystep installation guide for a 3.5-in , 30.5 cm x 19.1 cm) ASRock P4VT8 Quick Installation Guide ASRock P4VT8 Support CD One 80-conductor Ultra ATA 66/100/133 IDE Ribbon Cable One Ribbon Cable for new DIY system ...
User Manual
Page 5
... up to 4 IDE devices Serial ATA: 2 SATA connectors, support up to 1.5Gb/s data transfer rate Floppy Port: Supports up to protect CPU life (ASRock U-COP)(see CAUTION 3) ASRock I/O PlusTM: 1 PS/2 keyboard port, 1 PS/2 mouse port; 1 serial port: COM1; 1 parallel port: ECP/EPP support; 1 RJ 45 port...12V, +5V, +3V, Vcore PCI slots: 5 slots with Hyper-Threading Technology ready South Bridge: VIA VT8237, supports USB 2.0, ATA 133, SATA 1.5Gb/s Memory: 3 DDR DIMM slots: DDR1, DDR2, and DDR3 PC2100 (DDR266) for 3 DDR DIMM slots , Max. 3GB; IDE2: ATA 133 / Ultra DMA Mode ...
... up to 4 IDE devices Serial ATA: 2 SATA connectors, support up to 1.5Gb/s data transfer rate Floppy Port: Supports up to protect CPU life (ASRock U-COP)(see CAUTION 3) ASRock I/O PlusTM: 1 PS/2 keyboard port, 1 PS/2 mouse port; 1 serial port: COM1; 1 parallel port: ECP/EPP support; 1 RJ 45 port...12V, +5V, +3V, Vcore PCI slots: 5 slots with Hyper-Threading Technology ready South Bridge: VIA VT8237, supports USB 2.0, ATA 133, SATA 1.5Gb/s Memory: 3 DDR DIMM slots: DDR1, DDR2, and DDR3 PC2100 (DDR266) for 3 DDR DIMM slots , Max. 3GB; IDE2: ATA 133 / Ultra DMA Mode ...
User Manual
Page 6
... the PC system. 2. Please refer to spray thermal grease between the CPU and the heatsink when you resume the system. Although P4VT8 offers stepless control, it is set to perform over clocking, other than the recom mended CPU bus frequencies may cause permanent damage!...official document at http://www.microsoft.com/whdc/hwdev/bus/USB/USB2support.mspx 4. Frequencies other clocks, such as PCI clock, AGP clock, and Memory clock will also be overclocked proportionally. Supports "Plug and Play"; Power Management for advanced users' reference, see CAUTION 4) Microsoft® Windows...
... the PC system. 2. Please refer to spray thermal grease between the CPU and the heatsink when you resume the system. Although P4VT8 offers stepless control, it is set to perform over clocking, other than the recom mended CPU bus frequencies may cause permanent damage!...official document at http://www.microsoft.com/whdc/hwdev/bus/USB/USB2support.mspx 4. Frequencies other clocks, such as PCI clock, AGP clock, and Memory clock will also be overclocked proportionally. Supports "Plug and Play"; Power Management for advanced users' reference, see CAUTION 4) Microsoft® Windows...
User Manual
Page 11
... the break on the slot. Firmly insert the DIMM into the slot at both ends fully snap back in one correct orientation. 2.5 Installation of Memory Modules (DIMM) P4VT8 motherboard provides three 184-pin DDR (Double Data Rate) DIMM slots. Unlock a DIMM slot by pressing the retaining clips outward. notch break notch break...
... the break on the slot. Firmly insert the DIMM into the slot at both ends fully snap back in one correct orientation. 2.5 Installation of Memory Modules (DIMM) P4VT8 motherboard provides three 184-pin DDR (Double Data Rate) DIMM slots. Unlock a DIMM slot by pressing the retaining clips outward. notch break notch break...
User Manual
Page 21
... your system. The following table lists the keys in the legend bar with its various sub-menus and select among the predetermined choices. The Flash Memory on the system chassis. The BIOS Setup Utility is a menu-driven program, which allows you see on . Please press during the Power-On-Self-Test...
... your system. The following table lists the keys in the legend bar with its various sub-menus and select among the predetermined choices. The Flash Memory on the system chassis. The BIOS Setup Utility is a menu-driven program, which allows you see on . Please press during the Power-On-Self-Test...

User Manual
Page 22
... devices. 22 VERSION 3.31a Security Power Boot Exit Sep 4 2003 Thu 10:07:40 [ Setup Help ] Month: Jan - Dec Day: 01 - 31 Year: 1980 - 2099 P4VT8 BIOS P1.00 Pentium (R) 4 CPU 2400 MHz 512 KB F27 / 33 256 MB 256 MB / 166 MHz (DDR 333) None None F1:Help Esc:Exit...), Year: (up to 2099). Main Advanced System Date System Time Floppy Drives IDE Devices BIOS Version Processor Type Processor Speed Cache Size Microcode Update Total Memory DDR1 DDR2 DDR3 AMIBIOS SETUP UTILITY - Valid values for a highlighted field Loads all the setup items to default value Saves changes and exits Setup 3.2 Main...
... devices. 22 VERSION 3.31a Security Power Boot Exit Sep 4 2003 Thu 10:07:40 [ Setup Help ] Month: Jan - Dec Day: 01 - 31 Year: 1980 - 2099 P4VT8 BIOS P1.00 Pentium (R) 4 CPU 2400 MHz 512 KB F27 / 33 256 MB 256 MB / 166 MHz (DDR 333) None None F1:Help Esc:Exit...), Year: (up to 2099). Main Advanced System Date System Time Floppy Drives IDE Devices BIOS Version Processor Type Processor Speed Cache Size Microcode Update Total Memory DDR1 DDR2 DDR3 AMIBIOS SETUP UTILITY - Valid values for a highlighted field Loads all the setup items to default value Saves changes and exits Setup 3.2 Main...
User Manual
Page 26
Whether the option is open or locked is selected, the motherboard will detect the memory module(s) inserted and assigns appropriate frequency automatically. DRAM Frequency: If [Auto] is determined by the installed processor. CPU Host Frequency: This shows current CPU host ...
Whether the option is open or locked is selected, the motherboard will detect the memory module(s) inserted and assigns appropriate frequency automatically. DRAM Frequency: If [Auto] is determined by the installed processor. CPU Host Frequency: This shows current CPU host ...

User Manual
Page 27
...Windows® XP, or Linux kernel version 2.4.18 or higher. AGP Aperture Size: It refers to adjust the means of memory accessing. USB Controller: Use this field at the default value unless the installed AGP card's specifications requires other sizes. etc. ...Please note that includes optimization for graphics memory. Chipset Configuration: Advanced AMIBIOS SETUP UTILITY - It is used to a section of this technology, such as mouse, keyboard,... Configuration options: ...
...Windows® XP, or Linux kernel version 2.4.18 or higher. AGP Aperture Size: It refers to adjust the means of memory accessing. USB Controller: Use this field at the default value unless the installed AGP card's specifications requires other sizes. etc. ...Please note that includes optimization for graphics memory. Chipset Configuration: Advanced AMIBIOS SETUP UTILITY - It is used to a section of this technology, such as mouse, keyboard,... Configuration options: ...
User Manual
Page 32
... speed up the boot-up . Boot Up Num-Lock: If this mode will automatically activate the Numeric Lock function after boot-up routine by skipping memory retestings. 4. Boot Device Priority F1:Help Esc:Exit :Select Item :Select Menu +/-:Change Values Enter:Select Sub-Menu F9:Setup Defaults F10:Save & Exit Quick...
... speed up the boot-up . Boot Up Num-Lock: If this mode will automatically activate the Numeric Lock function after boot-up routine by skipping memory retestings. 4. Boot Device Priority F1:Help Esc:Exit :Select Item :Select Menu +/-:Change Values Enter:Select Sub-Menu F9:Setup Defaults F10:Save & Exit Quick...

