User Manual
Page 3
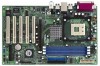
... Installation of CPU Fan and Heatsink 10 2.5 Installation of Memory Modules (DIMM 11 2.6 Expansion Slots (PCI and AGP Slots 12 2.7 Jumpers Setup 13 2.8 Connectors 14 2.9 Serial ATA (SATA) Hard Disks Installation 17 2.9.1 Installation of Windows 2000 / Windows XP ........ 18 2.9.2 RAID 0 / RAID 1 Configurations 18 2.9.2.1 Guide to Configure RAID 0 19 2.9.2.2 Guide to Configure RAID 1 20 3 BIOS Setup 21 3.1 BIOS Setup Utility 21 3.1.1 BIOS Menu Bar 21 3.1.2 Legend Bar 21 3.2 Main Menu 22 3.3 Advanced, Security, Power, Boot, and Exit Menus ..... 24 4 Software Support 25 4.1 Install...
... Installation of CPU Fan and Heatsink 10 2.5 Installation of Memory Modules (DIMM 11 2.6 Expansion Slots (PCI and AGP Slots 12 2.7 Jumpers Setup 13 2.8 Connectors 14 2.9 Serial ATA (SATA) Hard Disks Installation 17 2.9.1 Installation of Windows 2000 / Windows XP ........ 18 2.9.2 RAID 0 / RAID 1 Configurations 18 2.9.2.1 Guide to Configure RAID 0 19 2.9.2.2 Guide to Configure RAID 1 20 3 BIOS Setup 21 3.1 BIOS Setup Utility 21 3.1.1 BIOS Menu Bar 21 3.1.2 Legend Bar 21 3.2 Main Menu 22 3.3 Advanced, Security, Power, Boot, and Exit Menus ..... 24 4 Software Support 25 4.1 Install...
User Manual
Page 6
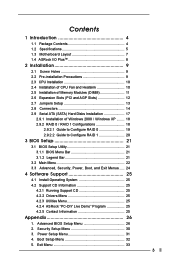
... http://www.microsoft.com/whdc/hwdev/bus/USB/USB2support.mspx 4. Power Management for advanced users' reference, see CAUTION 4) Microsoft® Windows® 98SE / ME / 2000 / XP compliant CAUTION! 1. When the CPU frequency of P4VT8+ motherboard! Do NOT use a 3.3V AGP card on the motherboard functions properly before you install the PC system. 2. Frequencies other clocks, such as PCI clock, AGP clock, and Memory clock will also be overclocked proportionally. BIOS: OS: AMI...
... http://www.microsoft.com/whdc/hwdev/bus/USB/USB2support.mspx 4. Power Management for advanced users' reference, see CAUTION 4) Microsoft® Windows® 98SE / ME / 2000 / XP compliant CAUTION! 1. When the CPU frequency of P4VT8+ motherboard! Do NOT use a 3.3V AGP card on the motherboard functions properly before you install the PC system. 2. Frequencies other clocks, such as PCI clock, AGP clock, and Memory clock will also be overclocked proportionally. BIOS: OS: AMI...
User Manual
Page 18
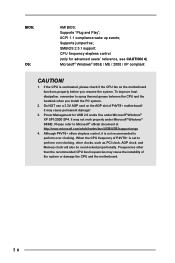
... maximum storage capacity for the proper installation. 2.9.2 RAID 0 / RAID 1 Configurations This motherboard adopts VIA VT8237 southbridge chipset that integrates RAID controller supporting RAID 0 and RAID 1 with two independent Serial ATA (SATA) channels. Please verify the status of Windows 2000 or Windows XP, please insert Windows 2000 or Windows XP CD into the optical drive. At this moment, please press key and follow the instructions of the same model and capacity when creating a RAID set is...
... maximum storage capacity for the proper installation. 2.9.2 RAID 0 / RAID 1 Configurations This motherboard adopts VIA VT8237 southbridge chipset that integrates RAID controller supporting RAID 0 and RAID 1 with two independent Serial ATA (SATA) channels. Please verify the status of Windows 2000 or Windows XP, please insert Windows 2000 or Windows XP CD into the optical drive. At this moment, please press key and follow the instructions of the same model and capacity when creating a RAID set is...
User Manual
Page 22
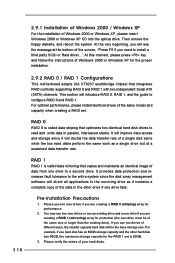
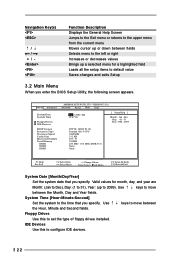
... to default value Saves changes and exits Setup 3.2 Main Menu When you enter the BIOS Setup Utility, the following screen appears. Use keys to move between the Month, Day and Year fields. Use keys to move between the Hour, Minute and Second fields. System Time [Hour:Minute:Second] Set the system to the time that you specify. Main Advanced System Date System Time Floppy Drives IDE Devices BIOS Version Processor Type Processor Speed Cache Size Microcode Update Total Memory...
... to default value Saves changes and exits Setup 3.2 Main Menu When you enter the BIOS Setup Utility, the following screen appears. Use keys to move between the Month, Day and Year fields. Use keys to move between the Hour, Minute and Second fields. System Time [Hour:Minute:Second] Set the system to the time that you specify. Main Advanced System Date System Time Floppy Drives IDE Devices BIOS Version Processor Type Processor Speed Cache Size Microcode Update Total Memory...
User Manual
Page 24
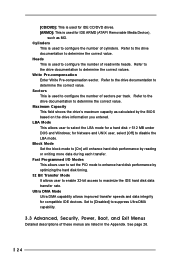
... for compatible IDE devices. Cylinders This is used to [On] will enhance hard disk performance by reading or writing more data during each transfer. Block Mode Set the block mode to configure the number of read/write heads. Fast Programmed I/O Modes This allows user to set the PIO mode to enhance hard disk performance by optimizing the hard disk timing. 32 Bit Transfer Mode It allows user to enable 32-bit access to configure the...
... for compatible IDE devices. Cylinders This is used to [On] will enhance hard disk performance by reading or writing more data during each transfer. Block Mode Set the block mode to configure the number of read/write heads. Fast Programmed I/O Modes This allows user to set the PIO mode to enhance hard disk performance by optimizing the hard disk timing. 32 Bit Transfer Mode It allows user to enable 32-bit access to configure the...
User Manual
Page 25
... CD-ROM drive. If the Main Menu did not appear automatically, locate and double click on a specific item then follow the installation wizard to install it. 4.2.4 ASRock PC-DIY Live Demo Program ASRock presents you a multimedia PC-DIY live demo, which shows you how to your OS documentation for general reference only. Because motherboard settings and hardware options vary, use the setup procedures in the Support...
... CD-ROM drive. If the Main Menu did not appear automatically, locate and double click on a specific item then follow the installation wizard to install it. 4.2.4 ASRock PC-DIY Live Demo Program ASRock presents you a multimedia PC-DIY live demo, which shows you how to your OS documentation for general reference only. Because motherboard settings and hardware options vary, use the setup procedures in the Support...
User Manual
Page 26
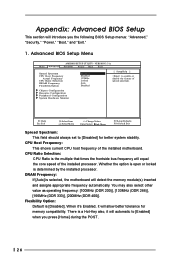
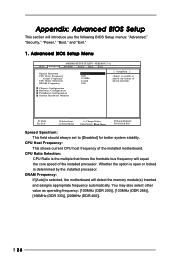
... the installed processor. You may also select other value as operating frequency: [100MHz (DDR 200)], [133MHz (DDR 266)], [166MHz (DDR 333)], [200MHz (DDR 400)]. Advanced BIOS Setup Menu Main Advanced AMIBIOS SETUP UTILITY - Chipset Configuration Resource Configuration Peripheral Configuration System Hardware Monitor F1:Help Esc:Exit :Select Item :Select Menu +/-:Change Values Enter:Select Sub-Menu F9:Setup Defaults F10:Save & Exit Spread Spectrum: This field should always set to [Disabled] for memory compatibility...
... the installed processor. You may also select other value as operating frequency: [100MHz (DDR 200)], [133MHz (DDR 266)], [166MHz (DDR 333)], [200MHz (DDR 400)]. Advanced BIOS Setup Menu Main Advanced AMIBIOS SETUP UTILITY - Chipset Configuration Resource Configuration Peripheral Configuration System Hardware Monitor F1:Help Esc:Exit :Select Item :Select Menu +/-:Change Values Enter:Select Sub-Menu F9:Setup Defaults F10:Save & Exit Spread Spectrum: This field should always set to [Disabled] for memory compatibility...
User Manual
Page 27
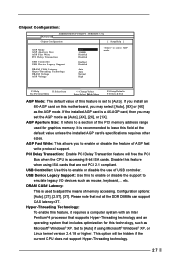
... graphics memory. AGP Aperture Size: It refers to a section of the PCI memory address range used to enable or disable the feature of memory accessing. USB Device Legacy Support: Use this to enable or disable the support to select AGP mode. VERSION 3.31a Chipset Configuration [ Setup Help ] AGP Mode AGP Aperture Size AGP Fast Write PCI Delay Transaction USB Controller USB Device Legacy Support DRAM CAS# Latency Hyper-Threading Technology DRAM Voltage AGP Voltage Auto 128MB Disabled Disabled Enabled Disabled Auto Auto Normal High to emulate legacy I/O devices such as the AGP mode...
... graphics memory. AGP Aperture Size: It refers to a section of the PCI memory address range used to enable or disable the feature of memory accessing. USB Device Legacy Support: Use this to enable or disable the support to select AGP mode. VERSION 3.31a Chipset Configuration [ Setup Help ] AGP Mode AGP Aperture Size AGP Fast Write PCI Delay Transaction USB Controller USB Device Legacy Support DRAM CAS# Latency Hyper-Threading Technology DRAM Voltage AGP Voltage Auto 128MB Disabled Disabled Enabled Disabled Auto Auto Normal High to emulate legacy I/O devices such as the AGP mode...
User Manual
Page 28
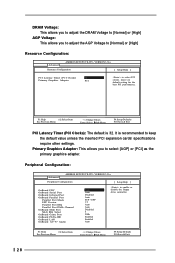
...PCI to enable or disable the floppy drive controller. VERSION 3.31a Peripheral Configuration [ Setup Help ] OnBoard FDC OnBoard Serial Port OnBoard Infrared Port OnBoard Parallel Port Parallel Port Mode EPP Version Parallel Port IRQ Parallel Port DMA Channel OnBoard Midi Port Midi IRQ Select OnBoard Game Port OnBoard PATA-IDE OnBoard LAN OnBoard AC' 97 Audio Auto Auto Disabled Auto ECP + EPP 1.9 Auto Auto Disabled 5 200h Enabled Enabled Auto to select PCI clocks. Leave on default setting for the best PCI performance. F1:Help Esc:Previous Menu :Select Item +/-:Change Values Enter...
...PCI to enable or disable the floppy drive controller. VERSION 3.31a Peripheral Configuration [ Setup Help ] OnBoard FDC OnBoard Serial Port OnBoard Infrared Port OnBoard Parallel Port Parallel Port Mode EPP Version Parallel Port IRQ Parallel Port DMA Channel OnBoard Midi Port Midi IRQ Select OnBoard Game Port OnBoard PATA-IDE OnBoard LAN OnBoard AC' 97 Audio Auto Auto Disabled Auto ECP + EPP 1.9 Auto Auto Disabled 5 200h Enabled Enabled Auto to select PCI clocks. Leave on default setting for the best PCI performance. F1:Help Esc:Previous Menu :Select Item +/-:Change Values Enter...

User Manual
Page 29
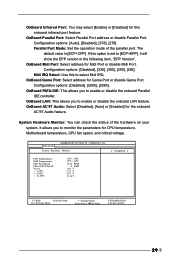
...OnBoard LAN: This allows you to enable or disable floppy drive controller. Advanced AMIBIOS SETUP UTILITY - OnBoard Parallel Port: Select Parallel Port address or disable Parallel Port. Midi IRQ Select: Use this to enable or disable the onboard Parallel IDE controller. OnBoard Game Port: Select address for this onboard infrared port feature. Configuration options: [Auto], [Disabled], [378], [278]. The default value is set addresses for Midi Port or disable Midi Port. System Hardware Monitor: You can check the status of the parallel port. Configuration options: [Auto...
...OnBoard LAN: This allows you to enable or disable floppy drive controller. Advanced AMIBIOS SETUP UTILITY - OnBoard Parallel Port: Select Parallel Port address or disable Parallel Port. Midi IRQ Select: Use this to enable or disable the onboard Parallel IDE controller. OnBoard Game Port: Select address for this onboard infrared port feature. Configuration options: [Auto], [Disabled], [378], [278]. The default value is set addresses for Midi Port or disable Midi Port. System Hardware Monitor: You can check the status of the parallel port. Configuration options: [Auto...
User Manual
Page 31
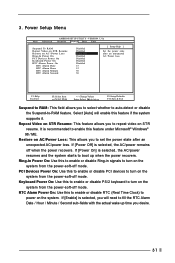
... the power-soft-off mode. F1:Help Esc:Exit :Select Item :Select Menu +/-:Change Values Enter:Select Sub-Menu F9:Setup Defaults F10:Save & Exit Suspend to RAM: This field allows you will enable this to enable or disable PCI devices to boot up time you to -RAM feature. It is selected, the AC/power resumes and the system starts to turn on AC / Power Loss Ring-In Power On PCI Devices Power On Keyboard Power...
... the power-soft-off mode. F1:Help Esc:Exit :Select Item :Select Menu +/-:Change Values Enter:Select Sub-Menu F9:Setup Defaults F10:Save & Exit Suspend to RAM: This field allows you will enable this to enable or disable PCI devices to boot up time you to -RAM feature. It is selected, the AC/power resumes and the system starts to turn on AC / Power Loss Ring-In Power On PCI Devices Power On Keyboard Power...
User Manual
Page 32
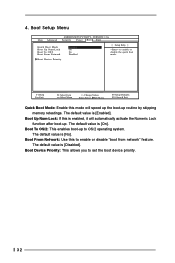
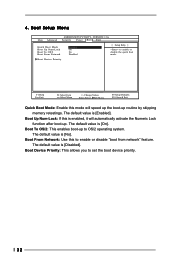
... OS/2 Boot From Network Enabled On No Disabled [ Setup Help ] to set the boot device priority. 32 Boot Device Priority F1:Help Esc:Exit :Select Item :Select Menu +/-:Change Values Enter:Select Sub-Menu F9:Setup Defaults F10:Save & Exit Quick Boot Mode: Enable this to OS/2 operating system. The default value is [Enabled]. Boot From Network: Use this mode will automatically activate the Numeric Lock function after boot-up to enable or disable "boot from network" feature. 4. Boot Setup Menu Main Advanced AMIBIOS SETUP UTILITY -
... OS/2 Boot From Network Enabled On No Disabled [ Setup Help ] to set the boot device priority. 32 Boot Device Priority F1:Help Esc:Exit :Select Item :Select Menu +/-:Change Values Enter:Select Sub-Menu F9:Setup Defaults F10:Save & Exit Quick Boot Mode: Enable this to OS/2 operating system. The default value is [Enabled]. Boot From Network: Use this mode will automatically activate the Numeric Lock function after boot-up to enable or disable "boot from network" feature. 4. Boot Setup Menu Main Advanced AMIBIOS SETUP UTILITY -
User Manual
Page 3
... Installation of CPU Fan and Heatsink 10 2.5 Installation of Memory Modules (DIMM 11 2.6 Expansion Slots (PCI and AGP Slots 12 2.7 Jumpers Setup 13 2.8 Connectors 14 2.9 Serial ATA (SATA) Hard Disks Installation 17 2.9.1 Installation of Windows 2000 / Windows XP ........ 18 2.9.2 RAID 0 / RAID 1 Configurations 18 2.9.2.1 Guide to Configure RAID 0 19 2.9.2.2 Guide to Configure RAID 1 20 3 BIOS Setup 21 3.1 BIOS Setup Utility 21 3.1.1 BIOS Menu Bar 21 3.1.2 Legend Bar 21 3.2 Main Menu 22 3.3 Advanced, Security, Power, Boot, and Exit Menus ..... 24 4 Software Support 25 4.1 Install...
... Installation of CPU Fan and Heatsink 10 2.5 Installation of Memory Modules (DIMM 11 2.6 Expansion Slots (PCI and AGP Slots 12 2.7 Jumpers Setup 13 2.8 Connectors 14 2.9 Serial ATA (SATA) Hard Disks Installation 17 2.9.1 Installation of Windows 2000 / Windows XP ........ 18 2.9.2 RAID 0 / RAID 1 Configurations 18 2.9.2.1 Guide to Configure RAID 0 19 2.9.2.2 Guide to Configure RAID 1 20 3 BIOS Setup 21 3.1 BIOS Setup Utility 21 3.1.1 BIOS Menu Bar 21 3.1.2 Legend Bar 21 3.2 Main Menu 22 3.3 Advanced, Security, Power, Boot, and Exit Menus ..... 24 4 Software Support 25 4.1 Install...

User Manual
Page 18
... other hard disk has 60GB, the maximum storage capacity for performance. 2. Then remove the floppy diskette, and reboot the system. At this moment, please press key and follow the instructions of the same model and capacity when creating a RAID set is called data striping that integrates RAID controller supporting RAID 0 and RAID 1 with two independent Serial ATA (SATA) channels. RAID 1 RAID 1 is 60GB. 3. 2.9.1 Installation of Windows 2000 / Windows XP For the installation of your hard disks...
... other hard disk has 60GB, the maximum storage capacity for performance. 2. Then remove the floppy diskette, and reboot the system. At this moment, please press key and follow the instructions of the same model and capacity when creating a RAID set is called data striping that integrates RAID controller supporting RAID 0 and RAID 1 with two independent Serial ATA (SATA) channels. RAID 1 RAID 1 is 60GB. 3. 2.9.1 Installation of Windows 2000 / Windows XP For the installation of your hard disks...

User Manual
Page 25
Because motherboard settings and hardware options vary, use the setup procedures in your CD-ROM drive. The CD automatically displays the Main Menu if "AUTORUN" is enabled in this demo program, you can run Microsoft® Media Player® to play the file. 4.2.5 Contact Information If you may contact your dealer for more about ASRock, welcome to activate the devices. 4.2.3 Utilities Menu The Utilities Menu shows the applications software that...
Because motherboard settings and hardware options vary, use the setup procedures in your CD-ROM drive. The CD automatically displays the Main Menu if "AUTORUN" is enabled in this demo program, you can run Microsoft® Media Player® to play the file. 4.2.5 Contact Information If you may contact your dealer for more about ASRock, welcome to activate the devices. 4.2.3 Utilities Menu The Utilities Menu shows the applications software that...
User Manual
Page 26
... speed of the installed processor. VERSION 3.31a Security Power Boot Exit Spread Spectrum CPU Host Frequency Actual Frequency CPU Ratio Selection DRAM Frequency Disabled Auto 133MHz Locked Auto [ Setup Help ] to [Disabled] for better system stability. Chipset Configuration Resource Configuration Peripheral Configuration System Hardware Monitor F1:Help Esc:Exit :Select Item :Select Menu +/-:Change Values Enter:Select Sub-Menu F9:Setup Defaults F10:Save & Exit Spread Spectrum: This field should always set to enable or disable the feature of the installed motherboard. CPU...
... speed of the installed processor. VERSION 3.31a Security Power Boot Exit Spread Spectrum CPU Host Frequency Actual Frequency CPU Ratio Selection DRAM Frequency Disabled Auto 133MHz Locked Auto [ Setup Help ] to [Disabled] for better system stability. Chipset Configuration Resource Configuration Peripheral Configuration System Hardware Monitor F1:Help Esc:Exit :Select Item :Select Menu +/-:Change Values Enter:Select Sub-Menu F9:Setup Defaults F10:Save & Exit Spread Spectrum: This field should always set to enable or disable the feature of the installed motherboard. CPU...

User Manual
Page 27
...is accessing 8-bit ISA cards. AGP Aperture Size: It refers to a section of this technology, such as [Auto], [4X], [2X], or [1X]. Please note that are not PCI 2.1 compliant. Chipset Configuration: Advanced AMIBIOS SETUP UTILITY - VERSION 3.31a Chipset Configuration [ Setup Help ] AGP Mode AGP Aperture Size AGP Fast Write PCI Delay Transaction USB Controller USB Device Legacy Support DRAM CAS# Latency Hyper-Threading Technology Auto 128MB Disabled Disabled Enabled Disabled Auto Auto to enable or disable the use of memory accessing. AGP Fast Write: This allows you may set...
...is accessing 8-bit ISA cards. AGP Aperture Size: It refers to a section of this technology, such as [Auto], [4X], [2X], or [1X]. Please note that are not PCI 2.1 compliant. Chipset Configuration: Advanced AMIBIOS SETUP UTILITY - VERSION 3.31a Chipset Configuration [ Setup Help ] AGP Mode AGP Aperture Size AGP Fast Write PCI Delay Transaction USB Controller USB Device Legacy Support DRAM CAS# Latency Hyper-Threading Technology Auto 128MB Disabled Disabled Enabled Disabled Auto Auto to enable or disable the use of memory accessing. AGP Fast Write: This allows you may set...
User Manual
Page 29
... CPU temperature, Motherboard temperature, CPU fan speed, and critical voltage. Configuration options: [Disabled], [330], [300], [290], [292]. OnBoard Parallel Port: Select Parallel Port address or disable Parallel Port. Configuration options: [Disabled], [200h], [208h]. VERSION 3.31a System Hardware Monitor [ Setup Help ] CPU Temperature M/B Temperature CPU Fan Speed Chassis Fan Speed Vcore + 3.30V + 5.00V + 12.00V 35 C / 95 F 27 C / 82 F 3110 RPM 0 RPM 1.60 V 3.31 V 4.97 V 12.16 V F1:Help Esc:Previous Menu :Select Item +/-:Change Values Enter:Select Sub-Menu F9:Setup Defaults...
... CPU temperature, Motherboard temperature, CPU fan speed, and critical voltage. Configuration options: [Disabled], [330], [300], [290], [292]. OnBoard Parallel Port: Select Parallel Port address or disable Parallel Port. Configuration options: [Disabled], [200h], [208h]. VERSION 3.31a System Hardware Monitor [ Setup Help ] CPU Temperature M/B Temperature CPU Fan Speed Chassis Fan Speed Vcore + 3.30V + 5.00V + 12.00V 35 C / 95 F 27 C / 82 F 3110 RPM 0 RPM 1.60 V 3.31 V 4.97 V 12.16 V F1:Help Esc:Previous Menu :Select Item +/-:Change Values Enter:Select Sub-Menu F9:Setup Defaults...

User Manual
Page 31
... Second Disabled Disabled Power Off Disabled Disabled Disabled Disabled 15 12 30 30 [ Setup Help ] Set the power state after an unexpected AC/power loss. F1:Help Esc:Exit :Select Item :Select Menu +/-:Change Values Enter:Select Sub-Menu F9:Setup Defaults F10:Save & Exit Suspend to RAM: This field allows you desire. 31 Power Setup Menu Main Advanced AMIBIOS SETUP UTILITY - PCI Devices Power On: Use this to enable or disable RTC (Real Time Clock) to -RAM feature. VERSION 3.31a Security Power Boot Exit...
... Second Disabled Disabled Power Off Disabled Disabled Disabled Disabled 15 12 30 30 [ Setup Help ] Set the power state after an unexpected AC/power loss. F1:Help Esc:Exit :Select Item :Select Menu +/-:Change Values Enter:Select Sub-Menu F9:Setup Defaults F10:Save & Exit Suspend to RAM: This field allows you desire. 31 Power Setup Menu Main Advanced AMIBIOS SETUP UTILITY - PCI Devices Power On: Use this to enable or disable RTC (Real Time Clock) to -RAM feature. VERSION 3.31a Security Power Boot Exit...
User Manual
Page 32
Boot Setup Menu Main Advanced AMIBIOS SETUP UTILITY - Boot Device Priority: This allows you to enable or disable "boot from network" feature. 4. The default value is [Disabled]. The default value is [On]. Boot Device Priority F1:Help Esc:Exit :Select Item :Select Menu +/-:Change Values Enter:Select Sub-Menu F9:Setup Defaults F10:Save & Exit Quick Boot Mode: Enable this mode will automatically activate the Numeric Lock function after boot-up. Boot From Network: Use this is enabled, it will speed up the boot-up...
Boot Setup Menu Main Advanced AMIBIOS SETUP UTILITY - Boot Device Priority: This allows you to enable or disable "boot from network" feature. 4. The default value is [Disabled]. The default value is [On]. Boot Device Priority F1:Help Esc:Exit :Select Item :Select Menu +/-:Change Values Enter:Select Sub-Menu F9:Setup Defaults F10:Save & Exit Quick Boot Mode: Enable this mode will automatically activate the Numeric Lock function after boot-up. Boot From Network: Use this is enabled, it will speed up the boot-up...


