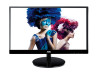
Spec Sheet_i2269Vw
Page 1
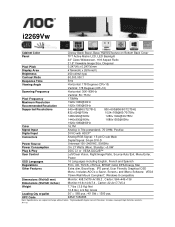
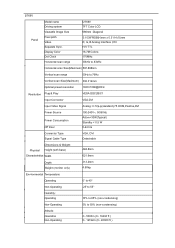
... Bottom Back Cover TFT Active Matrix LCD, LED Backlight 22" Class Widescreen, 16:9 Aspect Ratio 21.5" Viewable Image Size, Diagonal 0.247(H) x 0.247(V)mm 476mm(H) x 267mm(V) 250 cd/m2 (typ) 50,000,000:1 5ms Horizontal: 178 Degrees (CR>10) Vertical: 178 Degrees (CR>10) Scanning Frequency Horizontal: 30K~83KHz Vertical: 50~75 Hz Pixel Frequency Maximum Resolution Recommended Resolution 170MHz 1920x1080@60Hz 1920x1080@60Hz Supported Resolutions Color Signal Input Digital Input Connectors Power Source Power Consumption Plug & Play User Control 640...
... Bottom Back Cover TFT Active Matrix LCD, LED Backlight 22" Class Widescreen, 16:9 Aspect Ratio 21.5" Viewable Image Size, Diagonal 0.247(H) x 0.247(V)mm 476mm(H) x 267mm(V) 250 cd/m2 (typ) 50,000,000:1 5ms Horizontal: 178 Degrees (CR>10) Vertical: 178 Degrees (CR>10) Scanning Frequency Horizontal: 30K~83KHz Vertical: 50~75 Hz Pixel Frequency Maximum Resolution Recommended Resolution 170MHz 1920x1080@60Hz 1920x1080@60Hz Supported Resolutions Color Signal Input Digital Input Connectors Power Source Power Consumption Plug & Play User Control 640...
User's Manual_i2269Vw
Page 2
... ...8 Setup Stand & Base ...9 Adjusting Viewing Angle...10 Connecting the Monitor...11 Adjusting ...12 Setting Optimal Resolution ...12 Windows Vista ...12 Windows XP ...14 Windows ME/2000...15 Hotkeys ...16 Using"Mobile High-Defintion Link" ...17 OSD Setting...20 Luminance ...21 Image Setup ...23 Color Setup...25 Picture Boost ...27 OSD Setup ...29 Extra ...31 Exit...33 LED Indicator ...34 Driver ...35 Monitor Driver ...35 Windows 7 ...35 Windows Vista ...39 Windows XP ...41 Windows 2000 ...44 Windows ME...44 i-Menu ...45 e-Saver ...46 Screen+ ...47 Troubleshoot ...48 Specification...
... ...8 Setup Stand & Base ...9 Adjusting Viewing Angle...10 Connecting the Monitor...11 Adjusting ...12 Setting Optimal Resolution ...12 Windows Vista ...12 Windows XP ...14 Windows ME/2000...15 Hotkeys ...16 Using"Mobile High-Defintion Link" ...17 OSD Setting...20 Luminance ...21 Image Setup ...23 Color Setup...25 Picture Boost ...27 OSD Setup ...29 Extra ...31 Exit...33 LED Indicator ...34 Driver ...35 Monitor Driver ...35 Windows 7 ...35 Windows Vista ...39 Windows XP ...41 Windows 2000 ...44 Windows ME...44 i-Menu ...45 e-Saver ...46 Screen+ ...47 Troubleshoot ...48 Specification...
User's Manual_i2269Vw
Page 4
... ensure satisfactory operation, use an adapter to ground the appliance safely. The monitor is equipped with a three-pronged grounded plug, a plug with certified computers which have an electrician install the correct outlet, or use the monitor only with a third (grounding) pin. Do not overload power strips and extension cords. This plug will not be used for long periods of power supplied to your home...
... ensure satisfactory operation, use an adapter to ground the appliance safely. The monitor is equipped with a three-pronged grounded plug, a plug with certified computers which have an electrician install the correct outlet, or use the monitor only with a third (grounding) pin. Do not overload power strips and extension cords. This plug will not be used for long periods of power supplied to your home...
User's Manual_i2269Vw
Page 19
... 1 Source/Auto/Exit 2 Clear Vision/ 3 Volume/ > 4 Menu/Enter 5 Power > I2269VW /I2369V/I2769V 1 Source/Auto/Exit 2 Clear Vision/ 3 4:3 or wide / > 4 Menu/Enter 5 Power > Power Press the Power button to do auto configure. When the OSD is no OSD, press Auto/Source button continuously about 2 second to turn on/off the monitor. Press Source button continuously to select the input source showed in the message bar, press Menu/Enter button to change 4:3 or wide image ratio. (If the product screen size is 4:3 or input signal resolution is wide format...
... 1 Source/Auto/Exit 2 Clear Vision/ 3 Volume/ > 4 Menu/Enter 5 Power > I2269VW /I2369V/I2769V 1 Source/Auto/Exit 2 Clear Vision/ 3 4:3 or wide / > 4 Menu/Enter 5 Power > Power Press the Power button to do auto configure. When the OSD is no OSD, press Auto/Source button continuously about 2 second to turn on/off the monitor. Press Source button continuously to select the input source showed in the message bar, press Menu/Enter button to change 4:3 or wide image ratio. (If the product screen size is 4:3 or input signal resolution is wide format...
User's Manual_i2269Vw
Page 21
... screen of the mobile device. z When the MHL cable is used, [HDMI 1/ MHL] is the only port on this monitor that supports MHL) on the mobile device. Press the source button and switch to HDMI 1/MHL to the [HDMI 1 / MHL] port on the mobile device to activate MHL mode. 3. Using "MHL(Mobile High-Definition Link)" 1. You can check if your mobile device is not activated, check the connection...
... screen of the mobile device. z When the MHL cable is used, [HDMI 1/ MHL] is the only port on this monitor that supports MHL) on the mobile device. Press the source button and switch to HDMI 1/MHL to the [HDMI 1 / MHL] port on the mobile device to activate MHL mode. 3. Using "MHL(Mobile High-Definition Link)" 1. You can check if your mobile device is not activated, check the connection...
User's Manual_i2269Vw
Page 23
... product has only one signal input, the item of "Input Select" is disable to adjust. 2) If the product screen size is 4:3 or input signal resolution is wide format, the item of "Image Ratio" is disable to turn the monitor on the control keys. 1) Press the MENU-button to activate the OSD window. 2) Press < or > to activate it . 3) Press < or > to change the settings of the selected function. Press AUTO to navigate through the...
... product has only one signal input, the item of "Input Select" is disable to adjust. 2) If the product screen size is 4:3 or input signal resolution is wide format, the item of "Image Ratio" is disable to turn the monitor on the control keys. 1) Press the MENU-button to activate the OSD window. 2) Press < or > to activate it . 3) Press < or > to change the settings of the selected function. Press AUTO to navigate through the...
User's Manual_i2269Vw
Page 39
... icons" or "Small icons". 4. Click on my computer". 11. Close all open windows and remove the CD. 15. Windows 7 1. Click on 'Control Panel'. Click the "Advanced Settings" button. 7. The files will automatically select the maximum refresh rate and corresponding Color Matching Profiles. Click on the 'Start' button and then click on the "Change display settings" button. 6. Right click and click All apps at the bottom-right of...
... icons" or "Small icons". 4. Click on my computer". 11. Close all open windows and remove the CD. 15. Windows 7 1. Click on 'Control Panel'. Click the "Advanced Settings" button. 7. The files will automatically select the maximum refresh rate and corresponding Color Matching Profiles. Click on the 'Start' button and then click on the "Change display settings" button. 6. Right click and click All apps at the bottom-right of...
User's Manual_i2269Vw
Page 44
If the message "Windows needs..." Check the "Browse my computer for your monitor model and click on the following screens displayed in the "Driver" tab. 6. button, then click on my computer". 7. is displayed, as is. button and then select the appropriate drive F:\Driver (CD-ROM Drive). 8. Click "Close" → "Close" → "OK" → "OK" on the 'Next' button. 9. Click "Properties" in the figure below...
If the message "Windows needs..." Check the "Browse my computer for your monitor model and click on the following screens displayed in the "Driver" tab. 6. button, then click on my computer". 7. is displayed, as is. button and then select the appropriate drive F:\Driver (CD-ROM Drive). 8. Click "Close" → "Close" → "OK" → "OK" on the 'Next' button. 9. Click "Properties" in the figure below...
User's Manual_i2269Vw
Page 46
If the 'Properties' button is inactive, it means your monitor is active, click on 'Properties' button. Select 'Monitor' tab - Click on the 'Driver' tab and then click on the 'Advanced' button. 6. Please follow the steps below. 7. Please stop installation. - button. If the 'Properties' button is properly configured. 5. Select the 'Settings' tab then click on 'Update Driver...'
If the 'Properties' button is inactive, it means your monitor is active, click on 'Properties' button. Select 'Monitor' tab - Click on the 'Driver' tab and then click on the 'Advanced' button. 6. Please follow the steps below. 7. Please stop installation. - button. If the 'Properties' button is properly configured. 5. Select the 'Settings' tab then click on 'Update Driver...'
User's Manual_i2269Vw
Page 48
... your monitor model and click on 'Change...' Select the 'Monitor' button, then click on the 'Next' button. 11. Double click on 'Properties' button. Click on the 'Display' Icon. 4. Select 'Display a list of all the drivers in a specific location, so you can choose the driver you can choose a specific driver', then click on 'Next' and then click on 'Have Disk...'. 8. Click on 'Control Panel'. 3. Click on the 'Start' button...
... your monitor model and click on 'Change...' Select the 'Monitor' button, then click on the 'Next' button. 11. Double click on 'Properties' button. Click on the 'Display' Icon. 4. Select 'Display a list of all the drivers in a specific location, so you can choose the driver you can choose a specific driver', then click on 'Next' and then click on 'Have Disk...'. 8. Click on 'Control Panel'. 3. Click on the 'Start' button...
User's Manual_i2269Vw
Page 50
... Welcome to complete software installation. The AOC e-Saver features Smart Shutdown functions for your monitor to automatically shutdown. Please click on "driver/e-Saver/setup.exe" to start installing the e-Saver software, follow the install wizard to use AOC e-Saver monitor power management software! the actual shutdown time depends on . 2) The monitor will automatically shutdown 5 minutes after the PC is powered on your monitor to its default settings like below ). The...
... Welcome to complete software installation. The AOC e-Saver features Smart Shutdown functions for your monitor to automatically shutdown. Please click on "driver/e-Saver/setup.exe" to start installing the e-Saver software, follow the install wizard to use AOC e-Saver monitor power management software! the actual shutdown time depends on . 2) The monitor will automatically shutdown 5 minutes after the PC is powered on your monitor to its default settings like below ). The...
User's Manual_i2269Vw
Page 52
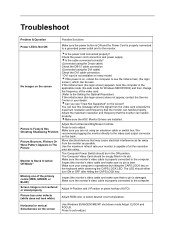
... DVI cable connection. * DVI input is properly connected to a grounded power outlet and to the computer. Make sure the AOC Monitor Drivers are not using . Inspect the monitor's video cable and make sure that the monitor can handle properly. Press to auto-adjust. Check the power cord connection and power supply. Adjust the maximum resolution and frequency that no pin is capable of the video card. (Refer to the Setting the Optimal Resolution) If the initial screen (the login screen) does not appear, contact the Service...
... DVI cable connection. * DVI input is properly connected to a grounded power outlet and to the computer. Make sure the AOC Monitor Drivers are not using . Inspect the monitor's video cable and make sure that the monitor can handle properly. Press to auto-adjust. Check the power cord connection and power supply. Adjust the maximum resolution and frequency that no pin is capable of the video card. (Refer to the Setting the Optimal Resolution) If the initial screen (the login screen) does not appear, contact the Service...
User's Manual_i2269Vw
Page 53
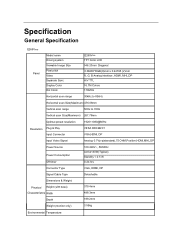
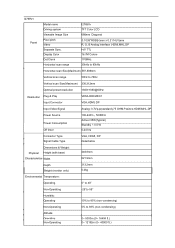
Specification General Specification I2269VWM Panel Model name Driving system Viewable Image Size Pixel pitch Video Separate Sync. Display Color Dot Clock I2269VWM TFT Color LCD 546.20mm Diagonal 0.08265*RGB(H)mm x 0.24795 (V)mm R, G, B Analog lnterface ,HDMI ,MHL,DP H/V TTL 16.7M Colors 170MHz Horizontal scan range 30kHz to 83kHz Horizontal scan Size(Maximum) 476.06mm Vertical scan range 50Hz to 76Hz Vertical scan Size(Maximum) 267.79mm Optimal preset resolution 1920×1080@60Hz Resolution Plug & Play Input Connector VESA DDC2B/C1 VGA,HDMI, DP Input Video Signal Analog: 0.7Vp...
Specification General Specification I2269VWM Panel Model name Driving system Viewable Image Size Pixel pitch Video Separate Sync. Display Color Dot Clock I2269VWM TFT Color LCD 546.20mm Diagonal 0.08265*RGB(H)mm x 0.24795 (V)mm R, G, B Analog lnterface ,HDMI ,MHL,DP H/V TTL 16.7M Colors 170MHz Horizontal scan range 30kHz to 83kHz Horizontal scan Size(Maximum) 476.06mm Vertical scan range 50Hz to 76Hz Vertical scan Size(Maximum) 267.79mm Optimal preset resolution 1920×1080@60Hz Resolution Plug & Play Input Connector VESA DDC2B/C1 VGA,HDMI, DP Input Video Signal Analog: 0.7Vp...

User's Manual_i2269Vw
Page 55
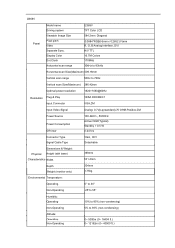
I2269VW Panel Model name Driving system Viewable Image Size Pixel pitch Video Separate Sync. Display Color Dot Clock Horizontal scan range I2269VW TFT Color LCD 546.20mm Diagonal 0.08265*RGB(H)mm x 0.24795 (V)mm R, G, B Analog lnterface ,DVI H/V TTL 16.7M Colors 170MHz 30kHz to 83kHz Horizontal scan Size(Maximum) 476.06mm Vertical scan range 50Hz to 76Hz Vertical scan Size(Maximum) 267.79mm Optimal preset resolution 1920×1080@60Hz Resolution Plug & Play Input Connector VESA DDC2B/C1 VGA, DVI Input Video Signal Analog: 0.7Vp-p(standard),75 OHM,Positive,DVI Power Source Power ...
I2269VW Panel Model name Driving system Viewable Image Size Pixel pitch Video Separate Sync. Display Color Dot Clock Horizontal scan range I2269VW TFT Color LCD 546.20mm Diagonal 0.08265*RGB(H)mm x 0.24795 (V)mm R, G, B Analog lnterface ,DVI H/V TTL 16.7M Colors 170MHz 30kHz to 83kHz Horizontal scan Size(Maximum) 476.06mm Vertical scan range 50Hz to 76Hz Vertical scan Size(Maximum) 267.79mm Optimal preset resolution 1920×1080@60Hz Resolution Plug & Play Input Connector VESA DDC2B/C1 VGA, DVI Input Video Signal Analog: 0.7Vp-p(standard),75 OHM,Positive,DVI Power Source Power ...
User's Manual_i2269Vw
Page 56
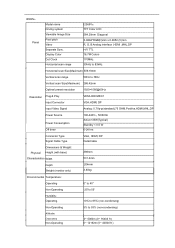
I2369V Panel Model name Driving system Viewable Image Size Pixel pitch Video Separate Sync. Display Color Dot Clock Horizontal scan range I2369V TFT Color LCD 584.2mm Diagonal 0.0884*RGB(H)mm x 0.2652 (V)mm R, G, B Analog lnterface ,DVI H/V TTL 16.7M Colors 170MHz 30kHz to 83kHz Horizontal scan Size(Maximum) 509.18mm Vertical scan range 50Hz to 76Hz Vertical scan Size(Maximum) 286.42mm Optimal preset resolution 1920×1080@60Hz Resolution Plug & Play Input Connector VESA DDC2B/C1 VGA,DVI Input Video Signal Analog: 0.7Vp-p(standard),75 OHM,Positive,DVI Power Source Power ...
I2369V Panel Model name Driving system Viewable Image Size Pixel pitch Video Separate Sync. Display Color Dot Clock Horizontal scan range I2369V TFT Color LCD 584.2mm Diagonal 0.0884*RGB(H)mm x 0.2652 (V)mm R, G, B Analog lnterface ,DVI H/V TTL 16.7M Colors 170MHz 30kHz to 83kHz Horizontal scan Size(Maximum) 509.18mm Vertical scan range 50Hz to 76Hz Vertical scan Size(Maximum) 286.42mm Optimal preset resolution 1920×1080@60Hz Resolution Plug & Play Input Connector VESA DDC2B/C1 VGA,DVI Input Video Signal Analog: 0.7Vp-p(standard),75 OHM,Positive,DVI Power Source Power ...
User's Manual_i2269Vw
Page 57
... Image Size Pixel pitch Video Separate Sync. Display Color Dot Clock Horizontal scan range I2369VM TFT Color LCD 584.20mm Diagonal 0.0884*RGB(H)mm x 0.2652 (V)mm R, G, B Analog lnterface ,HDMI ,MHL,DP H/V TTL 16.7M Colors 170MHz 30kHz to 83kHz Horizontal scan Size(Maximum) 509.18mm Vertical scan range 50Hz to 76Hz Vertical scan Size(Maximum) 286.42mm Optimal preset resolution 1920×1080@60Hz Resolution Plug & Play Input Connector VESA DDC2B/C1 VGA,HDMI, DP Input Video Signal Analog: 0.7Vp-p(standard),75 OHM,Positive,HDMI,MHL,DP Power Source Power...
... Image Size Pixel pitch Video Separate Sync. Display Color Dot Clock Horizontal scan range I2369VM TFT Color LCD 584.20mm Diagonal 0.0884*RGB(H)mm x 0.2652 (V)mm R, G, B Analog lnterface ,HDMI ,MHL,DP H/V TTL 16.7M Colors 170MHz 30kHz to 83kHz Horizontal scan Size(Maximum) 509.18mm Vertical scan range 50Hz to 76Hz Vertical scan Size(Maximum) 286.42mm Optimal preset resolution 1920×1080@60Hz Resolution Plug & Play Input Connector VESA DDC2B/C1 VGA,HDMI, DP Input Video Signal Analog: 0.7Vp-p(standard),75 OHM,Positive,HDMI,MHL,DP Power Source Power...
User's Manual_i2269Vw
Page 58
... Clock Horizontal scan range I2769V TFT Color LCD 686mm Diagonal 0.1038*RGB(H)mm x 0.3114 (V)mm R, G, B Analog lnterface ,DVI H/V TTL 16.7M Colors 170MHz 30kHz to 83kHz Horizontal scan Size(Maximum) 597.888mm Vertical scan range 50Hz to 76Hz Vertical scan Size(Maximum) 336.312mm Optimal preset resolution 1920×1080@60Hz Resolution Plug & Play Input Connector VESA DDC2B/C1 VGA,DVI Input Video Signal Analog: 0.7Vp-p(standard),75 OHM,Positive,DVI Power Source Power Consumption Off timer 100-240V~, 50/60Hz Active I2769V Panel Model...
... Clock Horizontal scan range I2769V TFT Color LCD 686mm Diagonal 0.1038*RGB(H)mm x 0.3114 (V)mm R, G, B Analog lnterface ,DVI H/V TTL 16.7M Colors 170MHz 30kHz to 83kHz Horizontal scan Size(Maximum) 597.888mm Vertical scan range 50Hz to 76Hz Vertical scan Size(Maximum) 336.312mm Optimal preset resolution 1920×1080@60Hz Resolution Plug & Play Input Connector VESA DDC2B/C1 VGA,DVI Input Video Signal Analog: 0.7Vp-p(standard),75 OHM,Positive,DVI Power Source Power Consumption Off timer 100-240V~, 50/60Hz Active I2769V Panel Model...
User's Manual_i2269Vw
Page 59
... R, G, B Analog lnterface ,HDMI,MHL,DP H/V TTL 16.7M Colors 170MHz 30kHz to 83kHz Horizontal scan Size(Maximum) 597.888mm Vertical scan range 50Hz to 76Hz Vertical scan Size(Maximum) 336.312mm Optimal preset resolution 1920×1080@60Hz Resolution Plug & Play Input Connector VESA DDC2B/C1 VGA,HDMI, DP Input Video Signal Analog: 0.7Vp-p(standard),75 OHM,Positive,HDMI,MHL,DP Power Source Power Consumption Off timer 100-240V~, 50/60Hz Active I2769V M Panel Model name Driving system Viewable Image Size Pixel...
... R, G, B Analog lnterface ,HDMI,MHL,DP H/V TTL 16.7M Colors 170MHz 30kHz to 83kHz Horizontal scan Size(Maximum) 597.888mm Vertical scan range 50Hz to 76Hz Vertical scan Size(Maximum) 336.312mm Optimal preset resolution 1920×1080@60Hz Resolution Plug & Play Input Connector VESA DDC2B/C1 VGA,HDMI, DP Input Video Signal Analog: 0.7Vp-p(standard),75 OHM,Positive,HDMI,MHL,DP Power Source Power Consumption Off timer 100-240V~, 50/60Hz Active I2769V M Panel Model name Driving system Viewable Image Size Pixel...
User's Manual_i2269Vw
Page 67
... rebuilt product at its option, either repair the defective product with new or rebuilt parts, or replace it with the transportation of options or parts by anyone other than an AOC Certified or Authorized Service Center • Improper environments like humidity and dusts • Damaged by non-authorized source • Repair, modification, or installation of product across international borders.
... rebuilt product at its option, either repair the defective product with new or rebuilt parts, or replace it with the transportation of options or parts by anyone other than an AOC Certified or Authorized Service Center • Improper environments like humidity and dusts • Damaged by non-authorized source • Repair, modification, or installation of product across international borders.
User's Manual_i2269Vw
Page 68
... CRT Tube or LCD Panel after the original date of consumer purchase. Warranty Statement for North & South America (excluding Brazil) WARRANTY STATEMENT for AOC Color Monitors Including those Sold within North America as a result of: Shipping or improper installation or maintenance Misuse Neglect Any cause other than ordinary commercial or industrial application Adjustment by non-authorized source Repair, modification, or installation...
... CRT Tube or LCD Panel after the original date of consumer purchase. Warranty Statement for North & South America (excluding Brazil) WARRANTY STATEMENT for AOC Color Monitors Including those Sold within North America as a result of: Shipping or improper installation or maintenance Misuse Neglect Any cause other than ordinary commercial or industrial application Adjustment by non-authorized source Repair, modification, or installation...


