
User Manual
Page 3
Contents Using Your eMachines Flat-Panel Monitor 1 Unpacking the monitor 2 Setting up the monitor 2 Attaching the base 2 Connecting cables 3 Connecting a security cable 4 Turning on the monitor 4 Adjusting monitor settings 5 Monitor buttons 5 On-screen display options 6 Changing Windows screen settings 8 Power management 9 ENERGY STAR 9 Energy declaration 9 Maintaining 10 Troubleshooting 10 No power 10 No picture 10 Display colors are wrong 11...
Contents Using Your eMachines Flat-Panel Monitor 1 Unpacking the monitor 2 Setting up the monitor 2 Attaching the base 2 Connecting cables 3 Connecting a security cable 4 Turning on the monitor 4 Adjusting monitor settings 5 Monitor buttons 5 On-screen display options 6 Changing Windows screen settings 8 Power management 9 ENERGY STAR 9 Energy declaration 9 Maintaining 10 Troubleshooting 10 No power 10 No picture 10 Display colors are wrong 11...

User Manual
Page 5
Using Your eMachines Flat-Panel Monitor • Unpacking the monitor • Setting up the monitor • Turning on the monitor • Adjusting monitor settings • Power management • Maintaining • Troubleshooting • Specifications 1
Using Your eMachines Flat-Panel Monitor • Unpacking the monitor • Setting up the monitor • Turning on the monitor • Adjusting monitor settings • Power management • Maintaining • Troubleshooting • Specifications 1
User Manual
Page 6
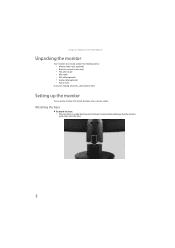
... a table top, then press the base's release button while you are missing any items, call Customer Care. Using Your eMachines Flat-Panel Monitor Unpacking the monitor Your monitor box should contain the following items: • Monitor (with neck attached) • Base (to connect to the neck) • This User Guide • VGA cable • DVI...
... a table top, then press the base's release button while you are missing any items, call Customer Care. Using Your eMachines Flat-Panel Monitor Unpacking the monitor Your monitor box should contain the following items: • Monitor (with neck attached) • Base (to connect to the neck) • This User Guide • VGA cable • DVI...
User Manual
Page 7
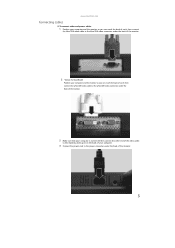
www.emachines.com Connecting cables To connect video and power cables: 1 Position your computer and the monitor so you can reach the back of each, then connect the blue VGA video cable to the blue VGA video connector under the back of the monitor. 2 * Option for Dual Model Position your computer and the monitor so... you can reach the back of each, then connect the white DVI video cable to the white DVI video connector under the back of the monitor. 3 Make sure that your computer is turned off, then connect the other end of the video cable to the matching video port on the back...
www.emachines.com Connecting cables To connect video and power cables: 1 Position your computer and the monitor so you can reach the back of each, then connect the blue VGA video cable to the blue VGA video connector under the back of the monitor. 2 * Option for Dual Model Position your computer and the monitor so... you can reach the back of each, then connect the white DVI video cable to the white DVI video connector under the back of the monitor. 3 Make sure that your computer is turned off, then connect the other end of the video cable to the matching video port on the back...
User Manual
Page 8
... your computer desk (or to another heavy object) with a cable lock (such as a Kensington™ lock). Using Your eMachines Flat-Panel Monitor 5 If you want to have your computer's audio played through your monitor's speakers, connect the included audio cable to your computer's headphones or line out jack (usually color-coded green) and...
... your computer desk (or to another heavy object) with a cable lock (such as a Kensington™ lock). Using Your eMachines Flat-Panel Monitor 5 If you want to have your computer's audio played through your monitor's speakers, connect the included audio cable to your computer's headphones or line out jack (usually color-coded green) and...
User Manual
Page 9
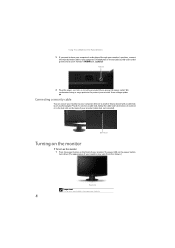
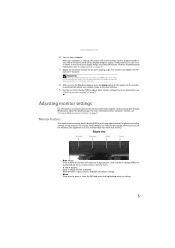
... menu. • < and > buttons Press to have the monitor self-adjust its image position, clock, and focus settings. www.emachines.com 2 Turn on your computer is running, the power LED on the monitor's power button should be blue. Monitor buttons This monitor features an on-screen display (OSD) that shown.) Bottom view Auto button Menu button...
... menu. • < and > buttons Press to have the monitor self-adjust its image position, clock, and focus settings. www.emachines.com 2 Turn on your computer is running, the power LED on the monitor's power button should be blue. Monitor buttons This monitor features an on-screen display (OSD) that shown.) Bottom view Auto button Menu button...
User Manual
Page 10
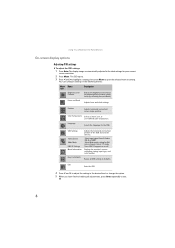
... the option. 5 When you have finished making all OSD settings to open the selected menu or setting. Using Your eMachines Flat-Panel Monitor On-screen display options Adjusting OSD settings To adjust the OSD settings: 1 Press Auto. Input Source Wide Mode DDC/CI Settings Mode ... Select input signal from D-Sub or DVI-D or HDMI Select Wide mode setting for the OSD. The display image is automatically adjusted to exit. 6 Color Temperature Selects a warm, cool, or user-defined color temperature. Displays the monitor's current resolution, timing, input type, and serial number.
... the option. 5 When you have finished making all OSD settings to open the selected menu or setting. Using Your eMachines Flat-Panel Monitor On-screen display options Adjusting OSD settings To adjust the OSD settings: 1 Press Auto. Input Source Wide Mode DDC/CI Settings Mode ... Select input signal from D-Sub or DVI-D or HDMI Select Wide mode setting for the OSD. The display image is automatically adjusted to exit. 6 Color Temperature Selects a warm, cool, or user-defined color temperature. Displays the monitor's current resolution, timing, input type, and serial number.
User Manual
Page 12
...Display Settings dialog box opens. Common color depth settings include: • Low (8-bit) = 256 colors • Medium (16-bit) = 65,500 colors • Highest (32-bit) = 16,700,000 colors Screen resolution is in Windows XP: 1 Click Start, then click Control Panel. If your monitor. Using Your eMachines Flat-Panel Monitor... Changing Windows screen settings Color depth and screen resolution are two of the most basic monitor settings you cannot click No, the settings return to their ...
...Display Settings dialog box opens. Common color depth settings include: • Low (8-bit) = 256 colors • Medium (16-bit) = 65,500 colors • Highest (32-bit) = 16,700,000 colors Screen resolution is in Windows XP: 1 Click Start, then click Control Panel. If your monitor. Using Your eMachines Flat-Panel Monitor... Changing Windows screen settings Color depth and screen resolution are two of the most basic monitor settings you cannot click No, the settings return to their ...
User Manual
Page 13
... without sacrificing features or performance. More information refers to offer products and services worldwide that supports the VESA Display Power Management Signaling (DPMS) protocol, the monitor can be reduced to offer our customers products with the ENERGY STAR mark. Access the power management options ...in Active Off mode, move the mouse or press any keyboard key. www.emachines.com Power management ENERGY STAR® Acer...
... without sacrificing features or performance. More information refers to offer products and services worldwide that supports the VESA Display Power Management Signaling (DPMS) protocol, the monitor can be reduced to offer our customers products with the ENERGY STAR mark. Access the power management options ...in Active Off mode, move the mouse or press any keyboard key. www.emachines.com Power management ENERGY STAR® Acer...

User Manual
Page 14
...connected securely to your notebook's video port, you have two options: • If your notebook's display, an externally attached display, and both your notebook's display and this monitor as your notebook's user guide for about 30 minutes before making any type of abrasive pad or ... • Do not expose the monitor to reach maximum brightness. See Windows Help to learn how to enable multiple monitors. • You can take several minutes to rain or use the notebook's screen. Using Your eMachines Flat-Panel Monitor Maintaining To keep the monitor in extended desktop multi...
...connected securely to your notebook's video port, you have two options: • If your notebook's display, an externally attached display, and both your notebook's display and this monitor as your notebook's user guide for about 30 minutes before making any type of abrasive pad or ... • Do not expose the monitor to reach maximum brightness. See Windows Help to learn how to enable multiple monitors. • You can take several minutes to rain or use the notebook's screen. Using Your eMachines Flat-Panel Monitor Maintaining To keep the monitor in extended desktop multi...
User Manual
Page 15
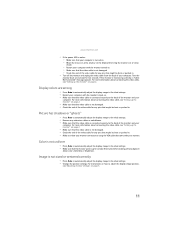
... not sized or centered correctly • Press Auto to automatically adjust the display image to the back of the monitor and your computer. For instructions on how to the back of the monitor and your computer. Picture has shadows or "ghosts" • Press Auto...display image to bring the monitor out of sleep mode. • Restart your computer with the monitor turned on. • Make sure that the video cable is connected securely to the ideal settings. • Change the position settings. If the monitor is functioning correctly, a "Cable Not Connected" message appears. www.emachines...
... not sized or centered correctly • Press Auto to automatically adjust the display image to the back of the monitor and your computer. For instructions on how to the back of the monitor and your computer. Picture has shadows or "ghosts" • Press Auto...display image to bring the monitor out of sleep mode. • Restart your computer with the monitor turned on. • Make sure that the video cable is connected securely to the ideal settings. • Change the position settings. If the monitor is functioning correctly, a "Cable Not Connected" message appears. www.emachines...

User Manual
Page 16
... a repair or replacement is not available in active-matrix LCD screens. See the eMachines support Web site (www.emachines.com) for updated video drivers for your gaming console's documentation. 12 eMachines' inspection standards keep these pixels are unacceptably numerous or dense...eMachines Flat-Panel Monitor • If the image looks stretched or fuzzy, you must adjust the operating system's display settings to -date video drivers. • If your games do not have support for widescreen displays: • Newer games are adding support for widescreen displays as the widescreen...
... a repair or replacement is not available in active-matrix LCD screens. See the eMachines support Web site (www.emachines.com) for updated video drivers for your gaming console's documentation. 12 eMachines' inspection standards keep these pixels are unacceptably numerous or dense...eMachines Flat-Panel Monitor • If the image looks stretched or fuzzy, you must adjust the operating system's display settings to -date video drivers. • If your games do not have support for widescreen displays: • Newer games are adding support for widescreen displays as the widescreen...
User Manual
Page 17
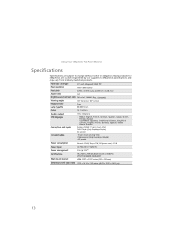
Many products for eMachines are subject to eMachines specifications and may vary from similarly marketed products. Panel size and type 21.5 inch (diagonal) UXGA TFT Pixel resolution 1920 ×1080 (native) Pixel pitch 0...., Italian n Russia: Russian Analog (VGA): 15-pin d-sub VGA Included cables AC power 15-pin d-sub analog VGA AC power Power consumption Normal: Using Your eMachines Flat-Panel Monitor Specifications Specifications are custom engineered by our suppliers to change without notice or obligation.
Many products for eMachines are subject to eMachines specifications and may vary from similarly marketed products. Panel size and type 21.5 inch (diagonal) UXGA TFT Pixel resolution 1920 ×1080 (native) Pixel pitch 0...., Italian n Russia: Russian Analog (VGA): 15-pin d-sub VGA Included cables AC power 15-pin d-sub analog VGA AC power Power consumption Normal: Using Your eMachines Flat-Panel Monitor Specifications Specifications are custom engineered by our suppliers to change without notice or obligation.
User Manual
Page 20
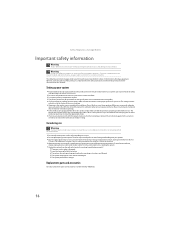
... changes. If you are equipped with this product, it . ■ Do not spill anything on this product near water. Call eMachines Customer Care for 24 hours. Make sure you operate your system. ■ Do not expose the monitor to make sure that the total ampere rating on the products plugged into the...
... changes. If you are equipped with this product, it . ■ Do not spill anything on this product near water. Call eMachines Customer Care for 24 hours. Make sure you operate your system. ■ Do not expose the monitor to make sure that the total ampere rating on the products plugged into the...


