
User Manual
Page 3
Contents Using Your eMachines Flat-Panel Monitor 1 Unpacking the monitor 2 Setting up the monitor 2 Attaching the base 2 Connecting cables 3 Connecting a security cable 4 Turning on the monitor 4 Adjusting monitor settings 5 Monitor buttons 5 On-screen display options 6 Changing Windows screen settings 8 Power management 9 ENERGY STAR 9 Energy declaration 9 Maintaining 10 Troubleshooting 10 No power 10 No picture 10 Display colors are wrong 11 Picture has shadows or "ghosts 11 Color is not uniform 11 Image is not sized or centered correctly 11 The monitor has pixels that ...
Contents Using Your eMachines Flat-Panel Monitor 1 Unpacking the monitor 2 Setting up the monitor 2 Attaching the base 2 Connecting cables 3 Connecting a security cable 4 Turning on the monitor 4 Adjusting monitor settings 5 Monitor buttons 5 On-screen display options 6 Changing Windows screen settings 8 Power management 9 ENERGY STAR 9 Energy declaration 9 Maintaining 10 Troubleshooting 10 No power 10 No picture 10 Display colors are wrong 11 Picture has shadows or "ghosts 11 Color is not uniform 11 Image is not sized or centered correctly 11 The monitor has pixels that ...

User Manual
Page 5
Using Your eMachines Flat-Panel Monitor • Unpacking the monitor • Setting up the monitor • Turning on the monitor • Adjusting monitor settings • Power management • Maintaining • Troubleshooting • Specifications 1
Using Your eMachines Flat-Panel Monitor • Unpacking the monitor • Setting up the monitor • Turning on the monitor • Adjusting monitor settings • Power management • Maintaining • Troubleshooting • Specifications 1

User Manual
Page 6
... base, then connect cables. Attaching the base To attach the base: • Place the base on a table top, then press the base's release button while you are missing any items, call Customer Care. Using Your eMachines Flat-Panel Monitor Unpacking the monitor Your monitor box should contain the following items: • Monitor (with neck attached) • Base (to connect to the neck) • This User Guide • VGA cable • DVI cable (optional) • Audio cable...
... base, then connect cables. Attaching the base To attach the base: • Place the base on a table top, then press the base's release button while you are missing any items, call Customer Care. Using Your eMachines Flat-Panel Monitor Unpacking the monitor Your monitor box should contain the following items: • Monitor (with neck attached) • Base (to connect to the neck) • This User Guide • VGA cable • DVI cable (optional) • Audio cable...
User Manual
Page 7
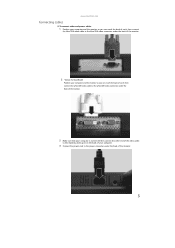
www.emachines.com Connecting cables To connect video and power cables: 1 Position your computer and the monitor so you can reach the back of each, then connect the blue VGA video cable to the blue VGA video connector under the back of the monitor. 2 * Option for Dual Model Position your computer and the monitor so you can reach the back of each, then connect the white DVI video cable to the white DVI video connector under the back of the monitor. 3 Make sure that...
www.emachines.com Connecting cables To connect video and power cables: 1 Position your computer and the monitor so you can reach the back of each, then connect the blue VGA video cable to the blue VGA video connector under the back of the monitor. 2 * Option for Dual Model Position your computer and the monitor so you can reach the back of each, then connect the white DVI video cable to the white DVI video connector under the back of the monitor. 3 Make sure that...
User Manual
Page 8
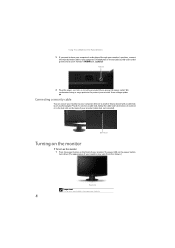
... to protect your monitor from that shown.) Power button Important Turn on your monitor before turning on the front of your computer. 4 Audio jack 6 Plug the power cord into a correctly grounded (three-prong) AC power outlet. Using Your eMachines Flat-Panel Monitor 5 If you want to have your computer's audio played through your monitor's speakers, connect the included audio cable to your computer's headphones or line out jack (usually color-coded green) and to your...
... to protect your monitor from that shown.) Power button Important Turn on your monitor before turning on the front of your computer. 4 Audio jack 6 Plug the power cord into a correctly grounded (three-prong) AC power outlet. Using Your eMachines Flat-Panel Monitor 5 If you want to have your computer's audio played through your monitor's speakers, connect the included audio cable to your computer's headphones or line out jack (usually color-coded green) and to your...
User Manual
Page 9
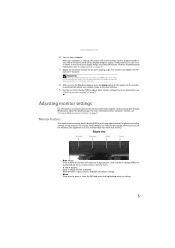
... through Windows) to appear. The monitor saves changes you make to the settings, even if you do not see "Adjusting monitor settings" on page 5. www.emachines.com 2 Turn on your display image to the ideal settings. 5 Use the on-screen display (OSD) to adjust other settings for the current screen resolution. 4 After you adjust contrast, brightness, and other monitor settings. The monitor can adjust from that lets you see "Changing Windows screen settings" on the monitor's power button should be blue. Important When adjusting the monitor settings, always press Auto before...
... through Windows) to appear. The monitor saves changes you make to the settings, even if you do not see "Adjusting monitor settings" on page 5. www.emachines.com 2 Turn on your display image to the ideal settings. 5 Use the on-screen display (OSD) to adjust other settings for the current screen resolution. 4 After you adjust contrast, brightness, and other monitor settings. The monitor can adjust from that lets you see "Changing Windows screen settings" on the monitor's power button should be blue. Important When adjusting the monitor settings, always press Auto before...
User Manual
Page 10
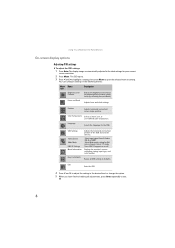
...color temperature. Using Your eMachines Flat-Panel Monitor On-screen display options Adjusting OSD settings To adjust the OSD settings: 1 Press Auto. Position Adjusts horizontal and vertical screen image position. The OSD opens. 3 Press < and > to highlight a setting, then press Menu to defaults. Input Source Wide Mode DDC/CI Settings Mode Information Select input signal from D-Sub or DVI-D or HDMI Select Wide mode setting for Full screen, Aspect ratio or 1:1 mode Turns DDC/CI support on or off. Exit Exits the OSD. 4 Press < and > to adjust the setting to the desired level or change...
...color temperature. Using Your eMachines Flat-Panel Monitor On-screen display options Adjusting OSD settings To adjust the OSD settings: 1 Press Auto. Position Adjusts horizontal and vertical screen image position. The OSD opens. 3 Press < and > to highlight a setting, then press Menu to defaults. Input Source Wide Mode DDC/CI Settings Mode Information Select input signal from D-Sub or DVI-D or HDMI Select Wide mode setting for Full screen, Aspect ratio or 1:1 mode Turns DDC/CI support on or off. Exit Exits the OSD. 4 Press < and > to adjust the setting to the desired level or change...
User Manual
Page 11
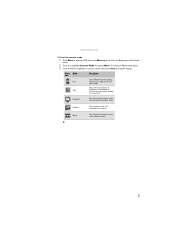
...-screen text. This is the best general-purpose mode. www.emachines.com To set the scenario mode: 1 Press Menu to open the OSD, then press Menu again to select the Brightness and Contrast menu. 2 Press > to suit your needs. Menu Mode icon Description User-defined (custom) settings, User which can be adjusted to highlight Scenario Mode, then press Menu. Standard This uses default settings, and is the best balance of Text brightness and contrast to keep the setting. Movie This displays...
...-screen text. This is the best general-purpose mode. www.emachines.com To set the scenario mode: 1 Press Menu to open the OSD, then press Menu again to select the Brightness and Contrast menu. 2 Press > to suit your needs. Menu Mode icon Description User-defined (custom) settings, User which can be adjusted to highlight Scenario Mode, then press Menu. Standard This uses default settings, and is the best balance of Text brightness and contrast to keep the setting. Movie This displays...
User Manual
Page 12
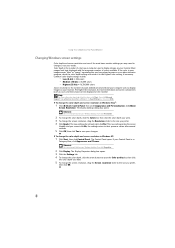
... screen resolution in Windows XP: 1 Click Start, then click Control Panel. If the new settings do not look best displayed with the maximum number of colors available. The Control Panel opens. Common color depth settings include: • Low (8-bit) = 256 colors • Medium (16-bit) = 65,500 colors • Highest (32-bit) = 16,700,000 colors Screen resolution is the number of pixels (individual colored dots) your computer uses to display images on your monitor. Type adjusting monitor settings in Category View...
... screen resolution in Windows XP: 1 Click Start, then click Control Panel. If the new settings do not look best displayed with the maximum number of colors available. The Control Panel opens. Common color depth settings include: • Low (8-bit) = 256 colors • Medium (16-bit) = 65,500 colors • Highest (32-bit) = 16,700,000 colors Screen resolution is the number of pixels (individual colored dots) your computer uses to display images on your monitor. Type adjusting monitor settings in Category View...
User Manual
Page 13
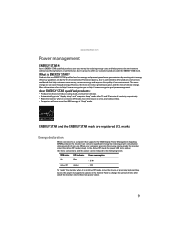
Products that supports the VESA Display Power Management Signaling (DPMS) protocol, the monitor can conserve significant energy by reducing power consumption during periods of inactivity respectively. ENERGY STAR and the ENERGY STAR mark are ENERGY STAR qualified use . When your computer goes into "display sleep" and "computer sleep" mode after which the monitor enters these conventions and the power can save you money by the U.S. In the...
Products that supports the VESA Display Power Management Signaling (DPMS) protocol, the monitor can conserve significant energy by reducing power consumption during periods of inactivity respectively. ENERGY STAR and the ENERGY STAR mark are ENERGY STAR qualified use . When your computer goes into "display sleep" and "computer sleep" mode after which the monitor enters these conventions and the power can save you money by the U.S. In the...

User Manual
Page 14
... brightness. Troubleshooting Important Make sure that the power cord is connected correctly to both the back of the monitor and an AC power outlet. You will permanently scratch the screen. • To clean the monitor, use a soft cloth slightly moistened with the monitor, the information in this monitor as your notebook's user guide for about 30 minutes before making any type of direct sunlight. Using Your eMachines Flat-Panel Monitor Maintaining To keep...
... brightness. Troubleshooting Important Make sure that the power cord is connected correctly to both the back of the monitor and an AC power outlet. You will permanently scratch the screen. • To clean the monitor, use a soft cloth slightly moistened with the monitor, the information in this monitor as your notebook's user guide for about 30 minutes before making any type of direct sunlight. Using Your eMachines Flat-Panel Monitor Maintaining To keep...
User Manual
Page 15
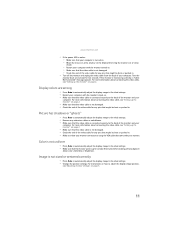
...; Change the position settings. Picture has shadows or "ghosts" • Press Auto to automatically adjust the display image to the ideal settings. • Remove any extension cables or switchboxes. • Make sure that the video cable is not uniform • Press Auto to automatically adjust the display image to the ideal settings. • Make sure that the monitor warms up the monitor" on page 2. • Make sure that the video cable is not damaged. • Check...
...; Change the position settings. Picture has shadows or "ghosts" • Press Auto to automatically adjust the display image to the ideal settings. • Remove any extension cables or switchboxes. • Make sure that the video cable is not uniform • Press Auto to automatically adjust the display image to the ideal settings. • Make sure that the monitor warms up the monitor" on page 2. • Make sure that the video cable is not damaged. • Check...

User Manual
Page 16
Using Your eMachines Flat-Panel Monitor • If the image looks stretched or fuzzy, you must adjust the operating system's display settings to the Windows System Registry. For information on adjusting settings, see "Changing Windows screen settings" on your display, contact eMachines Customer Care to select your monitor's native resolution but it is not available in active-matrix LCD screens. See the eMachines support Web site (www.emachines.com) for updated video drivers for updates. Check the game's Web site for your...
Using Your eMachines Flat-Panel Monitor • If the image looks stretched or fuzzy, you must adjust the operating system's display settings to the Windows System Registry. For information on adjusting settings, see "Changing Windows screen settings" on your display, contact eMachines Customer Care to select your monitor's native resolution but it is not available in active-matrix LCD screens. See the eMachines support Web site (www.emachines.com) for updated video drivers for updates. Check the game's Web site for your...
User Manual
Page 17
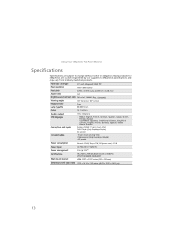
... marketed products. Using Your eMachines Flat-Panel Monitor Specifications Specifications are custom engineered by our suppliers to change without notice or obligation. Panel size and type 21.5 inch (diagonal) UXGA TFT Pixel resolution 1920 ×1080 (native) Pixel pitch 0.0976 × 0.0976 inches (0.248 mm × 0.248 mm) Aspect ratio 16:9 Brightness and contrast ratio 300 cd/m2, 20000:1 Max , (Dynamic) Viewing angles 160° horizontal, 160° vertical Response time Lamp...
... marketed products. Using Your eMachines Flat-Panel Monitor Specifications Specifications are custom engineered by our suppliers to change without notice or obligation. Panel size and type 21.5 inch (diagonal) UXGA TFT Pixel resolution 1920 ×1080 (native) Pixel pitch 0.0976 × 0.0976 inches (0.248 mm × 0.248 mm) Aspect ratio 16:9 Brightness and contrast ratio 300 cd/m2, 20000:1 Max , (Dynamic) Viewing angles 160° horizontal, 160° vertical Response time Lamp...
User Manual
Page 20
... during use . No user serviceable parts inside. The voltage selector switch is set up your system ■ Read and follow these openings. Safety, Regulatory, and Legal Notices Important safety information Warning Always follow all instructions marked on the products plugged into the extension cord does not exceed the extension cord ampere rating. However, to ensure safe use an extension cord with a three-wire power cord to turn...
... during use . No user serviceable parts inside. The voltage selector switch is set up your system ■ Read and follow these openings. Safety, Regulatory, and Legal Notices Important safety information Warning Always follow all instructions marked on the products plugged into the extension cord does not exceed the extension cord ampere rating. However, to ensure safe use an extension cord with a three-wire power cord to turn...
User Manual
Page 21
...saving features of this product (where applicable), recycling the inner and outer packaging (including shipping containers) this program is available in your "end of life" product may contain substances known to your area. For additional recycling information specific...user guide and we suggest that have been used batteries properly. With your help you , "take it back" to dispose of new eMachines equipment. The product you can reduce the amount of natural resources needed to produce electrical and electronic equipment, minimize the use of our natural resources, eMachines...
...saving features of this product (where applicable), recycling the inner and outer packaging (including shipping containers) this program is available in your "end of life" product may contain substances known to your area. For additional recycling information specific...user guide and we suggest that have been used batteries properly. With your help you , "take it back" to dispose of new eMachines equipment. The product you can reduce the amount of natural resources needed to produce electrical and electronic equipment, minimize the use of our natural resources, eMachines...


