eMachines 17F3 - eView - 17" CRT Display Support and Manuals
Get Help and Manuals for this eMachines item
View All Support Options Below
Free eMachines 17F3 manuals!
Problems with eMachines 17F3?
Ask a Question
Free eMachines 17F3 manuals!
Problems with eMachines 17F3?
Ask a Question
Popular eMachines 17F3 Manual Pages
User Guide - Page 3

Contents
17f3 Monitor 1
Setting up the monitor 2 Adjusting settings 5
On-screen display menu options 6 Video modes 8 Maintenance 9 Troubleshooting 10 Specifications 12
Safety, Regulatory, and Legal Information 13
www.emachines.com
i
User Guide - Page 5

17f3 Monitor
• Setting up the monitor • Adjusting settings • Maintenance • Troubleshooting • Specifications
1
User Guide - Page 6

... with the corresponding slots on the product. To set the monitor upright and place it on a sturdy, level surface.
2
www.emachines.com Follow all warnings and instructions marked on the bottom of the monitor.
3 Slide the base toward the front of the monitor so all instructions before using the monitor and save them for later use. A
retaining latch...
User Guide - Page 7

Caution
The openings in a bookcase or some other end of the power cable into these openings.
www.emachines.com
3
Tightening the screws also prevents radio and TV interference.
4 Connect the power cable that came with the monitor to the AC power connector on the video cable connector to keep it for ventilation.
2 Connect the video cable...
User Guide - Page 9

... sub-menu. Turns the monitor on -screen display (OSD) menu or selects an OSD menu option. OSD active: Navigates to and adjusts the selected OSD menu option. OSD inactive: Adjusts the contrast.
Adjusting settings
Power button. MENU button. Exit. The OSD menu opens.
1024 x 768 / 85Hz CONTRAST
OSD
i EXIT
www.emachines.com
5 Enters the...
User Guide - Page 10

... size of the display image. OR- Controls the horizontal position of the display image.
6
www.emachines.com On-screen display menu options
Icon Description CONTRAST.
2 Press the or buttons to highlight an ... or buttons to adjust an OSD menu option. 4 Press the EXIT button to save your settings and exit the OSD. The change menu for example
Contrast), then press the MENU button to...
User Guide - Page 11

TOP CORNER. Adjusts color balance. Resets the monitor settings to counteract vertical moire. Changes the display time that the OSD is highlighted. Provides information on the screen. www.emachines.com
7 Increases or decreases the trapezoid distortion of the display image inward or outward. Adjusts the display to the factory default settings. COLOR.
PINCUSHION. ...
User Guide - Page 12

....emachines.com Factory preset video modes include:
Mode 1 2 3 4 5 6 7 8 9 10 11
Resolution ...720 × 400 640 × 480 640 × 480 800 × 600 800 × 600 800 × 600 800 × 600 1024 × 768 1024 × 768 1024 × 768 1280 × 768
HF -
Horizontal frequency (KHz) VF - Recommended video mode is 1024 × 768 @ 85 Hz. Video modes
The monitor supports...
User Guide - Page 13
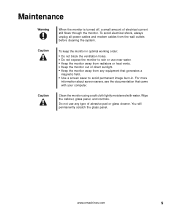
... cabinet, glass panel, and controls. To avoid electrical shock, always unplug all power cables and modem cables from any type of electrical current still flows through the monitor. Clean the monitor using a soft cloth lightly moistened with your computer.
www.emachines.com
9 For more
information about screen savers, see the documentation that generates a
magnetic...
User Guide - Page 14

...colors are not placed too close to the monitor. ■ The monitor... solves the problem, try plugging the monitor into another monitor, power transformer or
...monitor turned on a different circuit.
10
www.emachines.com
Troubleshooting
No picture
■ Make sure that the monitor is turned on. ■ Make sure that the power cord is connected correctly to both the back of the monitor...
User Guide - Page 16

Specifications
Specifications are subject to 60°C) Humidity: 5% ~ 90%
12
www.emachines.com
CRT Synchronization range Resolution Dot rate Power supply Input signal Display analog input Weight ...
Input voltage: AC 100-240 V @ 50/60 Hz Consumption: 100 watts maximum
Video: Analog 0.7 Vp-p/75 Ohms Sync: Separate sync, TTL level
Unlimited colors
Net: 33.5 lbs (15.2 kg) Gross: 40 lbs (18.2 kg)...
User Guide - Page 18

... is in the monitor case are equipped with a three-wire power cord to make sure that the switch is set at least 6 inches (15 cm), around the system for your Gateway system. Do not block or cover these instructions to help guard against voltage surges and buildup of static charges.
14
www.emachines.com This...
User Guide - Page 19

... dental facilities, oxygen-laden environments, or industrial facilities.
No user serviceable parts inside. Replacement parts and accessories
Use only replacement parts and accessories recommended by Gateway. Care during use near your
system. ■ Do not expose the monitor to rain or use
■ Do not walk on the power cord or allow it . ■ Do not spill anything...
User Guide - Page 21

... for energy efficiency when used with a computer equipped with a Display Power Management System.
EPA ENERGY STAR
As an ENERGY STAR® Partner, Gateway has determined that this product meets the ENERGY STAR guidelines for radio noise emissions from digital apparatus as set out in the radio interference regulations of Industry Canada.
Le...
User Guide - Page 22

...part of their respective owners. The information in this manual and the products it describes at www.gateway.com. Due to be reproduced or transmitted by copyright and all rights are reserved. In no event will Gateway be the trademarks or registered trademarks of it may appear in this manual...the latest product updates, consult the ...manual, even if advised of the possibility of eMachines...
eMachines 17F3 Reviews
We have not received any reviews for eMachines yet.