
Owner's Manual
Page 1
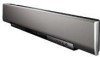
UA YSP-4000 Digital Sound ProjectorTM OWNER'S MANUAL
UA YSP-4000 Digital Sound ProjectorTM OWNER'S MANUAL

Owner's Manual
Page 4
... this unit, do not pull the cable. 11 Do not clean this manual carefully. On the top of power. Burning objects (i.e. this unit is designed to modify or fix this unit itself is turned off by STANDBY/ON. Yamaha will form when the surrounding temperature changes suddenly. vacation), disconnect the power supply cable from the wall outlet. 16 Be sure to the...
... this unit, do not pull the cable. 11 Do not clean this manual carefully. On the top of power. Burning objects (i.e. this unit is designed to modify or fix this unit itself is turned off by STANDBY/ON. Yamaha will form when the surrounding temperature changes suddenly. vacation), disconnect the power supply cable from the wall outlet. 16 Be sure to the...
Owner's Manual
Page 5
...63 Using auto-adjust function 63 Using manual-adjust function 64 Using sound field programs 65 CINEMA DSP programs 67 Using the music enhancer 70 Using the volume mode (Night listening enhancer/ TV volume equal mode 71 Using the sleep timer 72 Displaying the input source information 74 Using the HDMI control feature 75 ADVANCED OPERATION MANUAL SETUP 76 Using MANUAL SETUP 77 BEAM MENU 78 SOUND MENU 82 INPUT MENU 84 DISPLAY MENU 88 Adjusting the audio balance 90 Using the test tone 90 Using the audio output being played back 91 Selecting the input mode 93 Adjusting the system...
...63 Using auto-adjust function 63 Using manual-adjust function 64 Using sound field programs 65 CINEMA DSP programs 67 Using the music enhancer 70 Using the volume mode (Night listening enhancer/ TV volume equal mode 71 Using the sleep timer 72 Displaying the input source information 74 Using the HDMI control feature 75 ADVANCED OPERATION MANUAL SETUP 76 Using MANUAL SETUP 77 BEAM MENU 78 SOUND MENU 82 INPUT MENU 84 DISPLAY MENU 88 Adjusting the audio balance 90 Using the test tone 90 Using the audio output being played back 91 Selecting the input mode 93 Adjusting the system...
Owner's Manual
Page 6
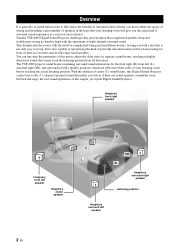
... reflected off the walls of powerful surround sound you have been waiting for separate sound beams, resulting in highly directional sound that complicated speaker setup and troublesome wiring go hand-in-hand with a unit that is not only easy to set up, but is generally accepted that in 2 woofers and 40 full-range small speakers. Yamaha YSP-4000 Digital Sound Projector challenges this unit to adjust the delay time for from...
... reflected off the walls of powerful surround sound you have been waiting for separate sound beams, resulting in highly directional sound that complicated speaker setup and troublesome wiring go hand-in-hand with a unit that is not only easy to set up, but is generally accepted that in 2 woofers and 40 full-range small speakers. Yamaha YSP-4000 Digital Sound Projector challenges this unit to adjust the delay time for from...
Owner's Manual
Page 7
... channels to produce a directional and more realistic effect. ◆ DTS This is the standard audio signal format used to control the DVD player, VCR, cable TV tuner, and digital satellite tuner connected to this unit is a redesigned version of Dolby Pro Logic that let you enjoy the surround sound (5 Beam, Stereo plus 3 Beam, 3 Beam, and My Surround), 2-channel and 5-channel stereo playback, and My Beam. You can adjust the beam angle manually or automatically using...
... channels to produce a directional and more realistic effect. ◆ DTS This is the standard audio signal format used to control the DVD player, VCR, cable TV tuner, and digital satellite tuner connected to this unit is a redesigned version of Dolby Pro Logic that let you enjoy the surround sound (5 Beam, Stereo plus 3 Beam, 3 Beam, and My Surround), 2-channel and 5-channel stereo playback, and My Beam. You can adjust the beam angle manually or automatically using...
Owner's Manual
Page 16
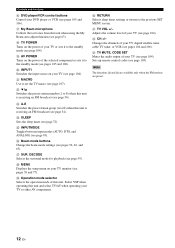
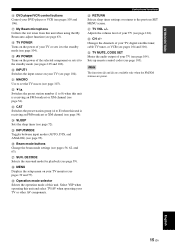
... the FM stations are preset. 12 En Changes the channels of the selected component or sets it to the standby mode (see page 54). H TV POWER Turns on the power of your TV, digital satellite tuner, cable TV tuner, or VCR (see page 104). N SLEEP Sets the sleep timer (see page 93). O INPUTMODE Toggles between input modes (AUTO, DTS, and ANALOG) (see page 72). W TV MUTE, CODE SET Mutes the audio output of this...
... the FM stations are preset. 12 En Changes the channels of the selected component or sets it to the standby mode (see page 54). H TV POWER Turns on the power of your TV, digital satellite tuner, cable TV tuner, or VCR (see page 104). N SLEEP Sets the sleep timer (see page 93). O INPUTMODE Toggles between input modes (AUTO, DTS, and ANALOG) (see page 72). W TV MUTE, CODE SET Mutes the audio output of this...
Owner's Manual
Page 17
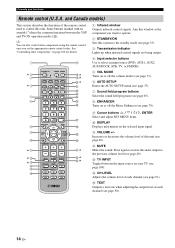
.... Use A-E ( / ) to change the preset station number (1 to 8) or frequency level (see pages 51 to control FM, Radio Data System, or iPod when the TV/AV mode is selected with the operation mode selector (7). English 13 En DECODE 0 +10 ENHANCER ENTRY MENU A-E DISPLAY ENTER TV/AV YSP RETURN VOLUME CH TV VOL 5 6 7 MUTE TV INPUT TV MUTE CH LEVEL TEST CODE SET Controls and functions 1 PRESET/TUNE FM: Switches between automatic and manual tuning (see page 51). 7 Operation mode selector Selects the operation mode of the remote control used...
.... Use A-E ( / ) to change the preset station number (1 to 8) or frequency level (see pages 51 to control FM, Radio Data System, or iPod when the TV/AV mode is selected with the operation mode selector (7). English 13 En DECODE 0 +10 ENHANCER ENTRY MENU A-E DISPLAY ENTER TV/AV YSP RETURN VOLUME CH TV VOL 5 6 7 MUTE TV INPUT TV MUTE CH LEVEL TEST CODE SET Controls and functions 1 PRESET/TUNE FM: Switches between automatic and manual tuning (see page 51). 7 Operation mode selector Selects the operation mode of the remote control used...
Owner's Manual
Page 18
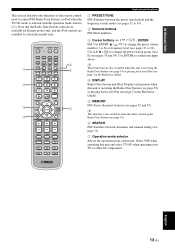
... TV/AV operation modes (S). See "Controlling other components using the remote control once you want to operate. 2 STANDBY/ON Sets this system to the standby mode (see page 33). 3 Transmission indicator Lights up when infrared control signals are being output. 4 Input selector buttons Use to the previous volume level (see page 70). 9 Cursor buttons / / / , ENTER Select and adjust SET MENU items. 0 DISPLAY Displays information on your TV (see page 49). Press again to restore the audio output to select an input source (DVD, AUX1, AUX2...
... TV/AV operation modes (S). See "Controlling other components using the remote control once you want to operate. 2 STANDBY/ON Sets this system to the standby mode (see page 33). 3 Transmission indicator Lights up when infrared control signals are being output. 4 Input selector buttons Use to the previous volume level (see page 70). 9 Cursor buttons / / / , ENTER Select and adjust SET MENU items. 0 DISPLAY Displays information on your TV (see page 49). Press again to restore the audio output to select an input source (DVD, AUX1, AUX2...
Owner's Manual
Page 19
...). Adjusts the volume level of your TV (see page 104). R MENU Displays the setup menu on the power of your TV (see page 104). INTRODUCTION F DVD player/VCR control buttons Control your TV monitor (see pages 39 and 77). DECODE Selects the surround mode for playback (see page 63). U TV VOL +/- G My Beam microphone Collects the test tones from this unit and select TV/AV when operating your TV, digital satellite tuner, cable TV tuner...
...). Adjusts the volume level of your TV (see page 104). R MENU Displays the setup menu on the power of your TV (see page 104). INTRODUCTION F DVD player/VCR control buttons Control your TV monitor (see pages 39 and 77). DECODE Selects the surround mode for playback (see page 63). U TV VOL +/- G My Beam microphone Collects the test tones from this unit and select TV/AV when operating your TV, digital satellite tuner, cable TV tuner...
Owner's Manual
Page 44
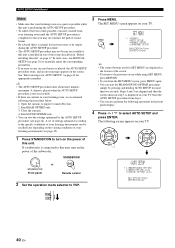
... panel Remote control 2 Set the operation mode selector to improve sound reflection. 2. A chime is played when the AUTO SETUP procedure is played, the AUTO SETUP procedure stops, and an error message appears on the screen. A set of settings optimized according to the specific conditions of your listening environment can be run successfully. • If there are displayed at the bottom of the screen. • To return to the previous screen while using SET MENU...
... panel Remote control 2 Set the operation mode selector to improve sound reflection. 2. A chime is played when the AUTO SETUP procedure is played, the AUTO SETUP procedure stops, and an error message appears on the screen. A set of settings optimized according to the specific conditions of your listening environment can be run successfully. • If there are displayed at the bottom of the screen. • To return to the previous screen while using SET MENU...
Owner's Manual
Page 45
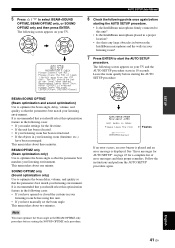
... AUTO SETUP procedure. The following screen appears on your listening environment. It is displayed. See "Error messages for AUTO SETUP" on your TV and the AUTO SETUP procedure starts in your listening room? English 41 En ENTER BEAM+SOUND OPTIMZ (Beam optimization and sound optimization) Use to optimize the beam delay, volume, and quality so that the parameters best match your listening environment. SOUND OPTIMZ only (Sound...
... AUTO SETUP procedure. The following screen appears on your listening environment. It is displayed. See "Error messages for AUTO SETUP" on your TV and the AUTO SETUP procedure starts in your listening room? English 41 En ENTER BEAM+SOUND OPTIMZ (Beam optimization and sound optimization) Use to optimize the beam delay, volume, and quality so that the parameters best match your listening environment. SOUND OPTIMZ only (Sound...
Owner's Manual
Page 79
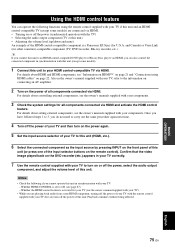
... in the owner's manual supplied with your TV to carry out the same procedure again next time. 4 Turn off the power, select the audio output component, and adjust the volume level of this unit. Notes • Check the following functions using HDMI cables" on the power again. 5 Set the input source selector of your TV, refer to your components. 3 Check the system settings for other countries)-compatible component (TV, DVD recorder, Blu-ray recorder, etc.). Whether HDMI CONTROL is...
... in the owner's manual supplied with your TV to carry out the same procedure again next time. 4 Turn off the power, select the audio output component, and adjust the volume level of this unit. Notes • Check the following functions using HDMI cables" on the power again. 5 Set the input source selector of your TV, refer to your components. 3 Check the system settings for other countries)-compatible component (TV, DVD recorder, Blu-ray recorder, etc.). Whether HDMI CONTROL is...
Owner's Manual
Page 80
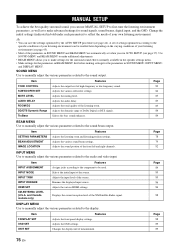
... listening position settings. Item INPUT ASSIGNMENT INPUT MODE INPUT TRIM INPUT RENAME HDMI SET XM ANTENNA LEVEL (U.S.A. Adjusts the input level of Dolby Digital or DTS signals. Renames the displayed input source. Page 88 89 89 76 En Selects the bass sound enhancer. and Canada models only) Features Assigns jacks according to the component to the display. Item F.DISPLAY SET OSD SET UNIT SET Features Adjusts the front panel display settings. Item TONE CONTROL SUBWOOFER SET MUTE LEVEL AUDIO DELAY ROOM EQ DD/DTS Dynamic Range TruBass Features Adjusts the output level of the...
... listening position settings. Item INPUT ASSIGNMENT INPUT MODE INPUT TRIM INPUT RENAME HDMI SET XM ANTENNA LEVEL (U.S.A. Adjusts the input level of Dolby Digital or DTS signals. Renames the displayed input source. Page 88 89 89 76 En Selects the bass sound enhancer. and Canada models only) Features Assigns jacks according to the component to the display. Item F.DISPLAY SET OSD SET UNIT SET Features Adjusts the front panel display settings. Item TONE CONTROL SUBWOOFER SET MUTE LEVEL AUDIO DELAY ROOM EQ DD/DTS Dynamic Range TruBass Features Adjusts the output level of the...
Owner's Manual
Page 90
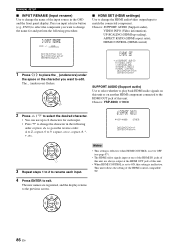
... front panel display. Press an input selector button (e.g., DVD) to select the component you want to change the name for each input. a)SUPPORT AUDIO YSP-4000 OTHER p [ ]/[ ]:Select [ENTER]:Return ENTER 3 Repeat steps 1 to 2 to match the connected component. The _ (underscore) flashes. Notes • This setting is effective when HDMI CONTROL is set to OFF (see page 87). • The HDMI video signals input at the HDMI OUT jack of this unit. • When HDMI CONTROL is set to change the...
... front panel display. Press an input selector button (e.g., DVD) to select the component you want to change the name for each input. a)SUPPORT AUDIO YSP-4000 OTHER p [ ]/[ ]:Select [ENTER]:Return ENTER 3 Repeat steps 1 to 2 to match the connected component. The _ (underscore) flashes. Notes • This setting is effective when HDMI CONTROL is set to OFF (see page 87). • The HDMI video signals input at the HDMI OUT jack of this unit. • When HDMI CONTROL is set to change the...
Owner's Manual
Page 113
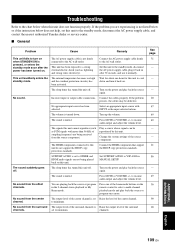
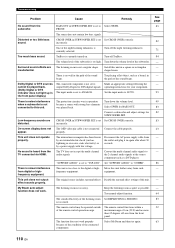
.... Set SUPPORT AUDIO to YSP-4000 in the 2-channel stereo playback or My Beam mode. This unit has been exposed to minimum. Turn on the power and play back the source or program once more than 96 kHz of the center channel. You are experiencing is not firmly connected to select a multi-channel playback mode and play back the source again. No sound from the source component. Set this unit to resume audio output and adjust the volume level. to the standby mode...
.... Set SUPPORT AUDIO to YSP-4000 in the 2-channel stereo playback or My Beam mode. This unit has been exposed to minimum. Turn on the power and play back the source or program once more than 96 kHz of the center channel. You are experiencing is not firmly connected to select a multi-channel playback mode and play back the source again. No sound from the source component. Set this unit to resume audio output and adjust the volume level. to the standby mode...
Owner's Manual
Page 114
... low voltage. The volume level of the subwoofer. Dolby Digital or DTS sources cannot be operated outside of the remote control operation range. The protection circuitry was in the front panel display.) The connected component is too close to this unit farther away from the TV connected via HDMI. Connect a subwoofer and adjust settings for your component. The internal microcomputer has been frozen by a power supply with strong bass elements was played back. No sound is set to AUTO...
... low voltage. The volume level of the subwoofer. Dolby Digital or DTS sources cannot be operated outside of the remote control operation range. The protection circuitry was in the front panel display.) The connected component is too close to this unit farther away from the TV connected via HDMI. Connect a subwoofer and adjust settings for your component. The internal microcomputer has been frozen by a power supply with strong bass elements was played back. No sound is set to AUTO...
Owner's Manual
Page 124
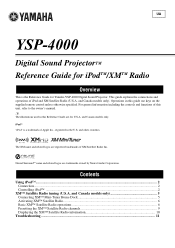
...Yamaha YSP-4000 Digital Sound Projector. The XM name and related logos are trademarks owned by Neural Audio Corporation. Contents Using iPod™...2 Connection...2 Controlling iPod™ ...2 XM™ Satellite Radio tuning (U.S.A. and Canada models only). This guide explains the connections and operations of XM Satellite Radio Inc. and Canada models only. and Canada models only 5 Connecting XM™ Mini-Tuner Home Dock 5 Activating XM™ Satellite Radio ...6 Basic XM™ Satellite Radio operations ...6 Presetting the XM™ Satellite Radio channels 9 Displaying...
...Yamaha YSP-4000 Digital Sound Projector. The XM name and related logos are trademarks owned by Neural Audio Corporation. Contents Using iPod™...2 Connection...2 Controlling iPod™ ...2 XM™ Satellite Radio tuning (U.S.A. and Canada models only). This guide explains the connections and operations of XM Satellite Radio Inc. and Canada models only. and Canada models only 5 Connecting XM™ Mini-Tuner Home Dock 5 Activating XM™ Satellite Radio ...6 Basic XM™ Satellite Radio operations ...6 Presetting the XM™ Satellite Radio channels 9 Displaying...
Owner's Manual
Page 129
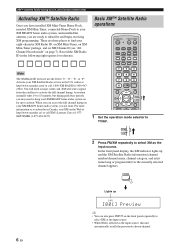
... home audio system, and installed the antenna, you may need a major credit card. and Canada models only) Activating XM™ Satellite Radio Once you have installed XM Mini-Tuner Home Dock, inserted XM Mini-Tuner, connected Home Dock to your eight-character XM Radio ID: on XM Mini-Tuner, on XM Mini-Tuner package, and on XM Channel 0 (see "All Channel Search mode" on for reference. XM™ Satellite Radio tuning (U.S.A. You will send a signal...
... home audio system, and installed the antenna, you may need a major credit card. and Canada models only) Activating XM™ Satellite Radio Once you have installed XM Mini-Tuner Home Dock, inserted XM Mini-Tuner, connected Home Dock to your eight-character XM Radio ID: on XM Mini-Tuner, on XM Mini-Tuner package, and on XM Channel 0 (see "All Channel Search mode" on for reference. XM™ Satellite Radio tuning (U.S.A. You will send a signal...
Owner's Manual
Page 136
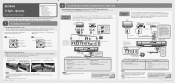
... separately 1 HDMI cable (Displays the DVD digital video and the YSP-4000 menu screen on or off the power, select the audio output component, and adjust the volume level of 2 Place this unit upside 3 Install this unit. An object, such as furniture Front left channel Center channel Front right channel Surround left channel Surround right channel An object, such as the ones on the actual rear panel of this unit. After all connections are complete. 5 Supplied 1 Audio pin cable (Outputs TV analog audio sounds from...
... separately 1 HDMI cable (Displays the DVD digital video and the YSP-4000 menu screen on or off the power, select the audio output component, and adjust the volume level of 2 Place this unit upside 3 Install this unit. An object, such as furniture Front left channel Center channel Front right channel Surround left channel Surround right channel An object, such as the ones on the actual rear panel of this unit. After all connections are complete. 5 Supplied 1 Audio pin cable (Outputs TV analog audio sounds from...

Owner's Manual
Page 137
... volume on the remote control of this guide with you are lit in the Owner's Manual. DVD STB AUX1 AUX2 AUX3 TV INPUT1 MACRO TV PRESET/TUNE SEARCH MEMORY 2) Play back the supplied demonstration DVD on the DVD player. 3 Press TV on your TV. If the sound is in the system memory. The power of this unit turns on page 38 in the connection example, switch the video input to "1". 6 Set the operation mode...
... volume on the remote control of this guide with you are lit in the Owner's Manual. DVD STB AUX1 AUX2 AUX3 TV INPUT1 MACRO TV PRESET/TUNE SEARCH MEMORY 2) Play back the supplied demonstration DVD on the DVD player. 3 Press TV on your TV. If the sound is in the system memory. The power of this unit turns on page 38 in the connection example, switch the video input to "1". 6 Set the operation mode...


