Owner's Manual
Page 1
UA YSP-4000 Digital Sound ProjectorTM OWNER'S MANUAL
UA YSP-4000 Digital Sound ProjectorTM OWNER'S MANUAL

Owner's Manual
Page 4
...time (i.e. The cabinet should be connected to modify or fix this sound system in a well ventilated, cool, dry, clean place with at least...to the AC wall outlet, even if this Owner's Manual in a live socket outlet. IMPORTANT THE WIRES ...Condensation will not be used. Contact qualified Yamaha service personnel when any reasons. 15 When ... AND-YELLOW. CUSTOMERS If the socket outlets in the home are complete. 8 Do not operate this unit upside...digital apparatus complies with the same or equivalent type. For details, refer to read this might damage the finish. this manual...
...time (i.e. The cabinet should be connected to modify or fix this sound system in a well ventilated, cool, dry, clean place with at least...to the AC wall outlet, even if this Owner's Manual in a live socket outlet. IMPORTANT THE WIRES ...Condensation will not be used. Contact qualified Yamaha service personnel when any reasons. 15 When ... AND-YELLOW. CUSTOMERS If the socket outlets in the home are complete. 8 Do not operate this unit upside...digital apparatus complies with the same or equivalent type. For details, refer to read this might damage the finish. this manual...

Owner's Manual
Page 9
...as a result of external components, refer to the supplied owner's manual for your TV and other external components. If you want to make additional settings and adjustments 7 Run MANUAL SETUP to your operation. • This manual is printed prior to connect and operate this unit. Designs ... En English See "Installation" on page 56. See "Enjoying surround sound" on page 17. 2 Connect this unit to fine-tune settings and/or set remote control codes. In case of this unit. INTRODUCTION Using this manual Using this manual Notes • This manual describes how to production.
...as a result of external components, refer to the supplied owner's manual for your TV and other external components. If you want to make additional settings and adjustments 7 Run MANUAL SETUP to your operation. • This manual is printed prior to connect and operate this unit. Designs ... En English See "Installation" on page 56. See "Enjoying surround sound" on page 17. 2 Connect this unit to fine-tune settings and/or set remote control codes. In case of this unit. INTRODUCTION Using this manual Using this manual Notes • This manual describes how to production.
Owner's Manual
Page 52
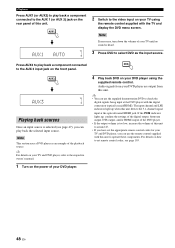
...indicator lights up when this unit. AUX1 AUX1 AUTO 2 Switch to the video input on your DVD player using the remote control supplied with the digital connection (optical/coaxial/HDMI). Note This section uses a DVD player as the input source. The input channel and LFE indicators light up , ... example of your TV and DVD player, refer to the respective owner's manual. 1 Turn on the power of this unit to check the digital signals being input at the optical/coaxial/HDMI jack. y For details on your TV until no sound is selected (see page 103. 48 En Note If necessary, ...
...indicator lights up when this unit. AUX1 AUX1 AUTO 2 Switch to the video input on your DVD player using the remote control supplied with the digital connection (optical/coaxial/HDMI). Note This section uses a DVD player as the input source. The input channel and LFE indicators light up , ... example of your TV and DVD player, refer to the respective owner's manual. 1 Turn on the power of this unit to check the digital signals being input at the optical/coaxial/HDMI jack. y For details on your TV until no sound is selected (see page 103. 48 En Note If necessary, ...
Owner's Manual
Page 79
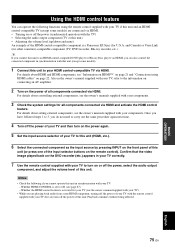
For details about controlling external components, see the owner's manuals supplied with your components. 3 Check the system settings for U.S.A. Playback continues without being affected. 75 En English Confirm that the video image played back on the DVD recorder (etc.) appears in ... is activated for other countries)-compatible component (TV, DVD recorder, Blu-ray recorder, etc.). and Canada) or Viera Link (for your TV (see the owner's manuals supplied with your TV, refer to the information on connecting an AV amplifier. 2 Turn on page 22. y If you connect this unit to an HDMI...
For details about controlling external components, see the owner's manuals supplied with your components. 3 Check the system settings for U.S.A. Playback continues without being affected. 75 En English Confirm that the video image played back on the DVD recorder (etc.) appears in ... is activated for other countries)-compatible component (TV, DVD recorder, Blu-ray recorder, etc.). and Canada) or Viera Link (for your TV (see the owner's manuals supplied with your TV, refer to the information on connecting an AV amplifier. 2 Turn on page 22. y If you connect this unit to an HDMI...
Owner's Manual
Page 124
...general information including the controls and functions of Apple Inc., registered in this Reference Guide are for Yamaha YSP-4000 Digital Sound Projector. and Canada models only. The XM name and related logos are trademarks owned by Neural Audio...Home Dock 5 Activating XM™ Satellite Radio ...6 Basic XM™ Satellite Radio operations ...6 Presetting the XM™ Satellite Radio channels 9 Displaying the XM™ Satellite Radio information 10 Troubleshooting ...11 Operations in this unit, refer to the owner's manual. and other countries. UA YSP-4000 Digital Sound...
...general information including the controls and functions of Apple Inc., registered in this Reference Guide are for Yamaha YSP-4000 Digital Sound Projector. and Canada models only. The XM name and related logos are trademarks owned by Neural Audio...Home Dock 5 Activating XM™ Satellite Radio ...6 Basic XM™ Satellite Radio operations ...6 Presetting the XM™ Satellite Radio channels 9 Displaying the XM™ Satellite Radio information 10 Troubleshooting ...11 Operations in this unit, refer to the owner's manual. and other countries. UA YSP-4000 Digital Sound...

Owner's Manual
Page 126
...(Australia model), and set your iPod in the Yamaha iPod universal dock. and Canada models) or AUX3 (Australia model), and set your iPod in the Yamaha iPod universal dock. In the OSD, you can ...complete list of status messages that appear in the front panel display and in the OSD, see the owner's manual for information on the OSD). Such advanced operations cannot be performed also on your iPod. 1 Set...iPod battery is stationed in the iPod screen (some basic operations such as desired. TV/AV YSP 2 Press AUX3/DOCK (U.S.A. In the front panel display, "iPod connected" appears and the ...
...(Australia model), and set your iPod in the Yamaha iPod universal dock. and Canada models) or AUX3 (Australia model), and set your iPod in the Yamaha iPod universal dock. In the OSD, you can ...complete list of status messages that appear in the front panel display and in the OSD, see the owner's manual for information on the OSD). Such advanced operations cannot be performed also on your iPod. 1 Set...iPod battery is stationed in the iPod screen (some basic operations such as desired. TV/AV YSP 2 Press AUX3/DOCK (U.S.A. In the front panel display, "iPod connected" appears and the ...

Owner's Manual
Page 127
... > Shuffle, Repeat Settings parameters: Shuffle Shuffle Use this mode. • Undisplayable characters are being shuffled. Notes • The YAMAHA logo appears in the iPod screen in the owner's manual (see page 89). • You can set the front panel display mode: CONT. Press ENTER repeatedly to toggle between the ... on your iPod in the front panel display. See "OSD DISPLAY TIME" (OSD display time) in "OSD SET" (OSD settings) in the owner's manual (see page 88). • You can view the photos or video clips stored on the current song also appears in the OSD (some models only...
... > Shuffle, Repeat Settings parameters: Shuffle Shuffle Use this mode. • Undisplayable characters are being shuffled. Notes • The YAMAHA logo appears in the iPod screen in the owner's manual (see page 89). • You can set the front panel display mode: CONT. Press ENTER repeatedly to toggle between the ... on your iPod in the front panel display. See "OSD DISPLAY TIME" (OSD display time) in "OSD SET" (OSD settings) in the owner's manual (see page 88). • You can view the photos or video clips stored on the current song also appears in the OSD (some models only...
Owner's Manual
Page 128
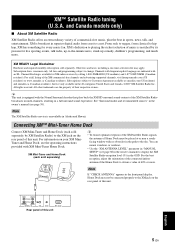
...XM IR IN RS-232C Rear panel of commercial-free music, plus the best in superior digital audio from classical to playing the richest selection of their respective owners. and Canada models only) ■ About XM Satellite Radio XM Satellite Radio offers an ...Home Dock. y This unit is matched by its passion for XM radio receivers by XM Satellite Radio) to obtain a value of the XM Satellite Radio broadcasts in multi-channels, resulting in the owner's manual (see the operating instructions provided with an XL. See "Surround modes and recommended sources" in a full surround sound...
...XM IR IN RS-232C Rear panel of commercial-free music, plus the best in superior digital audio from classical to playing the richest selection of their respective owners. and Canada models only) ■ About XM Satellite Radio XM Satellite Radio offers an ...Home Dock. y This unit is matched by its passion for XM radio receivers by XM Satellite Radio) to obtain a value of the XM Satellite Radio broadcasts in multi-channels, resulting in the owner's manual (see the operating instructions provided with an XL. See "Surround modes and recommended sources" in a full surround sound...

Owner's Manual
Page 133
...: [043] XMU When the channel category is displayed: XM INFORMATION ALL CH SEARCH XM :043 CHAN :XMU CAT :Rock NAME :Coldplay TITLE :Speed of sound .(Coldplay/Spe) [ ]/[ ]:CHANNEL [ ]/[ ]:CATEGORY y • To turn off the OSD, press DISPLAY again. • You can save up to...after an operation. The following information displays. See "SCROLL" (Front panel display scroll) in "F.DISPLAY SET" (Front panel display settings) in the owner's manual (page 88). • Undisplayable characters are displayed as spaces. ■ Displaying the XM channel information in the OSD, see the "XM Satellite ...
...: [043] XMU When the channel category is displayed: XM INFORMATION ALL CH SEARCH XM :043 CHAN :XMU CAT :Rock NAME :Coldplay TITLE :Speed of sound .(Coldplay/Spe) [ ]/[ ]:CHANNEL [ ]/[ ]:CATEGORY y • To turn off the OSD, press DISPLAY again. • You can save up to...after an operation. The following information displays. See "SCROLL" (Front panel display scroll) in "F.DISPLAY SET" (Front panel display settings) in the owner's manual (page 88). • Undisplayable characters are displayed as spaces. ■ Displaying the XM channel information in the OSD, see the "XM Satellite ...
Owner's Manual
Page 136
...digital audio output of this unit. For details, see page 17 in the Owner's Manual. HDMI OUTPUT HDMI connection 2 (Sold separately) This connection is not necessary if your TV and DVD player is completed. AUX1 For details, see pages 20 to 31 in the Owner's Manual. DVD IN OUT HDMI YSP-4000...the direction Pull out the cap before installing this unit. on the TV) 3 Optical cable (Outputs TV digital audio sounds from this unit) 4 Digital audio pin cable (Outputs DVD digital audio sounds from this unit) 5 AC power supply cable (Connects this unit. For details, refer to the AC...
...digital audio output of this unit. For details, see page 17 in the Owner's Manual. HDMI OUTPUT HDMI connection 2 (Sold separately) This connection is not necessary if your TV and DVD player is completed. AUX1 For details, see pages 20 to 31 in the Owner's Manual. DVD IN OUT HDMI YSP-4000...the direction Pull out the cap before installing this unit. on the TV) 3 Optical cable (Outputs TV digital audio sounds from this unit) 4 Digital audio pin cable (Outputs DVD digital audio sounds from this unit) 5 AC power supply cable (Connects this unit. For details, refer to the AC...

Owner's Manual
Page 137
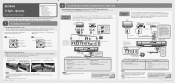
...sure that there are no children around in the listening room while the AUTO SETUP procedure is displayed, see page 8 in the Owner's Manual) are lit in the system memory. IntelliBeam microphone Center height of this unit Upper bound position of the microphone Within 1 m (3.3 ft) Cardboard microphone stand ...procedure. y Hint • When leaving the room, bring this unit. INTELLIBEAM MIC 4 Enjoying surround sound Enjoy TV or DVD digital audio in step 10. This unit switches to the YSP operation mode. After [ENTER] is output from your TV speakers, mute the volume on the front ...
...sure that there are no children around in the listening room while the AUTO SETUP procedure is displayed, see page 8 in the Owner's Manual) are lit in the system memory. IntelliBeam microphone Center height of this unit Upper bound position of the microphone Within 1 m (3.3 ft) Cardboard microphone stand ...procedure. y Hint • When leaving the room, bring this unit. INTELLIBEAM MIC 4 Enjoying surround sound Enjoy TV or DVD digital audio in step 10. This unit switches to the YSP operation mode. After [ENTER] is output from your TV speakers, mute the volume on the front ...


