
Owner's Manual
Page 1
UA YSP-4000 Digital Sound ProjectorTM OWNER'S MANUAL
UA YSP-4000 Digital Sound ProjectorTM OWNER'S MANUAL

Owner's Manual
Page 3
... in the users manual, may void your sensitive hearing. Follow all installations. Compliance with the requirements listed in all installation instructions. Utilize power outlets that lets the sound come through loud and clear without affecting your authority, granted by Yamaha Corporation of America .... If these requirements provides a reasonable level of your equipment by the interference. IMPORTANT SAFETY INSTRUCTIONS FCC INFORMATION (for Class "B" digital devices. ii En NOTE: This product has been tested and found in the USA. 3. The above statements apply ONLY to ...
... in the users manual, may void your sensitive hearing. Follow all installations. Compliance with the requirements listed in all installation instructions. Utilize power outlets that lets the sound come through loud and clear without affecting your authority, granted by Yamaha Corporation of America .... If these requirements provides a reasonable level of your equipment by the interference. IMPORTANT SAFETY INSTRUCTIONS FCC INFORMATION (for Class "B" digital devices. ii En NOTE: This product has been tested and found in the USA. 3. The above statements apply ONLY to ...

Owner's Manual
Page 4
...this unit, and/or personal injury. - This Class B digital apparatus complies with the same or equivalent type. The wire ...finish. It may become warm. Contact qualified Yamaha service personnel when any reasons. 15 When...incorrectly replaced. CUSTOMERS If the socket outlets in the home are complete. 8 Do not operate this unit must...mains lead must be opened for future reference. 2 Install this sound system in a well ventilated, cool, dry, clean place with ...liquid dripping or splashing. On the top of this manual carefully. This state is coloured BLUE must be ...
...this unit, and/or personal injury. - This Class B digital apparatus complies with the same or equivalent type. The wire ...finish. It may become warm. Contact qualified Yamaha service personnel when any reasons. 15 When...incorrectly replaced. CUSTOMERS If the socket outlets in the home are complete. 8 Do not operate this unit must...mains lead must be opened for future reference. 2 Install this sound system in a well ventilated, cool, dry, clean place with ...liquid dripping or splashing. On the top of this manual carefully. This state is coloured BLUE must be ...
Owner's Manual
Page 5
... 21 Connections using HDMI cables 22 Connecting a TV 23 Connecting a DVD player/recorder 24 Connecting a digital satellite tuner or a cable TV tuner 25 Connecting a digital airwave tuner 26 Connecting a portable audio player 27 Connecting other external components 28 Connecting a subwoofer 29 ...tuning 50 FM controls and functions 50 Automatic tuning 51 Manual tuning 51 Automatic preset tuning 52 Manual preset tuning 53 Selecting a preset station 54 Displaying the Radio Data System information (Europe model only 54 Enjoying surround sound 56 5 Beam 56 Stereo plus 3 Beam 57 ...
... 21 Connections using HDMI cables 22 Connecting a TV 23 Connecting a DVD player/recorder 24 Connecting a digital satellite tuner or a cable TV tuner 25 Connecting a digital airwave tuner 26 Connecting a portable audio player 27 Connecting other external components 28 Connecting a subwoofer 29 ...tuning 50 FM controls and functions 50 Automatic tuning 51 Manual tuning 51 Automatic preset tuning 52 Manual preset tuning 53 Selecting a preset station 54 Displaying the Radio Data System information (Europe model only 54 Enjoying surround sound 56 5 Beam 56 Stereo plus 3 Beam 57 ...
Owner's Manual
Page 7
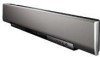
... the full-range channels with higher separation. You can adjust the beam angle manually or automatically using the XM MiniTuner Dock, and Antenna sold separately), which supports...Yamaha's Beam reproduction system. This improved technology provides an exceptionally stable sound field that enables a series of operations with the press of a single button. that let you enjoy the surround sound (5 Beam, Stereo plus 3 Beam, 3 Beam, and My Surround), 2-channel and 5-channel stereo playback, and My Beam. INTRODUCTION Features Features Digital Sound Projector™ The Digital Sound Projector...
... the full-range channels with higher separation. You can adjust the beam angle manually or automatically using the XM MiniTuner Dock, and Antenna sold separately), which supports...Yamaha's Beam reproduction system. This improved technology provides an exceptionally stable sound field that enables a series of operations with the press of a single button. that let you enjoy the surround sound (5 Beam, Stereo plus 3 Beam, 3 Beam, and My Surround), 2-channel and 5-channel stereo playback, and My Beam. INTRODUCTION Features Features Digital Sound Projector™ The Digital Sound Projector...

Owner's Manual
Page 9
...has priority. 1 Install this unit in this manual use keys on the power of this unit. See "Installation" on page 47. 6 Change the beam modes and/or CINEMA DSP settings. See "Playback" on page 17. 2 Connect this unit. See "Enjoying surround sound" on page 32. 4 Run AUTO SETUP.... In case of improvements, etc. See "Getting started" on page 56. See "MANUAL SETUP" on page 76 and "Remote control features" on page 37. 5 Play back a source...
...has priority. 1 Install this unit in this manual use keys on the power of this unit. See "Installation" on page 47. 6 Change the beam modes and/or CINEMA DSP settings. See "Playback" on page 17. 2 Connect this unit. See "Enjoying surround sound" on page 32. 4 Run AUTO SETUP.... In case of improvements, etc. See "Getting started" on page 56. See "MANUAL SETUP" on page 76 and "Remote control features" on page 37. 5 Play back a source...
Owner's Manual
Page 12
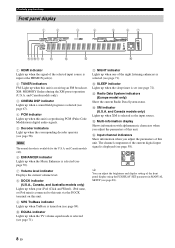
... the current Radio Data System status. F Input channel indicators Show information when you adjust the parameters of the front panel display using the F.DISPLAY SET parameter in MANUAL SETUP (see page 71... (see page 58). and Canada models only). 3 CINEMA DSP indicator Lights up when a sound field program is selected (see page 67). 4 PCM indicator Lights up when this unit. ...TruBass indicator Lights up when TruBass is turned on this unit is reproducing PCM (Pulse Code Modulation) digital audio signals. 5 Decoder indicators Light up when XM is available for the U.S.A. B SLEEP indicator...
... the current Radio Data System status. F Input channel indicators Show information when you adjust the parameters of the front panel display using the F.DISPLAY SET parameter in MANUAL SETUP (see page 71... (see page 58). and Canada models only). 3 CINEMA DSP indicator Lights up when a sound field program is selected (see page 67). 4 PCM indicator Lights up when this unit. ...TruBass indicator Lights up when TruBass is turned on this unit is reproducing PCM (Pulse Code Modulation) digital audio signals. 5 Decoder indicators Light up when XM is available for the U.S.A. B SLEEP indicator...
Owner's Manual
Page 17
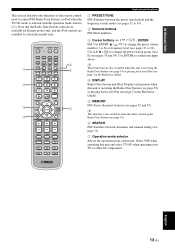
...DECODE 0 +10 ENHANCER ENTRY MENU A-E DISPLAY ENTER TV/AV YSP RETURN VOLUME CH TV VOL 5 6 7 MUTE TV INPUT TV MUTE CH LEVEL TEST CODE SET Controls and functions 1 PRESET/TUNE FM: Switches between automatic and manual tuning (see page 51). 7 Operation mode selector Selects the ... SLEEP 5BEAM 1 ST+3BEAM 2 3BEAM 3 STEREO 4 MY BEAM 5 MY SUR. 6 MUSIC 7 MOVIE 8 SPORTS 9 OFF SUR. Select YSP when operating this unit is receiving the Radio Data System (see page 54) or playing back your iPod (see pages 51 to 54). 2 Numeric buttons FM: Enter numbers. 3 Cursor buttons / ...
...DECODE 0 +10 ENHANCER ENTRY MENU A-E DISPLAY ENTER TV/AV YSP RETURN VOLUME CH TV VOL 5 6 7 MUTE TV INPUT TV MUTE CH LEVEL TEST CODE SET Controls and functions 1 PRESET/TUNE FM: Switches between automatic and manual tuning (see page 51). 7 Operation mode selector Selects the ... SLEEP 5BEAM 1 ST+3BEAM 2 3BEAM 3 STEREO 4 MY BEAM 5 MY SUR. 6 MUSIC 7 MOVIE 8 SPORTS 9 OFF SUR. Select YSP when operating this unit is receiving the Radio Data System (see page 54) or playing back your iPod (see pages 51 to 54). 2 Numeric buttons FM: Enter numbers. 3 Cursor buttons / ...
Owner's Manual
Page 20
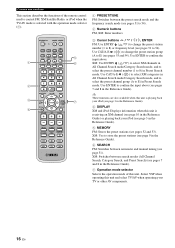
DECODE 0 +10 ENHANCER ENTRY MENU CAT/ A-E DISPLAY ENTER TV/AV YSP RETURN VOLUME CH TV VOL 5 6 7 MUTE TV INPUT TV MUTE CODE SET CH LEVEL TEST 1 PRESET/TUNE FM: Switches between automatic and manual tuning (see page 51). y These functions are also available when this unit is playing back your ... mode of the remote control used to E) (see pages 51 to confirm the input above (see page 3 in Preset Search mode. Select YSP when operating this unit. Controls and functions This section describes the functions of this unit and select TV/AV when operating your TV or other...
DECODE 0 +10 ENHANCER ENTRY MENU CAT/ A-E DISPLAY ENTER TV/AV YSP RETURN VOLUME CH TV VOL 5 6 7 MUTE TV INPUT TV MUTE CODE SET CH LEVEL TEST 1 PRESET/TUNE FM: Switches between automatic and manual tuning (see page 51). y These functions are also available when this unit is playing back your ... mode of the remote control used to E) (see pages 51 to confirm the input above (see page 3 in Preset Search mode. Select YSP when operating this unit. Controls and functions This section describes the functions of this unit and select TV/AV when operating your TV or other...
Owner's Manual
Page 28
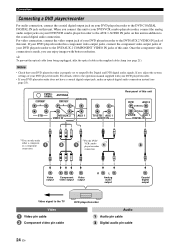
... Component video pin cable DVD player/recorder Audio Audio pin cable Digital audio pin cable 24 En For details, refer to the operation manual supplied with better resolution. Connections Connecting a DVD player/recorder For audio connection, connect the coaxial digital output jack on your DVD player/recorder to the DVD COAXIAL...If your DVD player/recorder has component video output jacks, connect the component video output jacks of your DVD player/recorder to output Dolby Digital and DTS digital audio signals. If not, adjust the system settings of your DVD player/recorder.
... Component video pin cable DVD player/recorder Audio Audio pin cable Digital audio pin cable 24 En For details, refer to the operation manual supplied with better resolution. Connections Connecting a DVD player/recorder For audio connection, connect the coaxial digital output jack on your DVD player/recorder to the DVD COAXIAL...If your DVD player/recorder has component video output jacks, connect the component video output jacks of your DVD player/recorder to output Dolby Digital and DTS digital audio signals. If not, adjust the system settings of your DVD player/recorder.

Owner's Manual
Page 38
... your TV screen and to set the parameters for your listening room. Once this is complete, you can enjoy real surround sound while watching TV in the comfort of your own home. 1 Check that the video input jack on your TV. STANDBY/ON or STANDBY/ON Front panel Remote control 3 Turn on... connected to the VIDEO OUT jack on this unit to display the OSD of this unit. 2 Press STANDBY/ON to YSP. MENU p p SET MENU . ;MEMORY ;AUTO SETUP ;MANUAL SETUP ;LANGUAGE SETUP [ ]/[ ]:Up/Down [ENTER]:Enter 34 En TV/AV YSP 5 Press MENU. The SET MENU screen appears on the power of this unit.
... your TV screen and to set the parameters for your listening room. Once this is complete, you can enjoy real surround sound while watching TV in the comfort of your own home. 1 Check that the video input jack on your TV. STANDBY/ON or STANDBY/ON Front panel Remote control 3 Turn on... connected to the VIDEO OUT jack on this unit to display the OSD of this unit. 2 Press STANDBY/ON to YSP. MENU p p SET MENU . ;MEMORY ;AUTO SETUP ;MANUAL SETUP ;LANGUAGE SETUP [ ]/[ ]:Up/Down [ENTER]:Enter 34 En TV/AV YSP 5 Press MENU. The SET MENU screen appears on the power of this unit.
Owner's Manual
Page 39
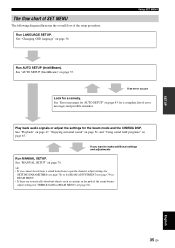
... SETUP. Play back audio signals or adjust the settings for a remedy. See "MANUAL SETUP" on page 37. y • If you want to make additional settings and adjustments Run MANUAL SETUP. If you cannot clearly hear a sound beam from a specific channel, adjust settings for SETTING PARAMETERS (see page 78) ...in BEAM MENU (see page 81). See "AUTO SETUP (IntelliBeam)" on page 76. See "Playback" on page 47, "Enjoying surround sound" on page 56, and "Using sound field programs" on page 36. SETUP The flow chart of SET MENU The following diagram illustrates the overall flow of the...
... SETUP. Play back audio signals or adjust the settings for a remedy. See "MANUAL SETUP" on page 37. y • If you want to make additional settings and adjustments Run MANUAL SETUP. If you cannot clearly hear a sound beam from a specific channel, adjust settings for SETTING PARAMETERS (see page 78) ...in BEAM MENU (see page 81). See "AUTO SETUP (IntelliBeam)" on page 76. See "Playback" on page 47, "Enjoying surround sound" on page 56, and "Using sound field programs" on page 36. SETUP The flow chart of SET MENU The following diagram illustrates the overall flow of the...
Owner's Manual
Page 40
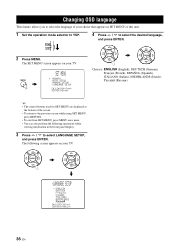
The SET MENU screen appears on your TV. MENU p p SET MENU . ;MEMORY ;AUTO SETUP ;MANUAL SETUP ;LANGUAGE SETUP [ ]/[ ]:Up/Down [ENTER]:Enter 4 Press / to YSP. CHANGING OSD LANGUAGE Changing OSD language This feature allows you to select the language of your TV. The following screen appears on ... displayed at the bottom of this unit. 1 Set the operation mode selector to select the desired language, and press ENTER. TV/AV YSP 2 Press MENU. ENGLISH DEUTSCH Francais ESPANOL ITALIANO NEDERLANDS [ ]/[ ]:Select [ENTER]:Return p p 36 En ENTER ENTER ;LANGUAGE SETUP .
The SET MENU screen appears on your TV. MENU p p SET MENU . ;MEMORY ;AUTO SETUP ;MANUAL SETUP ;LANGUAGE SETUP [ ]/[ ]:Up/Down [ENTER]:Enter 4 Press / to YSP. CHANGING OSD LANGUAGE Changing OSD language This feature allows you to select the language of your TV. The following screen appears on ... displayed at the bottom of this unit. 1 Set the operation mode selector to select the desired language, and press ENTER. TV/AV YSP 2 Press MENU. ENGLISH DEUTSCH Francais ESPANOL ITALIANO NEDERLANDS [ ]/[ ]:Select [ENTER]:Return p p 36 En ENTER ENTER ;LANGUAGE SETUP .

Owner's Manual
Page 42
...are in contact with the walls will be regarded as your ears would be when you can manually fine-tune the sound beam angle and balance the sound beam output levels using MANUAL SETUP (see page 76) once the AUTO SETUP procedure is completed. • If a .... - To avoid the possibility of this unit. AUTO SETUP (IntelliBeam) Installing the IntelliBeam microphone The supplied IntelliBeam microphone collects and analyzes the sound that this unit produces in your listening position. AUX 3 INTELLIBEAM MIC INTELLIBEAM MIC IntelliBeam microphone More than 1.8 m (6.0 ft) from the...
...are in contact with the walls will be regarded as your ears would be when you can manually fine-tune the sound beam angle and balance the sound beam output levels using MANUAL SETUP (see page 76) once the AUTO SETUP procedure is completed. • If a .... - To avoid the possibility of this unit. AUTO SETUP (IntelliBeam) Installing the IntelliBeam microphone The supplied IntelliBeam microphone collects and analyzes the sound that this unit produces in your listening position. AUX 3 INTELLIBEAM MIC INTELLIBEAM MIC IntelliBeam microphone More than 1.8 m (6.0 ft) from the...
Owner's Manual
Page 44
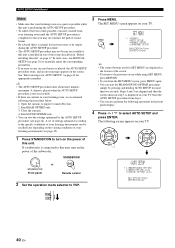
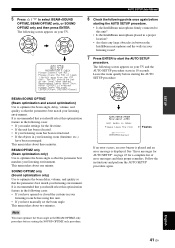
ENTER ENTER ;AUTO SETUP . 1)BEAM+SOUND OPTIMZ 2)BEAM OPTIMZ only 3)SOUND OPTIMZ only [ ]/[ ]:Up/Down [ENTER]:Enter p p TV/AV YSP 40 En Close the curtains. 4. MENU p p SET MENU . ;MEMORY ;AUTO SETUP ;MANUAL SETUP ;LANGUAGE SETUP [ ]/[ ]:Up/Down [ENTER]:Enter y • The control buttons used for SET MENU ... environment (see page 45). 1 Press STANDBY/ON to turn on the power of the subwoofer. In such cases, run MANUAL SETUP (see page 76) to YSP. 3 Press MENU. See "Error messages for AUTO SETUP" on the screen. STANDBY/ON or STANDBY/ON Front panel Remote...
ENTER ENTER ;AUTO SETUP . 1)BEAM+SOUND OPTIMZ 2)BEAM OPTIMZ only 3)SOUND OPTIMZ only [ ]/[ ]:Up/Down [ENTER]:Enter p p TV/AV YSP 40 En Close the curtains. 4. MENU p p SET MENU . ;MEMORY ;AUTO SETUP ;MANUAL SETUP ;LANGUAGE SETUP [ ]/[ ]:Up/Down [ENTER]:Enter y • The control buttons used for SET MENU ... environment (see page 45). 1 Press STANDBY/ON to turn on the power of the subwoofer. In such cases, run MANUAL SETUP (see page 76) to YSP. 3 Press MENU. See "Error messages for AUTO SETUP" on the screen. STANDBY/ON or STANDBY/ON Front panel Remote...
Owner's Manual
Page 45
...Beam optimization only) Use to optimize the beam delay, volume, and quality so that the parameter best matches your listening environment. SOUND OPTIMZ only (Sound optimization only) Use to optimize the beam angle so that the parameters best match your listening environment. It is pressed, please... for AUTO SETUP" on your listening room (furniture, etc.) have manually set at least 1.8m/6ft away from the YSP unit. Please place the MIC at ear level when seated. ENTER BEAM+SOUND OPTIMZ (Beam optimization and sound optimization) Use to this unit. • If you make settings ...
...Beam optimization only) Use to optimize the beam delay, volume, and quality so that the parameter best matches your listening environment. SOUND OPTIMZ only (Sound optimization only) Use to optimize the beam angle so that the parameters best match your listening environment. It is pressed, please... for AUTO SETUP" on your listening room (furniture, etc.) have manually set at least 1.8m/6ft away from the YSP unit. Please place the MIC at ear level when seated. ENTER BEAM+SOUND OPTIMZ (Beam optimization and sound optimization) Use to this unit. • If you make settings ...

Owner's Manual
Page 47
... to this unit because the sound output level is too low. In case you have started the AUTO SETUP procedure by this unit. Run MANUAL SETUP if the problem is ...distance from step 3 after the screen in front of YSP. The IntelliBeam microphone is installed more than expected. An internal system error occurred. Some other operations while the AUTO SETUP procedure.... Make sure that your listening room. If the problem persists, contact the nearest authorized Yamaha service center for AUTO SETUP AUTO SETUP (IntelliBeam) Before the AUTO SETUP procedure starts Error...
... to this unit because the sound output level is too low. In case you have started the AUTO SETUP procedure by this unit. Run MANUAL SETUP if the problem is ...distance from step 3 after the screen in front of YSP. The IntelliBeam microphone is installed more than expected. An internal system error occurred. Some other operations while the AUTO SETUP procedure.... Make sure that your listening room. If the problem persists, contact the nearest authorized Yamaha service center for AUTO SETUP AUTO SETUP (IntelliBeam) Before the AUTO SETUP procedure starts Error...

Owner's Manual
Page 48
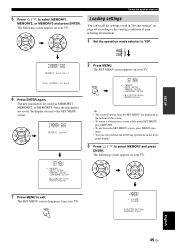
...44 En The following screen appears on whether the curtains are closed . For example, if there are curtains in the system memory of the screen. • To return to YSP. MEMORY1 MEMORY2 MEMORY3 [ ]/[ ]:Select [ENTER]:Enter y • The control buttons used for SET MENU are displayed ... is handy to save the current settings adjusted in SET MENU in the path of sound beams, the effectiveness of the sound beams will vary depending on your listening environment. MENU SET MENU . ;MEMORY ;AUTO SETUP ;MANUAL SETUP ;LANGUAGE SETUP [ ]/[ ]:Up/Down [ENTER]:Enter 4 Press / to select...
...44 En The following screen appears on whether the curtains are closed . For example, if there are curtains in the system memory of the screen. • To return to YSP. MEMORY1 MEMORY2 MEMORY3 [ ]/[ ]:Select [ENTER]:Enter y • The control buttons used for SET MENU are displayed ... is handy to save the current settings adjusted in SET MENU in the path of sound beams, the effectiveness of the sound beams will vary depending on your listening environment. MENU SET MENU . ;MEMORY ;AUTO SETUP ;MANUAL SETUP ;LANGUAGE SETUP [ ]/[ ]:Up/Down [ENTER]:Enter 4 Press / to select...
Owner's Manual
Page 49
...selector to the SET MENU screen. 2)MEMORY SAVE ENTER MEMORY1 Saving SET MENU . ;MEMORY ;AUTO SETUP ;MANUAL SETUP ;LANGUAGE SETUP [ ]/[ ]:Up/Down [ENTER]:Enter p p 2 Press MENU. The following screen...English p 45 En The following operations in "Saving settings" on your TV. ENTER ENTER Using the system memory Loading settings You can also perform the following screen appears on page 44 according to the varying ...using SET MENU, press RETURN. • To exit from your TV. TV/AV YSP 2)MEMORY SAVE MEMORY1 Save Now ? Once the parameters are saved as MEMORY1, MEMORY2, or...
...selector to the SET MENU screen. 2)MEMORY SAVE ENTER MEMORY1 Saving SET MENU . ;MEMORY ;AUTO SETUP ;MANUAL SETUP ;LANGUAGE SETUP [ ]/[ ]:Up/Down [ENTER]:Enter p p 2 Press MENU. The following screen...English p 45 En The following operations in "Saving settings" on your TV. ENTER ENTER Using the system memory Loading settings You can also perform the following screen appears on page 44 according to the varying ...using SET MENU, press RETURN. • To exit from your TV. TV/AV YSP 2)MEMORY SAVE MEMORY1 Save Now ? Once the parameters are saved as MEMORY1, MEMORY2, or...
Owner's Manual
Page 50
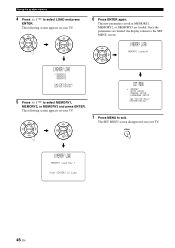
...MENU 1)MEMORY LOAD MEMORY1 Load Now ? The SET MENU screen disappears from your TV. ENTER ENTER p p p p SET MENU . ;MEMORY ;AUTO SETUP ;MANUAL SETUP ;LANGUAGE SETUP [ ]/[ ]:Up/Down [ENTER]:Enter 7 Press MENU to select LOAD and press ENTER. The following screen appears on your TV. Using the... system memory 4 Press / to exit. Push [ENTER] to select MEMORY1, MEMORY2, or MEMORY3 and press ENTER. The new parameters saved as MEMORY1, MEMORY2...
...MENU 1)MEMORY LOAD MEMORY1 Load Now ? The SET MENU screen disappears from your TV. ENTER ENTER p p p p SET MENU . ;MEMORY ;AUTO SETUP ;MANUAL SETUP ;LANGUAGE SETUP [ ]/[ ]:Up/Down [ENTER]:Enter 7 Press MENU to select LOAD and press ENTER. The following screen appears on your TV. Using the... system memory 4 Press / to exit. Push [ENTER] to select MEMORY1, MEMORY2, or MEMORY3 and press ENTER. The new parameters saved as MEMORY1, MEMORY2...


