Owner's Manual
Page 5
... Connecting a TV 23 Connecting a DVD player/recorder 24 Connecting a digital satellite tuner or a cable TV tuner 25 Connecting a digital airwave tuner 26 Connecting a portable audio player 27 Connecting other components... of AUTO SETUP 37 Installing the IntelliBeam microphone 38 Using AUTO SETUP (IntelliBeam 39 Using the system memory 44 Convenient usage of the system memory 44 Saving settings 44 Loading settings 45... feature 75 ADVANCED OPERATION MANUAL SETUP 76 Using MANUAL SETUP 77 BEAM MENU 78 SOUND MENU 82 INPUT MENU 84 DISPLAY MENU 88 Adjusting the audio balance 90 Using...
... Connecting a TV 23 Connecting a DVD player/recorder 24 Connecting a digital satellite tuner or a cable TV tuner 25 Connecting a digital airwave tuner 26 Connecting a portable audio player 27 Connecting other components... of AUTO SETUP 37 Installing the IntelliBeam microphone 38 Using AUTO SETUP (IntelliBeam 39 Using the system memory 44 Convenient usage of the system memory 44 Saving settings 44 Loading settings 45... feature 75 ADVANCED OPERATION MANUAL SETUP 76 Using MANUAL SETUP 77 BEAM MENU 78 SOUND MENU 82 INPUT MENU 84 DISPLAY MENU 88 Adjusting the audio balance 90 Using...
Owner's Manual
Page 7
...microphone. that best match your listening environment. This surround technology delivers high-quality digital audio for up to 5.1 discrete channels to produce a directional and more realistic effect. ◆ DTS This is equipped with all the original dramatic sound impact. INTRODUCTION Features Features Digital Sound Projector™ The Digital Sound Projector...the automatic sound beam and acoustic optimization technology with DiMAGIC's Euphony technology and Yamaha's Beam reproduction system. My Beam This unit employs My Beam that allows you to improve the sound quality of...
...microphone. that best match your listening environment. This surround technology delivers high-quality digital audio for up to 5.1 discrete channels to produce a directional and more realistic effect. ◆ DTS This is equipped with all the original dramatic sound impact. INTRODUCTION Features Features Digital Sound Projector™ The Digital Sound Projector...the automatic sound beam and acoustic optimization technology with DiMAGIC's Euphony technology and Yamaha's Beam reproduction system. My Beam This unit employs My Beam that allows you to improve the sound quality of...
Owner's Manual
Page 10
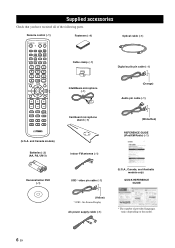
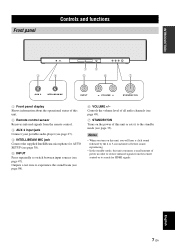
...following parts. DECODE 0 +10 ENHANCER ENTRY MENU CAT/ A-E DISPLAY ENTER TV/AV YSP RETURN VOLUME CH TV VOL Fasteners (×4) Cable clamp (×1) IntelliBeam microphone (×1) Optical cable (×1) Digital audio pin cable (×1) (Orange) Audio pin cable (×1) MUTE TV INPUT ...TV MUTE CODE SET CH LEVEL TEST Cardboard microphone stand (×1) (White/Red) (U.S.A. Remote control ...
...following parts. DECODE 0 +10 ENHANCER ENTRY MENU CAT/ A-E DISPLAY ENTER TV/AV YSP RETURN VOLUME CH TV VOL Fasteners (×4) Cable clamp (×1) IntelliBeam microphone (×1) Optical cable (×1) Digital audio pin cable (×1) (Orange) Audio pin cable (×1) MUTE TV INPUT ...TV MUTE CODE SET CH LEVEL TEST Cardboard microphone stand (×1) (White/Red) (U.S.A. Remote control ...
Owner's Manual
Page 11
...signals from the remote control or to search for AUTO SETUP (see page 38). 5 INPUT Press repeatedly to experience the sound beam (see page 33). Notes • When you turn on the power of this unit consumes a small amount of...all audio channels (see page 49). 7 STANDBY/ON Turns on this unit, you will hear a click sound followed by the 4 to 5-second interval before sound reproducing. • In the standby mode, this unit or sets it to the standby mode (see page...your portable audio player (see page 27). 4 INTELLIBEAM MIC jack Connect the supplied IntelliBeam microphone for HDMI signals.
...signals from the remote control or to search for AUTO SETUP (see page 38). 5 INPUT Press repeatedly to experience the sound beam (see page 33). Notes • When you turn on the power of this unit consumes a small amount of...all audio channels (see page 49). 7 STANDBY/ON Turns on this unit, you will hear a click sound followed by the 4 to 5-second interval before sound reproducing. • In the standby mode, this unit or sets it to the standby mode (see page...your portable audio player (see page 27). 4 INTELLIBEAM MIC jack Connect the supplied IntelliBeam microphone for HDMI signals.
Owner's Manual
Page 16
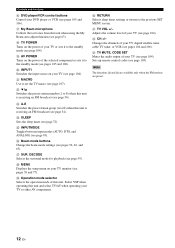
...H TV POWER Turns on the power of your TV (see pages 56, 62, and 63). Select YSP when operating this unit. W TV MUTE, CODE SET Mutes the audio output of the selected component or...8) when this unit is receiving an FM broadcast (see page 54). Adjusts the volume level of your TV, digital satellite tuner, cable TV tuner, or VCR (see page 72). K MACRO Use to the previous SET MENU screen...pages 104 and 106). DECODE Selects the surround mode for playback (see page 63). G My Beam microphone Collects the test tones from this unit is receiving an FM broadcast (see page 54). O INPUTMODE...
...H TV POWER Turns on the power of your TV (see pages 56, 62, and 63). Select YSP when operating this unit. W TV MUTE, CODE SET Mutes the audio output of the selected component or...8) when this unit is receiving an FM broadcast (see page 54). Adjusts the volume level of your TV, digital satellite tuner, cable TV tuner, or VCR (see page 72). K MACRO Use to the previous SET MENU screen...pages 104 and 106). DECODE Selects the surround mode for playback (see page 63). G My Beam microphone Collects the test tones from this unit is receiving an FM broadcast (see page 54). O INPUTMODE...
Owner's Manual
Page 19
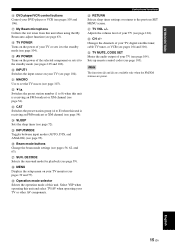
...settings (see pages 104 and 106). R MENU Displays the setup menu on the power of your TV, digital satellite tuner, cable TV tuner, or VCR (see pages 56, 62, and 63). Changes the channels... your TV or sets it to the standby mode (see pages 105 and 106). G My Beam microphone Collects the test tones from this unit when using the My Beam auto-adjust function (see page 54...see page 107). O INPUTMODE Toggles between input modes (AUTO, DTS, and ANALOG) (see page 103). Select YSP when operating this unit. Q SUR. Sets up remote control codes (see page 93). INTRODUCTION F DVD player...
...settings (see pages 104 and 106). R MENU Displays the setup menu on the power of your TV, digital satellite tuner, cable TV tuner, or VCR (see pages 56, 62, and 63). Changes the channels... your TV or sets it to the standby mode (see pages 105 and 106). G My Beam microphone Collects the test tones from this unit when using the My Beam auto-adjust function (see page 54...see page 107). O INPUTMODE Toggles between input modes (AUTO, DTS, and ANALOG) (see page 103). Select YSP when operating this unit. Q SUR. Sets up remote control codes (see page 93). INTRODUCTION F DVD player...
Owner's Manual
Page 41
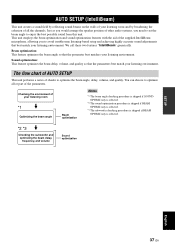
... choose to optimize all the channels. Just as you would arrange the speaker position of other audio systems, you to enjoy the best possible sound from this unit. Sound optimization: This feature optimizes the beam delay, volume, and quality so that best match your listening environment... a series of the parameters. Checking the environment of the supplied IntelliBeam microphone, allowing you need to set the beam angle to avoid troublesome listening-based setup and achieving highly accurate sound adjustments that the parameters best match your listening room *1 Optimizing the beam...
... choose to optimize all the channels. Just as you would arrange the speaker position of other audio systems, you to enjoy the best possible sound from this unit. Sound optimization: This feature optimizes the beam delay, volume, and quality so that best match your listening environment... a series of the parameters. Checking the environment of the supplied IntelliBeam microphone, allowing you need to set the beam angle to avoid troublesome listening-based setup and achieving highly accurate sound adjustments that the parameters best match your listening room *1 Optimizing the beam...

Owner's Manual
Page 42
... possibility of an error: - Note Be sure to place the IntelliBeam microphone on top of this unit. AUTO SETUP (IntelliBeam) Installing the IntelliBeam microphone The supplied IntelliBeam microphone collects and analyzes the sound that there are no large obstacles between the IntelliBeam microphone and the walls in your listening room as these objects obstruct the...
... possibility of an error: - Note Be sure to place the IntelliBeam microphone on top of this unit. AUTO SETUP (IntelliBeam) Installing the IntelliBeam microphone The supplied IntelliBeam microphone collects and analyzes the sound that there are no large obstacles between the IntelliBeam microphone and the walls in your listening room as these objects obstruct the...
Owner's Manual
Page 43
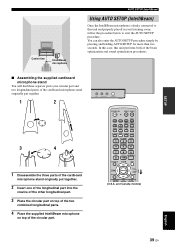
... Canada models) English 39 En SETUP Center line IntelliBeam microphone AUTO SETUP (IntelliBeam) Using AUTO SETUP (IntelliBeam) Once the IntelliBeam microphone is firmly connected to this unit performs both of the beam optimization and sound optimization procedures. ■ Assembling the supplied cardboard microphone stand You will find three separate parts (one circular part...5BEAM 1 ST+3BEAM 2 3BEAM 3 STEREO 4 MY BEAM 5 MY SUR. 6 MUSIC 7 MOVIE 8 SPORTS 9 OFF SUR. DECODE 0 +10 ENHANCER ENTRY MENU CAT/ A-E DISPLAY ENTER TV/AV YSP RETURN VOLUME CH TV VOL (U.S.A.
... Canada models) English 39 En SETUP Center line IntelliBeam microphone AUTO SETUP (IntelliBeam) Using AUTO SETUP (IntelliBeam) Once the IntelliBeam microphone is firmly connected to this unit performs both of the beam optimization and sound optimization procedures. ■ Assembling the supplied cardboard microphone stand You will find three separate parts (one circular part...5BEAM 1 ST+3BEAM 2 3BEAM 3 STEREO 4 MY BEAM 5 MY SUR. 6 MUSIC 7 MOVIE 8 SPORTS 9 OFF SUR. DECODE 0 +10 ENHANCER ENTRY MENU CAT/ A-E DISPLAY ENTER TV/AV YSP RETURN VOLUME CH TV VOL (U.S.A.
Owner's Manual
Page 45
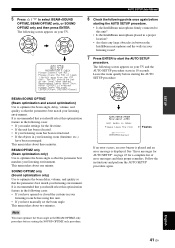
...ENTER 6 Check the following cases: • If you make settings for AUTO SETUP" on your TV. ENTER BEAM+SOUND OPTIMZ (Beam optimization and sound optimization) Use to this unit? • Is the IntelliBeam microphone placed in a proper location? • Are there any large obstacles in between the IntelliBeam...) Use to select BEAM+SOUND OPTIMZ, BEAM OPTIMZ only, or SOUND OPTIMZ only and then press ENTER. AUTO SETUP PREPARATION & CHECK Please connect the MIC. The following cases: • If you have manually set at least 1.8m/6ft away from the YSP unit. This menu takes about...
...ENTER 6 Check the following cases: • If you make settings for AUTO SETUP" on your TV. ENTER BEAM+SOUND OPTIMZ (Beam optimization and sound optimization) Use to this unit? • Is the IntelliBeam microphone placed in a proper location? • Are there any large obstacles in between the IntelliBeam...) Use to select BEAM+SOUND OPTIMZ, BEAM OPTIMZ only, or SOUND OPTIMZ only and then press ENTER. AUTO SETUP PREPARATION & CHECK Please connect the MIC. The following cases: • If you have manually set at least 1.8m/6ft away from the YSP unit. This menu takes about...

Owner's Manual
Page 46
... [FAILED]" is displayed on your TV. Press ENTER to save set up . AUTO SETUP COMPLETE Your YSP unit may be set -up. The following screen is displayed for AUTO SETUP" on page 44. 42... INTELLIBEAM MIC y If you try again. Please press [ENTER] key to exit. 10 Disconnect the IntelliBeam microphone from your TV. 9 Press ENTER to confirm the results or press RETURN to this case, see step 9....may not be set -up. [RETURN]:Do not save and load settings, see "Using the system memory" on page 43. If "ENVIRONMENT CHECK [FAILED]" is displayed in "Error messages for ...
... [FAILED]" is displayed on your TV. Press ENTER to save set up . AUTO SETUP COMPLETE Your YSP unit may be set -up. The following screen is displayed for AUTO SETUP" on page 44. 42... INTELLIBEAM MIC y If you try again. Please press [ENTER] key to exit. 10 Disconnect the IntelliBeam microphone from your TV. 9 Press ENTER to confirm the results or press RETURN to this case, see step 9....may not be set -up. [RETURN]:Do not save and load settings, see "Using the system memory" on page 43. If "ENVIRONMENT CHECK [FAILED]" is displayed in "Error messages for ...

Owner's Manual
Page 47
...YSP. You may want to this unit and within 1 m (3.3 ft) from step 3 after the screen in front of this unit. The IntelliBeam microphone...MIC position. If the problem persists, contact the nearest authorized Yamaha service center for AUTO SETUP AUTO SETUP (IntelliBeam) Before the ... The IntelliBeam microphone cannot collect the sound produced by pressing AUTO SETUP in front of this unit. Make sure that the IntelliBeam microphone is in ...of this unit. Cause The IntelliBeam microphone is detected. An internal system error occurred. In case you have ...
...YSP. You may want to this unit and within 1 m (3.3 ft) from step 3 after the screen in front of this unit. The IntelliBeam microphone...MIC position. If the problem persists, contact the nearest authorized Yamaha service center for AUTO SETUP AUTO SETUP (IntelliBeam) Before the ... The IntelliBeam microphone cannot collect the sound produced by pressing AUTO SETUP in front of this unit. Make sure that the IntelliBeam microphone is in ...of this unit. Cause The IntelliBeam microphone is detected. An internal system error occurred. In case you have ...
Owner's Manual
Page 67
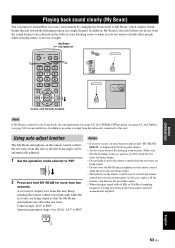
... listening room or when you do not want the sound beams to be automatically adjusted. 1 Set the operation mode selector to YSP. MY BEAM 5 BASIC OPERATION English 63 En Make sure that the My Beam microphone can collect the test tones. My Beam microphone STANDBY/ON VOL MODE POWER POWER AV TV INPUTMODE...also ideal when you do not want to disturb other people while enjoying music or movies at night. Using auto-adjust function The My Beam microphone on the remote control while the test tones are being output so that the listening room is as quiet as the beam mode, the ...
... listening room or when you do not want the sound beams to be automatically adjusted. 1 Set the operation mode selector to YSP. MY BEAM 5 BASIC OPERATION English 63 En Make sure that the My Beam microphone can collect the test tones. My Beam microphone STANDBY/ON VOL MODE POWER POWER AV TV INPUTMODE...also ideal when you do not want to disturb other people while enjoying music or movies at night. Using auto-adjust function The My Beam microphone on the remote control while the test tones are being output so that the listening room is as quiet as the beam mode, the ...
Owner's Manual
Page 120
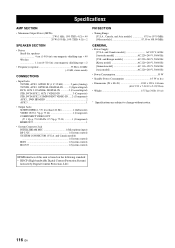
... Input Jacks TV/STB, AUX 1 AUDIO IN (1 V, 32 k 2 pairs (Analog) TV/STB, AUX 1 OPTICAL DIGITAL IN ........ 2 (Optical digital) DVD, AUX 2 COAXIAL DIGITAL IN 2 (Coaxial digital) STB, DVD/AUX 2, AUX 1 VIDEO IN 3 (Composite) STB, DVD/AUX 2 COMPONENT VIDEO IN .....2 (Component...PR: 0.5 Vp-p, 75 1 (Component) HDMI OUT 1 • System Connector Jack INTELLIBEAM MIC 1 (Microphone input) RS-232C 1 (System control) SYSTEM CONNECTOR (U.S.A. and Canada models 1 (System control) IR IN 1 (System control) IR-OUT 1 (System control) FM SECTION • Tuning Range [U.S.A., Canada, and Asia models ...
... Input Jacks TV/STB, AUX 1 AUDIO IN (1 V, 32 k 2 pairs (Analog) TV/STB, AUX 1 OPTICAL DIGITAL IN ........ 2 (Optical digital) DVD, AUX 2 COAXIAL DIGITAL IN 2 (Coaxial digital) STB, DVD/AUX 2, AUX 1 VIDEO IN 3 (Composite) STB, DVD/AUX 2 COMPONENT VIDEO IN .....2 (Component...PR: 0.5 Vp-p, 75 1 (Component) HDMI OUT 1 • System Connector Jack INTELLIBEAM MIC 1 (Microphone input) RS-232C 1 (System control) SYSTEM CONNECTOR (U.S.A. and Canada models 1 (System control) IR IN 1 (System control) IR-OUT 1 (System control) FM SECTION • Tuning Range [U.S.A., Canada, and Asia models ...
Owner's Manual
Page 136
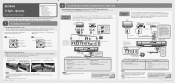
...your TV and this unit. YSP-4000 QUICK REFERENCE GUIDE Items used for connections and operations in this guide s Audio pin cable (x1) s OSD* video pin cable (x1) s Optical cable (x1) s Coaxial cable (x1) s AC power supply cable (x1) s IntelliBeam microphone (x1) s Cardboard microphone stand (x1) s Demonstration ...) 2 OSD video pin cable (Displays the DVD analog video and the YSP-4000 menu screen on the TV) 3 Optical cable (Outputs TV digital audio sounds from this unit) 4 Digital audio pin cable (Outputs DVD digital audio sounds from the floor. • You can enjoy DVD audio and video with...
...your TV and this unit. YSP-4000 QUICK REFERENCE GUIDE Items used for connections and operations in this guide s Audio pin cable (x1) s OSD* video pin cable (x1) s Optical cable (x1) s Coaxial cable (x1) s AC power supply cable (x1) s IntelliBeam microphone (x1) s Cardboard microphone stand (x1) s Demonstration ...) 2 OSD video pin cable (Displays the DVD analog video and the YSP-4000 menu screen on the TV) 3 Optical cable (Outputs TV digital audio sounds from this unit) 4 Digital audio pin cable (Outputs DVD digital audio sounds from the floor. • You can enjoy DVD audio and video with...

Owner's Manual
Page 137
... on the DVD player. 3 Press TV on page 43 in progress. 1 Connect the supplied IntelliBeam microphone to the owner's manual supplied with each component. For details about digital audio input signals, see page 42 in the Owner's Manual. 5 Press VOLUME +/- Select one of... TV/AV YSP RETURN AUTO SETUP START Will begin in surround sound. This unit switches to the DVD playback mode. This unit switches to the YSP operation mode. on the extended center line of the microphone Within 1 m (3.3 ft) Cardboard microphone stand More than 2 seconds. IntelliBeam microphone Center height ...
... on the DVD player. 3 Press TV on page 43 in progress. 1 Connect the supplied IntelliBeam microphone to the owner's manual supplied with each component. For details about digital audio input signals, see page 42 in the Owner's Manual. 5 Press VOLUME +/- Select one of... TV/AV YSP RETURN AUTO SETUP START Will begin in surround sound. This unit switches to the DVD playback mode. This unit switches to the YSP operation mode. on the extended center line of the microphone Within 1 m (3.3 ft) Cardboard microphone stand More than 2 seconds. IntelliBeam microphone Center height ...