Owner's Manual
Page 2
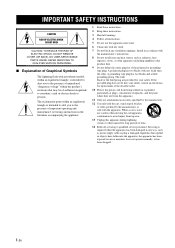
... long periods of time. 14 Refer all instructions. 5 Do not use attachments/accessories specified by the manufacturer. 12 Use only with the cart, stand, tripod, bracket, or table specified by the manufacturer, or sold with arrowhead symbol, within the product's enclosure that produce heat. 9 Do not defeat the safety purpose of...
... long periods of time. 14 Refer all instructions. 5 Do not use attachments/accessories specified by the manufacturer. 12 Use only with the cart, stand, tripod, bracket, or table specified by the manufacturer, or sold with arrowhead symbol, within the product's enclosure that produce heat. 9 Do not defeat the safety purpose of...
Owner's Manual
Page 21
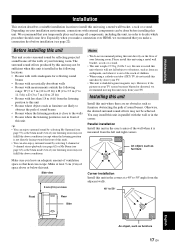
...sufficient when this unit is installed in ) of your listening room. The surround sound effects produced by reflecting projected sound beams off the walls of space above your TV. Be sure to install this unit using a metal wall bracket, a rack or a stand. Please install this unit where it is close ... furniture are no obstacles such as the beam mode even if your listening room may not be done before installing this unit using a metal wall bracket, a rack, or a stand. • This unit weighs 15.5 kg (34 lbs 3 oz). We recommend that heat can be achieved. Especially when you make...
...sufficient when this unit is installed in ) of your listening room. The surround sound effects produced by reflecting projected sound beams off the walls of space above your TV. Be sure to install this unit using a metal wall bracket, a rack or a stand. Please install this unit where it is close ... furniture are no obstacles such as the beam mode even if your listening room may not be done before installing this unit using a metal wall bracket, a rack, or a stand. • This unit weighs 15.5 kg (34 lbs 3 oz). We recommend that heat can be achieved. Especially when you make...
Owner's Manual
Page 23
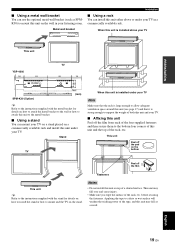
... corners of this unit either above your TV This unit YSP-4000 150 355 24- 7x22 TV 355 150 92 112 730 SPM-K30 (Option) 4- 7 (mm) y Refer to the instructions supplied with the stand for details on how to attach the metal bracket to the wall or how to attach this unit to... mount and the TV on the bottom Fasteners Peel off the film from each of a slanted surface. before securing the fasteners. Metal wall bracket Installation ■ Using a rack You can install this unit and the top of the rack, etc. This unit Peel off the pad on the stand...
... corners of this unit either above your TV This unit YSP-4000 150 355 24- 7x22 TV 355 150 92 112 730 SPM-K30 (Option) 4- 7 (mm) y Refer to the instructions supplied with the stand for details on how to attach the metal bracket to the wall or how to attach this unit to... mount and the TV on the bottom Fasteners Peel off the film from each of a slanted surface. before securing the fasteners. Metal wall bracket Installation ■ Using a rack You can install this unit and the top of the rack, etc. This unit Peel off the pad on the stand...
Owner's Manual
Page 136
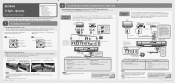
... this unit) 2 OSD video pin cable (Displays the DVD analog video and the YSP-4000 menu screen on the TV) 3 Optical cable (Outputs TV digital audio sounds from this unit) 4 Digital audio pin cable (Outputs DVD digital audio sounds from being scratched, we recommend putting a piece of cloth on the floor in step...first. Use the video pin cable supplied with the metal wall bracket. Sold separately 1 HDMI cable (Displays the DVD digital video and the YSP-4000 menu screen on the actual rear panel of this unit and achieve the surround sound effects in a rack. down and connect this unit by using...
... this unit) 2 OSD video pin cable (Displays the DVD analog video and the YSP-4000 menu screen on the TV) 3 Optical cable (Outputs TV digital audio sounds from this unit) 4 Digital audio pin cable (Outputs DVD digital audio sounds from being scratched, we recommend putting a piece of cloth on the floor in step...first. Use the video pin cable supplied with the metal wall bracket. Sold separately 1 HDMI cable (Displays the DVD digital video and the YSP-4000 menu screen on the actual rear panel of this unit and achieve the surround sound effects in a rack. down and connect this unit by using...