Owners Manual
Page 6
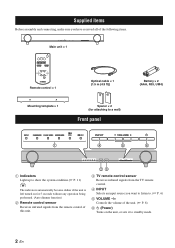
... Before assembly and connecting, make sure you have received all of the following items. Main unit × 1 Remote control × 1 Mounting template × 1 Optical cable × 1 (1.5 m (4.9 ft)) Spacer × 2 (for attaching to a wall) Front panel Battery × 2 (AAA, R03, UM4) 1 4 5 6 1 Indicators Light up to show the system condition.(☞ P. 11) y The indicators...
... Before assembly and connecting, make sure you have received all of the following items. Main unit × 1 Remote control × 1 Mounting template × 1 Optical cable × 1 (1.5 m (4.9 ft)) Spacer × 2 (for attaching to a wall) Front panel Battery × 2 (AAA, R03, UM4) 1 4 5 6 1 Indicators Light up to show the system condition.(☞ P. 11) y The indicators...
Owners Manual
Page 7
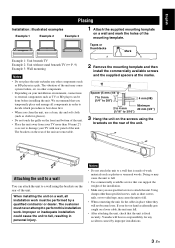
...• Do not attach the unit to a wall that you use a clean, dry and soft cloth (such as not to damage your TV with rear panel of the installation. • Make sure you temporarily place and arrange all installation work . Yamaha will not become loose. in other components. •... screws to attach the unit. Tapes or thumbtacks Mark Example 1: Unit beneath TV Example 2: Unit without stand beneath TV (☞ P. 9) Example 3: Wall mounting Notes • Do not place the unit on the rear of the unit may cause the unit to fall , resulting in a pile. If your installation...
...• Do not attach the unit to a wall that you use a clean, dry and soft cloth (such as not to damage your TV with rear panel of the installation. • Make sure you temporarily place and arrange all installation work . Yamaha will not become loose. in other components. •... screws to attach the unit. Tapes or thumbtacks Mark Example 1: Unit beneath TV Example 2: Unit without stand beneath TV (☞ P. 9) Example 3: Wall mounting Notes • Do not place the unit on the rear of the unit may cause the unit to fall , resulting in a pile. If your installation...
