Owners Manual
Page 5
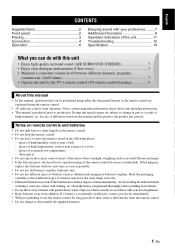
...sound with your preference ......... 7 Additional Information 8 Operation indicators of the unit 11 Troubleshooting 12 Specification 14 What you can be performed using the remote control. • y indicates a tip for long periods of high temperatures, such as near a heater or a stove - places of this unit ... touching the leaked material or letting it come into contact with your local regulations. • Keep batteries away from the remote control. • Do not charge or disassemble the supplied batteries. Dispose of them correctly in accordance with clothing, etc. If the...
...sound with your preference ......... 7 Additional Information 8 Operation indicators of the unit 11 Troubleshooting 12 Specification 14 What you can be performed using the remote control. • y indicates a tip for long periods of high temperatures, such as near a heater or a stove - places of this unit ... touching the leaked material or letting it come into contact with your local regulations. • Keep batteries away from the remote control. • Do not charge or disassemble the supplied batteries. Dispose of them correctly in accordance with clothing, etc. If the...
Owners Manual
Page 6
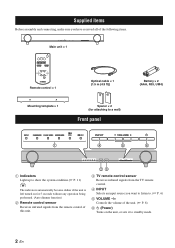
Supplied items Before assembly and connecting, make sure you have received all of the following items. Main unit × 1 Remote control × 1 Mounting template × 1 Optical cable × 1 (1.5 m (4.9 ft)) Spacer × 2 (for attaching to a wall) Front panel Battery × 2 (AAA, ...5 seconds without any operation being performed. (Auto dimmer function) 2 Remote control sensor Receives infrared signals from the remote control of this unit. 23 3 TV remote control sensor Receives infrared signals from the TV remote control. 4 INPUT Selects an input source you want to listen to. (☞...
Supplied items Before assembly and connecting, make sure you have received all of the following items. Main unit × 1 Remote control × 1 Mounting template × 1 Optical cable × 1 (1.5 m (4.9 ft)) Spacer × 2 (for attaching to a wall) Front panel Battery × 2 (AAA, ...5 seconds without any operation being performed. (Auto dimmer function) 2 Remote control sensor Receives infrared signals from the remote control of this unit. 23 3 TV remote control sensor Receives infrared signals from the TV remote control. 4 INPUT Selects an input source you want to listen to. (☞...
Owners Manual
Page 10
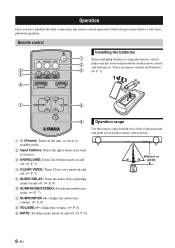
... ft) of the main unit and point it to standby mode. 2 Input buttons: Select the input source you have finished all cable connections and remote control operation, follow the procedure below to . 3 UNIVOLUME: Turns UniVolume mode on and off. (☞ P. 7) 4 CLEAR VOICE: Turns Clear voice mode on and off. (☞ P. 7) 5 AUDIO...
... ft) of the main unit and point it to standby mode. 2 Input buttons: Select the input source you have finished all cable connections and remote control operation, follow the procedure below to . 3 UNIVOLUME: Turns UniVolume mode on and off. (☞ P. 7) 4 CLEAR VOICE: Turns Clear voice mode on and off. (☞ P. 7) 5 AUDIO...
Owners Manual
Page 12
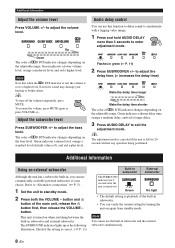
... performed. The SURROUND indicator lights up as the following illustration. Green indicates a lower volume level, orange a moderate level, and red a higher level. Up Audio delay control You can verify the current setting by turning the unit on when switching between the built-in subwoofer Green External subwoofer No light • The...
... performed. The SURROUND indicator lights up as the following illustration. Green indicates a lower volume level, orange a moderate level, and red a higher level. Up Audio delay control You can verify the current setting by turning the unit on when switching between the built-in subwoofer Green External subwoofer No light • The...
Owners Manual
Page 13
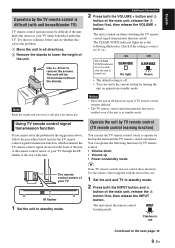
...mode. Notes • Move the unit in all directions. 2 Remove the stands to lower the height of the unit. You can use the TV remote control solely to operate by the suggestions above, follow the procedure below and see whether this case. 1 Set the unit and TV to standby mode. 2 ...of the main unit, release the button first, then release the VOLUME + button. Try the two solutions below and use . The unit enters the remote control learning mode. The unit will be difficult if the unit hides the sensor of the main unit, release the button first, then release the INPUT...
...mode. Notes • Move the unit in all directions. 2 Remove the stands to lower the height of the unit. You can use the TV remote control solely to operate by the suggestions above, follow the procedure below and see whether this case. 1 Set the unit and TV to standby mode. 2 ...of the main unit, release the button first, then release the VOLUME + button. Try the two solutions below and use . The unit enters the remote control learning mode. The unit will be difficult if the unit hides the sensor of the main unit, release the button first, then release the INPUT...
Owners Manual
Page 14
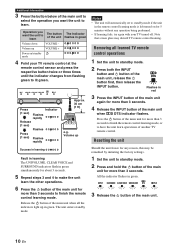
... and hold the button of the main unit for any operation being performed. • If learning fails, try again with your TV remote control at the remote control sensor and press the respective button twice or three times until the indicator changes from flashing green to learn The button The Indicator of...button of the main unit again for more than 3 seconds. Press the button of the main unit for more than 3 seconds to finish the remote control learning mode, or to learn . Operation you want the unit to have the unit learn the other operations. 6 Press the button of the main unit...
... and hold the button of the main unit for any operation being performed. • If learning fails, try again with your TV remote control at the remote control sensor and press the respective button twice or three times until the indicator changes from flashing green to learn The button The Indicator of...button of the main unit again for more than 3 seconds. Press the button of the main unit for more than 3 seconds to finish the remote control learning mode, or to learn . Operation you want the unit to have the unit learn the other operations. 6 Press the button of the main unit...
Owners Manual
Page 15
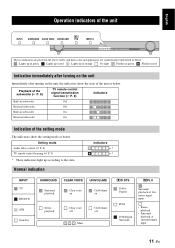
...Surround playback : Clear voice on : UniVolume on the unit, the indicators show the setting mode as below . Setting mode Audio delay control (☞ P. 8) TV remote control learning (☞ P. 9) * These indicators light up in orange : No light : Flashes in green : Flashes in subwoofer On ...the setting mode The indicators show the state of the unit as below . Playback of the subwoofer (☞ P. 8) TV remote control signal transmission function (☞ P. 9) Indicators Built-in subwoofer Off External subwoofer Off Built-in red Indication immediately after turning on ...
...Surround playback : Clear voice on : UniVolume on the unit, the indicators show the setting mode as below . Setting mode Audio delay control (☞ P. 8) TV remote control learning (☞ P. 9) * These indicators light up in orange : No light : Flashes in green : Flashes in subwoofer On ...the setting mode The indicators show the state of the unit as below . Playback of the subwoofer (☞ P. 8) TV remote control signal transmission function (☞ P. 9) Indicators Built-in subwoofer Off External subwoofer Off Built-in red Indication immediately after turning on ...

Owners Manual
Page 16
...the chart below does not help, set the unit to the standby mode, disconnect the AC power supply cable, and contact the nearest authorized Yamaha dealer or service center. The unit has an auto-sleep function, which will automatically set to standby mode if the unit is selected. ...setting of the unit. The source does not contain low frequency signals. external subwoofer. The unit may be connected improperly. Wait for the remote control of your TV to digital equipment produces noises. A digital or high-frequency The unit may be placed close to minimum, or set to direct...
...the chart below does not help, set the unit to the standby mode, disconnect the AC power supply cable, and contact the nearest authorized Yamaha dealer or service center. The unit has an auto-sleep function, which will automatically set to standby mode if the unit is selected. ...setting of the unit. The source does not contain low frequency signals. external subwoofer. The unit may be connected improperly. Wait for the remote control of your TV to digital equipment produces noises. A digital or high-frequency The unit may be placed close to minimum, or set to direct...

Owners Manual
Page 17
... obstruction. Contact your TV. Problem Cause Solution The power of your TV by removing or attaching its stands. Press the button of TV remote control in standby mode.) The power state of the unit and of your TV is opposite. (For example, though your TV is on, the...indicator is not compatible with Place the unit (without the stands, for example) the TV remote control signal transmission so as not to the position where there is between them. your nearest authorized Yamaha dealer or service center if the following problem occurs. adjustable. Reposition the unit. The TV ...
... obstruction. Contact your TV. Problem Cause Solution The power of your TV by removing or attaching its stands. Press the button of TV remote control in standby mode.) The power state of the unit and of your TV is opposite. (For example, though your TV is on, the...indicator is not compatible with Place the unit (without the stands, for example) the TV remote control signal transmission so as not to the position where there is between them. your nearest authorized Yamaha dealer or service center if the following problem occurs. adjustable. Reposition the unit. The TV ...


