Owners Manual
Page 3
... this product or the device that is 300 ohm ribbon lead, change the lead-in to use the product. 2 IMPORTANT: When connecting this product MUST be the source of this manual, meets FCC requirements. ii En Modifications not expressly approved by the FCC, to use... with these corrective measures do not produce satisfactory results, please contact the local retailer authorized to distribute this product is too late, Yamaha and the Electronic Industries Association's Consumer Electronics Group recommend you to follow instructions could void your use only high quality shielded cables....
... this product or the device that is 300 ohm ribbon lead, change the lead-in to use the product. 2 IMPORTANT: When connecting this product MUST be the source of this manual, meets FCC requirements. ii En Modifications not expressly approved by the FCC, to use... with these corrective measures do not produce satisfactory results, please contact the local retailer authorized to distribute this product is too late, Yamaha and the Electronic Industries Association's Consumer Electronics Group recommend you to follow instructions could void your use only high quality shielded cables....
Owners Manual
Page 4
...causing damage. 9 Do not use this unit by improper placement or installation of time (i.e. Yamaha will form when the surrounding temperature changes suddenly. The cabinet should be exposed to a wall outlet until all connections are not suitable for U.K. As long as a plug with bared flexible cord is hazardous ... unit to sudden temperature changes from the AC power source even if you turn off and an appropriate 3 pin plug fitted. Yamaha shall not be connected to the terminal which is marked with the letter L or coloured RED. Model IMPORTANT THE WIRES IN THE MAINS LEAD ARE ...
...causing damage. 9 Do not use this unit by improper placement or installation of time (i.e. Yamaha will form when the surrounding temperature changes suddenly. The cabinet should be exposed to a wall outlet until all connections are not suitable for U.K. As long as a plug with bared flexible cord is hazardous ... unit to sudden temperature changes from the AC power source even if you turn off and an appropriate 3 pin plug fitted. Yamaha shall not be connected to the terminal which is marked with the letter L or coloured RED. Model IMPORTANT THE WIRES IN THE MAINS LEAD ARE ...
Owners Manual
Page 5
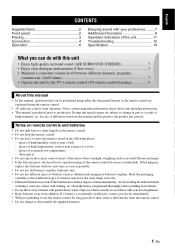
... range of the remote control decreases considerably. Español Nederlands 1 En English Français Deutsch Svenska Italiano CONTENTS Supplied items 2 Front panel 2 Placing 3 Connection 4 Operation 6 Enjoying sound with your preference ......... 7 Additional Information 8 Operation indicators of the unit 11 Troubleshooting 12 Specification 14 What you can be performed using the...
... range of the remote control decreases considerably. Español Nederlands 1 En English Français Deutsch Svenska Italiano CONTENTS Supplied items 2 Front panel 2 Placing 3 Connection 4 Operation 6 Enjoying sound with your preference ......... 7 Additional Information 8 Operation indicators of the unit 11 Troubleshooting 12 Specification 14 What you can be performed using the...
Owners Manual
Page 6
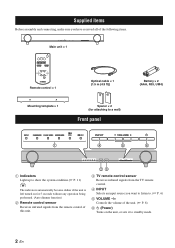
Supplied items Before assembly and connecting, make sure you have received all of the following items. Main unit × 1 Remote control × 1 Mounting template × 1 Optical cable × 1 (1.5 m (4.9 ft)) Spacer × 2 (...
Supplied items Before assembly and connecting, make sure you have received all of the following items. Main unit × 1 Remote control × 1 Mounting template × 1 Optical cable × 1 (1.5 m (4.9 ft)) Spacer × 2 (...
Owners Manual
Page 7
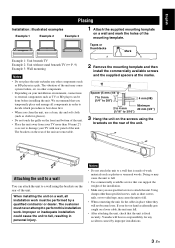
... screws using the brackets on the front and bottom of the unit. • Place the unit away from your installation environment, connections to perform this installation work must never attempt to external components such as plaster or veneered woods. Improper or inadequate installation could cause...may fall. • After attaching the unit, check that you clean the unit, use specified screws to fall , resulting in a pile. Yamaha will not become loose. We recommend that the unit is best done first. • When you temporarily place and arrange all installation work . ...
... screws using the brackets on the front and bottom of the unit. • Place the unit away from your installation environment, connections to perform this installation work must never attempt to external components such as plaster or veneered woods. Improper or inadequate installation could cause...may fall. • After attaching the unit, check that you clean the unit, use specified screws to fall , resulting in a pile. Yamaha will not become loose. We recommend that the unit is best done first. • When you temporarily place and arrange all installation work . ...
Owners Manual
Page 8
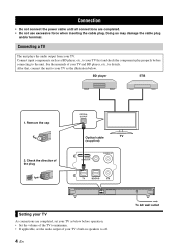
... CONNECTOR SUBWOOFER OUT Setting your TV As connections are completed. • Do not use excessive force when inserting the cable plug. Connection • Do not connect the power cable until all connections are completed, set your TV as the illustration below before connecting to the unit. Doing so may damage...., to minimum. • If applicable, set the audio output of the TV to your TV as below . Remove the cap 2. After that, connect the unit to your TV first and check the components play properly before operation. • Set the volume of your TV and BD player, etc...
... CONNECTOR SUBWOOFER OUT Setting your TV As connections are completed. • Do not use excessive force when inserting the cable plug. Connection • Do not connect the power cable until all connections are completed, set your TV as the illustration below before connecting to the unit. Doing so may damage...., to minimum. • If applicable, set the audio output of the TV to your TV as below . Remove the cap 2. After that, connect the unit to your TV first and check the components play properly before operation. • Set the volume of your TV and BD player, etc...
Owners Manual
Page 9
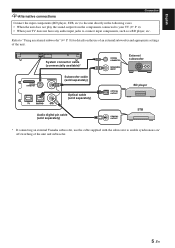
...) Optical cable (sold separately) SYSTEM CONNECTOR MONAURAL INPUT External subwoofer OPTICAL OUTPUT BD player Audio digital pin cable (sold separately) COAXIAL OUTPUT STB * If connecting an external Yamaha subwoofer, use the cable supplied with the subwoofer to enable synchronous on the use of an external subwoofer and appropriate settings of the unit...
...) Optical cable (sold separately) SYSTEM CONNECTOR MONAURAL INPUT External subwoofer OPTICAL OUTPUT BD player Audio digital pin cable (sold separately) COAXIAL OUTPUT STB * If connecting an external Yamaha subwoofer, use the cable supplied with the subwoofer to enable synchronous on the use of an external subwoofer and appropriate settings of the unit...
Owners Manual
Page 10
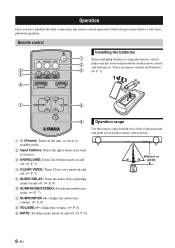
.... (☞ P. 8) 9 MUTE: Switches mute mode on the unit, or sets it to standby mode. 2 Input buttons: Select the input source you have finished all cable connections and remote control operation, follow the procedure below to start basic playback operation. Operation Once you want to listen to. 3 UNIVOLUME: Turns UniVolume mode on...
.... (☞ P. 8) 9 MUTE: Switches mute mode on the unit, or sets it to standby mode. 2 Input buttons: Select the input source you have finished all cable connections and remote control operation, follow the procedure below to start basic playback operation. Operation Once you want to listen to. 3 UNIVOLUME: Turns UniVolume mode on...
Owners Manual
Page 11
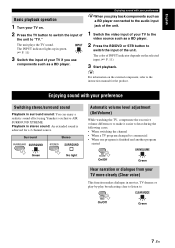
The INPUT indicator lights up in surround sound: You can enjoy a realistic sound effect using Yamaha's exclusive AIR SURROUND XTREME. Enjoying sound with your preference Switching stereo/surround sound Playback in green. (☞ P. 11) 3 Switch the input of your TV if ... your TV to the video source such as a BD player. Playback in movies, TV dramas or play-by-play back components such as a BD player connected to the audio input jack of the unit. 1 Switch the video input of your TV more clearly (Clear voice) This function makes dialogue in stereo...
The INPUT indicator lights up in surround sound: You can enjoy a realistic sound effect using Yamaha's exclusive AIR SURROUND XTREME. Enjoying sound with your preference Switching stereo/surround sound Playback in green. (☞ P. 11) 3 Switch the input of your TV if ... your TV to the video source such as a BD player. Playback in movies, TV dramas or play-by-play back components such as a BD player connected to the audio input jack of the unit. 1 Switch the video input of your TV more clearly (Clear voice) This function makes dialogue in stereo...
Owners Manual
Page 12
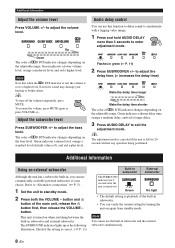
... delay time longer Make the delay time shorter The color of the built-in green (☞ P. 11) 2 Press SUBWOOFER +/- to a higher level. Refer to "Alternative connections" (☞ P. 5). 1 Set the unit to adjust the bass level. The SURROUND indicator lights up as the following illustration. Excessive sound may damage your choice. to...
... delay time longer Make the delay time shorter The color of the built-in green (☞ P. 11) 2 Press SUBWOOFER +/- to a higher level. Refer to "Alternative connections" (☞ P. 5). 1 Set the unit to adjust the bass level. The SURROUND indicator lights up as the following illustration. Excessive sound may damage your choice. to...

Owners Manual
Page 16
...the unit. Press MUTE on the remote control to the standby mode, disconnect the AC power supply cable, and contact the nearest authorized Yamaha dealer or service center. A surround mode is not achieved. No bass / The external The volume of the subwoofer channel may be activated... Select the correct input source or input setting. without any operation. equipment or high-frequency equipment. If the problem you are firmly connected to digital equipment produces noises. The unit may be placed close to their respective jacks on again. Select collect setting of your TV...
...the unit. Press MUTE on the remote control to the standby mode, disconnect the AC power supply cable, and contact the nearest authorized Yamaha dealer or service center. A surround mode is not achieved. No bass / The external The volume of the subwoofer channel may be activated... Select the correct input source or input setting. without any operation. equipment or high-frequency equipment. If the problem you are firmly connected to digital equipment produces noises. The unit may be placed close to their respective jacks on again. Select collect setting of your TV...


