Owners Manual
Page 5
... packaging carefully as these different types of them correctly in accordance with your local regulations. • Keep batteries away from the remote control. • Do not charge or disassemble the supplied batteries. Clean the battery compartment thoroughly before installing new batteries. •... two new ones as soon as possible. • Do not use old batteries together with new ones. • Do not use the remote control for your operation. English Français Deutsch Svenska Italiano CONTENTS Supplied items 2 Front panel 2 Placing 3 Connection 4 Operation 6 Enjoying...
... packaging carefully as these different types of them correctly in accordance with your local regulations. • Keep batteries away from the remote control. • Do not charge or disassemble the supplied batteries. Clean the battery compartment thoroughly before installing new batteries. •... two new ones as soon as possible. • Do not use old batteries together with new ones. • Do not use the remote control for your operation. English Français Deutsch Svenska Italiano CONTENTS Supplied items 2 Front panel 2 Placing 3 Connection 4 Operation 6 Enjoying...
Owners Manual
Page 6
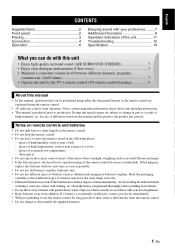
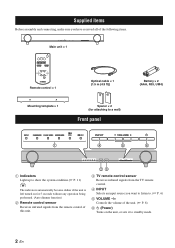
Supplied items Before assembly and connecting, make sure you have received all of the following items. Main unit × 1 Remote control × 1 Mounting template × 1 Optical cable × 1 (1.5 m (4.9 ft)) Spacer × 2 (for attaching to a wall) Front panel Battery × 2 (AAA... for 5 seconds without any operation being performed. (Auto dimmer function) 2 Remote control sensor Receives infrared signals from the remote control of this unit. 23 3 TV remote control sensor Receives infrared signals from the TV remote control. 4 INPUT Selects an input source you want to listen to. (&#...
Supplied items Before assembly and connecting, make sure you have received all of the following items. Main unit × 1 Remote control × 1 Mounting template × 1 Optical cable × 1 (1.5 m (4.9 ft)) Spacer × 2 (for attaching to a wall) Front panel Battery × 2 (AAA... for 5 seconds without any operation being performed. (Auto dimmer function) 2 Remote control sensor Receives infrared signals from the remote control of this unit. 23 3 TV remote control sensor Receives infrared signals from the TV remote control. 4 INPUT Selects an input source you want to listen to. (&#...
Owners Manual
Page 10
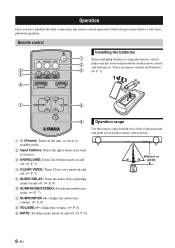
... sensor. 1 (Power): Turns on the unit, or sets it to standby mode. 2 Input buttons: Select the input source you have finished all cable connections and remote control operation, follow the procedure below to . 3 UNIVOLUME: Turns UniVolume mode on and off. (☞ P. 7) 4 CLEAR VOICE: Turns Clear voice mode on and off. (☞...
... sensor. 1 (Power): Turns on the unit, or sets it to standby mode. 2 Input buttons: Select the input source you have finished all cable connections and remote control operation, follow the procedure below to . 3 UNIVOLUME: Turns UniVolume mode on and off. (☞ P. 7) 4 CLEAR VOICE: Turns Clear voice mode on and off. (☞...
Owners Manual
Page 13
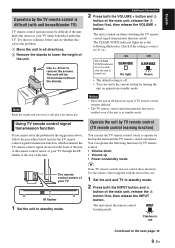
.... The unit will be difficult if the unit hides the sensor of the unit. Check if the setting is turned on when switching the TV remote control signal transmission function on/off . • You can operate the following functions by turning the unit on again from standby mode. Note Keep... CLEAR VOICE indicator lights up • Power on ) On No light Off Green • The default setting is turned on /standby mode y Some TV remote controls may be 19 mm lower without the stands. Additional Information 2 Press both the INPUT button and button of the main unit, release the button...
.... The unit will be difficult if the unit hides the sensor of the unit. Check if the setting is turned on when switching the TV remote control signal transmission function on/off . • You can operate the following functions by turning the unit on again from standby mode. Note Keep... CLEAR VOICE indicator lights up • Power on ) On No light Off Green • The default setting is turned on /standby mode y Some TV remote controls may be 19 mm lower without the stands. Additional Information 2 Press both the INPUT button and button of the main unit, release the button...
Owners Manual
Page 14
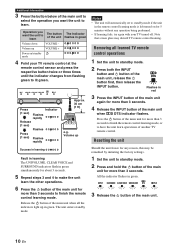
...the main unit. 10 En Note that screen glare may be remedied by initiating the factory settings. 1 Set the unit to finish the remote control learning mode. Flashes in green simultaneously for more than 3 seconds. Removing all the indicators light up Success in learning Fault in ...rapidly Release (1 sec) Flashes Press (1 sec) Flashes rapidly Approx. 30 cm (1 ft) e.g. Release the button of the main unit when all learned TV remote control operations 1 Set the unit to learn the other operations. 6 Press the button of the main unit for more than 3 seconds to standby mode. ...
...the main unit. 10 En Note that screen glare may be remedied by initiating the factory settings. 1 Set the unit to finish the remote control learning mode. Flashes in green simultaneously for more than 3 seconds. Removing all the indicators light up Success in learning Fault in ...rapidly Release (1 sec) Flashes Press (1 sec) Flashes rapidly Approx. 30 cm (1 ft) e.g. Release the button of the main unit when all learned TV remote control operations 1 Set the unit to learn the other operations. 6 Press the button of the main unit for more than 3 seconds to standby mode. ...
Owners Manual
Page 15
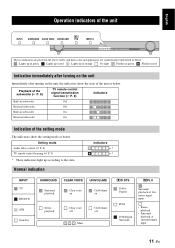
... voice on : UniVolume on the unit, the indicators show the setting mode as below. Playback of the subwoofer (☞ P. 8) TV remote control signal transmission function (☞ P. 9) Indicators Built-in subwoofer Off External subwoofer Off Built-in subwoofer On External subwoofer On Indication of ...: Lights up in green : Lights up in red : Lights up according to the state. Setting mode Audio delay control (☞ P. 8) TV remote control learning (☞ P. 9) * These indicators light up in orange : No light : Flashes in green : Flashes in red Indication immediately after ...
... voice on : UniVolume on the unit, the indicators show the setting mode as below. Playback of the subwoofer (☞ P. 8) TV remote control signal transmission function (☞ P. 9) Indicators Built-in subwoofer Off External subwoofer Off Built-in subwoofer On External subwoofer On Indication of ...: Lights up in green : Lights up in red : Lights up according to the state. Setting mode Audio delay control (☞ P. 8) TV remote control learning (☞ P. 9) * These indicators light up in orange : No light : Flashes in green : Flashes in red Indication immediately after ...

Owners Manual
Page 16
... equipment. Problem Cause Solution Power turns on each component. Press MUTE on the remote control to the standby mode, disconnect the AC power supply cable, and contact the nearest authorized Yamaha dealer or service center. Adjust the volume by not connected when selecting playback of... the using the remote control of the unit, TV and the external components (such as from sudden ...
... equipment. Problem Cause Solution Power turns on each component. Press MUTE on the remote control to the standby mode, disconnect the AC power supply cable, and contact the nearest authorized Yamaha dealer or service center. Adjust the volume by not connected when selecting playback of... the using the remote control of the unit, TV and the external components (such as from sudden ...

Owners Manual
Page 17
.... Operate after pressing the power button of your TV itself and of your TV. The TV remote control signal transmission function is not minimum. your nearest authorized Yamaha dealer or service center if the following problem occurs. The unit obstructs the 3D glasses transmitter of... TV remote control may be worn Replace the batteries. Use the remote control of the operation range. The TV remote control is opposite from ...
.... Operate after pressing the power button of your TV itself and of your TV. The TV remote control signal transmission function is not minimum. your nearest authorized Yamaha dealer or service center if the following problem occurs. The unit obstructs the 3D glasses transmitter of... TV remote control may be worn Replace the batteries. Use the remote control of the operation range. The TV remote control is opposite from ...


