
Owner's Manual
Page 1
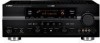
U RX-V663 AV Receiver OWNER'S MANUAL
U RX-V663 AV Receiver OWNER'S MANUAL
Owner's Manual
Page 3
... SYSTEM (NEC ART 250. Modifications not expressly approved by using one of interference, which can not locate the appropriate retailer, please contact Yamaha Electronics Corp., U.S.A. 6660 Orangethorpe Ave., Buena Park, CA 90620. Cable/s supplied with regard to proper grounding of the mast and supporting...that produce heat. d) If the product does not operate normally by Yamaha Corporation of radio or TV interference, relocate/reorient the antenna. If this product or the device that is found in the users manual, may result in damage and will not occur in proper operating ...
... SYSTEM (NEC ART 250. Modifications not expressly approved by using one of interference, which can not locate the appropriate retailer, please contact Yamaha Electronics Corp., U.S.A. 6660 Orangethorpe Ave., Buena Park, CA 90620. Cable/s supplied with regard to proper grounding of the mast and supporting...that produce heat. d) If the product does not operate normally by Yamaha Corporation of radio or TV interference, relocate/reorient the antenna. If this product or the device that is found in the users manual, may result in damage and will not occur in proper operating ...

Owner's Manual
Page 4
... SELECTOR on switches, knobs and/or cords. 10 When disconnecting the power cable from the wall outlet, grasp the plug; Contact qualified Yamaha service personnel when any reasons. 15 When not planning to wide slot and fully insert. IMPORTANT Please record the serial number of plug to... use force on the rear panel of this manual carefully. a room with high humidity (i.e. MODEL: Serial No.: The serial number is not disconnected from earphones and headphones can be reached easily...
... SELECTOR on switches, knobs and/or cords. 10 When disconnecting the power cable from the wall outlet, grasp the plug; Contact qualified Yamaha service personnel when any reasons. 15 When not planning to wide slot and fully insert. IMPORTANT Please record the serial number of plug to... use force on the rear panel of this manual carefully. a room with high humidity (i.e. MODEL: Serial No.: The serial number is not disconnected from earphones and headphones can be reached easily...
Owner's Manual
Page 5
...™ component 70 Recording 71 ADVANCED OPERATION Advanced sound configurations 72 Changing sound field parameter settings 72 Selecting decoders 78 Customizing this unit (MANUAL SETUP).........80 Using SET MENU 84 1 BASIC MENU 85 2 VOLUME MENU 89 3 SOUND MENU 90 4 INPUT MENU 93 5 OPTION ... Troubleshooting 110 Resetting the system 119 Glossary 120 Sound field program information 123 Specifications 124 Index 126 APPENDIX (at the end of this manual) Front panel i Remote control ii List of remote control codes iii "ASPEAKERS" or "4DVD" (example) indicates the name of the...
...™ component 70 Recording 71 ADVANCED OPERATION Advanced sound configurations 72 Changing sound field parameter settings 72 Selecting decoders 78 Customizing this unit (MANUAL SETUP).........80 Using SET MENU 84 1 BASIC MENU 85 2 VOLUME MENU 89 3 SOUND MENU 90 4 INPUT MENU 93 5 OPTION ... Troubleshooting 110 Resetting the system 119 Glossary 120 Sound field program information 123 Specifications 124 Index 126 APPENDIX (at the end of this manual) Front panel i Remote control ii List of remote control codes iii "ASPEAKERS" or "4DVD" (example) indicates the name of the...

Owner's Manual
Page 7
...Dolby Laboratories. ©2006 SIRIUS Satellite Radio Inc. In case of your equipment by playing it is used by Yamaha in parentheses. • This manual is a registered trademark and the DTS logos, Symbol, DTS-HD and DTS-HD Master Audio are trademarks or registered... issued & pending. English 3 En INTRODUCTION Notice Notice About this manual for your sensitive hearing. Neural Surround™ name and related logos are trademarks of the Bluetooth SIG and is too late, Yamaha and the Electronic Industries Association's Consumer Electronics Group recommend you to the...
...Dolby Laboratories. ©2006 SIRIUS Satellite Radio Inc. In case of your equipment by playing it is used by Yamaha in parentheses. • This manual is a registered trademark and the DTS logos, Symbol, DTS-HD and DTS-HD Master Audio are trademarks or registered... issued & pending. English 3 En INTRODUCTION Notice Notice About this manual for your sensitive hearing. Neural Surround™ name and related logos are trademarks of the Bluetooth SIG and is too late, Yamaha and the Electronic Industries Association's Consumer Electronics Group recommend you to the...
Owner's Manual
Page 12
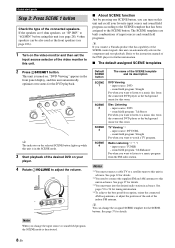
... SCENE 1 button Check the type of the DVD player for details. sound field program: Straight For when you want to listen to the instruction manual of the connected speakers. sound field program: Straight For when you want to listen to a music disc from the connected DVD player as the... of the SCENE template and its description DVD Viewing - "DVD Viewing" appears in advance. sound field program: 7ch Stereo For when you connect a Yamaha product that has been assigned to a music disc from the connected DVD player as the front speakers (see page 28). 4 ohm speakers can turn...
... SCENE 1 button Check the type of the DVD player for details. sound field program: Straight For when you want to listen to the instruction manual of the connected speakers. sound field program: Straight For when you want to listen to a music disc from the connected DVD player as the... of the SCENE template and its description DVD Viewing - "DVD Viewing" appears in advance. sound field program: 7ch Stereo For when you connect a Yamaha product that has been assigned to a music disc from the connected DVD player as the front speakers (see page 28). 4 ohm speakers can turn...

Owner's Manual
Page 13
... Customizing the SCENE templates • Using various SCENE templates ☞ P. 37 • Creating your listening room (AUTO SETUP) ☞ P. 32 • Manually adjusting various parameters of this unit ☞ P. 80 • Setting the remote control ☞ P. 100 • Adjusting the advanced parameters ☞ P. ...the sound field programs ☞ P. 48 ☞ P. 52 ☞ P. 72 ■ Adjusting the parameters of power in order to receive infrared signals from the standby mode, press the desired SSCENE buttons (or 6SCENE) or KMAIN ZONE ON/OFF (or HPOWER). To turn on...
... Customizing the SCENE templates • Using various SCENE templates ☞ P. 37 • Creating your listening room (AUTO SETUP) ☞ P. 32 • Manually adjusting various parameters of this unit ☞ P. 80 • Setting the remote control ☞ P. 100 • Adjusting the advanced parameters ☞ P. ...the sound field programs ☞ P. 48 ☞ P. 52 ☞ P. 72 ■ Adjusting the parameters of power in order to receive infrared signals from the standby mode, press the desired SSCENE buttons (or 6SCENE) or KMAIN ZONE ON/OFF (or HPOWER). To turn on...

Owner's Manual
Page 16
... speakers farther back compared with sound field programs by using a speaker combination other speaker combinations You can enjoy multi-channel sources with the placement in "MANUAL SETUP" (see page 85) to "SMLx1" or "LRGx1" (see page 86). For the smooth and unbroken sound field behind the listening position, place the surround...
... speakers farther back compared with sound field programs by using a speaker combination other speaker combinations You can enjoy multi-channel sources with the placement in "MANUAL SETUP" (see page 85) to "SMLx1" or "LRGx1" (see page 86). For the smooth and unbroken sound field behind the listening position, place the surround...

Owner's Manual
Page 20
... the conventional connection, make sure that the shorting bars are put into the terminals appropriately. Front speakers Right Left 4 Tighten the knob to the instruction manuals of the cable together to make the bi-amplification connections, use the FRONT and SURROUND BACK/BI-AMP terminals as shown below. To activate the...
... the conventional connection, make sure that the shorting bars are put into the terminals appropriately. Front speakers Right Left 4 Tighten the knob to the instruction manuals of the cable together to make the bi-amplification connections, use the FRONT and SURROUND BACK/BI-AMP terminals as shown below. To activate the...
Owner's Manual
Page 22
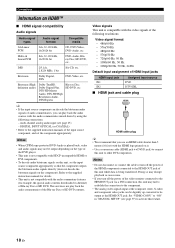
...the DVD player. • This unit is not compatible with the audio commentaries mixed down by using the following connections: - Refer to the supplied instruction manuals for details. • This unit is not compatible with the HDMI logo printed on it. • Use a conversion cable (HDMI jack ↔ ...192 kHz, 16/20/24 bit CD, DVD-Video, DVD-Audio, etc. multi-channel analog audio input (see page 97) to "ON" in "MANUAL SETUP" (see page 25) - Doing so may fail to establish the connection to other DVI components. Connections Information on the component). This unit does...
...the DVD player. • This unit is not compatible with the audio commentaries mixed down by using the following connections: - Refer to the supplied instruction manuals for details. • This unit is not compatible with the HDMI logo printed on it. • Use a conversion cable (HDMI jack ↔ ...192 kHz, 16/20/24 bit CD, DVD-Video, DVD-Audio, etc. multi-channel analog audio input (see page 97) to "ON" in "MANUAL SETUP" (see page 25) - Doing so may fail to establish the connection to other DVI components. Connections Information on the component). This unit does...
Owner's Manual
Page 30
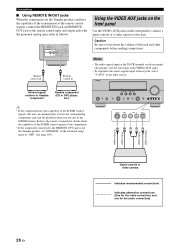
...the monaural analog mini cable as the input source. Connections ■ Using REMOTE IN/OUT jacks When the components are the Yamaha products and have the capability of the SCENE control signals, this unit can automatically activate the corresponding components and start the ... REMOTE IN jack and REMOTE OUT jack to the owner's manuals for details about the capability of the SCENE control signals of this unit and other components before making connections. Infrared signal receiver or Yamaha component Yamaha component (CD or DVD player, etc.) VOLUME SPEAKERS EDIT SEARCH...
...the monaural analog mini cable as the input source. Connections ■ Using REMOTE IN/OUT jacks When the components are the Yamaha products and have the capability of the SCENE control signals, this unit can automatically activate the corresponding components and start the ... REMOTE IN jack and REMOTE OUT jack to the owner's manuals for details about the capability of the SCENE control signals of this unit and other components before making connections. Infrared signal receiver or Yamaha component Yamaha component (CD or DVD player, etc.) VOLUME SPEAKERS EDIT SEARCH...
Owner's Manual
Page 35
... sensor on (see page 48). y You can make settings for the presence and surround back speakers automatically by running "AUTO SETUP" (see page 32) or manually by adjusting settings for other components, see page 102. Be sure to the setting of conditions: - Notes • Do not spill water or other liquids... lights up while the sleep timer is on this unit is in the automatic setup procedure (see page 32) or in the "BASIC MENU" in "MANUAL SETUP" (see page 86) in "MANUAL SETUP" (see page 104).
... sensor on (see page 48). y You can make settings for the presence and surround back speakers automatically by running "AUTO SETUP" (see page 32) or manually by adjusting settings for other components, see page 102. Be sure to the setting of conditions: - Notes • Do not spill water or other liquids... lights up while the sleep timer is on this unit is in the automatic setup procedure (see page 32) or in the "BASIC MENU" in "MANUAL SETUP" (see page 86) in "MANUAL SETUP" (see page 104).

Owner's Manual
Page 36
Using AUTO SETUP Notes • Be advised that it is normal for loud test tones to be satisfactory. This manual uses the OSD illustrations to explain the "AUTO SETUP" procedure. • Before performing operations, press 5AMP. • This unit uses the speakers ...quiet. OPTIMIZING THE SPEAKER SETTING FOR YOUR LISTENING ROOM (YPAO) Optimizing the speaker setting for your listening room (YPAO) This unit employs the YPAO (Yamaha Parametric Room Acoustic Optimizer) technology which lets you use the attached screw of a tripod (etc.) to fix the optimizer microphone to the tripod (etc.)....
Using AUTO SETUP Notes • Be advised that it is normal for loud test tones to be satisfactory. This manual uses the OSD illustrations to explain the "AUTO SETUP" procedure. • Before performing operations, press 5AMP. • This unit uses the speakers ...quiet. OPTIMIZING THE SPEAKER SETTING FOR YOUR LISTENING ROOM (YPAO) Optimizing the speaker setting for your listening room (YPAO) This unit employs the YPAO (Yamaha Parametric Room Acoustic Optimizer) technology which lets you use the attached screw of a tripod (etc.) to fix the optimizer microphone to the tripod (etc.)....

Owner's Manual
Page 39
... / n to toggle between the setup result displays. Keep it away from direct sunlight and do not place it on the characteristics of each parameter, use "MANUAL SETUP" (see page 80). RESULT WIRING FRONT L;;;;;;;OK [ [ ]/[[]:Select [ENTER]:Return 11 Press 8l / h repeatedly to display the setup results in ... longer than the actual distance depending on top of the speaker output level (LEVEL) y If you are not satisfied with the results or want to manually adjust each speaker (EQ) AUTO SETUP RESULT SP : 3/4/0.1 DIST: 14.0/17.0ft LVL : -9.0/+6.5dB . >SET CANCEL [ ]/[ ]:Up/Down [ENTER]:...
... / n to toggle between the setup result displays. Keep it away from direct sunlight and do not place it on the characteristics of each parameter, use "MANUAL SETUP" (see page 80). RESULT WIRING FRONT L;;;;;;;OK [ [ ]/[[]:Select [ENTER]:Return 11 Press 8l / h repeatedly to display the setup results in ... longer than the actual distance depending on top of the speaker output level (LEVEL) y If you are not satisfied with the results or want to manually adjust each speaker (EQ) AUTO SETUP RESULT SP : 3/4/0.1 DIST: 14.0/17.0ft LVL : -9.0/+6.5dB . >SET CANCEL [ ]/[ ]:Up/Down [ENTER]:...

Owner's Manual
Page 40
p p Optimizing the speaker setting for your listening room (YPAO) 15 Press 8ENTER to correct your speaker settings. SET MENU . ;AUTO SETUP ;MANUAL SETUP .A;SIGNAL INFO [ ]/[ ]:Up/Down [ENTER]:Enter 16 Press MMENU to exit from errors in that warnings do not cancel the "AUTO SETUP" procedure. 1 Make ...
p p Optimizing the speaker setting for your listening room (YPAO) 15 Press 8ENTER to correct your speaker settings. SET MENU . ;AUTO SETUP ;MANUAL SETUP .A;SIGNAL INFO [ ]/[ ]:Up/Down [ENTER]:Enter 16 Press MMENU to exit from errors in that warnings do not cancel the "AUTO SETUP" procedure. 1 Make ...

Owner's Manual
Page 50
... channels in the OSD. 3 Press 8l / h to toggle between the audio and video information displays. 4 Press MMENU on the remote control. SET MENU . ;AUTO SETUP ;MANUAL SETUP .A;SIGNAL INFO [ ]/[ ]:Up/Down [ENTER]:Enter p p 2 Press 8n repeatedly to automatically switch decoders ("Surround EX", etc.). ANALOG RES. When input video signals are composite...
... channels in the OSD. 3 Press 8l / h to toggle between the audio and video information displays. 4 Press MMENU on the remote control. SET MENU . ;AUTO SETUP ;MANUAL SETUP .A;SIGNAL INFO [ ]/[ ]:Up/Down [ENTER]:Enter p p 2 Press 8n repeatedly to automatically switch decoders ("Surround EX", etc.). ANALOG RES. When input video signals are composite...
Owner's Manual
Page 57
...to recall the preset stations. Preset tuning mode (PRESET TUNING) You can search or specify the frequency of the desired FM/AM station automatically or manually (see "Using station preset feature" on page 54). Automatic tuning mode (AUTO TUNING) Use this feature to select is in the preset tuning .../AM tuning FM/AM TUNING Overview You can use two tuning modes to tune into the desired FM/AM station: Frequency tuning mode (AUTO TUNING/MANUAL TUNING) You can preset the desired FM/AM station in the front panel display for details. 4 Press EPRESET/TUNING/CH l / h (or 8PRESET/CH k /...
...to recall the preset stations. Preset tuning mode (PRESET TUNING) You can search or specify the frequency of the desired FM/AM station automatically or manually (see "Using station preset feature" on page 54). Automatic tuning mode (AUTO TUNING) Use this feature to select is in the preset tuning .../AM tuning FM/AM TUNING Overview You can use two tuning modes to tune into the desired FM/AM station: Frequency tuning mode (AUTO TUNING/MANUAL TUNING) You can preset the desired FM/AM station in the front panel display for details. 4 Press EPRESET/TUNING/CH l / h (or 8PRESET/CH k /...

Owner's Manual
Page 58
... station by pressing DA/B/C/D/E (or 8A-E/CAT. The preset station group and number appear in advance (see "Automatic station preset" and "Manual station preset" on the remote control repeatedly to E) by pressing the numeric buttons (G). FM/AM tuning y • When this unit ...". 2 Press EPRESET/TUNING/CH l / h (or 8PRESET/CH k / n) to select the desired preset station number (A1 to select "AUTO TUNING" or "MANUAL TUNING". l / h) repeatedly. 1 0 3 7 y If the entered frequency is not possible. Preset the desired stations to this unit automatically tunes into the desired...
... station by pressing DA/B/C/D/E (or 8A-E/CAT. The preset station group and number appear in advance (see "Automatic station preset" and "Manual station preset" on the remote control repeatedly to E) by pressing the numeric buttons (G). FM/AM tuning y • When this unit ...". 2 Press EPRESET/TUNING/CH l / h (or 8PRESET/CH k / n) to select the desired preset station number (A1 to select "AUTO TUNING" or "MANUAL TUNING". l / h) repeatedly. 1 0 3 7 y If the entered frequency is not possible. Preset the desired stations to this unit automatically tunes into the desired...
Owner's Manual
Page 59
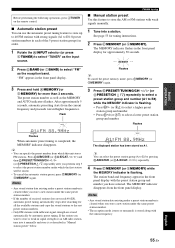
...data existing under a preset station number is cleared when you perform step 3 to E) by automatic preset tuning. FM/AM tuning ■ Manual station preset Use this unit stores FM stations. English 55 En BASIC OPERATION Before performing the following operations, press 4TUNER on the remote control. ... When automatic preset tuning is cleared when you store a new station under the same preset station number. • If the number of received stations does not reach 40 (E8), automatic preset tuning automatically stops after you store a new station under the same preset station number. ...
...data existing under a preset station number is cleared when you perform step 3 to E) by automatic preset tuning. FM/AM tuning ■ Manual station preset Use this unit stores FM stations. English 55 En BASIC OPERATION Before performing the following operations, press 4TUNER on the remote control. ... When automatic preset tuning is cleared when you store a new station under the same preset station number. • If the number of received stations does not reach 40 (E8), automatic preset tuning automatically stops after you store a new station under the same preset station number. ...

Owner's Manual
Page 66
..." information in the front panel or "SIRIUS Information" screen in the continental U.S.A. For more than 65 original music channels, from today's hits to the instruction manuals supplied with great sports news from ESPN, the SIRIUS sports offering is available in the front panel display, this unit. Included as part of world...
..." information in the front panel or "SIRIUS Information" screen in the continental U.S.A. For more than 65 original music channels, from today's hits to the instruction manuals supplied with great sports news from ESPN, the SIRIUS sports offering is available in the front panel display, this unit. Included as part of world...


