Owner's Manual
Page 3
... operating instructions. Caution-ii En When replacement parts are on different branch (circuit breaker or fuse) circuits or install AC line filter/s. NATIONAL ELECTRICAL CODE ANTENNA LEAD IN WIRE ANTENNA DISCHARGE UNIT (NEC SECTION 810-20) GROUNDING CONDUCTORS (NEC SECTION 810-21) GROUND CLAMPS POWER SERVICE GROUNDING ELECTRODE SYSTEM (NEC ART 250. Follow all installations. The product should be sure the service technician has used...
... operating instructions. Caution-ii En When replacement parts are on different branch (circuit breaker or fuse) circuits or install AC line filter/s. NATIONAL ELECTRICAL CODE ANTENNA LEAD IN WIRE ANTENNA DISCHARGE UNIT (NEC SECTION 810-20) GROUNDING CONDUCTORS (NEC SECTION 810-21) GROUND CLAMPS POWER SERVICE GROUNDING ELECTRODE SYSTEM (NEC ART 250. Follow all installations. The product should be sure the service technician has used...
Owner's Manual
Page 5
... parameter settings 72 Selecting decoders 78 Customizing this unit (MANUAL SETUP).........80 Using SET MENU 84 1 BASIC MENU 85 2 VOLUME MENU 89 3 SOUND MENU 90 4 INPUT MENU 93 5 OPTION MENU 96 Remote control features 100 Controlling this unit, a TV, or other components.......... 100 Setting remote control codes 102 Using multi-zone configuration 103 Connecting Zone 2 103 Controlling Zone 2 104 Advanced setup 106 Using the advanced setup 106 ADDITIONAL INFORMATION Troubleshooting 110 Resetting the system 119 Glossary 120 Sound field program information 123 Specifications 124...
... parameter settings 72 Selecting decoders 78 Customizing this unit (MANUAL SETUP).........80 Using SET MENU 84 1 BASIC MENU 85 2 VOLUME MENU 89 3 SOUND MENU 90 4 INPUT MENU 93 5 OPTION MENU 96 Remote control features 100 Controlling this unit, a TV, or other components.......... 100 Setting remote control codes 102 Using multi-zone configuration 103 Connecting Zone 2 103 Controlling Zone 2 104 Advanced setup 106 Using the advanced setup 106 ADDITIONAL INFORMATION Troubleshooting 110 Resetting the system 119 Glossary 120 Sound field program information 123 Specifications 124...

Owner's Manual
Page 6
... control signal support component (some models only) working with preset remote control codes capability ◆ Zone 2 custom installation facility ◆ Bi-amplification connection capability ◆ Sleep timer Supplied accessories Check that you to optimize this unit to connect a Yamaha iPod universal dock (such as YDS-10, sold separately) or Bluetooth adapter (such as multi-channel digital audio based on HDMI version 1.3a (HDMI is Licensed by Digital Content Protection, LLC. ◆ Analog video to HDMI digital video up-conversion (composite video ↔ S-video ↔ component...
... control signal support component (some models only) working with preset remote control codes capability ◆ Zone 2 custom installation facility ◆ Bi-amplification connection capability ◆ Sleep timer Supplied accessories Check that you to optimize this unit to connect a Yamaha iPod universal dock (such as YDS-10, sold separately) or Bluetooth adapter (such as multi-channel digital audio based on HDMI version 1.3a (HDMI is Licensed by Digital Content Protection, LLC. ◆ Analog video to HDMI digital video up-conversion (composite video ↔ S-video ↔ component...
Owner's Manual
Page 11
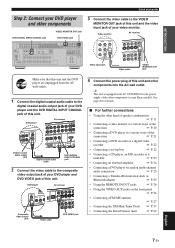
... connections • Using the other components VIDEO MONITOR OUT jack DVD DIGITAL INPUT COAXIAL jack DVD VIDEO jack AUDIO L MULTI CH INPUT FRONT (8CH) CENTER PRE OUT SINGLE CENTER R IN MD/ OUT CD (PLAY) CD-R (REC) DVD DTV/CBL IN OUT DVR IN OUT VCR SUB SB (8CH) SURROUND WOOFER ZONE 2 HDMI OUT FRONT SURROUND SUR. TOTAL 0.8A MAX. TOTAL C DVR 3 Connect the video cable to the digital coaxial audio output jack of your DVD player and the DVD DIGITAL INPUT COAXIAL jack of this unit. Video monitor AV receiver Video input jack VIDEO IN DVD...
... connections • Using the other components VIDEO MONITOR OUT jack DVD DIGITAL INPUT COAXIAL jack DVD VIDEO jack AUDIO L MULTI CH INPUT FRONT (8CH) CENTER PRE OUT SINGLE CENTER R IN MD/ OUT CD (PLAY) CD-R (REC) DVD DTV/CBL IN OUT DVR IN OUT VCR SUB SB (8CH) SURROUND WOOFER ZONE 2 HDMI OUT FRONT SURROUND SUR. TOTAL 0.8A MAX. TOTAL C DVR 3 Connect the video cable to the digital coaxial audio output jack of your DVD player and the DVD DIGITAL INPUT COAXIAL jack of this unit. Video monitor AV receiver Video input jack VIDEO IN DVD...
Owner's Manual
Page 22
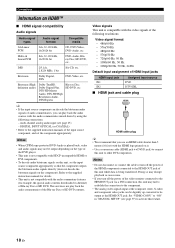
... audio) Dolby TrueHD, Dolby Digital Plus, DTS-HD Master Audio, DTS-HD High Resolution Audio, DTS Express Blu-ray Disc, HD DVD, etc. Video signals This unit is compatible with the video signals of Blu-ray Disc or HD DVD. Bitstream Dolby Digital, DTS DVD-Video, etc. DIGITAL INPUT OPTICAL (or COAXIAL) • Refer to the supplied instruction manuals of the input source component, and set the input source component appropriately so that you turn off the power of the video monitor connected to the HDMI OUT jack via Internet) of the following connections...
... audio) Dolby TrueHD, Dolby Digital Plus, DTS-HD Master Audio, DTS-HD High Resolution Audio, DTS Express Blu-ray Disc, HD DVD, etc. Video signals This unit is compatible with the video signals of Blu-ray Disc or HD DVD. Bitstream Dolby Digital, DTS DVD-Video, etc. DIGITAL INPUT OPTICAL (or COAXIAL) • Refer to the supplied instruction manuals of the input source component, and set the input source component appropriately so that you turn off the power of the video monitor connected to the HDMI OUT jack via Internet) of the following connections...

Owner's Manual
Page 29
... INPUT jacks. Connect a Yamaha iPod universal dock or Bluetooth adapter to the DOCK terminal on the rear panel of your Bluetooth components. DOCK VIDEO VIDEO S VIDEO DVD DTV/CBL IN OUT DVR IN OUT VCR COMPONENT VIDEO PR A DVD PB Y PR B DTV/CBL PB MONITOR OUT Y MONITOR OUT C DVR English Yamaha iPod universal dock or Bluetooth adapter 25 En MULTI CH INPUT FRONT (8CH) CENTER L R SUB SB (8CH) SURROUND WOOFER L *1 R MULTI CH INPUT FRONT (8CH) CENTER L R SUB SB (8CH) SURROUND WOOFER LR LR LR LR LR PREPARATION Center out Subwoofer out Surround out Surround...
... INPUT jacks. Connect a Yamaha iPod universal dock or Bluetooth adapter to the DOCK terminal on the rear panel of your Bluetooth components. DOCK VIDEO VIDEO S VIDEO DVD DTV/CBL IN OUT DVR IN OUT VCR COMPONENT VIDEO PR A DVD PB Y PR B DTV/CBL PB MONITOR OUT Y MONITOR OUT C DVR English Yamaha iPod universal dock or Bluetooth adapter 25 En MULTI CH INPUT FRONT (8CH) CENTER L R SUB SB (8CH) SURROUND WOOFER L *1 R MULTI CH INPUT FRONT (8CH) CENTER L R SUB SB (8CH) SURROUND WOOFER LR LR LR LR LR PREPARATION Center out Subwoofer out Surround out Surround...
Owner's Manual
Page 30
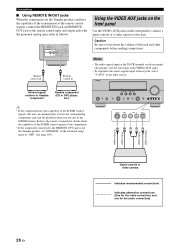
...the ones input at the VIDEO AUX jacks. • To reproduce the source signals input at these jacks, select "V-AUX" as follows. REMOTE TRIGGER OUT +12V IN OUT 15mA MAX. Infrared signal receiver or Yamaha component Yamaha component (CD or DVD player, etc.) VOLUME SPEAKERS EDIT SEARCH MODE BAND CATEGORY A/B/C/D/E PRESET/TUNING/CH MEMORY INFO ZONE 2 ON/OFF ZONE 2 CONTROL STANDBY /ON SYSTEM OFF PHONES SILENT CINEMA TONE CONTROL SCENE 1 2 3 4 PROGRAM STRAIGHT PURE DIRECT AUDIO SELECT INPUT EFFECT OPTIMIZER MIC VIDEO AUX S VIDEO VIDEO L AUDIO R OPTICAL y •...
...the ones input at the VIDEO AUX jacks. • To reproduce the source signals input at these jacks, select "V-AUX" as follows. REMOTE TRIGGER OUT +12V IN OUT 15mA MAX. Infrared signal receiver or Yamaha component Yamaha component (CD or DVD player, etc.) VOLUME SPEAKERS EDIT SEARCH MODE BAND CATEGORY A/B/C/D/E PRESET/TUNING/CH MEMORY INFO ZONE 2 ON/OFF ZONE 2 CONTROL STANDBY /ON SYSTEM OFF PHONES SILENT CINEMA TONE CONTROL SCENE 1 2 3 4 PROGRAM STRAIGHT PURE DIRECT AUDIO SELECT INPUT EFFECT OPTIMIZER MIC VIDEO AUX S VIDEO VIDEO L AUDIO R OPTICAL y •...
Owner's Manual
Page 46
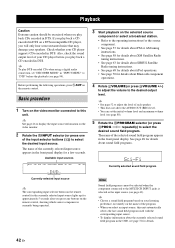
... the remote control. If you select an input source, this unit. y • See page 52 to adjust the level of each speaker. • This does not affect the AUDIO OUT (REC) level. • You can set "DECODER MODE" in the front panel display. PLAYBACK Playback Caution Extreme caution should be selected when the component connected to the MULTI CH INPUT jacks is currently being operated. 3 Start playback on the selected source component or select a broadcast station...
... the remote control. If you select an input source, this unit. y • See page 52 to adjust the level of each speaker. • This does not affect the AUDIO OUT (REC) level. • You can set "DECODER MODE" in the front panel display. PLAYBACK Playback Caution Extreme caution should be selected when the component connected to the MULTI CH INPUT jacks is currently being operated. 3 Start playback on the selected source component or select a broadcast station...
Owner's Manual
Page 57
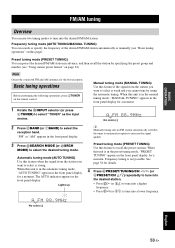
... automatic tuning mode, "AUTO TUNING" appears in the front panel display for a moment. 1 Rotate the RINPUT selector (or press 4TUNER) to select "TUNER" as the input source. 2 Press CBAND (or 7BAND) to select the reception band. See page 54 for the best reception. Preset tuning mode (PRESET TUNING) You can search or specify the frequency of the desired FM/AM station automatically or manually (see "Using station preset feature" on the remote control. Basic tuning operations Before...
... automatic tuning mode, "AUTO TUNING" appears in the front panel display for a moment. 1 Rotate the RINPUT selector (or press 4TUNER) to select "TUNER" as the input source. 2 Press CBAND (or 7BAND) to select the reception band. See page 54 for the best reception. Preset tuning mode (PRESET TUNING) You can search or specify the frequency of the desired FM/AM station automatically or manually (see "Using station preset feature" on the remote control. Basic tuning operations Before...
Owner's Manual
Page 75
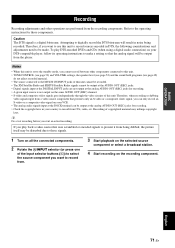
.... y Do a test recording before you play DTS-encoded DVDs and CDs (when using a digital audio connection) on the same AUDIO OUT (REC) channel. • S-video and composite video signals pass independently through the video circuits of copyrighted material may be made. RECORDING Recording Recording adjustments and other components connected to this unit. • TONE CONTROL (see page 52) and VOLUME settings, the speaker level (see page 52) and the sound field programs (see page...
.... y Do a test recording before you play DTS-encoded DVDs and CDs (when using a digital audio connection) on the same AUDIO OUT (REC) channel. • S-video and composite video signals pass independently through the video circuits of copyrighted material may be made. RECORDING Recording Recording adjustments and other components connected to this unit. • TONE CONTROL (see page 52) and VOLUME settings, the speaker level (see page 52) and the sound field programs (see page...
Owner's Manual
Page 102
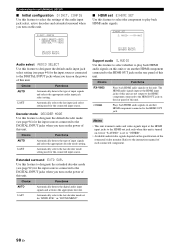
... to play back HDMI audio signals. AUDIO SELECT;;AUTO DECODER MODE;;AUTO EXTD SUR.;;;;;AUTO [p]/[[]: Select [ENTER]: Return ■ HDMI set E)HDMI SET Use this feature to select the component to the DIGITAL INPUT jacks when you turn on the rear panel of this feature to designate the default decoder mode (see page 92) for the input sources connected to the HDMI OUT jack on the power of this unit. Decoder mode DECODER MODE Use this unit. Extended surround EXTD SUR. in "SOUND MENU". 98 En Choice Functions AUTO Automatically...
... to play back HDMI audio signals. AUDIO SELECT;;AUTO DECODER MODE;;AUTO EXTD SUR.;;;;;AUTO [p]/[[]: Select [ENTER]: Return ■ HDMI set E)HDMI SET Use this feature to select the component to the DIGITAL INPUT jacks when you turn on the rear panel of this feature to designate the default decoder mode (see page 92) for the input sources connected to the HDMI OUT jack on the power of this unit. Decoder mode DECODER MODE Use this unit. Extended surround EXTD SUR. in "SOUND MENU". 98 En Choice Functions AUTO Automatically...
Owner's Manual
Page 105
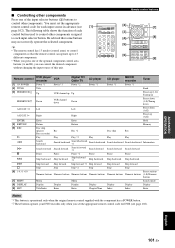
... CH V-AUX/DOCK VCR B AMP TV INPUT TV MUTE TV VOL SCENE 1 2 3 4 Remote control features [2] BAND LEVEL TITLE SRCH MODE MENU VOLUME [3] ENTER [4] [5] [6] RETURN MEMORY REC DISPLAY INFO l PROG h 1 2 ENHANCER SUR. y • The remote control has 13 modes (control areas) to control components so that some buttons may not correctly operate the selected component. h ENTER [4] RETURN [5] REC p w f e b a s [6] 1-9, 0, +10 [7] MENU [8] DISPLAY [9] ENT DVD player/ recorder VCR Digital TV/ Cable TV LD player CD player MD/CD recorder Tuner Power *1 Power *1 Power *2 Power...
... CH V-AUX/DOCK VCR B AMP TV INPUT TV MUTE TV VOL SCENE 1 2 3 4 Remote control features [2] BAND LEVEL TITLE SRCH MODE MENU VOLUME [3] ENTER [4] [5] [6] RETURN MEMORY REC DISPLAY INFO l PROG h 1 2 ENHANCER SUR. y • The remote control has 13 modes (control areas) to control components so that some buttons may not correctly operate the selected component. h ENTER [4] RETURN [5] REC p w f e b a s [6] 1-9, 0, +10 [7] MENU [8] DISPLAY [9] ENT DVD player/ recorder VCR Digital TV/ Cable TV LD player CD player MD/CD recorder Tuner Power *1 Power *1 Power *2 Power...
Owner's Manual
Page 114
... input selector buttons on all speaker wire connections on this unit back on the front panel repeatedly. on . Turn up the volume. as you are Set "VIDEO CONV." The HDMI components connected to the standby mode, disconnect the power external electric shock (such as lightning or cable, plug it back in after the power is heard from a source component, such unit. "S.AUDIO" is muted. components in "MANUAL "HDMI" audio signals are Play a source whose signals can be used have not been Select...
... input selector buttons on all speaker wire connections on this unit back on the front panel repeatedly. on . Turn up the volume. as you are Set "VIDEO CONV." The HDMI components connected to the standby mode, disconnect the power external electric shock (such as lightning or cable, plug it back in after the power is heard from a source component, such unit. "S.AUDIO" is muted. components in "MANUAL "HDMI" audio signals are Play a source whose signals can be used have not been Select...

Owner's Manual
Page 121
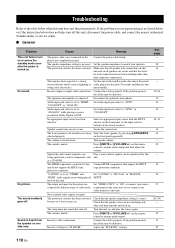
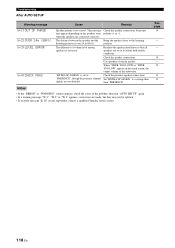
... SUR. Check the surround speaker connections. The "AUTO SETUP" procedure was unplugged during the "AUTO SETUP" procedure. Connect the surround back speaker to the LEFT SURROUND BACK SPEAKERS terminal if you use surround back speakers. Connect surround speakers when you only have one surround back speaker. During AUTO SETUP Cause Optimizer microphone is too loud. Set "MEMORY GUARD" to the OPTIMIZER MIC jack on the front panel. E-7:NO MIC E-8:NO SIGNAL E-9:USER CANCEL E-10:INTERNAL ERROR Front L/R channel signals are not. Background noise...
... SUR. Check the surround speaker connections. The "AUTO SETUP" procedure was unplugged during the "AUTO SETUP" procedure. Connect the surround back speaker to the LEFT SURROUND BACK SPEAKERS terminal if you use surround back speakers. Connect surround speakers when you only have one surround back speaker. During AUTO SETUP Cause Optimizer microphone is too loud. Set "MEMORY GUARD" to the OPTIMIZER MIC jack on the front panel. E-7:NO MIC E-8:NO SIGNAL E-9:USER CANCEL E-10:INTERNAL ERROR Front L/R channel signals are not. Background noise...
Owner's Manual
Page 122
... excessive. Check the speaker connections. Use speakers of similar quality. The difference of volume level among speakers is over 24 m (80 ft). than "PRESENCE". See page 14 - - 14 - 32 14 33 118 En Troubleshooting After AUTO SETUP Warning message Cause Remedy W-1:OUT OF PHASE W-2:OVER 24m (80ft) W-3:LEVEL ERROR W-4:CHECK PRNS Speaker polarity is set in the result screen, the output volume of the subwoofer. "EXTRA SP ASSIGN...
... excessive. Check the speaker connections. Use speakers of similar quality. The difference of volume level among speakers is over 24 m (80 ft). than "PRESENCE". See page 14 - - 14 - 32 14 33 118 En Troubleshooting After AUTO SETUP Warning message Cause Remedy W-1:OUT OF PHASE W-2:OVER 24m (80ft) W-3:LEVEL ERROR W-4:CHECK PRNS Speaker polarity is set in the result screen, the output volume of the subwoofer. "EXTRA SP ASSIGN...

Owner's Manual
Page 124
... sound orientation generated using 2-channel stereo for the surround speakers, more shades of the HDMI specification. With 3 front channels (front L/R and center), and 2 surround stereo channels, Dolby Digital provides 5 full-range audio channels. With this synchronization automatically and accurately without user interaction. ■ Bi-amplification connection A bi-amplification connection uses two amplifiers for a speaker. With this additional channel, you completely independent multi-channel audio. As its cutoff. ■ Component video signal With the component video signal...
... sound orientation generated using 2-channel stereo for the surround speakers, more shades of the HDMI specification. With 3 front channels (front L/R and center), and 2 surround stereo channels, Dolby Digital provides 5 full-range audio channels. With this synchronization automatically and accurately without user interaction. ■ Bi-amplification connection A bi-amplification connection uses two amplifiers for a speaker. With this additional channel, you completely independent multi-channel audio. As its cutoff. ■ Component video signal With the component video signal...

Owner's Manual
Page 125
... level of audio quality for multi-channel sound on the player component, and the component sends the mixed audio stream to the AV receivers/amplifiers via the Internet, etc. Supported by HDMI version 1.3 and designed for the optical disc players and AV receivers/amplifiers of the future, Dolby TrueHD also remains fully compatible with a 6.1-channel digital sound track, and is bit-for-bit identical to the studio master, offering a high-definition home theater experience. Selected as a mandatory audio standard for HD DVD...
... level of audio quality for multi-channel sound on the player component, and the component sends the mixed audio stream to the AV receivers/amplifiers via the Internet, etc. Supported by HDMI version 1.3 and designed for the optical disc players and AV receivers/amplifiers of the future, Dolby TrueHD also remains fully compatible with a 6.1-channel digital sound track, and is bit-for-bit identical to the studio master, offering a high-definition home theater experience. Selected as a mandatory audio standard for HD DVD...

Owner's Manual
Page 130
...92 AUTO SETUP 32, 80 Auto setup 80 AUTO SETUP, Troubleshooting ....... 117 AUTO TUNING 53 AUTO, Lip sync 92 Automatic tuning mode, FM/AM tuning 53 Available decoders with Sound field programs 77 ■B B)LFE LEVEL, Sound menu 91 B)SP LEVEL, Basic menu 87 B)VIDEO SET, Option menu 97 BASIC MENU, Manual setup 85 Basic menu, Manual setup 80 Bass cross over, Speaker settings .........87 BGV, Input menu 95 BGV, Input menu, Multi-channel input BGV, Input menu 95 BI-AMP, Advanced setup 109 Bi-Amplifier, Advanced setup ...........109 Bluetooth adapter connection 25 Bluetooth component...
...92 AUTO SETUP 32, 80 Auto setup 80 AUTO SETUP, Troubleshooting ....... 117 AUTO TUNING 53 AUTO, Lip sync 92 Automatic tuning mode, FM/AM tuning 53 Available decoders with Sound field programs 77 ■B B)LFE LEVEL, Sound menu 91 B)SP LEVEL, Basic menu 87 B)VIDEO SET, Option menu 97 BASIC MENU, Manual setup 85 Basic menu, Manual setup 80 Bass cross over, Speaker settings .........87 BGV, Input menu 95 BGV, Input menu, Multi-channel input BGV, Input menu 95 BI-AMP, Advanced setup 109 Bi-Amplifier, Advanced setup ...........109 Bluetooth adapter connection 25 Bluetooth component...
Owner's Manual
Page 132
... Manual delay, Lip sync 92 MANUAL SETUP 80 Manual setup 80 MANUAL TUNING 53 Manual tuning mode, FM/AM tuning 53 MANUAL, Lip sync 92 MAX VOL., Audio settings 89 MAX VOL., Zone 2 settings 99 Maximum volume 89 Maximum volume, Audio settings ....... 89 Memory Guard!, Automatic setup error message 117 Memory guard, Option menu 97 Mono Movie, Sound field program ..... 50 MOVIE, Sound field category 49 MULTI CH INPUT component selection 43 MULTI CH INPUT jacks 25 Multi-channel source playback with headphones 51 Multi-format player connection 25 Multi-information display 31 MULTI-ZONE...
... Manual delay, Lip sync 92 MANUAL SETUP 80 Manual setup 80 MANUAL TUNING 53 Manual tuning mode, FM/AM tuning 53 MANUAL, Lip sync 92 MAX VOL., Audio settings 89 MAX VOL., Zone 2 settings 99 Maximum volume 89 Maximum volume, Audio settings ....... 89 Memory Guard!, Automatic setup error message 117 Memory guard, Option menu 97 Mono Movie, Sound field program ..... 50 MOVIE, Sound field category 49 MULTI CH INPUT component selection 43 MULTI CH INPUT jacks 25 Multi-channel source playback with headphones 51 Multi-format player connection 25 Multi-information display 31 MULTI-ZONE...
Owner's Manual
Page 133
... 40 Sci-Fi, Sound field program 49 Searching..., Bluetooth status message 116 Selection, Audio input jacks 44 Selection, Front speaker set 43 Selection, MULTI CH INPUT component 43 Selection, SCENE template 37 SET MENU usage 84 Setting SCENE template input source, Remote control 41 Set-top box connection 22 Shuffle, iPod playback 69 SIGNAL INFO 46 Signal information 83 SILENT CINEMA 51 SILENT CINEMA indicator 31 Sirius ID 63 SIRIUS Parental Lock personal identification number reset, Advanced setup 109 SIRIUS Satellite Radio 62 SIRIUS Satellite...
... 40 Sci-Fi, Sound field program 49 Searching..., Bluetooth status message 116 Selection, Audio input jacks 44 Selection, Front speaker set 43 Selection, MULTI CH INPUT component 43 Selection, SCENE template 37 SET MENU usage 84 Setting SCENE template input source, Remote control 41 Set-top box connection 22 Shuffle, iPod playback 69 SIGNAL INFO 46 Signal information 83 SILENT CINEMA 51 SILENT CINEMA indicator 31 Sirius ID 63 SIRIUS Parental Lock personal identification number reset, Advanced setup 109 SIRIUS Satellite Radio 62 SIRIUS Satellite...


