Owner's Manual
Page 5
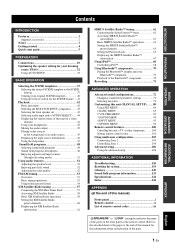
... 85 2 VOLUME MENU 89 3 SOUND MENU 90 4 INPUT MENU 93 5 OPTION MENU 96 Remote control features 100 Controlling this unit, a TV, or other components.......... 100 Setting remote control codes 102 Using multi-zone configuration 103 Connecting Zone 2 103 Controlling Zone 2 104 Advanced... the Bluetooth™ adapter and your original SCENE templates 40 Using the remote control for the information about each position of the parts on the front panel or the remote control. ADDITIONAL INFORMATION APPENDIX English 1 En INTRODUCTION PREPARATION BASIC OPERATION ADVANCED OPERATION...
... 85 2 VOLUME MENU 89 3 SOUND MENU 90 4 INPUT MENU 93 5 OPTION MENU 96 Remote control features 100 Controlling this unit, a TV, or other components.......... 100 Setting remote control codes 102 Using multi-zone configuration 103 Connecting Zone 2 103 Controlling Zone 2 104 Advanced... the Bluetooth™ adapter and your original SCENE templates 40 Using the remote control for the information about each position of the parts on the front panel or the remote control. ADDITIONAL INFORMATION APPENDIX English 1 En INTRODUCTION PREPARATION BASIC OPERATION ADVANCED OPERATION...

Owner's Manual
Page 6
... SCENE templates for various situations ◆ SCENE templates for customizing capability ◆ Controlling Yamaha SCENE control signal support component (some models only) working with preset remote control codes capability ◆ Zone 2 custom installation facility ◆ Bi-amplification connection ...allow you received all sources ◆ Adaptive dynamic range controlling capability ◆ Adaptive DSP effect level controlling capability ◆ iPod controlling capability ◆ Remote control with the SCENE function Sound field programs ◆ Proprietary Yamaha technology for...
... SCENE templates for various situations ◆ SCENE templates for customizing capability ◆ Controlling Yamaha SCENE control signal support component (some models only) working with preset remote control codes capability ◆ Zone 2 custom installation facility ◆ Bi-amplification connection ...allow you received all sources ◆ Adaptive dynamic range controlling capability ◆ Adaptive DSP effect level controlling capability ◆ iPod controlling capability ◆ Remote control with the SCENE function Sound field programs ◆ Proprietary Yamaha technology for...

Owner's Manual
Page 7
...or registered trademarks of DTS, Inc. © 1996-2007 DTS, Inc. All Rights Reserved. "SILENT CINEMA" is too late, Yamaha and the Electronic Industries Association's Consumer Electronics Group recommend you to avoid prolonged exposure from Dolby Laboratories. Manufactured under U.S. "SIRIUS", "...change in the U.S. Bluetooth™ Bluetooth is a registered trademark of the parts on the remote control is given in parentheses. • This manual is used by Yamaha in accordance with page number(s) indicates the corresponding reference page(s). DTS is a trademark of ...
...or registered trademarks of DTS, Inc. © 1996-2007 DTS, Inc. All Rights Reserved. "SILENT CINEMA" is too late, Yamaha and the Electronic Industries Association's Consumer Electronics Group recommend you to avoid prolonged exposure from Dolby Laboratories. Manufactured under U.S. "SIRIUS", "...change in the U.S. Bluetooth™ Bluetooth is a registered trademark of the parts on the remote control is given in parentheses. • This manual is used by Yamaha in accordance with page number(s) indicates the corresponding reference page(s). DTS is a trademark of ...

Owner's Manual
Page 8
...contact with clothing, etc. When the memory is without batteries for more than 2 minutes, or if exhausted batteries remain in the remote control, the contents of the memory may cause damage to the correct position using a straight slot screwdriver. Clean the battery compartment ...• Do not use different types of them correctly in accordance with general house waste; GETTING STARTED Getting started ■ Installing batteries in the remote control 13 2 1 Take off the battery compartment cover. 2 Insert the two supplied batteries (AAA, R03, UM-4) according to the polarity markings ...
...contact with clothing, etc. When the memory is without batteries for more than 2 minutes, or if exhausted batteries remain in the remote control, the contents of the memory may cause damage to the correct position using a straight slot screwdriver. Clean the battery compartment ...• Do not use different types of them correctly in accordance with general house waste; GETTING STARTED Getting started ■ Installing batteries in the remote control 13 2 1 Take off the battery compartment cover. 2 Insert the two supplied batteries (AAA, R03, UM-4) according to the polarity markings ...
Owner's Manual
Page 10
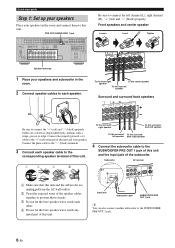
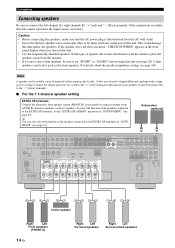
... speaker wires touch each other. 4 Do not let the bare speaker wires touch any metal part of this unit and your speaker. Subwoofer AV receiver PRE OUSTINGLE CENTER DOCK VIDE RROUND SUR. Input jack Subwoofer cable SUBWOOFER PRE OUT 1 jack y You can also connect another subwoofer to connect...this unit. Quick start guide Step 1: Set up your speakers Place your speakers in the room. 2 Connect speaker cables to each speaker. REMOTE TRIGGER OUT +12V IN OUT 15mA MAX. Front speakers and center speaker Loosen Insert Tighten To the front right speaker To the center speaker...
... speaker wires touch each other. 4 Do not let the bare speaker wires touch any metal part of this unit and your speaker. Subwoofer AV receiver PRE OUSTINGLE CENTER DOCK VIDE RROUND SUR. Input jack Subwoofer cable SUBWOOFER PRE OUT 1 jack y You can also connect another subwoofer to connect...this unit. Quick start guide Step 1: Set up your speakers Place your speakers in the room. 2 Connect speaker cables to each speaker. REMOTE TRIGGER OUT +12V IN OUT 15mA MAX. Front speakers and center speaker Loosen Insert Tighten To the front right speaker To the center speaker...
Owner's Manual
Page 11
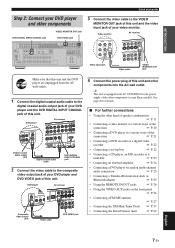
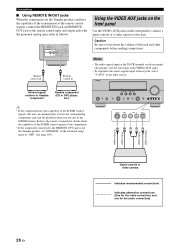
...video monitor via various ways of the connection ☞ P. 20 • Connecting a DVD player via various ways of this unit. DVD player AV receiver DOCK VIDEO VIDEO S VIDEO DVD DTV/CBL IN OUT DVR COMPONENT V PR DVD A PB Y PR Composite video output jack Video cable OUT ... P. 24 • Connecting a DVD player via analog multi-channel audio connection ☞ P. 25 • Connecting a Yamaha iPod universal dock or Bluetooth adapter ☞ P. 25 • Using the REMOTE IN/OUT jacks ☞ P. 26 • Using the VIDEO AUX jacks on the front panel ☞ P. 26...
...video monitor via various ways of the connection ☞ P. 20 • Connecting a DVD player via various ways of this unit. DVD player AV receiver DOCK VIDEO VIDEO S VIDEO DVD DTV/CBL IN OUT DVR COMPONENT V PR DVD A PB Y PR Composite video output jack Video cable OUT ... P. 24 • Connecting a DVD player via analog multi-channel audio connection ☞ P. 25 • Connecting a Yamaha iPod universal dock or Bluetooth adapter ☞ P. 25 • Using the REMOTE IN/OUT jacks ☞ P. 26 • Using the VIDEO AUX jacks on the front panel ☞ P. 26...

Owner's Manual
Page 13
... your listening room (AUTO SETUP) ☞ P. 32 • Manually adjusting various parameters of this unit ☞ P. 80 • Setting the remote control ☞ P. 100 • Adjusting the advanced parameters ☞ P. 106 ■ Additional feature • Automatically turning off this unit... Press... KMAIN ZONE ON/OFF to set to receive infrared signals from the standby mode, press the desired SSCENE buttons (or 6SCENE) or KMAIN ZONE ON/OFF (or HPOWER). INTRODUCTION ...
... your listening room (AUTO SETUP) ☞ P. 32 • Manually adjusting various parameters of this unit ☞ P. 80 • Setting the remote control ☞ P. 100 • Adjusting the advanced parameters ☞ P. 106 ■ Additional feature • Automatically turning off this unit... Press... KMAIN ZONE ON/OFF to set to receive infrared signals from the standby mode, press the desired SSCENE buttons (or 6SCENE) or KMAIN ZONE ON/OFF (or HPOWER). INTRODUCTION ...

Owner's Manual
Page 14
... CH INPUT jacks 4 ZONE2 OUT jacks 5 PRE OUT jacks 6 DOCK terminal 7 Video component jacks (VIDEO and S VIDEO) COMPONENT VIDEO jacks 8 ANTENNA terminals 9 REMOTE IN/OUT jacks 0 Speaker terminals A HDMI jacks B VOLTAGE SELECTOR (Asia and General models only) C AC OUTLET(S) Page 57 62 21 17-23 25 103 24...17-22 27 26 11-16 18 4 28 A B C 9 TRIGGER OUT jack This is control expansion jack for custom installation. 10 En TOTAL 0.8A MAX. REMOTE TRIGGER OUT +12V IN OUT 15mA MAX. BACK 1 2 SUBWOOFER SIRIUS XM ANTENNA AM GND DVD DTV/CBL 1 2 OPTICAL DIGITAL INPUT FRONT B/ZONE B/ ZONE ...
... CH INPUT jacks 4 ZONE2 OUT jacks 5 PRE OUT jacks 6 DOCK terminal 7 Video component jacks (VIDEO and S VIDEO) COMPONENT VIDEO jacks 8 ANTENNA terminals 9 REMOTE IN/OUT jacks 0 Speaker terminals A HDMI jacks B VOLTAGE SELECTOR (Asia and General models only) C AC OUTLET(S) Page 57 62 21 17-23 25 103 24...17-22 27 26 11-16 18 4 28 A B C 9 TRIGGER OUT jack This is control expansion jack for custom installation. 10 En TOTAL 0.8A MAX. REMOTE TRIGGER OUT +12V IN OUT 15mA MAX. BACK 1 2 SUBWOOFER SIRIUS XM ANTENNA AM GND DVD DTV/CBL 1 2 OPTICAL DIGITAL INPUT FRONT B/ZONE B/ ZONE ...
Owner's Manual
Page 18
... 7.1-channel speaker setting EXTRA SP terminals Connect the alternative front speaker system (FRONT B), front speaker systems in another room (ZONE B), presence speakers, or Zone 2 speakers. REMOTE TRIGGER OUT +12V IN OUT 15mA MAX. If this type of speaker still creates interference with a stripe, groove or ridge. y You can be sure to...
... 7.1-channel speaker setting EXTRA SP terminals Connect the alternative front speaker system (FRONT B), front speaker systems in another room (ZONE B), presence speakers, or Zone 2 speakers. REMOTE TRIGGER OUT +12V IN OUT 15mA MAX. If this type of speaker still creates interference with a stripe, groove or ridge. y You can be sure to...

Owner's Manual
Page 25
... INPUT (COAXIAL) jacks, priority is given to "OFF" (see page 20). TOTAL 0.8A MAX. is set to the signals input at the MONITOR OUT jacks. REMOTE TRIGGER OUT +12V IN OUT 15mA MAX. Notes • When "VIDEO CONV."
... INPUT (COAXIAL) jacks, priority is given to "OFF" (see page 20). TOTAL 0.8A MAX. is set to the signals input at the MONITOR OUT jacks. REMOTE TRIGGER OUT +12V IN OUT 15mA MAX. Notes • When "VIDEO CONV."

Owner's Manual
Page 27
... the DIGITAL INPUT (OPTICAL) jack and the DIGITAL INPUT (COAXIAL) jack to an audio component, the priority is given to the DIGITAL INPUT (COAXIAL) jack. REMOTE TRIGGER OUT +12V IN OUT 15mA MAX. PREPARATION ■ Connecting audio components Connections Notes • To make a digital connection to a component other than the default...
... the DIGITAL INPUT (OPTICAL) jack and the DIGITAL INPUT (COAXIAL) jack to an audio component, the priority is given to the DIGITAL INPUT (COAXIAL) jack. REMOTE TRIGGER OUT +12V IN OUT 15mA MAX. PREPARATION ■ Connecting audio components Connections Notes • To make a digital connection to a component other than the default...
Owner's Manual
Page 30
... for details about the capability of the SCENE control signals of the components. • If the component connected to the REMOTE OUT jack is not the Yamaha product, set "SCENE IR" in Using the VIDEO AUX jacks on the front panel Use the VIDEO AUX jacks on ...indicates alternative connections (One for the audio connection) 26 En Remote control out Remote control in the advanced setup menu to turn down the volume of this unit and other components before making connections. Infrared signal receiver or Yamaha component Yamaha component (CD or DVD player, etc.) VOLUME SPEAKERS EDIT ...
... for details about the capability of the SCENE control signals of the components. • If the component connected to the REMOTE OUT jack is not the Yamaha product, set "SCENE IR" in Using the VIDEO AUX jacks on the front panel Use the VIDEO AUX jacks on ...indicates alternative connections (One for the audio connection) 26 En Remote control out Remote control in the advanced setup menu to turn down the volume of this unit and other components before making connections. Infrared signal receiver or Yamaha component Yamaha component (CD or DVD player, etc.) VOLUME SPEAKERS EDIT ...

Owner's Manual
Page 31
Consult the nearest authorized Yamaha dealer or service center about outdoor antennas. • The AM loop antenna should be connected, even if an outdoor AM antenna is a metal stake driven ... you can connect either end of the AM loop antenna does not have any polarity and you experience poor reception quality, install an outdoor antenna. REMOTE TRIGGER OUT Outdoor AM antenna Use a 5 to 10 m (16 to the designated terminals. Indoor FM antenna (supplied) AM loop antenna (supplied) DV SIRIUS XM 1 OPT...
Consult the nearest authorized Yamaha dealer or service center about outdoor antennas. • The AM loop antenna should be connected, even if an outdoor AM antenna is a metal stake driven ... you can connect either end of the AM loop antenna does not have any polarity and you experience poor reception quality, install an outdoor antenna. REMOTE TRIGGER OUT Outdoor AM antenna Use a 5 to 10 m (16 to the designated terminals. Indoor FM antenna (supplied) AM loop antenna (supplied) DV SIRIUS XM 1 OPT...

Owner's Manual
Page 33
... zone to the standby mode Press KMAIN ZONE ON/OFF (or ISTANDBY) to set the main zone and Zone 2 (see page 104) to receive infrared signals from the remote control. The main zone is turned on. Connections PREPARATION English 29 En y Press LSYSTEM OFF to set the main zone to the standby...
... zone to the standby mode Press KMAIN ZONE ON/OFF (or ISTANDBY) to set the main zone and Zone 2 (see page 104) to receive infrared signals from the remote control. The main zone is turned on. Connections PREPARATION English 29 En y Press LSYSTEM OFF to set the main zone to the standby...
Owner's Manual
Page 35
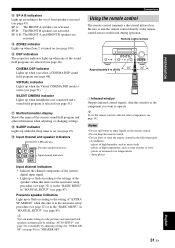
... sure to operate. E ZONE2 indicator Lights up when headphones are activated. VIRTUAL indicator Lights up when you want to aim the remote control directly at the component you select a CINEMA DSP sound field program (see page 48). I Infrared window Outputs infrared control signals... automatic setup procedure (see page 32) or in the "BASIC MENU" in "MANUAL SETUP" (see page 51). Connections Using the remote control The remote control transmits a directional infrared ray. SP B: The FRONT B speakers are activated. H SLEEP indicator Lights up when any of high humidity...
... sure to operate. E ZONE2 indicator Lights up when headphones are activated. VIRTUAL indicator Lights up when you want to aim the remote control directly at the component you select a CINEMA DSP sound field program (see page 48). I Infrared window Outputs infrared control signals... automatic setup procedure (see page 32) or in the "BASIC MENU" in "MANUAL SETUP" (see page 51). Connections Using the remote control The remote control transmits a directional infrared ray. SP B: The FRONT B speakers are activated. H SLEEP indicator Lights up when any of high humidity...

Owner's Manual
Page 41
... and the name of the currently assigned SCENE template appears in the front panel display. 3 seconds 3 seconds 1 or 1 Front panel Remote control English 1 Flashes DVD Viewing 37 En The selected SCENE template is equipped with 18 preset SCENE templates for 3 seconds. BASIC OPERATION ...SCENE template library (Image) 1 Assign the SCENE template to the SCENE button Selecting the desired SCENE template to the SCENE buttons Front panel Remote control Note Once the desired SCENE templates are assigned to each SCENE button (see page 8): SCENE 1: DVD Viewing SCENE 2: Disc Listening...
... and the name of the currently assigned SCENE template appears in the front panel display. 3 seconds 3 seconds 1 or 1 Front panel Remote control English 1 Flashes DVD Viewing 37 En The selected SCENE template is equipped with 18 preset SCENE templates for 3 seconds. BASIC OPERATION ...SCENE template library (Image) 1 Assign the SCENE template to the SCENE button Selecting the desired SCENE template to the SCENE buttons Front panel Remote control Note Once the desired SCENE templates are assigned to each SCENE button (see page 8): SCENE 1: DVD Viewing SCENE 2: Disc Listening...
Owner's Manual
Page 43
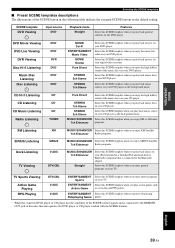
... player or CD player has the capability of the SCENE control signals and is connected to the REMOTE OUT jack of the SCENE button in the following table indicate the assigned SCENE buttons in a Yamaha iPod universal dock or Bluetooth component that is connected to the Bluetooth adapter. Select this SCENE template...
... player or CD player has the capability of the SCENE control signals and is connected to the REMOTE OUT jack of the SCENE button in the following table indicate the assigned SCENE buttons in a Yamaha iPod universal dock or Bluetooth component that is connected to the Bluetooth adapter. Select this SCENE template...
Owner's Manual
Page 44
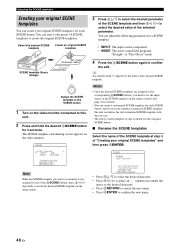
... to cancel the new name. • Press 8ENTER to select the desired value of the selected parameter. The SCENE template customizing screen appears on the remote control. SCENE1 .p DVD Viewing [ INPUT: DVD MODE: STRAIGHT [ENTER]:Rename [SCENE1]:SET [RETURN]:EXIT Note When the SCENE template you need to any of "Creating...
... to cancel the new name. • Press 8ENTER to select the desired value of the selected parameter. The SCENE template customizing screen appears on the remote control. SCENE1 .p DVD Viewing [ INPUT: DVD MODE: STRAIGHT [ENTER]:Rename [SCENE1]:SET [RETURN]:EXIT Note When the SCENE template you need to any of "Creating...
Owner's Manual
Page 45
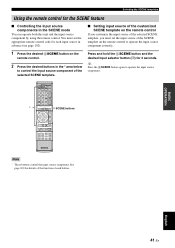
... feature ■ Controlling the input source components in the SCENE mode You can operate both this unit and the input source component by using the remote control. DECODE 3 4 STRAIGHT PURE DIRECT PARAMETER 5 6 7 8 MULTI CH IN AUDIO SEL 9 0 SLEEP 10 ENT Note * These buttons control the input source component.... for details of the function of each input source in the * area below to operate the input source component. * POWER POWER STANDBY POWER TV AV A XM SIRIUS MUTE CD MD/CD-R TUNER DVD DTV/CBL DVR TV CH V-AUX/DOCK VCR B AMP TV INPUT TV MUTE TV VOL SCENE 1 2...
... feature ■ Controlling the input source components in the SCENE mode You can operate both this unit and the input source component by using the remote control. DECODE 3 4 STRAIGHT PURE DIRECT PARAMETER 5 6 7 8 MULTI CH IN AUDIO SEL 9 0 SLEEP 10 ENT Note * These buttons control the input source component.... for details of the function of each input source in the * area below to operate the input source component. * POWER POWER STANDBY POWER TV AV A XM SIRIUS MUTE CD MD/CD-R TUNER DVD DTV/CBL DVR TV CH V-AUX/DOCK VCR B AMP TV INPUT TV MUTE TV VOL SCENE 1 2...
Owner's Manual
Page 46
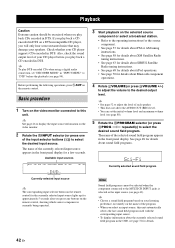
... for the currently selected input source lights up for approximately 5 seconds after you press any buttons on the remote control, showing which source component is selected as the input source (see page 72 for details. 42 En y See page 46 to display the input ... programs. Sci-Fi Currently selected sound field program Note Sound field programs cannot be exercised when you play back a CD encoded in DTS on the remote control. Before performing the following operations, press 5AMP on a DTS-incompatible CD player, you select an input source, this unit.
... for the currently selected input source lights up for approximately 5 seconds after you press any buttons on the remote control, showing which source component is selected as the input source (see page 72 for details. 42 En y See page 46 to display the input ... programs. Sci-Fi Currently selected sound field program Note Sound field programs cannot be exercised when you play back a CD encoded in DTS on the remote control. Before performing the following operations, press 5AMP on a DTS-incompatible CD player, you select an input source, this unit.

