Owner's Manual
Page 5
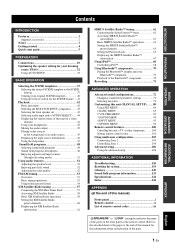
... the front speaker set 43 Selecting audio input jacks (AUDIO SELECT)...... 44 Displaying the current status of this manual) Front panel i Remote control ii List of remote control codes iii "ASPEAKERS" or "4DVD" (example) indicates the name of the parts. Refer to the attached sheet or the ...68 Controlling iPod 68 Using Bluetooth™ components 70 Pairing the Bluetooth™ adapter and your original SCENE templates 40 Using the remote control for your listening room (YPAO 32 Using AUTO SETUP 32 BASIC OPERATION Selecting the SCENE templates 37 Selecting the desired SCENE template...
... the front speaker set 43 Selecting audio input jacks (AUDIO SELECT)...... 44 Displaying the current status of this manual) Front panel i Remote control ii List of remote control codes iii "ASPEAKERS" or "4DVD" (example) indicates the name of the parts. Refer to the attached sheet or the ...68 Controlling iPod 68 Using Bluetooth™ components 70 Pairing the Bluetooth™ adapter and your original SCENE templates 40 Using the remote control for your listening room (YPAO 32 Using AUTO SETUP 32 BASIC OPERATION Selecting the SCENE templates 37 Selecting the desired SCENE template...

Owner's Manual
Page 6
... situations ◆ SCENE templates for customizing capability ◆ Controlling Yamaha SCENE control signal support component (some models only) working with preset remote control codes capability ◆ Zone 2 custom installation facility ◆ Bi-amplification connection capability ◆ Sleep timer Supplied accessories Check that you received all sources ◆ Adaptive dynamic range controlling capability ◆...
... situations ◆ SCENE templates for customizing capability ◆ Controlling Yamaha SCENE control signal support component (some models only) working with preset remote control codes capability ◆ Zone 2 custom installation facility ◆ Bi-amplification connection capability ◆ Sleep timer Supplied accessories Check that you received all sources ◆ Adaptive dynamic range controlling capability ◆...

Owner's Manual
Page 7
... the parts. • The symbol "☞ " with a license agreement. Since hearing damage from loud sounds is too late, Yamaha and the Electronic Industries Association's Consumer Electronics Group recommend you to production. Design and specifications are subject to avoid prolonged exposure from Dolby... Multimedia Interface" are trademarks owned by using either the buttons on the front panel or the ones on the front panel or the remote control. English 3 En In case the button names differ between the manual and product, the product has priority. • "ASPEAKERS...
... the parts. • The symbol "☞ " with a license agreement. Since hearing damage from loud sounds is too late, Yamaha and the Electronic Industries Association's Consumer Electronics Group recommend you to production. Design and specifications are subject to avoid prolonged exposure from Dolby... Multimedia Interface" are trademarks owned by using either the buttons on the front panel or the ones on the front panel or the remote control. English 3 En In case the button names differ between the manual and product, the product has priority. • "ASPEAKERS...

Owner's Manual
Page 8
... carefully as alkaline and manganese batteries) together. Notes • Change all of the batteries if you notice that the operation range of the remote control decreases. • Do not use an old battery and a new one together. • Do not use different types of batteries ... material or letting it come into place. Improper setting of the VOLTAGE SELECTOR may be set up the remote control code. 4 En GETTING STARTED Getting started ■ Installing batteries in the remote control 13 2 1 Take off the battery compartment cover. 2 Insert the two supplied batteries (AAA, ...
... carefully as alkaline and manganese batteries) together. Notes • Change all of the batteries if you notice that the operation range of the remote control decreases. • Do not use an old battery and a new one together. • Do not use different types of batteries ... material or letting it come into place. Improper setting of the VOLTAGE SELECTOR may be set up the remote control code. 4 En GETTING STARTED Getting started ■ Installing batteries in the remote control 13 2 1 Take off the battery compartment cover. 2 Insert the two supplied batteries (AAA, ...
Owner's Manual
Page 10
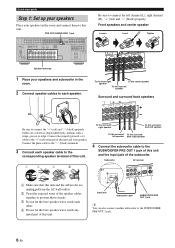
... SIRIUS XM ANTENNA AM GND DVD DTV/CBL 1 2 OPTICAL DIGITAL INPUT FRONT B/ZONE B/ ZONE 2/PRESENCE R EXTRA SP L CD DVD 3 4 COAXIAL FRONT A R L FM 75Ω UNBAL. REMOTE TRIGGER OUT +12V IN OUT 15mA MAX. TOTAL C DVR Speaker terminals 1 Place your speaker. Cables are unplugged from the AC wall outlets. 2 Twist the exposed... (R), "+" (red) and "-" (black) properly. Quick start guide Step 1: Set up your speakers Place your speakers in the room. 2 Connect speaker cables to each speaker. Subwoofer AV receiver PRE OUSTINGLE CENTER DOCK VIDE RROUND SUR.
... SIRIUS XM ANTENNA AM GND DVD DTV/CBL 1 2 OPTICAL DIGITAL INPUT FRONT B/ZONE B/ ZONE 2/PRESENCE R EXTRA SP L CD DVD 3 4 COAXIAL FRONT A R L FM 75Ω UNBAL. REMOTE TRIGGER OUT +12V IN OUT 15mA MAX. TOTAL C DVR Speaker terminals 1 Place your speaker. Cables are unplugged from the AC wall outlets. 2 Twist the exposed... (R), "+" (red) and "-" (black) properly. Quick start guide Step 1: Set up your speakers Place your speakers in the room. 2 Connect speaker cables to each speaker. Subwoofer AV receiver PRE OUSTINGLE CENTER DOCK VIDE RROUND SUR.
Owner's Manual
Page 11
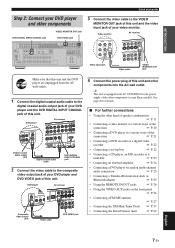
REMOTE TRIGGER OUT +12V IN OUT 15mA MAX. Video monitor AV receiver Video input jack VIDEO IN DVD PB OUT IN ... a DVD player via analog multi-channel audio connection ☞ P. 25 • Connecting a Yamaha iPod universal dock or Bluetooth adapter ☞ P. 25 • Using the REMOTE IN/OUT jacks ☞ P. 26 • Using the VIDEO AUX jacks on the front... to the composite video output jack of your DVD player and DVD VIDEO jack of your video monitor. DVD player AV receiver AUDIO M FRONT (8CH D/ D-R OUT (REC) DVD DTV/CBL IN OUT DVR IN OUT VCR SB (8CH...
REMOTE TRIGGER OUT +12V IN OUT 15mA MAX. Video monitor AV receiver Video input jack VIDEO IN DVD PB OUT IN ... a DVD player via analog multi-channel audio connection ☞ P. 25 • Connecting a Yamaha iPod universal dock or Bluetooth adapter ☞ P. 25 • Using the REMOTE IN/OUT jacks ☞ P. 26 • Using the VIDEO AUX jacks on the front... to the composite video output jack of your DVD player and DVD VIDEO jack of your video monitor. DVD player AV receiver AUDIO M FRONT (8CH D/ D-R OUT (REC) DVD DTV/CBL IN OUT DVR IN OUT VCR SB (8CH...

Owner's Manual
Page 13
...to the standby mode and consumes a small amount of power in order to the standby mode. To turn on this unit to receive infrared signals from the standby mode, press the desired SSCENE buttons (or 6SCENE) or KMAIN ZONE ON/OFF (or HPOWER). See...sound field programs ☞ P. 48 ☞ P. 52 ☞ P. 72 ■ Adjusting the parameters of this unit ☞ P. 80 • Setting the remote control ☞ P. 100 • Adjusting the advanced parameters ☞ P. 106 ■ Additional feature • Automatically turning off this unit... INTRODUCTION ■ After using...
...to the standby mode and consumes a small amount of power in order to the standby mode. To turn on this unit to receive infrared signals from the standby mode, press the desired SSCENE buttons (or 6SCENE) or KMAIN ZONE ON/OFF (or HPOWER). See...sound field programs ☞ P. 48 ☞ P. 52 ☞ P. 72 ■ Adjusting the parameters of this unit ☞ P. 80 • Setting the remote control ☞ P. 100 • Adjusting the advanced parameters ☞ P. 106 ■ Additional feature • Automatically turning off this unit... INTRODUCTION ■ After using...

Owner's Manual
Page 14
REMOTE TRIGGER OUT +12V IN OUT 15mA MAX. and Canada models only) SIRIUS jack (U.S.A. DVD DTV/CBL IN1 IN2 SPEAKERS CENTER SURROUND R L OUT SURROUND BACK/BI-.../OUTPUT jacks 3 MULTI CH INPUT jacks 4 ZONE2 OUT jacks 5 PRE OUT jacks 6 DOCK terminal 7 Video component jacks (VIDEO and S VIDEO) COMPONENT VIDEO jacks 8 ANTENNA terminals 9 REMOTE IN/OUT jacks 0 Speaker terminals A HDMI jacks B VOLTAGE SELECTOR (Asia and General models only) C AC OUTLET(S) Page 57 62 21 17-23 25 103 24...
REMOTE TRIGGER OUT +12V IN OUT 15mA MAX. and Canada models only) SIRIUS jack (U.S.A. DVD DTV/CBL IN1 IN2 SPEAKERS CENTER SURROUND R L OUT SURROUND BACK/BI-.../OUTPUT jacks 3 MULTI CH INPUT jacks 4 ZONE2 OUT jacks 5 PRE OUT jacks 6 DOCK terminal 7 Video component jacks (VIDEO and S VIDEO) COMPONENT VIDEO jacks 8 ANTENNA terminals 9 REMOTE IN/OUT jacks 0 Speaker terminals A HDMI jacks B VOLTAGE SELECTOR (Asia and General models only) C AC OUTLET(S) Page 57 62 21 17-23 25 103 24...
Owner's Manual
Page 18
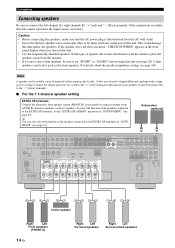
... SURROUND SUR. Caution • Before connecting the speakers, make sure that the AC power plug is actually a pair of this unit and/or the speakers. REMOTE TRIGGER OUT +12V IN OUT 15mA MAX. For details about the speaker impedance setting, see page 28). 4 ohm speakers can also select the function of...
... SURROUND SUR. Caution • Before connecting the speakers, make sure that the AC power plug is actually a pair of this unit and/or the speakers. REMOTE TRIGGER OUT +12V IN OUT 15mA MAX. For details about the speaker impedance setting, see page 28). 4 ohm speakers can also select the function of...

Owner's Manual
Page 25
.../ OUT CD (PLAY) CD-R (REC) DVD DTV/CBL IN OUT DVR IN OUT VCR SUB SB (8CH) SURROUND WOOFER ZONE 2 HDMI OUT FRONT SURROUND SUR. REMOTE TRIGGER OUT +12V IN OUT 15mA MAX. For example, if you connect your DVD player to both the DIGITAL INPUT (OPTICAL) and the DIGITAL INPUT...
.../ OUT CD (PLAY) CD-R (REC) DVD DTV/CBL IN OUT DVR IN OUT VCR SUB SB (8CH) SURROUND WOOFER ZONE 2 HDMI OUT FRONT SURROUND SUR. REMOTE TRIGGER OUT +12V IN OUT 15mA MAX. For example, if you connect your DVD player to both the DIGITAL INPUT (OPTICAL) and the DIGITAL INPUT...

Owner's Manual
Page 27
REMOTE TRIGGER OUT +12V IN OUT 15mA MAX. CD recorder, MD recorder or tape deck Audio out Audio in "I/O ASSIGNMENT" (see page 93). • When you ...
REMOTE TRIGGER OUT +12V IN OUT 15mA MAX. CD recorder, MD recorder or tape deck Audio out Audio in "I/O ASSIGNMENT" (see page 93). • When you ...
Owner's Manual
Page 30
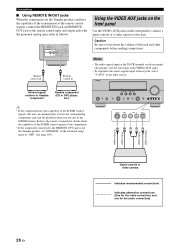
...see page 109). Caution Be sure to turn down the volume of the components. • If the component connected to the REMOTE OUT jack is not the Yamaha product, set "SCENE IR" in Using the VIDEO AUX jacks on the front panel Use the VIDEO AUX jacks on the ... at these jacks, select "V-AUX" as follows. Connections ■ Using REMOTE IN/OUT jacks When the components are the Yamaha products and have the capability of the SCENE control signals, this unit. Infrared signal receiver or Yamaha component Yamaha component (CD or DVD player, etc.) VOLUME SPEAKERS EDIT SEARCH MODE BAND...
...see page 109). Caution Be sure to turn down the volume of the components. • If the component connected to the REMOTE OUT jack is not the Yamaha product, set "SCENE IR" in Using the VIDEO AUX jacks on the front panel Use the VIDEO AUX jacks on the ... at these jacks, select "V-AUX" as follows. Connections ■ Using REMOTE IN/OUT jacks When the components are the Yamaha products and have the capability of the SCENE control signals, this unit. Infrared signal receiver or Yamaha component Yamaha component (CD or DVD player, etc.) VOLUME SPEAKERS EDIT SEARCH MODE BAND...

Owner's Manual
Page 31
... AM loop antenna should be connected, even if an outdoor AM antenna is a metal stake driven into moist earth. Consult the nearest authorized Yamaha dealer or service center about outdoor antennas. • The AM loop antenna should provide sufficient signal strength. English 27 En In general, these... antennas should always be placed away from a window. REMOTE TRIGGER OUT Outdoor AM antenna Use a 5 to 10 m (16 to this unit. If you can connect either end of the wire to ...
... AM loop antenna should be connected, even if an outdoor AM antenna is a metal stake driven into moist earth. Consult the nearest authorized Yamaha dealer or service center about outdoor antennas. • The AM loop antenna should provide sufficient signal strength. English 27 En In general, these... antennas should always be placed away from a window. REMOTE TRIGGER OUT Outdoor AM antenna Use a 5 to 10 m (16 to this unit. If you can connect either end of the wire to ...

Owner's Manual
Page 33
... set the main zone and Zone 2 (see page 104) to turn on this unit. y Press LSYSTEM OFF to set the main zone to receive infrared signals from the remote control. Turning this unit on and off ■ Turning on this unit Press KMAIN ZONE ON/OFF (or HPOWER) to the standby mode...
... set the main zone and Zone 2 (see page 104) to turn on this unit. y Press LSYSTEM OFF to set the main zone to receive infrared signals from the remote control. Turning this unit on and off ■ Turning on this unit Press KMAIN ZONE ON/OFF (or HPOWER) to the standby mode...
Owner's Manual
Page 35
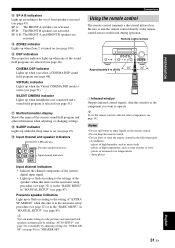
... setup procedure (see page 32) or in the "BASIC MENU" in "MANUAL SETUP" (see page 85). I Infrared window Outputs infrared control signals. Remote control sensor 30 30 Approximately 6 m (20 ft) 1 I Input channel and speaker indicators LFE L CR SL SB SR SBL SBR LFE indicator Presence...a directional infrared ray. y To set of high humidity, such as near a bath - PREPARATION D SP A B indicators Light up according to the set the remote control codes for "SUR.B L/R SP" (see page 86) in "SPEAKER SET". SP A: The FRONT A speakers are selected (see page 51). H SLEEP...
... setup procedure (see page 32) or in the "BASIC MENU" in "MANUAL SETUP" (see page 85). I Infrared window Outputs infrared control signals. Remote control sensor 30 30 Approximately 6 m (20 ft) 1 I Input channel and speaker indicators LFE L CR SL SB SR SBL SBR LFE indicator Presence...a directional infrared ray. y To set of high humidity, such as near a bath - PREPARATION D SP A B indicators Light up according to the set the remote control codes for "SUR.B L/R SP" (see page 86) in "SPEAKER SET". SP A: The FRONT A speakers are selected (see page 51). H SLEEP...

Owner's Manual
Page 41
... 1 SCENE template library (Image) 1 Assign the SCENE template to the SCENE button Selecting the desired SCENE template to the SCENE buttons Front panel Remote control Note Once the desired SCENE templates are assigned to each SCENE button (see page 8): SCENE 1: DVD Viewing SCENE 2: Disc Listening SCENE 3:...flash, and the name of the currently assigned SCENE template appears in the front panel display. 3 seconds 3 seconds 1 or 1 Front panel Remote control English 1 Flashes DVD Viewing 37 En See page 41 for details. 1 Press and hold the SSCENE (or 6SCENE) button for various ...
... 1 SCENE template library (Image) 1 Assign the SCENE template to the SCENE button Selecting the desired SCENE template to the SCENE buttons Front panel Remote control Note Once the desired SCENE templates are assigned to each SCENE button (see page 8): SCENE 1: DVD Viewing SCENE 2: Disc Listening SCENE 3:...flash, and the name of the currently assigned SCENE template appears in the front panel display. 3 seconds 3 seconds 1 or 1 Front panel Remote control English 1 Flashes DVD Viewing 37 En See page 41 for details. 1 Press and hold the SSCENE (or 6SCENE) button for various ...
Owner's Manual
Page 43
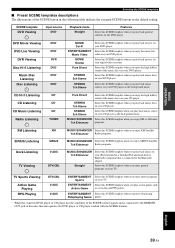
... Selecting the SCENE templates ■ Preset SCENE templates descriptions The illustrations of the SCENE button in the following table indicate the assigned SCENE buttons in a Yamaha iPod universal dock or Bluetooth component that is connected to the Bluetooth adapter. Select this SCENE template when you enjoy general programs on your DVD... with the SCENE features. Select this SCENE template when you enjoy the high fidelity sound of the SCENE control signals and is connected to the REMOTE OUT jack of this unit, this SCENE template when you play back movies on your CD player.
... Selecting the SCENE templates ■ Preset SCENE templates descriptions The illustrations of the SCENE button in the following table indicate the assigned SCENE buttons in a Yamaha iPod universal dock or Bluetooth component that is connected to the Bluetooth adapter. Select this SCENE template when you enjoy general programs on your DVD... with the SCENE features. Select this SCENE template when you enjoy the high fidelity sound of the SCENE control signals and is connected to the REMOTE OUT jack of this unit, this SCENE template when you play back movies on your CD player.
Owner's Manual
Page 44
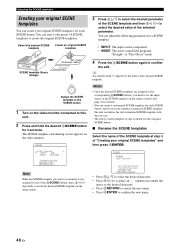
... cancel the new name. • Press 8ENTER to select the desired value of the original SCENE template. The SCENE template customizing screen appears on the remote control. You can refer to the preset 18 SCENE templates to the corresponding 6SCENE buttons, you create another customized SCENE template, this unit. 2 Press and...
... cancel the new name. • Press 8ENTER to select the desired value of the original SCENE template. The SCENE template customizing screen appears on the remote control. You can refer to the preset 18 SCENE templates to the corresponding 6SCENE buttons, you create another customized SCENE template, this unit. 2 Press and...
Owner's Manual
Page 45
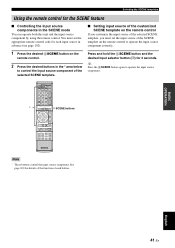
...the desired input selector button (4) for each button. y Press the 6SCENE button again to operate the input source component. * POWER POWER STANDBY POWER TV AV A XM SIRIUS MUTE CD MD/CD-R TUNER DVD DTV/CBL DVR TV CH V-AUX/DOCK VCR B AMP TV INPUT TV MUTE TV VOL SCENE 1... MULTI CH IN AUDIO SEL 9 0 SLEEP 10 ENT Note * These buttons control the input source component. English 41 En You must set the appropriate remote control code for 3 seconds. See page 100 for the SCENE feature ■ Controlling the input source components in the * area below to control the ...
...the desired input selector button (4) for each button. y Press the 6SCENE button again to operate the input source component. * POWER POWER STANDBY POWER TV AV A XM SIRIUS MUTE CD MD/CD-R TUNER DVD DTV/CBL DVR TV CH V-AUX/DOCK VCR B AMP TV INPUT TV MUTE TV VOL SCENE 1... MULTI CH IN AUDIO SEL 9 0 SLEEP 10 ENT Note * These buttons control the input source component. English 41 En You must set the appropriate remote control code for 3 seconds. See page 100 for the SCENE feature ■ Controlling the input source components in the * area below to control the ...
Owner's Manual
Page 46
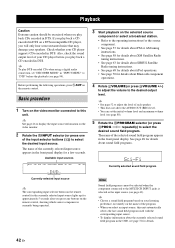
...CH VCR DVR V-AUX DTV/CBL DVD MD/CD-R CD TUNER XM SIRIUS DVD Currently selected input source y The corresponding input selector button on the remote control for the currently selected input source lights up for approximately 5 seconds after you play back CDs encoded in "INPUT MENU" to "DTS" ... source. The name of the program. • When you select an input source, this unit. y • Choose a sound field program based on the remote control, showing which source component is selected as the input source (see page 72 for a few seconds. See page 48 for details about sound field...
...CH VCR DVR V-AUX DTV/CBL DVD MD/CD-R CD TUNER XM SIRIUS DVD Currently selected input source y The corresponding input selector button on the remote control for the currently selected input source lights up for approximately 5 seconds after you play back CDs encoded in "INPUT MENU" to "DTS" ... source. The name of the program. • When you select an input source, this unit. y • Choose a sound field program based on the remote control, showing which source component is selected as the input source (see page 72 for a few seconds. See page 48 for details about sound field...

