
Owners Manual
Page 2
...34 Playing back tunes from Bluetooth™ components....... 36 Connecting a Yamaha Bluetooth wireless audio receiver 36 Pairing Bluetooth™ components 36 Using Bluetooth™ components 37 SETUP Configuring the settings specific for each input source (Option menu 38 Option menu display and...be configured as needed (Advanced Setup menu 55 Displaying/Setting the Advanced Setup menu 55 Setting the impedance of speakers 55 Avoiding crossing remote control signals when using multiple Yamaha receivers 56 Initializing various settings for this unit 56 Using the HDMI Control function ...
...34 Playing back tunes from Bluetooth™ components....... 36 Connecting a Yamaha Bluetooth wireless audio receiver 36 Pairing Bluetooth™ components 36 Using Bluetooth™ components 37 SETUP Configuring the settings specific for each input source (Option menu 38 Option menu display and...be configured as needed (Advanced Setup menu 55 Displaying/Setting the Advanced Setup menu 55 Setting the impedance of speakers 55 Avoiding crossing remote control signals when using multiple Yamaha receivers 56 Initializing various settings for this unit 56 Using the HDMI Control function ...
Owners Manual
Page 3
to match your speakers and listening environment - Speaker layout...10 - Setting for 2- Speaker distance settings ...43 - Sound quality control with the equalizer Subwoofer cable connection ...12 ■ Acoustic parameter adjustment to 5.1-channel configurations - Speaker cable connection.../sound field program switching (SCENE function 26 ■ Speaker connections for speaker acoustic parameters 22 - Speaker channels and functions ...9 - Specifying the settings for each speaker 42 - Volume control for each speaker...43 - Speaker impedance configuration...10 -
to match your speakers and listening environment - Speaker layout...10 - Setting for 2- Speaker distance settings ...43 - Sound quality control with the equalizer Subwoofer cable connection ...12 ■ Acoustic parameter adjustment to 5.1-channel configurations - Speaker cable connection.../sound field program switching (SCENE function 26 ■ Speaker connections for speaker acoustic parameters 22 - Speaker channels and functions ...9 - Specifying the settings for each speaker 42 - Volume control for each speaker...43 - Speaker impedance configuration...10 -

Owners Manual
Page 4
... and product, the product has priority. • "dHDMI1" (example) indicates the name of it. About this should occur, replace the batteries with new ones, and set the remote control codes. Refer to change in the remote control, remove the battery compartment cover from the reverse side of the remote control, and...
... and product, the product has priority. • "dHDMI1" (example) indicates the name of it. About this should occur, replace the batteries with new ones, and set the remote control codes. Refer to change in the remote control, remove the battery compartment cover from the reverse side of the remote control, and...
Owners Manual
Page 5
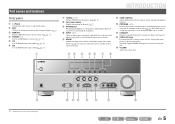
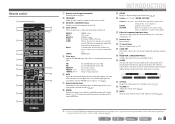
J1 e FM Sets the FM/AM tuner band to playback. i PHONES jack For plugging headphones in order. j INPUT l / h Selects an input source from which to FM (☞p. 30). ... (☞p. 26). J1 a INTRODUCTION g TUNING jj / ii Changes FM/AM tuner frequencies (☞p. 30). n STRAIGHT Changes a sound field program to AM (☞p. 30). J1 f AM Sets the FM/AM tuner band to straight decoding mode (☞p. 27). Press this key when this unit is in standby mode to cycle through the...
J1 e FM Sets the FM/AM tuner band to playback. i PHONES jack For plugging headphones in order. j INPUT l / h Selects an input source from which to FM (☞p. 30). ... (☞p. 26). J1 a INTRODUCTION g TUNING jj / ii Changes FM/AM tuner frequencies (☞p. 30). n STRAIGHT Changes a sound field program to AM (☞p. 30). J1 f AM Sets the FM/AM tuner band to straight decoding mode (☞p. 27). Press this key when this unit is in standby mode to cycle through the...
Owners Manual
Page 7
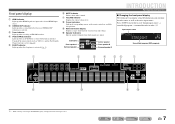
... decoder names as well as YDS-12), and the iPod Standby Charge function is active (☞p. 35). Press fINFO repeatedly to cycle through an optional Yamaha iPod universal dock (such as the active input source. h Cursor indicators Light up when receiving an FM/AM broadcast. c Tuner indicator Lights up if corresponding...
... decoder names as well as YDS-12), and the iPod Standby Charge function is active (☞p. 35). Press fINFO repeatedly to cycle through an optional Yamaha iPod universal dock (such as the active input source. h Cursor indicators Light up when receiving an FM/AM broadcast. c Tuner indicator Lights up if corresponding...
Owners Manual
Page 8
...Sleep 30min. Remote control codes must be registered for this unit is activated. Remote control a b c d e f g h i j k l m SOURCE 1 1 5 TRANSMIT CODE SET SLEEP RECEIVER HDMI 2 3 4 AV 2 3 4 AUDIO 1 2 V-AUX [ A ] [ B ] DOCK TUNER FM AM PRESET TUNING INFO MEMORY MOVIE ENHANCER SUR. The front panel... separate kExternal component operation keys for each input in standby mode to the DOCK TUNER jack. En 8 J1 DOCK A Yamaha iPod universal dock or Bluetooth wireless audio receiver connected to switch on the front panel display (the name of the sound output...
...Sleep 30min. Remote control codes must be registered for this unit is activated. Remote control a b c d e f g h i j k l m SOURCE 1 1 5 TRANSMIT CODE SET SLEEP RECEIVER HDMI 2 3 4 AV 2 3 4 AUDIO 1 2 V-AUX [ A ] [ B ] DOCK TUNER FM AM PRESET TUNING INFO MEMORY MOVIE ENHANCER SUR. The front panel... separate kExternal component operation keys for each input in standby mode to the DOCK TUNER jack. En 8 J1 DOCK A Yamaha iPod universal dock or Bluetooth wireless audio receiver connected to switch on the front panel display (the name of the sound output...
Owners Manual
Page 10
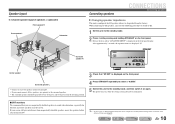
...especially for the front and center speakers near the screen. When connecting to 6Ω speakers, carry out the following procedure to switch to 6Ω. 1 Set this unit to the standby mode. 2 Press A while pressing and holding STRAIGHT on the front panel. If your TV. En 10 is displayed on ... impedance This unit is configured for 8Ω speakers when it on again. Release the keys when "ADVANCED SETUP" is displayed on , when the settings you made has been configured. ■ CRT monitors We recommend that "SP IMP." After approximately 3 seconds, the top menu items are displayed.
...especially for the front and center speakers near the screen. When connecting to 6Ω speakers, carry out the following procedure to switch to 6Ω. 1 Set this unit to the standby mode. 2 Press A while pressing and holding STRAIGHT on the front panel. If your TV. En 10 is displayed on ... impedance This unit is configured for 8Ω speakers when it on again. Release the keys when "ADVANCED SETUP" is displayed on , when the settings you made has been configured. ■ CRT monitors We recommend that "SP IMP." After approximately 3 seconds, the top menu items are displayed.

Owners Manual
Page 12
...down. 2 Insert the speaker cable end into the end of the terminal. 4 Tighten the terminal. Volume: Set to maximum. Crossover frequency (if available): Set to approximately half volume (or slightly less than half). CONNECTIONS Connecting speakers ■ Connecting the subwoofer 1 Connect...and then insert the banana plug into the terminal. 3 Lift the tab to the SUBWOOFER jack on this unit with an audio pin cable. 2 Set the subwoofer volume as follows. ■ Connecting front speakers KERS 3 2 FRONT 1 4 ■ Connecting center speakers / surround speakers SURROUND 1 ...
...down. 2 Insert the speaker cable end into the end of the terminal. 4 Tighten the terminal. Volume: Set to maximum. Crossover frequency (if available): Set to approximately half volume (or slightly less than half). CONNECTIONS Connecting speakers ■ Connecting the subwoofer 1 Connect...and then insert the banana plug into the terminal. 3 Lift the tab to the SUBWOOFER jack on this unit with an audio pin cable. 2 Set the subwoofer volume as follows. ■ Connecting front speakers KERS 3 2 FRONT 1 4 ■ Connecting center speakers / surround speakers SURROUND 1 ...
Owners Manual
Page 14
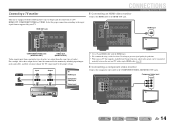
... OUT Y COMPONENT VIDEO VIDEO HDMI 3 HDMI 4 MONITOR OUT CONNECTIONS Connecting external devices ■ Connecting an HDMI video monitor Connect the HDMI cable to the proper setting. Connecting a TV monitor This unit is equipped with a single HDMI cable (☞p. 59). ■ Connecting a component video monitor Connect the component video cable to the...
... OUT Y COMPONENT VIDEO VIDEO HDMI 3 HDMI 4 MONITOR OUT CONNECTIONS Connecting external devices ■ Connecting an HDMI video monitor Connect the HDMI cable to the proper setting. Connecting a TV monitor This unit is equipped with a single HDMI cable (☞p. 59). ■ Connecting a component video monitor Connect the component video cable to the...

Owners Manual
Page 15
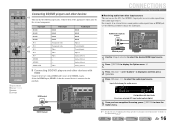
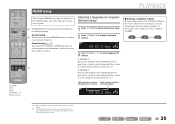
For the connections and settings, refer to "Single HDMI cable input to one of the AV5, AUDIO1, AUDIO2, or V-AUX with Audio Return Channel function" (☞p. 59). Connect to TV ... a TV that supports the HDMI Control functions When using a TV that makes TV sound control easier to the AV1-5 or AUDIO1-2. For the connections and settings, refer to the OPTICAL jack of the AV2 or AV3 with a digital audio pin cable. TV audio output Optical digital audio output Coaxial digital audio...
For the connections and settings, refer to "Single HDMI cable input to one of the AV5, AUDIO1, AUDIO2, or V-AUX with Audio Return Channel function" (☞p. 59). Connect to TV ... a TV that supports the HDMI Control functions When using a TV that makes TV sound control easier to the AV1-5 or AUDIO1-2. For the connections and settings, refer to the OPTICAL jack of the AV2 or AV3 with a digital audio pin cable. TV audio output Optical digital audio output Coaxial digital audio...
Owners Manual
Page 16
... Video input HDMI HDMI HDMI HDMI Component video Component video Video Video Video - - J 1 : See the section on "Configuring the settings specific for each input source (Option menu)" for playback. SOURCE 1 1 5 TRANSMIT CODE SET SLEEP RECEIVER HDMI 2 3 4 AV 2 3 4 AUDIO 1 2 V-AUX [ A ] [ B ] DOCK TUNER FM AM PRESET TUNING INFO MEMORY MOVIE ENHANCER SUR. Select the...
... Video input HDMI HDMI HDMI HDMI Component video Component video Video Video Video - - J 1 : See the section on "Configuring the settings specific for each input source (Option menu)" for playback. SOURCE 1 1 5 TRANSMIT CODE SET SLEEP RECEIVER HDMI 2 3 4 AV 2 3 4 AUDIO 1 2 V-AUX [ A ] [ B ] DOCK TUNER FM AM PRESET TUNING INFO MEMORY MOVIE ENHANCER SUR. Select the...
Owners Manual
Page 22
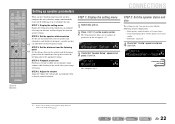
...each speaker reaches the listening point at the appropriate timing. STEP 4: Playback a test tone Playback a test tone to allow you to configure all settings for this unit on. 2 Press iSETUP on the Setup menu (☞p. 41). The Setup menu that the sound from which you have finished .... Front speaker: woofer diameter is 16 cm or smaller - Subwoofer;;Yes SW L CR SL SR Continues to configure this unit appears. SP SET Config This completes step 1. En 22 J1 SETUP VOL. DECODE MUSIC STEREO STRAIGHT BD DVD SETUP SCENE TV CD RADIO OPTION ENTER VOLUME RETURN...
...each speaker reaches the listening point at the appropriate timing. STEP 4: Playback a test tone Playback a test tone to allow you to configure all settings for this unit on. 2 Press iSETUP on the Setup menu (☞p. 41). The Setup menu that the sound from which you have finished .... Front speaker: woofer diameter is 16 cm or smaller - Subwoofer;;Yes SW L CR SL SR Continues to configure this unit appears. SP SET Config This completes step 1. En 22 J1 SETUP VOL. DECODE MUSIC STEREO STRAIGHT BD DVD SETUP SCENE TV CD RADIO OPTION ENTER VOLUME RETURN...
Owners Manual
Page 23
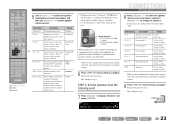
... play front channel low-frequency components through either of the surround speakers. Unit;;;;;;feet SW L CR SL SR 9 Press jRETURN when setting is complete. This completes step 3. Choose "None" if you do not have surround speakers connected. On/Off • Whether or...to 80.0 ft (0.30 m to 24.0 m) Center Center speaker 1.0 ft to 80.0 ft (0.30 m to the previous menu. Information Description Setting Subwoofer Sets the subwoofer status. None/Small/ Large Selects the size of the front speakers or the subwoofer (Off), or through both the subwoofer and front speakers...
... play front channel low-frequency components through either of the surround speakers. Unit;;;;;;feet SW L CR SL SR 9 Press jRETURN when setting is complete. This completes step 3. Choose "None" if you do not have surround speakers connected. On/Off • Whether or...to 80.0 ft (0.30 m to 24.0 m) Center Center speaker 1.0 ft to 80.0 ft (0.30 m to the previous menu. Information Description Setting Subwoofer Sets the subwoofer status. None/Small/ Large Selects the size of the front speakers or the subwoofer (Off), or through both the subwoofer and front speakers...
Owners Manual
Page 24
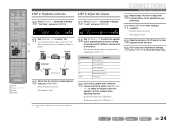
... complete. This completes step 5. 18 Repeat procedures 10-12 (step 4) to stop playback of the test tone. 19 Once you select "On." SOURCE 1 1 5 TRANSMIT CODE SET SLEEP RECEIVER HDMI 2 3 4 AV 2 3 4 AUDIO 1 2 V-AUX [ A ] [ B ] DOCK TUNER FM AM PRESET TUNING INFO MEMORY MOVIE ENHANCER SUR. d FL----d ---- DECODE MUSIC STEREO ... a test tone 10 Press jCursor C repeatedly to select "On." i The test tone plays back in procedure 5 output the test tone. J1 CONNECTIONS Setting up speaker parameters 16 Repeat steps 14 and 15 to adjust the volume balance for all...
... complete. This completes step 5. 18 Repeat procedures 10-12 (step 4) to stop playback of the test tone. 19 Once you select "On." SOURCE 1 1 5 TRANSMIT CODE SET SLEEP RECEIVER HDMI 2 3 4 AV 2 3 4 AUDIO 1 2 V-AUX [ A ] [ B ] DOCK TUNER FM AM PRESET TUNING INFO MEMORY MOVIE ENHANCER SUR. d FL----d ---- DECODE MUSIC STEREO ... a test tone 10 Press jCursor C repeatedly to select "On." i The test tone plays back in procedure 5 output the test tone. J1 CONNECTIONS Setting up speaker parameters 16 Repeat steps 14 and 15 to adjust the volume balance for all...
Owners Manual
Page 25
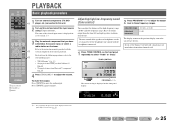
... CONTROL PHONES SILENT CINEMA INFO MEMORY PRESET FM AM INPUT BD DVD SCENE TV CD TONE CONTROL PROGRAM RADIO STRAIGHT PROGRAM l / h The current setting is displayed for details on the tuner. The tone control of sounds output from Bluetooth™ components" (☞p. 36) 4 Press rVOLUME +/- ...the input source name displayed on the front panel display as the source input, or select a radio station on playback. If you set separately. Set the headphone tone control with the r external component for a few seconds. Adjustable range -10.0 dB to +10.0 dB Adjustment ...
... CONTROL PHONES SILENT CINEMA INFO MEMORY PRESET FM AM INPUT BD DVD SCENE TV CD TONE CONTROL PROGRAM RADIO STRAIGHT PROGRAM l / h The current setting is displayed for details on the tuner. The tone control of sounds output from Bluetooth™ components" (☞p. 36) 4 Press rVOLUME +/- ...the input source name displayed on the front panel display as the source input, or select a radio station on playback. If you set separately. Set the headphone tone control with the r external component for a few seconds. Adjustable range -10.0 dB to +10.0 dB Adjustment ...
Owners Manual
Page 26
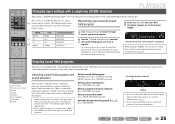
...STEREO STRAIGHT BD DVD SETUP SCENE TV CD RADIO OPTION ENTER VOLUME RETURN DISPLAY TOP MENU REC POP-UP MENU MUTE Changing input settings with a Yamaha digital sound field processing (DSP) chip. SCENE BD/DVD g TV CD h RADIO Input HDMI1 AV4 AV3 TUNER Sound field ... gSUR. SCENE1 VOL. DECODE g STRAIGHT h SCENE This unit is displayed. Selecting sound field programs and sound decoders This unit offers sound field settings (sound field programs) in the same category. MUSIC category: Press gMUSIC repeatedly. DECODE repeatedly. Choose a sound field program that the remote control...
...STEREO STRAIGHT BD DVD SETUP SCENE TV CD RADIO OPTION ENTER VOLUME RETURN DISPLAY TOP MENU REC POP-UP MENU MUTE Changing input settings with a Yamaha digital sound field processing (DSP) chip. SCENE BD/DVD g TV CD h RADIO Input HDMI1 AV4 AV3 TUNER Sound field ... gSUR. SCENE1 VOL. DECODE g STRAIGHT h SCENE This unit is displayed. Selecting sound field programs and sound decoders This unit offers sound field settings (sound field programs) in the same category. MUSIC category: Press gMUSIC repeatedly. DECODE repeatedly. Choose a sound field program that the remote control...
Owners Manual
Page 27
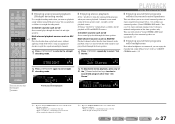
.... You can playback as follows in straight decoding mode. 2-channel sources such as CD Stereo sound plays back through the front speakers. SOURCE 1 1 5 TRANSMIT CODE SET SLEEP RECEIVER HDMI 2 3 4 AV 2 3 4 AUDIO 1 2 V-AUX [ A ] [ B ] DOCK TUNER FM AM PRESET TUNING INFO MEMORY MOVIE ENHANCER SUR. You can even enjoy surround sound presence with...
.... You can playback as follows in straight decoding mode. 2-channel sources such as CD Stereo sound plays back through the front speakers. SOURCE 1 1 5 TRANSMIT CODE SET SLEEP RECEIVER HDMI 2 3 4 AV 2 3 4 AUDIO 1 2 V-AUX [ A ] [ B ] DOCK TUNER FM AM PRESET TUNING INFO MEMORY MOVIE ENHANCER SUR. You can even enjoy surround sound presence with...
Owners Manual
Page 30
... of FM/AM stations by searching or specifying its frequency. FM 87.5 MHz SW L CR SL SR 3 Use eTUNING H / I to set a frequency to select a station on a lower frequency than the current one . J2 For example, enter as follows to receive. SOURCE 1 1 5 TRANSMIT ...CODE SET SLEEP RECEIVER HDMI 2 3 4 AV 2 3 4 AUDIO 1 2 V-AUX [ A ] [ B ] DOCK TUNER FM AM PRESET TUNING INFO MEMORY MOVIE ENHANCER SUR. Normal tuning ...
... of FM/AM stations by searching or specifying its frequency. FM 87.5 MHz SW L CR SL SR 3 Use eTUNING H / I to set a frequency to select a station on a lower frequency than the current one . J2 For example, enter as follows to receive. SOURCE 1 1 5 TRANSMIT ...CODE SET SLEEP RECEIVER HDMI 2 3 4 AV 2 3 4 AUDIO 1 2 V-AUX [ A ] [ B ] DOCK TUNER FM AM PRESET TUNING INFO MEMORY MOVIE ENHANCER SUR. Normal tuning ...

Owners Manual
Page 31
...L CR SL SR Preset number To cancel registration, press jRETURN. Registering and recalling a frequency (Preset tuning) You can force this unit to its original settings, use the jCursor D / E to "Stereo." J1 3 Use jCursor B / C to start the Auto Preset function. J2 En 31 PLAYBACK FM...DVD SETUP SCENE TV CD RADIO OPTION 3 Use jCursor B / C to the tuner input. J 1 : See the section on "Configuring the settings specific for each input source (Option menu)" for stations MEMORY When Auto Preset is completed, press qOPTION to register stations. ■ Presetting FM ...
...L CR SL SR Preset number To cancel registration, press jRETURN. Registering and recalling a frequency (Preset tuning) You can force this unit to its original settings, use the jCursor D / E to "Stereo." J1 3 Use jCursor B / C to start the Auto Preset function. J2 En 31 PLAYBACK FM...DVD SETUP SCENE TV CD RADIO OPTION 3 Use jCursor B / C to the tuner input. J 1 : See the section on "Configuring the settings specific for each input source (Option menu)" for stations MEMORY When Auto Preset is completed, press qOPTION to register stations. ■ Presetting FM ...

Owners Manual
Page 32
...The number of the station you are registered will appear. Repeat this operation. J 3 : See the section on "Configuring the settings specific for each input source (Option menu)" for about 30 seconds. ■ Recalling a preset station You can call preset stations ... to register. To cancel registration, press jRETURN or do not operate the remote control for details on the Option menu (☞p. 38). SOURCE 1 1 5 TRANSMIT CODE SET SLEEP RECEIVER HDMI 2 3 4 AV 2 3 4 AUDIO 1 2 V-AUX [ A ] [ B ] DOCK TUNER FM AM PRESET TUNING INFO MEMORY MOVIE ENHANCER SUR....
...The number of the station you are registered will appear. Repeat this operation. J 3 : See the section on "Configuring the settings specific for each input source (Option menu)" for about 30 seconds. ■ Recalling a preset station You can call preset stations ... to register. To cancel registration, press jRETURN or do not operate the remote control for details on the Option menu (☞p. 38). SOURCE 1 1 5 TRANSMIT CODE SET SLEEP RECEIVER HDMI 2 3 4 AV 2 3 4 AUDIO 1 2 V-AUX [ A ] [ B ] DOCK TUNER FM AM PRESET TUNING INFO MEMORY MOVIE ENHANCER SUR....


