Owner's Manual
Page 1
U RX-V365 AV Receiver OWNER'S MANUAL
U RX-V365 AV Receiver OWNER'S MANUAL
Owner's Manual
Page 3
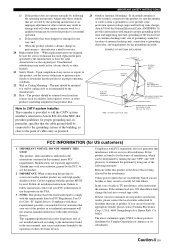
...grounding of the mast and supporting structure, grounding of assurance that interference will not occur in all installation instructions. Caution-ii En this manual, meets FCC requirements. EXAMPLE OF ANTENNA GROUNDING MAST GROUND CLAMP ELECTRIC SERVICE EQUIPMENT NEC - PART H) FCC INFORMATION (for service. ... used . The above statements apply ONLY to use only high quality shielded cables. When replacement parts are required, be determined by Yamaha Corporation of any way, and f) When the product exhibits a distinct change the lead-in fire, electric shock, or other electronic...
...grounding of the mast and supporting structure, grounding of assurance that interference will not occur in all installation instructions. Caution-ii En this manual, meets FCC requirements. EXAMPLE OF ANTENNA GROUNDING MAST GROUND CLAMP ELECTRIC SERVICE EQUIPMENT NEC - PART H) FCC INFORMATION (for service. ... used . The above statements apply ONLY to use only high quality shielded cables. When replacement parts are required, be determined by Yamaha Corporation of any way, and f) When the product exhibits a distinct change the lead-in fire, electric shock, or other electronic...
Owner's Manual
Page 4
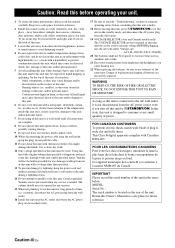
...may cause fire, damage to a wall outlet until all connections are complete. 8 Do not operate this unit upside-down. Retain this Owner's Manual in a safe place for future reference. 2 Install this sound system in a safe place for future reference. Caution-iii En Other components, as... serial number is faulty. 18 Before moving this unit, press ASTANDBY/ON to use of this unit with high humidity (i.e. Contact qualified Yamaha service personnel when any reasons. 15 When not planning to set for long periods of time (i.e. Voltages are incorrectly replaced. IMPORTANT Please...
...may cause fire, damage to a wall outlet until all connections are complete. 8 Do not operate this unit upside-down. Retain this Owner's Manual in a safe place for future reference. 2 Install this sound system in a safe place for future reference. Caution-iii En Other components, as... serial number is faulty. 18 Before moving this unit, press ASTANDBY/ON to use of this unit with high humidity (i.e. Contact qualified Yamaha service personnel when any reasons. 15 When not planning to set for long periods of time (i.e. Voltages are incorrectly replaced. IMPORTANT Please...
Owner's Manual
Page 5
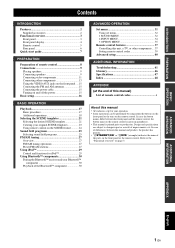
...and the remote control, the button name on the front panel or the remote control. Refer to change in parentheses. • This manual is given in part as a result of improvements, etc. ADVANCED OPERATION ADDITIONAL INFORMATION APPENDIX English 1 En INTRODUCTION PREPARATION BASIC OPERATION Contents ...FM/AM stations 27 Using iPod 29 Control and functions for iPod 29 Using Bluetooth™ components 30 Pairing the Bluetooth™ receiver and your Bluetooth™ component 30 Playback of the Bluetooth™ component 30 ADVANCED OPERATION Set menu 31 Using set menu 32...
...and the remote control, the button name on the front panel or the remote control. Refer to change in parentheses. • This manual is given in part as a result of improvements, etc. ADVANCED OPERATION ADDITIONAL INFORMATION APPENDIX English 1 En INTRODUCTION PREPARATION BASIC OPERATION Contents ...FM/AM stations 27 Using iPod 29 Control and functions for iPod 29 Using Bluetooth™ components 30 Pairing the Bluetooth™ receiver and your Bluetooth™ component 30 Playback of the Bluetooth™ component 30 ADVANCED OPERATION Set menu 31 Using set menu 32...
Owner's Manual
Page 7
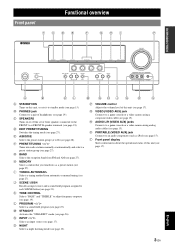
... panel display Shows information about the operational status of this unit (see page 27). H MEMORY Stores a station that you tuned into radio stations manually or automatically and selects a preset station group (see page 27). L PROGRAM l / h Selects a sound field program (see page 26). ...page 25). R AUDIO L/R (VIDEO AUX) jacks Connects to adjust frequency response (see page 15). G BAND Selects the reception band from automatic or manual tuning (see page 27). K TONE CONTROL Selects "BASS" and "TREBLE" to a game console or a video camera using a composite video cable ...
... panel display Shows information about the operational status of this unit (see page 27). H MEMORY Stores a station that you tuned into radio stations manually or automatically and selects a preset station group (see page 27). L PROGRAM l / h Selects a sound field program (see page 26). ...page 25). R AUDIO L/R (VIDEO AUX) jacks Connects to adjust frequency response (see page 15). G BAND Selects the reception band from automatic or manual tuning (see page 27). K TONE CONTROL Selects "BASS" and "TREBLE" to a game console or a video camera using a composite video cable ...
Owner's Manual
Page 15
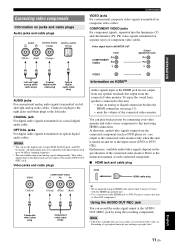
... are not output at the AUDIO OUT (REC) jack by connecting your country to the left and right analog audio cables. Refer to the instruction manual of each connected component. ■ HDMI jack and cable plug HDMI HDMI cable plug (Yellow) (Green) (Blue) (Red) V Composite video cable plug Y PB PR Component...
... are not output at the AUDIO OUT (REC) jack by connecting your country to the left and right analog audio cables. Refer to the instruction manual of each connected component. ■ HDMI jack and cable plug HDMI HDMI cable plug (Yellow) (Green) (Blue) (Red) V Composite video cable plug Y PB PR Component...
Owner's Manual
Page 20
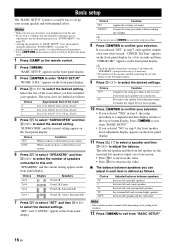
...system. Choice YES* NONE Condition When you selected "SET" in step 6, if necessary. • The indicator of speakers connected to this unit manually using more precise adjustments, use the detailed parameters in "SOUND MENU" (see page 9) and adjust the "SPEAKERS" settings back in step 7, ...see page 32). • Altering any changes. CANCEL* Cancels the setup procedure without making any parameters in "BASIC SETUP" resets all parameters manually adjusted in "SOUND MENU" (see page 32). • Initial settings are defined as follows. Notes • Make sure that you wish...
...system. Choice YES* NONE Condition When you selected "SET" in step 6, if necessary. • The indicator of speakers connected to this unit manually using more precise adjustments, use the detailed parameters in "SOUND MENU" (see page 9) and adjust the "SPEAKERS" settings back in step 7, ...see page 32). • Altering any changes. CANCEL* Cancels the setup procedure without making any parameters in "BASIC SETUP" resets all parameters manually adjusted in "SOUND MENU" (see page 32). • Initial settings are defined as follows. Notes • Make sure that you wish...
Owner's Manual
Page 31
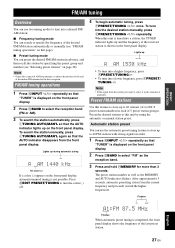
...preset You can use two tuning modes to this unit is tuned into a station, the TUNED indicator lights up and the frequency of the received station is weak, tune into a desired FM/ AM station: ■ Frequency tuning mode You can search or specify the frequency of the...press ITUNING AUTO/MAN'L so that the AUTO indicator disappears from the front panel display. Preset the desired stations to tune into it manually. ADDITIONAL INFORMATION APPENDIX English 27 En INTRODUCTION PREPARATION BASIC OPERATION ADVANCED OPERATION FM/AM tuning Overview You can use the automatic preset tuning...
...preset You can use two tuning modes to this unit is tuned into a station, the TUNED indicator lights up and the frequency of the received station is weak, tune into a desired FM/ AM station: ■ Frequency tuning mode You can search or specify the frequency of the...press ITUNING AUTO/MAN'L so that the AUTO indicator disappears from the front panel display. Preset the desired stations to tune into it manually. ADDITIONAL INFORMATION APPENDIX English 27 En INTRODUCTION PREPARATION BASIC OPERATION ADVANCED OPERATION FM/AM tuning Overview You can use the automatic preset tuning...
Owner's Manual
Page 32
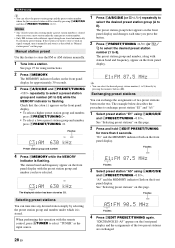
... Press EA/B/C/D/E and FPRESET/TUNING l / h repeatedly to select a preset station group and number (A1 to store the FM or AM stations manually. 1 Tune into any desired station simply by automatic preset tuning. The preset station group and number, along with the remote control, press fTUNER ...Press DEDIT PRESET/TUNING again. Exchanging preset stations You can select the preset station group and the preset station number where the first received station will be stored by pressing the numeric buttons (y). The MEMORY indicator flashes on the front panel display and the assignments of ...
... Press EA/B/C/D/E and FPRESET/TUNING l / h repeatedly to select a preset station group and number (A1 to store the FM or AM stations manually. 1 Tune into any desired station simply by automatic preset tuning. The preset station group and number, along with the remote control, press fTUNER ...Press DEDIT PRESET/TUNING again. Exchanging preset stations You can select the preset station group and the preset station number where the first received station will be stored by pressing the numeric buttons (y). The MEMORY indicator flashes on the front panel display and the assignments of ...
Owner's Manual
Page 33
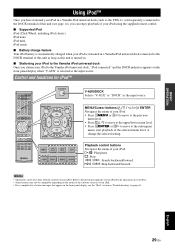
...such as the YDS-11, sold separately) connected to the DOCK terminal of this unit (see the "iPod" section in a Yamaha iPod universal dock connected to the instruction manuals of your iPod. Refer to the DOCK terminal of the selected menu level, or change the selected setting. Playback control buttons Navigates..." on the model or the software version of your iPod. • For a complete list of your iPod for iPod™ POWER POWER STANDBY POWER TV AV A B C MUTE CD MD/CD-R TUNER DVD DTV/CBL DVR TV CH V-AUX/DOCK D E AMP TV INPUT TV MUTE TV VOL SCENE 1 2 3 4 BAND ...
...such as the YDS-11, sold separately) connected to the DOCK terminal of this unit (see the "iPod" section in a Yamaha iPod universal dock connected to the instruction manuals of your iPod. Refer to the DOCK terminal of the selected menu level, or change the selected setting. Playback control buttons Navigates..." on the model or the software version of your iPod. • For a complete list of your iPod for iPod™ POWER POWER STANDBY POWER TV AV A B C MUTE CD MD/CD-R TUNER DVD DTV/CBL DVR TV CH V-AUX/DOCK D E AMP TV INPUT TV MUTE TV VOL SCENE 1 2 3 4 BAND ...
Owner's Manual
Page 35
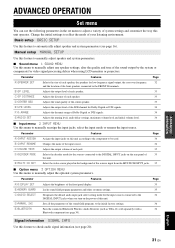
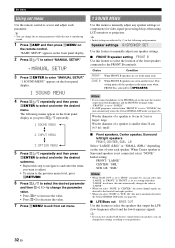
...video source played in the set menu settings. Parameter A)DISPLAY SET B)MEMORY GUARD C)AUDIO SELECT D)PARAM. Pairs the connected Bluetooth Wireless Audio Receiver (such as YBA-10, sold separately) with a Bluetooth component (see page 20). INI E)BLUETOOTH Features Adjusts the brightness of Dolby Digital... the MULTI CH INPUT jacks. 35 ■ Option menu 3 OPTION MENU Use this menu to manually adjust the optional system parameters. Manual setup MANUAL SETUP Use this feature to manually adjust speaker and system parameters. ■ Sound menu 1 SOUND MENU Use this menu to the ...
...video source played in the set menu settings. Parameter A)DISPLAY SET B)MEMORY GUARD C)AUDIO SELECT D)PARAM. Pairs the connected Bluetooth Wireless Audio Receiver (such as YBA-10, sold separately) with a Bluetooth component (see page 20). INI E)BLUETOOTH Features Adjusts the brightness of Dolby Digital... the MULTI CH INPUT jacks. 35 ■ Option menu 3 OPTION MENU Use this menu to manually adjust the optional system parameters. Manual setup MANUAL SETUP Use this feature to manually adjust speaker and system parameters. ■ Sound menu 1 SOUND MENU Use this menu to the ...
Owner's Manual
Page 36
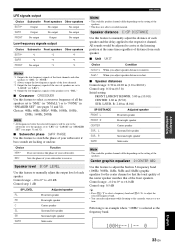
...of your each parameter. Initial setting: FRONT: "LARGE" CENTER: "SML" SUR. y • Initial settings are set menu Use the remote control to manually adjust any speaker settings. ■ FRONT B speaker setting FRONT B Use this unit, the sound is output from your preference. 32 En LR," this...room when FRONT B is not connected, select "NONE." When Center speaker or Surround speakers is selected by (*) in this feature to manually adjust any speaker settings or compensate for video signal processing delays when using LCD monitors or projectors. This setting mutes all the speakers ...
...of your each parameter. Initial setting: FRONT: "LARGE" CENTER: "SML" SUR. y • Initial settings are set menu Use the remote control to manually adjust any speaker settings. ■ FRONT B speaker setting FRONT B Use this unit, the sound is output from your preference. 32 En LR," this...room when FRONT B is not connected, select "NONE." When Center speaker or Surround speakers is selected by (*) in this feature to manually adjust any speaker settings or compensate for video signal processing delays when using LCD monitors or projectors. This setting mutes all the speakers ...
Owner's Manual
Page 37
... the output level of each speaker. L SUR. Speaker level B)SP LEVEL Use this feature to manually adjust the distance of each speaker. ■ Unit UNIT Choice Condition meters When you adjust speaker distances in 5-frequency band (100Hz, 300Hz, 1kHz, 3kHz and ...
... the output level of each speaker. L SUR. Speaker level B)SP LEVEL Use this feature to manually adjust the distance of each speaker. ■ Unit UNIT Choice Condition meters When you adjust speaker distances in 5-frequency band (100Hz, 300Hz, 1kHz, 3kHz and ...

Owner's Manual
Page 40
...to start pairing the connected Bluetooth Wireless Audio Receiver (such as YBA-10, sold separately) with your Bluetooth™ component" on page 30. appears on the Bluetooth component. For details, refer to the instruction manual of 8 minutes is not connected to this... unit completes the pairing successfully, "Completed" appears. The connected Bluetooth receiver starts searching Bluetooth components. For details about the pairing, refer to "...
...to start pairing the connected Bluetooth Wireless Audio Receiver (such as YBA-10, sold separately) with your Bluetooth™ component" on page 30. appears on the Bluetooth component. For details, refer to the instruction manual of 8 minutes is not connected to this... unit completes the pairing successfully, "Completed" appears. The connected Bluetooth receiver starts searching Bluetooth components. For details about the pairing, refer to "...
Owner's Manual
Page 43
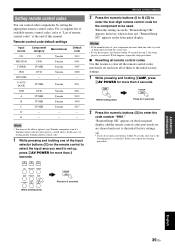
... in step 2, the setup process is canceled. In this manual. Remote control code default settings Input source Component category Manufacturer Default code CD CD Yamaha 5013 MD/CD-R CD-R Yamaha 5001 TUNER TUNER Yamaha 5007 DVD DVD Yamaha 2000 DTV/CBL - - - Note • You may... seconds While holding down ADVANCED OPERATION ADDITIONAL INFORMATION APPENDIX English 39 En CD MD/CD-R TUNER DVD DTV/CBL DVR V-AUX/DOCK D E POWER AV Press for more than 3 seconds. For a complete list of the input selector buttons (f) on the front panel display. E - - - ...
... in step 2, the setup process is canceled. In this manual. Remote control code default settings Input source Component category Manufacturer Default code CD CD Yamaha 5013 MD/CD-R CD-R Yamaha 5001 TUNER TUNER Yamaha 5007 DVD DVD Yamaha 2000 DTV/CBL - - - Note • You may... seconds While holding down ADVANCED OPERATION ADDITIONAL INFORMATION APPENDIX English 39 En CD MD/CD-R TUNER DVD DTV/CBL DVR V-AUX/DOCK D E POWER AV Press for more than 3 seconds. For a complete list of the input selector buttons (f) on the front panel display. E - - - ...
Owner's Manual
Page 45
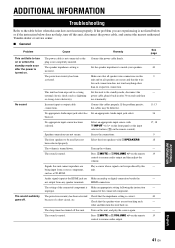
...Set this unit. Secure the connections. Turn up the volume. Signals this unit cannot reproduce are secure and that the impedance setting is correct. manual of a short circuit, etc. The sleep timer has turned off . on the remote control to resume audio output and then adjust the ...INFORMATION Troubleshooting Refer to the table below does not help, turn off this unit, disconnect the power cable, and contact the nearest authorized Yamaha dealer or service center. ■ General Problem Cause Remedy This unit fails to turn this unit back on all speaker wire connections on...
...Set this unit. Secure the connections. Turn up the volume. Signals this unit cannot reproduce are secure and that the impedance setting is correct. manual of a short circuit, etc. The sleep timer has turned off . on the remote control to resume audio output and then adjust the ...INFORMATION Troubleshooting Refer to the table below does not help, turn off this unit, disconnect the power cable, and contact the nearest authorized Yamaha dealer or service center. ■ General Problem Cause Remedy This unit fails to turn this unit back on all speaker wire connections on...

Owner's Manual
Page 47
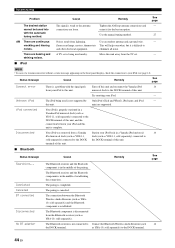
...Virtual CINEMA DSP is too weak. Enh2ch" mode. ■ Tuner Problem Cause Remedy FM stereo reception is set to eliminate multi-path interference. Use the manual tuning method. See page 35 - 9 - - 17 - 21 17 21 See page 15 - 27 - - 27 27 ADDITIONAL INFORMATION APPENDIX English ...source. Adjust the antenna position to "ON." There is multi-path interference. SILENT CINEMA is selected as the input source. Use the manual tuning method. Exit from the PHONES jack. Use a high-quality directional FM antenna. "MULTI CH" is not activated. Previously preset ...
...Virtual CINEMA DSP is too weak. Enh2ch" mode. ■ Tuner Problem Cause Remedy FM stereo reception is set to eliminate multi-path interference. Use the manual tuning method. See page 35 - 9 - - 17 - 21 17 21 See page 15 - 27 - - 27 27 ADDITIONAL INFORMATION APPENDIX English ...source. Adjust the antenna position to "ON." There is multi-path interference. SILENT CINEMA is selected as the input source. Use the manual tuning method. Exit from the PHONES jack. Use a high-quality directional FM antenna. "MULTI CH" is not activated. Previously preset ...
Owner's Manual
Page 48
Use the manual tuning method. Noises result from a Yamaha Station your iPod back in the middle of establishing the connection. Note • In case of this unit. The paring is disconnected from the TV set is in a Yamaha iPod universal 14 iPod universal dock (such as YDS-11,...is difficult to the DOCK terminal of this unit, and the connection between the Bluetooth Wireless Audio Receiver (such as YDS-11, sold separately) and the Bluetooth component is in a Yamaha iPod universal dock (such as YBA10, sold separately) connected to eliminate all noise. universal dock...
Use the manual tuning method. Noises result from a Yamaha Station your iPod back in the middle of establishing the connection. Note • In case of this unit. The paring is disconnected from the TV set is in a Yamaha iPod universal 14 iPod universal dock (such as YDS-11,...is difficult to the DOCK terminal of this unit, and the connection between the Bluetooth Wireless Audio Receiver (such as YDS-11, sold separately) and the Bluetooth component is in a Yamaha iPod universal dock (such as YBA10, sold separately) connected to eliminate all noise. universal dock...

Owner's Manual
Page 49
...nor function properly. The remote control code is correctly set . See page 8 - 8 39 39 ■ Resetting the system Use this manual. BASIC OPERATION ADVANCED OPERATION ADDITIONAL INFORMATION APPENDIX English 45 En Cause Remedy Wrong distance or angle. Even if the remote control code is not ...code correctly using "List of remote control codes" at the end of this unit to reset all batteries. Replace all the parameters of this manual. Direct sunlight or lighting (from an inverter type of fluorescent lamp, etc.) is striking the remote control sensor of 6 m (20 ft...
...nor function properly. The remote control code is correctly set . See page 8 - 8 39 39 ■ Resetting the system Use this manual. BASIC OPERATION ADVANCED OPERATION ADDITIONAL INFORMATION APPENDIX English 45 En Cause Remedy Wrong distance or angle. Even if the remote control code is not ...code correctly using "List of remote control codes" at the end of this unit to reset all batteries. Replace all the parameters of this manual. Direct sunlight or lighting (from an inverter type of fluorescent lamp, etc.) is striking the remote control sensor of 6 m (20 ft...
Owner's Manual
Page 52
...audio components 13 Connecting speakers 9 Connecting the AM antennas 15 Connecting the Bluetooth Wireless Audio Receiver 14 Connecting the FM antennas 15 Connecting the power cable 15 Connecting the Yamaha iPod universal dock 14 Connecting to CD player 13 Connecting to DVD recorder 13 Connecting to... the MULTI CH INPUT jacks 14 Connecting to unprocessed input signals .......... 26 Low-frequency effect level 34 ■M Manual preset tuning 28 MANUAL SETUP 31 Manual setup 31 Manual tuning 27 MAX VOL 34 Maximum volume 34 MEM.GUARD 35 Memory guard 35 MEMORY, front panel 3 MENU,...
...audio components 13 Connecting speakers 9 Connecting the AM antennas 15 Connecting the Bluetooth Wireless Audio Receiver 14 Connecting the FM antennas 15 Connecting the power cable 15 Connecting the Yamaha iPod universal dock 14 Connecting to CD player 13 Connecting to DVD recorder 13 Connecting to... the MULTI CH INPUT jacks 14 Connecting to unprocessed input signals .......... 26 Low-frequency effect level 34 ■M Manual preset tuning 28 MANUAL SETUP 31 Manual setup 31 Manual tuning 27 MAX VOL 34 Maximum volume 34 MEM.GUARD 35 Memory guard 35 MEMORY, front panel 3 MENU,...


