Owner's Manual
Page 5
...Basic procedure 17 Additional operations 18 Selecting the SCENE templates 21 Selecting the desired SCENE template 21 Creating your original SCENE templates 23 Using remote control on the SCENE feature........... 24 Sound field programs 25 Selecting sound field programs 25 FM/AM tuning 27 Overview 27 FM/AM tuning... FM/AM stations 27 Using iPod 29 Control and functions for iPod 29 Using Bluetooth™ components 30 Pairing the Bluetooth™ receiver and your operation. • Some operations can be performed by using either the buttons on the front panel or the ones on the...
...Basic procedure 17 Additional operations 18 Selecting the SCENE templates 21 Selecting the desired SCENE template 21 Creating your original SCENE templates 23 Using remote control on the SCENE feature........... 24 Sound field programs 25 Selecting sound field programs 25 FM/AM tuning 27 Overview 27 FM/AM tuning... FM/AM stations 27 Using iPod 29 Control and functions for iPod 29 Using Bluetooth™ components 30 Pairing the Bluetooth™ receiver and your operation. • Some operations can be performed by using either the buttons on the front panel or the ones on the...
Owner's Manual
Page 6
...is a registered trademark of the Bluetooth SIG and is used by playing it is too late, Yamaha and the Electronic Industries Association's Consumer Electronics Group recommend you received all of Yamaha Corporation. DTS is a trademark of HDMI Licensing LLC. iPod™ "iPod" is a ...and "High-Definition Multimedia Interface" are trademarks of Dolby Laboratories. Since hearing damage from loud sounds is a trademark of the following parts. ❏ Remote control ❏ Batteries (2) (AAA, R03, UM-4) ❏ AM loop antenna ❏ Indoor FM antenna 2 En "SILENT CINEMA" is ...
...is a registered trademark of the Bluetooth SIG and is used by playing it is too late, Yamaha and the Electronic Industries Association's Consumer Electronics Group recommend you received all of Yamaha Corporation. DTS is a trademark of HDMI Licensing LLC. iPod™ "iPod" is a ...and "High-Definition Multimedia Interface" are trademarks of Dolby Laboratories. Since hearing damage from loud sounds is a trademark of the following parts. ❏ Remote control ❏ Batteries (2) (AAA, R03, UM-4) ❏ AM loop antenna ❏ Indoor FM antenna 2 En "SILENT CINEMA" is ...
Owner's Manual
Page 9
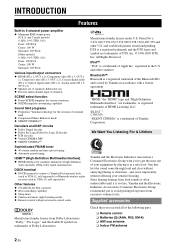
... a decoder from four decoders (see page 26). t STRAIGHT Activates the "STRAIGHT" mode (see page 26). INTRODUCTION PREPARATION BASIC OPERATION ADVANCED OPERATION Remote control a c b POWER POWER STANDBY POWER TV AV d A B C MUTE e CD MD/CD-R TUNER f DVD DTV/CBL DVR TV CH V-AUX/DOCK D E g h AMP TV ...program (see page 8). v MULTI CH IN Sets the input source to each SCENE button (see page 15). y Numeric buttons Enter remote control codes or preset station number (see page 18). g TV control buttons Controls your TV or other components on the front panel...
... a decoder from four decoders (see page 26). t STRAIGHT Activates the "STRAIGHT" mode (see page 26). INTRODUCTION PREPARATION BASIC OPERATION ADVANCED OPERATION Remote control a c b POWER POWER STANDBY POWER TV AV d A B C MUTE e CD MD/CD-R TUNER f DVD DTV/CBL DVR TV CH V-AUX/DOCK D E g h AMP TV ...program (see page 8). v MULTI CH IN Sets the input source to each SCENE button (see page 15). y Numeric buttons Enter remote control codes or preset station number (see page 18). g TV control buttons Controls your TV or other components on the front panel...
Owner's Manual
Page 12
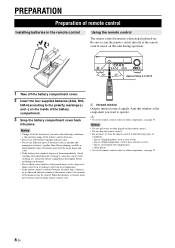
...8226; Do not spill water or other liquids on the inside of high humidity, such as alkaline and manganese batteries) together. places of remote control Installing batteries in the following conditions: - Aim this unit during operation. 2 30º 30º Approximately 6 m (20 ft... 1 Take off the battery compartment cover. 2 Insert the four supplied batteries (AAA, R03, UM-4) according to aim the remote control directly at the remote control sensor on this window at the component you notice the following types of conditions: - places of the battery compartment. 3 ...
...8226; Do not spill water or other liquids on the inside of high humidity, such as alkaline and manganese batteries) together. places of remote control Installing batteries in the following conditions: - Aim this unit during operation. 2 30º 30º Approximately 6 m (20 ft... 1 Take off the battery compartment cover. 2 Insert the four supplied batteries (AAA, R03, UM-4) according to aim the remote control directly at the remote control sensor on this window at the component you notice the following types of conditions: - places of the battery compartment. 3 ...
Owner's Manual
Page 19
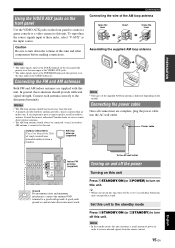
... jacks, select "V-AUX" as the input source. If you turn on this unit, there will be a 4 to this unit. Consult the nearest authorized Yamaha dealer or service center about outdoor antennas. • The AM loop antenna should always be placed away from this unit. • A properly installed outdoor ...connect the antenna GND terminal to 32 ft) of vinyl-covered wire extended outdoors from the remote control. 15 En English Set this unit to the standby mode Press ASTANDBY/ON (or cSTANDBY) to receive infrared signals from a window. Connecting the FM and AM antennas Both FM and AM indoor ...
... jacks, select "V-AUX" as the input source. If you turn on this unit, there will be a 4 to this unit. Consult the nearest authorized Yamaha dealer or service center about outdoor antennas. • The AM loop antenna should always be placed away from this unit. • A properly installed outdoor ...connect the antenna GND terminal to 32 ft) of vinyl-covered wire extended outdoors from the remote control. 15 En English Set this unit to the standby mode Press ASTANDBY/ON (or cSTANDBY) to receive infrared signals from a window. Connecting the FM and AM antennas Both FM and AM indoor ...
Owner's Manual
Page 20
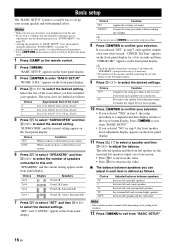
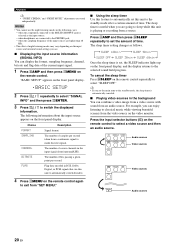
... display. 3 Press lENTER to enter "BASIC SETUP." Press kMENU to exit from each parameters. • Press nRETURN on the remote control to return to the previous menu level. 1 Press hAMP on the remote control. 2 Press kMENU. The selected speaker and the front left speaker (or the surround left speaker and the subwoofer...
... display. 3 Press lENTER to enter "BASIC SETUP." Press kMENU to exit from each parameters. • Press nRETURN on the remote control to return to the previous menu level. 1 Press hAMP on the remote control. 2 Press kMENU. The selected speaker and the front left speaker (or the surround left speaker and the subwoofer...
Owner's Manual
Page 23
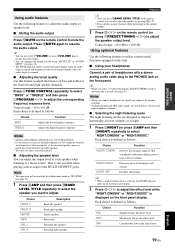
...is defined as follows. ADDITIONAL INFORMATION APPENDIX English 19 En y • When a night listening mode is selected, the NIGHT indicator lights up on the remote control (or press FPRESET/TUNING l / h) to a music source. in "SP LEVEL" (see page 33). 1 Press hAMP and then press ..., SILENT CINEMA mode is also possible when playing sources input at lower volumes. Control range: -10 to the PHONES jack on the remote control to adjust the corresponding frequency response level. Press eMUTE again to select the speaker you can configure the muting level by pressing lk...
...is defined as follows. ADDITIONAL INFORMATION APPENDIX English 19 En y • When a night listening mode is selected, the NIGHT indicator lights up on the remote control (or press FPRESET/TUNING l / h) to a music source. in "SP LEVEL" (see page 33). 1 Press hAMP and then press ..., SILENT CINEMA mode is also possible when playing sources input at lower volumes. Control range: -10 to the PHONES jack on the remote control to adjust the corresponding frequency response level. Press eMUTE again to select the speaker you can configure the muting level by pressing lk...
Owner's Manual
Page 24
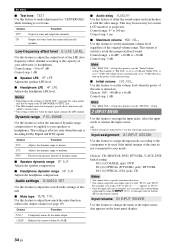
...The sleep timer is playing or recording from a source. To cancel the sleep timer Press xSLEEP on the remote control to select "SLEEP OFF." Press the input selector buttons (f) on the remote control repeatedly to select a video source and then an audio source. The number of the input sources are...of samples per second. Press hAMP and then press xSLEEP repeatedly to set this unit to automatically switch decoders. 4 Press kMENU on the remote control again to exit from the video source on the front panel display. SLEEP 120min SLEEP 90min SLEEP OFF SLEEP 30min SLEEP 60min Once the...
...The sleep timer is playing or recording from a source. To cancel the sleep timer Press xSLEEP on the remote control to select "SLEEP OFF." Press the input selector buttons (f) on the remote control repeatedly to select a video source and then an audio source. The number of the input sources are...of samples per second. Press hAMP and then press xSLEEP repeatedly to set this unit to automatically switch decoders. 4 Press kMENU on the remote control again to exit from the video source on the front panel display. SLEEP 120min SLEEP 90min SLEEP OFF SLEEP 30min SLEEP 60min Once the...
Owner's Manual
Page 25
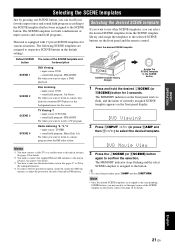
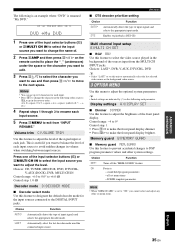
... to a music program from the SCENE template library and assign the templates to the selected SCENE buttons on the front panel and the remote control. Notes *1 You must connect a cable TV or a satellite tuner to this unit in advance. Selecting the desired SCENE template ...page 13 for various situations. Default SCENE button SCENE 1 SCENE 2 SCENE 3 SCENE 4 The name of currently assigned SCENE template appears on the remote control. sound field program: STRAIGHT For when you can select the desired SCENE templates from the FM radio station. input source: TUNER - See pages...
... to a music program from the SCENE template library and assign the templates to the selected SCENE buttons on the front panel and the remote control. Notes *1 You must connect a cable TV or a satellite tuner to this unit in advance. Selecting the desired SCENE template ...page 13 for various situations. Default SCENE button SCENE 1 SCENE 2 SCENE 3 SCENE 4 The name of currently assigned SCENE template appears on the remote control. sound field program: STRAIGHT For when you can select the desired SCENE templates from the FM radio station. input source: TUNER - See pages...
Owner's Manual
Page 27
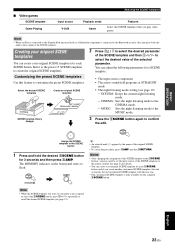
...unit plays back the audio sources input at the DOCK terminal. The MEMORY indicator on the remote control. Refer to the preset 13 SCENE templates to create the original SCENE templates. 2 ... for 3 seconds and then press hAMP. CINEMA: Sets the night listening mode to the Bluetooth receiver, this unit overwrites the old customized SCENE template with the new one. • The customized SCENE... connected to the CINEMA mode. - Note • When an iPod is connected to the Yamaha iPod universal dock or a Bluetooth component is only available for each SCENE button. Creating your ...
...unit plays back the audio sources input at the DOCK terminal. The MEMORY indicator on the remote control. Refer to the preset 13 SCENE templates to create the original SCENE templates. 2 ... for 3 seconds and then press hAMP. CINEMA: Sets the night listening mode to the Bluetooth receiver, this unit overwrites the old customized SCENE template with the new one. • The customized SCENE... connected to the CINEMA mode. - Note • When an iPod is connected to the Yamaha iPod universal dock or a Bluetooth component is only available for each SCENE button. Creating your ...
Owner's Manual
Page 28
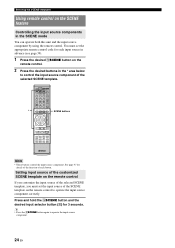
...8226; Press the iSCENE button again to operate the input source component correctly. See page 37 for 3 seconds. Selecting the SCENE templates Using remote control on the SCENE feature Controlling the input source components in the * area below to control the input source component of the selected SCENE ...template. * POWER POWER STANDBY POWER TV AV A B C MUTE CD MD/CD-R TUNER DVD DTV/CBL DVR TV CH V-AUX/DOCK D E AMP TV INPUT TV MUTE TV VOL SCENE 1 2 ...
...8226; Press the iSCENE button again to operate the input source component correctly. See page 37 for 3 seconds. Selecting the SCENE templates Using remote control on the SCENE feature Controlling the input source components in the * area below to control the input source component of the selected SCENE ...template. * POWER POWER STANDBY POWER TV AV A B C MUTE CD MD/CD-R TUNER DVD DTV/CBL DVR TV CH V-AUX/DOCK D E AMP TV INPUT TV MUTE TV VOL SCENE 1 2 ...
Owner's Manual
Page 32
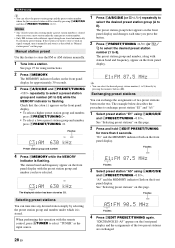
... flash on this page. FM/AM tuning y • You can select the preset station group and the preset station number where the first received station will be stored by pressing the numeric buttons (y). Check that the colon (:) appears on this page. 2 Press and hold DEDIT PRESET/...To select a lower preset station group and number, press FPRESET/TUNING l. The preset station group letter appears on the front panel display with the remote control, press fTUNER to store the FM or AM stations manually. 1 Tune into any desired station simply by automatic preset tuning. The station band...
... flash on this page. FM/AM tuning y • You can select the preset station group and the preset station number where the first received station will be stored by pressing the numeric buttons (y). Check that the colon (:) appears on this page. 2 Press and hold DEDIT PRESET/...To select a lower preset station group and number, press FPRESET/TUNING l. The preset station group letter appears on the front panel display with the remote control, press fTUNER to store the FM or AM stations manually. 1 Tune into any desired station simply by automatic preset tuning. The station band...
Owner's Manual
Page 33
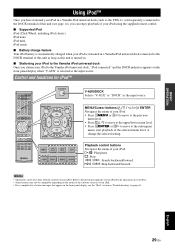
.... Refer to the instruction manuals of your iPod for iPod™ POWER POWER STANDBY POWER TV AV A B C MUTE CD MD/CD-R TUNER DVD DTV/CBL DVR TV CH V-AUX/DOCK ...backward/forward b / a: Skip backward/forward Notes • Operations can enjoy playback of your iPod using the supplied remote control. ■ Supported iPod iPod (Click Wheel, including iPod classic) iPod nano iPod mini iPod touch ■...INTRODUCTION PREPARATION BASIC OPERATION Using iPod™ Once you have stationed your iPod in a Yamaha iPod universal dock (such as the YDS-11, sold separately) connected to the DOCK...
.... Refer to the instruction manuals of your iPod for iPod™ POWER POWER STANDBY POWER TV AV A B C MUTE CD MD/CD-R TUNER DVD DTV/CBL DVR TV CH V-AUX/DOCK ...backward/forward b / a: Skip backward/forward Notes • Operations can enjoy playback of your iPod using the supplied remote control. ■ Supported iPod iPod (Click Wheel, including iPod classic) iPod nano iPod mini iPod touch ■...INTRODUCTION PREPARATION BASIC OPERATION Using iPod™ Once you have stationed your iPod in a Yamaha iPod universal dock (such as the YDS-11, sold separately) connected to the DOCK...
Owner's Manual
Page 34
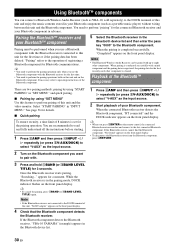
..." appears on the front panel display. Pairing the Bluetooth™ receiver and your Bluetooth component. "Pairing" refers to this unit, "No BT adapter" appears on the remote control, the connected Bluetooth receiver searches and connect to select "V-AUX" as YBA-10, sold ... the front panel display. 4 Check that the Bluetooth component detects the Bluetooth receiver. Once the Bluetooth receiver starts pairing, "Searching..." If the Bluetooth component detects the Bluetooth receiver, "YBA-10 YAMAHA" (example) appears in the Bluetooth device list and then enter the pass key...
..." appears on the front panel display. Pairing the Bluetooth™ receiver and your Bluetooth component. "Pairing" refers to this unit, "No BT adapter" appears on the remote control, the connected Bluetooth receiver searches and connect to select "V-AUX" as YBA-10, sold ... the front panel display. 4 Check that the Bluetooth component detects the Bluetooth receiver. Once the Bluetooth receiver starts pairing, "Searching..." If the Bluetooth component detects the Bluetooth receiver, "YBA-10 YAMAHA" (example) appears in the Bluetooth device list and then enter the pass key...
Owner's Manual
Page 36
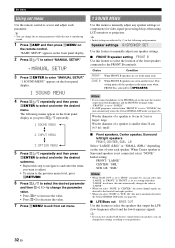
... effect) and the low-frequency signals. LR," this step to navigate to and enter the items you connect headphones to the PHONES jack on the remote control. "1 SOUND MENU" appears on the front panel display. 2 Press lk / n to select "MANUAL SETUP." .MANUAL SETUP 3 Press lENTER to enter "... or projectors. y • If you are directed to the front left /right speakers FRONT, CENTER, SUR. Set menu Using set menu Use the remote control to access and adjust each speaker. Woofer diameter of a speaker is not connected, select "NONE." y • You can change these settings according...
... effect) and the low-frequency signals. LR," this step to navigate to and enter the items you connect headphones to the PHONES jack on the remote control. "1 SOUND MENU" appears on the front panel display. 2 Press lk / n to select "MANUAL SETUP." .MANUAL SETUP 3 Press lENTER to enter "... or projectors. y • If you are directed to the front left /right speakers FRONT, CENTER, SUR. Set menu Using set menu Use the remote control to access and adjust each speaker. Woofer diameter of a speaker is not connected, select "NONE." y • You can change these settings according...
Owner's Manual
Page 38
... the corresponding component by using NINPUT l / h (or the input selector buttons (f) on the settings of "BASS OUT" (see page 19). Notes • Depending on the remote control). For example, if "INI.VOL." For example, you assign "CD" to "IN (2)," "---" appears in this feature to -30 dB Control step: 5 dB Note •...
... the corresponding component by using NINPUT l / h (or the input selector buttons (f) on the settings of "BASS OUT" (see page 19). Notes • Depending on the remote control). For example, if "INI.VOL." For example, you assign "CD" to "IN (2)," "---" appears in this feature to -30 dB Control step: 5 dB Note •...
Owner's Manual
Page 39
...," you want to use up to 8 characters for the input sources connected to adjust the brightness of . 2 Press hAMP and then press ll / h on the remote control to place the "_" (underscore) under the space or the character you want to edit. 3 Press lk / n to select the character you want to change...
...," you want to use up to 8 characters for the input sources connected to adjust the brightness of . 2 Press hAMP and then press ll / h on the remote control to place the "_" (underscore) under the space or the character you want to edit. 3 Press lk / n to select the character you want to change...
Owner's Manual
Page 41
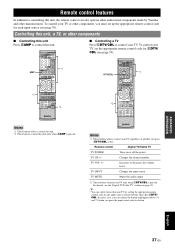
Controlling this unit, a TV, or other than one TV by Yamaha and other components, you must set the appropriate remote control code for fDTV/ CBL (see page 39). - To control your TV, set up the appropriate remote control code for each input source (see page 39). Notes *1 These buttons always ...7 8 MULTI CH IN AUDIO SEL 9 0 SLEEP 10 ENT *2 ■ Controlling a TV Press fDTV/CBL to control this unit. DTV/CBL *2 POWER POWER STANDBY POWER TV AV A B C MUTE CD MD/CD-R TUNER DVD DTV/CBL DVR TV CH V-AUX/DOCK D E AMP TV INPUT TV MUTE TV VOL SCENE 1 2 3 4 BAND LEVEL ...
Controlling this unit, a TV, or other than one TV by Yamaha and other components, you must set the appropriate remote control code for fDTV/ CBL (see page 39). - To control your TV, set up the appropriate remote control code for each input source (see page 39). Notes *1 These buttons always ...7 8 MULTI CH IN AUDIO SEL 9 0 SLEEP 10 ENT *2 ■ Controlling a TV Press fDTV/CBL to control this unit. DTV/CBL *2 POWER POWER STANDBY POWER TV AV A B C MUTE CD MD/CD-R TUNER DVD DTV/CBL DVR TV CH V-AUX/DOCK D E AMP TV INPUT TV MUTE TV VOL SCENE 1 2 3 4 BAND LEVEL ...
Owner's Manual
Page 42
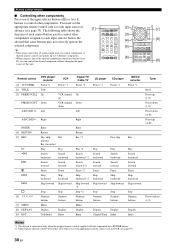
... SCENE 1 2 3 4 [2] BAND LEVEL TITLE MENU VOLUME [3] [4] [5] ENTER RETURN REC DISPLAY [7] [8] [6] l PROG h 1 2 ENHANCER SUR. DECODE 3 4 STRAIGHT NIGHT 5 6 7 8 MULTI CH IN AUDIO SEL 9 0 SLEEP 10 ENT [9] Remote control [1] AV POWER [2] TITLE [3] PRESET/CH k PRESET/CH n A/B/C/D/E l DVD player/ recorder VCR Power *1 Power *1 Title Up VCR channel up Down VCR channel down Left Digital TV/ Cable...
... SCENE 1 2 3 4 [2] BAND LEVEL TITLE MENU VOLUME [3] [4] [5] ENTER RETURN REC DISPLAY [7] [8] [6] l PROG h 1 2 ENHANCER SUR. DECODE 3 4 STRAIGHT NIGHT 5 6 7 8 MULTI CH IN AUDIO SEL 9 0 SLEEP 10 ENT [9] Remote control [1] AV POWER [2] TITLE [3] PRESET/CH k PRESET/CH n A/B/C/D/E l DVD player/ recorder VCR Power *1 Power *1 Title Up VCR channel up Down VCR channel down Left Digital TV/ Cable...
Owner's Manual
Page 43
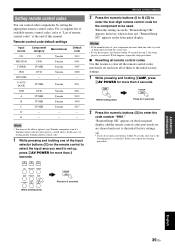
Remote control code default settings Input source Component category Manufacturer Default code CD CD Yamaha 5013 MD/CD-R CD-R Yamaha 5001 TUNER TUNER Yamaha 5007 DVD DVD Yamaha 2000 DTV/CBL - - - V-AUX/ DOCK TUNER Yamaha 5011 DVR DVR Yamaha 2011 A TUNER Yamaha 5012 B TUNER Yamaha 5009 C TUNER Yamaha 5017 D - - - E - - - When the setting succeeds, "RemoteSetup OK" appears; AMP POWER AV While holding hAMP...
Remote control code default settings Input source Component category Manufacturer Default code CD CD Yamaha 5013 MD/CD-R CD-R Yamaha 5001 TUNER TUNER Yamaha 5007 DVD DVD Yamaha 2000 DTV/CBL - - - V-AUX/ DOCK TUNER Yamaha 5011 DVR DVR Yamaha 2011 A TUNER Yamaha 5012 B TUNER Yamaha 5009 C TUNER Yamaha 5017 D - - - E - - - When the setting succeeds, "RemoteSetup OK" appears; AMP POWER AV While holding hAMP...


