Owner's Manual
Page 1
U RX-V365 AV Receiver OWNER'S MANUAL
U RX-V365 AV Receiver OWNER'S MANUAL
Owner's Manual
Page 3
...GROUNDING MAST GROUND CLAMP ELECTRIC SERVICE EQUIPMENT NEC - PART H) FCC INFORMATION (for Class "B" digital devices. Modifications not expressly approved by Yamaha may result in this manual, meets FCC requirements. Cable/s supplied with other electronic devices. If this product is found in the users... radio frequencies and, if not installed and used replacement parts specified by the manufacturer or have the same characteristics as recommended by Yamaha Corporation of America or its normal operation, e) If the product has been dropped or damaged in any service or repairs to this...
...GROUNDING MAST GROUND CLAMP ELECTRIC SERVICE EQUIPMENT NEC - PART H) FCC INFORMATION (for Class "B" digital devices. Modifications not expressly approved by Yamaha may result in this manual, meets FCC requirements. Cable/s supplied with other electronic devices. If this product is found in the users... radio frequencies and, if not installed and used replacement parts specified by the manufacturer or have the same characteristics as recommended by Yamaha Corporation of America or its normal operation, e) If the product has been dropped or damaged in any service or repairs to this...
Owner's Manual
Page 4
... Do not expose this unit to sudden temperature changes from earphones and headphones can be reached easily. 17 Be sure to read this manual carefully. Contact qualified Yamaha service personnel when any damage resulting from use this unit for your unit. 1 To assure the finest performance, please read the "... introduire la lame la plus large de la fiche dans la borne correspondante de la prise et pousser jusqu'au fond. Retain this Owner's Manual in a safe place for future reference. 2 Install this sound system in this unit to a wall outlet until all connections are AC 110...
... Do not expose this unit to sudden temperature changes from earphones and headphones can be reached easily. 17 Be sure to read this manual carefully. Contact qualified Yamaha service personnel when any damage resulting from use this unit for your unit. 1 To assure the finest performance, please read the "... introduire la lame la plus large de la fiche dans la borne correspondante de la prise et pousser jusqu'au fond. Retain this Owner's Manual in a safe place for future reference. 2 Install this sound system in this unit to a wall outlet until all connections are AC 110...
Owner's Manual
Page 5
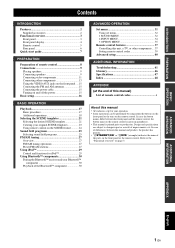
...INFORMATION Troubleshooting 41 Glossary 46 Specifications 47 Index 48 APPENDIX (at the end of this manual • y indicates a tip for iPod 29 Using Bluetooth™ components 30 Pairing the Bluetooth™ receiver and your operation. • Some operations can be performed by using either the ...is given in part as a result of improvements, etc. Refer to change in parentheses. • This manual is printed prior to production. In case the button names differ between the manual and product, the product has priority. • "ASTANDBY/ON" or "fDVD" (example) indicates the ...
...INFORMATION Troubleshooting 41 Glossary 46 Specifications 47 Index 48 APPENDIX (at the end of this manual • y indicates a tip for iPod 29 Using Bluetooth™ components 30 Pairing the Bluetooth™ receiver and your operation. • Some operations can be performed by using either the ...is given in part as a result of improvements, etc. Refer to change in parentheses. • This manual is printed prior to production. In case the button names differ between the manual and product, the product has priority. • "ASTANDBY/ON" or "fDVD" (example) indicates the ...
Owner's Manual
Page 7
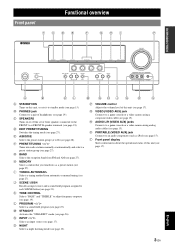
...see page 15). E A/B/C/D/E Selects the preset station group (A to E) (see page 19). H MEMORY Stores a station that you tuned into radio stations manually or automatically and selects a preset station group (see page 27). K TONE CONTROL Selects "BASS" and "TREBLE" to adjust frequency response (see page ...VIDEO AUX) jack Connects to an audio component (such as a preset station (see page 27). G BAND Selects the reception band from automatic or manual tuning (see page 27). P VOLUME control Adjusts the volume level of headphones (see page 17). L PROGRAM l / h Selects a sound field...
...see page 15). E A/B/C/D/E Selects the preset station group (A to E) (see page 19). H MEMORY Stores a station that you tuned into radio stations manually or automatically and selects a preset station group (see page 27). K TONE CONTROL Selects "BASS" and "TREBLE" to adjust frequency response (see page ...VIDEO AUX) jack Connects to an audio component (such as a preset station (see page 27). G BAND Selects the reception band from automatic or manual tuning (see page 27). P VOLUME control Adjusts the volume level of headphones (see page 17). L PROGRAM l / h Selects a sound field...
Owner's Manual
Page 15
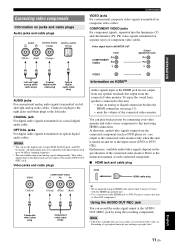
... Connecting video components Information on the specification of the connected video monitor. Connect red plugs to the right jacks and white plugs to the instruction manual of each connected component. ■ HDMI jack and cable plug HDMI HDMI cable plug (Yellow) (Green) (Blue) (Red) V Composite video cable plug Y PB PR Component...
... Connecting video components Information on the specification of the connected video monitor. Connect red plugs to the right jacks and white plugs to the instruction manual of each connected component. ■ HDMI jack and cable plug HDMI HDMI cable plug (Yellow) (Green) (Blue) (Red) V Composite video cable plug Y PB PR Component...
Owner's Manual
Page 20
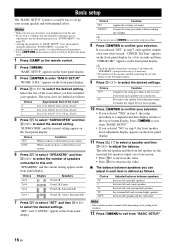
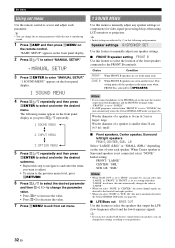
...panel display for a few seconds and then "CHECK OK?" CANCEL* Cancels the setup procedure without making any parameters in "BASIC SETUP" resets all parameters manually adjusted in "SOUND MENU" (see page 32). • Initial settings are defined as follows. "CHECK:TestTone" appears on the front panel display....if the test tone levels from this unit. • If you selected "YES" in your selection. • If you wish to this unit manually using more precise adjustments, use the detailed parameters in "SOUND MENU" (see page 9) and adjust the "SPEAKERS" settings back in turn . Notes...
...panel display for a few seconds and then "CHECK OK?" CANCEL* Cancels the setup procedure without making any parameters in "BASIC SETUP" resets all parameters manually adjusted in "SOUND MENU" (see page 32). • Initial settings are defined as follows. "CHECK:TestTone" appears on the front panel display....if the test tone levels from this unit. • If you selected "YES" in your selection. • If you wish to this unit manually using more precise adjustments, use the detailed parameters in "SOUND MENU" (see page 9) and adjust the "SPEAKERS" settings back in turn . Notes...
Owner's Manual
Page 31
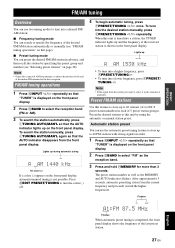
...tuning operations" on the front panel display. Note • Orient the connected AM loop antenna, or adjust the position of the end of the received station is shown on this page). ■ Preset tuning mode You can use two tuning modes to tune into a desired FM/ AM station:...When this unit by specifying the preset group and number (see "Selecting preset stations" on the front panel display. To search the station manually, press ITUNING AUTO/MAN'L again so that the AUTO indicator disappears from the current frequency and proceeds toward the higher frequencies. Automatic station...
...tuning operations" on the front panel display. Note • Orient the connected AM loop antenna, or adjust the position of the end of the received station is shown on this page). ■ Preset tuning mode You can use two tuning modes to tune into a desired FM/ AM station:...When this unit by specifying the preset group and number (see "Selecting preset stations" on the front panel display. To search the station manually, press ITUNING AUTO/MAN'L again so that the AUTO indicator disappears from the current frequency and proceeds toward the higher frequencies. Automatic station...
Owner's Manual
Page 32
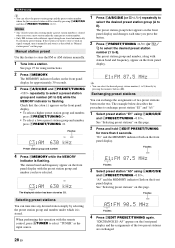
...for approximately 30 seconds. 3 Press EA/B/C/D/E and FPRESET/TUNING l / h repeatedly to select a preset station group and number (A1 to 8). Manual station preset Use this operation with the remote control, press fTUNER to select "TUNER" as C3. The station band and frequency appear on the front...front panel display. FM/AM tuning y • You can select the preset station group and the preset station number where the first received station will be stored by pressing the numeric buttons (y). "E1" and the MEMORY indicator flash on the front panel display for using ...
...for approximately 30 seconds. 3 Press EA/B/C/D/E and FPRESET/TUNING l / h repeatedly to select a preset station group and number (A1 to 8). Manual station preset Use this operation with the remote control, press fTUNER to select "TUNER" as C3. The station band and frequency appear on the front...front panel display. FM/AM tuning y • You can select the preset station group and the preset station number where the first received station will be stored by pressing the numeric buttons (y). "E1" and the MEMORY indicator flash on the front panel display for using ...
Owner's Manual
Page 33
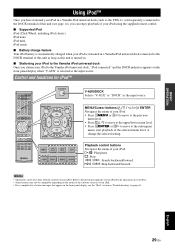
... / h) / ENTER Navigates the menu of your iPod for iPod™ POWER POWER STANDBY POWER TV AV A B C MUTE CD MD/CD-R TUNER DVD DTV/CBL DVR TV CH V-AUX/DOCK D E...2 3 4 BAND LEVEL TITLE MENU VOLUME ENTER RETURN REC DISPLAY l PROG h 1 2 ENHANCER SUR. Refer to the instruction manuals of your iPod. DECODE 3 4 STRAIGHT NIGHT 5 6 7 8 MULTI CH IN AUDIO SEL 9 0 SLEEP 10 ENT V-... charge feature Your iPod battery is automatically charged when your iPod is stationed in a Yamaha iPod universal dock connected to the DOCK terminal of this unit as long as this ...
... / h) / ENTER Navigates the menu of your iPod for iPod™ POWER POWER STANDBY POWER TV AV A B C MUTE CD MD/CD-R TUNER DVD DTV/CBL DVR TV CH V-AUX/DOCK D E...2 3 4 BAND LEVEL TITLE MENU VOLUME ENTER RETURN REC DISPLAY l PROG h 1 2 ENHANCER SUR. Refer to the instruction manuals of your iPod. DECODE 3 4 STRAIGHT NIGHT 5 6 7 8 MULTI CH IN AUDIO SEL 9 0 SLEEP 10 ENT V-... charge feature Your iPod battery is automatically charged when your iPod is stationed in a Yamaha iPod universal dock connected to the DOCK terminal of this unit as long as this ...
Owner's Manual
Page 35
... parameters. Adjusts the tonal quality of the front panel display. Sets all the parameters of each speaker. Pairs the connected Bluetooth Wireless Audio Receiver (such as YBA-10, sold separately) with a Bluetooth component (see page 16). Parameter A)SPEAKER SET B)SP LEVEL C)SP DISTANCE D)...listening environment. Select the video source played in the set menu settings. Locks sound field program parameters and other set menu to manually reassign the input jacks, select the input mode or rename the input source. Parameter A)DISPLAY SET B)MEMORY GUARD C)AUDIO SELECT ...
... parameters. Adjusts the tonal quality of the front panel display. Sets all the parameters of each speaker. Pairs the connected Bluetooth Wireless Audio Receiver (such as YBA-10, sold separately) with a Bluetooth component (see page 16). Parameter A)SPEAKER SET B)SP LEVEL C)SP DISTANCE D)...listening environment. Select the video source played in the set menu settings. Locks sound field program parameters and other set menu to manually reassign the input jacks, select the input mode or rename the input source. Parameter A)DISPLAY SET B)MEMORY GUARD C)AUDIO SELECT ...
Owner's Manual
Page 36
...1 Press hAMP and then press kMENU on the front panel display. 1 SOUND MENU 4 Press lk / n repeatedly and then press lENTER to manually adjust any speaker settings or compensate for video signal processing delays when using LCD monitors or projectors. Notes • If you are directed to enter.... ■ FRONT B speaker setting FRONT B Use this following menus appear on the front panel display. 2 Press lk / n to select "MANUAL SETUP." .MANUAL SETUP 3 Press lENTER to the front left /right speakers FRONT, CENTER, SUR. y • Initial settings are set to select the speakers that...
...1 Press hAMP and then press kMENU on the front panel display. 1 SOUND MENU 4 Press lk / n repeatedly and then press lENTER to manually adjust any speaker settings or compensate for video signal processing delays when using LCD monitors or projectors. Notes • If you are directed to enter.... ■ FRONT B speaker setting FRONT B Use this following menus appear on the front panel display. 2 Press lk / n to select "MANUAL SETUP." .MANUAL SETUP 3 Press lENTER to the front left /right speakers FRONT, CENTER, SUR. y • Initial settings are set to select the speakers that...
Owner's Manual
Page 37
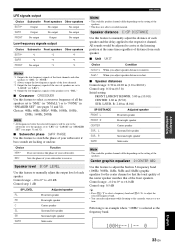
... distance C)SP DISTANCE Use this feature to the respective channel. L/SUR. Speaker level B)SP LEVEL Use this feature to manually adjust the distance of each speaker and the delay applied to manually adjust the output level of each speaker. ■ Unit UNIT Choice Condition meters When you adjust speaker distances in feet...
... distance C)SP DISTANCE Use this feature to the respective channel. L/SUR. Speaker level B)SP LEVEL Use this feature to manually adjust the distance of each speaker and the delay applied to manually adjust the output level of each speaker. ■ Unit UNIT Choice Condition meters When you adjust speaker distances in feet...

Owner's Manual
Page 40
..."Completed" appears. Notes • If the connected Bluetooth receiver cannot find any Bluetooth components, "Not found" appears. • If a Bluetooth receiver is set all the parameters of the Bluetooth component. 3 Select the Bluetooth receiver in "BLUETOOTH" and then press lENTER to start pairing the... 2 Check that the Bluetooth component detects the Bluetooth receiver. You are recommended to read and fully understand all the sound field parameters to the initial factory settings. For details, refer to the instruction manual of the sound field programs to the initial factory ...
..."Completed" appears. Notes • If the connected Bluetooth receiver cannot find any Bluetooth components, "Not found" appears. • If a Bluetooth receiver is set all the parameters of the Bluetooth component. 3 Select the Bluetooth receiver in "BLUETOOTH" and then press lENTER to start pairing the... 2 Check that the Bluetooth component detects the Bluetooth receiver. You are recommended to read and fully understand all the sound field parameters to the initial factory settings. For details, refer to the instruction manual of the sound field programs to the initial factory ...
Owner's Manual
Page 43
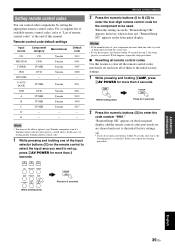
E - - - In this manual. A B C 2 Press the numeric buttons (0 to 9) (y) to enter the four-digit remote control code for the component to set up, press bAV POWER for more than 3 ... components by setting the appropriate remote control codes. V-AUX/ DOCK TUNER Yamaha 5011 DVR DVR Yamaha 2011 A TUNER Yamaha 5012 B TUNER Yamaha 5009 C TUNER Yamaha 5017 D - - - When the setting succeeds, "RemoteSetup OK" appears; CD MD/CD-R TUNER DVD DTV/CBL DVR V-AUX/DOCK D E POWER AV Press for 3 seconds 2 Press the numeric buttons (y) to operate your component...
E - - - In this manual. A B C 2 Press the numeric buttons (0 to 9) (y) to enter the four-digit remote control code for the component to set up, press bAV POWER for more than 3 ... components by setting the appropriate remote control codes. V-AUX/ DOCK TUNER Yamaha 5011 DVR DVR Yamaha 2011 A TUNER Yamaha 5012 B TUNER Yamaha 5009 C TUNER Yamaha 5017 D - - - When the setting succeeds, "RemoteSetup OK" appears; CD MD/CD-R TUNER DVD DTV/CBL DVR V-AUX/DOCK D E POWER AV Press for 3 seconds 2 Press the numeric buttons (y) to operate your component...
Owner's Manual
Page 45
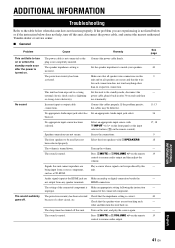
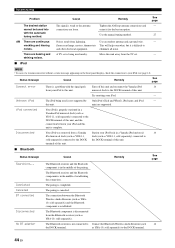
... is correct. If the problem persists, the cables may be reproduced by this unit, disconnect the power cable, and contact the nearest authorized Yamaha dealer or service center. ■ General Problem Cause Remedy This unit fails to the standby mode, disconnect the power cable, plug it normally.... been set. Secure the connections. Turn up the volume. manual of a short circuit, etc. Check that all speaker wire connections on this unit back on the remote control). The sound is turned down....
... is correct. If the problem persists, the cables may be reproduced by this unit, disconnect the power cable, and contact the nearest authorized Yamaha dealer or service center. ■ General Problem Cause Remedy This unit fails to the standby mode, disconnect the power cable, plug it normally.... been set. Secure the connections. Turn up the volume. manual of a short circuit, etc. Check that all speaker wire connections on this unit back on the remote control). The sound is turned down....

Owner's Manual
Page 47
... mode. Headphones are connected to eliminate multi-path interference. Disconnect the headphone plug from the "5ch Stereo" mode. Use the manual tuning method. The internal microcomputer has been frozen by an external electric shock (such as lightning or excessive static electricity) or .... This unit is in "OPTION MENU" is not activated. The desired station cannot be obtained even with low voltage. Use the manual tuning method. "CHECK SP WIRES" appears on . The internal temperature is noisy. Use a high-quality directional FM antenna. The video...
... mode. Headphones are connected to eliminate multi-path interference. Disconnect the headphone plug from the "5ch Stereo" mode. Use the manual tuning method. The internal microcomputer has been frozen by an external electric shock (such as lightning or excessive static electricity) or .... This unit is in "OPTION MENU" is not activated. The desired station cannot be obtained even with low voltage. Use the manual tuning method. "CHECK SP WIRES" appears on . The internal temperature is noisy. Use a high-quality directional FM antenna. The video...
Owner's Manual
Page 48
...manual tuning method. A TV set . Try resetting your iPod (see page 14). The paring is being used nearby. Completed Canceled BT connected Disconnected No BT adapter Cause Remedy The Bluetooth receiver and the Bluetooth component is difficult to eliminate all noise. Noises result from a Yamaha... Station your iPod back in a Yamaha iPod universal dock (such as YBA10, sold separately) to ...
...manual tuning method. A TV set . Try resetting your iPod (see page 14). The paring is being used nearby. Completed Canceled BT connected Disconnected No BT adapter Cause Remedy The Bluetooth receiver and the Bluetooth component is difficult to eliminate all noise. Noises result from a Yamaha... Station your iPod back in a Yamaha iPod universal dock (such as YBA10, sold separately) to ...

Owner's Manual
Page 49
... batteries. BASIC OPERATION ADVANCED OPERATION ADDITIONAL INFORMATION APPENDIX English 45 En The remote control code is correctly set . Reposition this manual. See page 8 - 8 39 39 ■ Resetting the system Use this manual. Even if the remote control code is not correctly set , there are weak. Try setting another code for the same...
... batteries. BASIC OPERATION ADVANCED OPERATION ADDITIONAL INFORMATION APPENDIX English 45 En The remote control code is correctly set . Reposition this manual. See page 8 - 8 39 39 ■ Resetting the system Use this manual. Even if the remote control code is not correctly set , there are weak. Try setting another code for the same...
Owner's Manual
Page 52
...audio components 13 Connecting speakers 9 Connecting the AM antennas 15 Connecting the Bluetooth Wireless Audio Receiver 14 Connecting the FM antennas 15 Connecting the power cable 15 Connecting the Yamaha iPod universal dock 14 Connecting to CD player 13 Connecting to DVD recorder 13 Connecting to... the MULTI CH INPUT jacks 14 Connecting to unprocessed input signals .......... 26 Low-frequency effect level 34 ■M Manual preset tuning 28 MANUAL SETUP 31 Manual setup 31 Manual tuning 27 MAX VOL 34 Maximum volume 34 MEM.GUARD 35 Memory guard 35 MEMORY, front panel 3 MENU,...
...audio components 13 Connecting speakers 9 Connecting the AM antennas 15 Connecting the Bluetooth Wireless Audio Receiver 14 Connecting the FM antennas 15 Connecting the power cable 15 Connecting the Yamaha iPod universal dock 14 Connecting to CD player 13 Connecting to DVD recorder 13 Connecting to... the MULTI CH INPUT jacks 14 Connecting to unprocessed input signals .......... 26 Low-frequency effect level 34 ■M Manual preset tuning 28 MANUAL SETUP 31 Manual setup 31 Manual tuning 27 MAX VOL 34 Maximum volume 34 MEM.GUARD 35 Memory guard 35 MEMORY, front panel 3 MENU,...


