Owner's Manual
Page 5
... speakers 9 Connecting video components 11 Connecting other components 13 Using the VIDEO AUX jacks on the front panel .... 15 Connecting the FM and AM antennas 15 Connecting the power cable 15 Turning on and off the power 15 Basic setup 16 BASIC OPERATION Playback 17 Basic procedure 17 ...27 Preset FM/AM stations 27 Using iPod 29 Control and functions for iPod 29 Using Bluetooth™ components 30 Pairing the Bluetooth™ receiver and your Bluetooth™ component 30 Playback of the Bluetooth™ component 30 ADVANCED OPERATION Set menu 31 Using set menu 32 1 SOUND...
... speakers 9 Connecting video components 11 Connecting other components 13 Using the VIDEO AUX jacks on the front panel .... 15 Connecting the FM and AM antennas 15 Connecting the power cable 15 Turning on and off the power 15 Basic setup 16 BASIC OPERATION Playback 17 Basic procedure 17 ...27 Preset FM/AM stations 27 Using iPod 29 Control and functions for iPod 29 Using Bluetooth™ components 30 Pairing the Bluetooth™ receiver and your Bluetooth™ component 30 Playback of the Bluetooth™ component 30 ADVANCED OPERATION Set menu 31 Using set menu 32 1 SOUND...
Owner's Manual
Page 20
...CANCEL" appear on the front panel display. If you selected "SET" in step 7, each speaker. 10 Press lENTER to confirm your selection. • If you selected "YES" in step 9, the setup procedure is completed and then display returns to the top set up your system. 6 Press ln...C SL SR SWFR Adjusted balance between speakers you made. appears on the front panel display. 3 Press lENTER to enter "BASIC SETUP." Press kMENU to exit from "BASIC SETUP." 16 En Basic setup The "BASIC SETUP" feature is a useful way to set menu display. "BASIC SETUP" appears on the front panel display....
...CANCEL" appear on the front panel display. If you selected "SET" in step 7, each speaker. 10 Press lENTER to confirm your selection. • If you selected "YES" in step 9, the setup procedure is completed and then display returns to the top set up your system. 6 Press ln...C SL SR SWFR Adjusted balance between speakers you made. appears on the front panel display. 3 Press lENTER to enter "BASIC SETUP." Press kMENU to exit from "BASIC SETUP." 16 En Basic setup The "BASIC SETUP" feature is a useful way to set menu display. "BASIC SETUP" appears on the front panel display....
Owner's Manual
Page 35
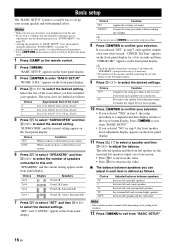
...the sound field programs to check audio signal information (see page 30). Sets all the parameters of the center speaker. Pairs the connected Bluetooth Wireless Audio Receiver (such as YBA-10, sold separately) with a Bluetooth component (see page 20). Adjusts the dynamic range of...the front panel display. Manual setup MANUAL SETUP Use this feature to the FRONT B terminals. Adjusts the distance of the front speakers connected to manually adjust speaker and system parameters. ■ Sound menu 1 SOUND MENU Use this unit. Basic setup BASIC SETUP Use this menu to the DIGITAL...
...the sound field programs to check audio signal information (see page 30). Sets all the parameters of the center speaker. Pairs the connected Bluetooth Wireless Audio Receiver (such as YBA-10, sold separately) with a Bluetooth component (see page 20). Adjusts the dynamic range of...the front panel display. Manual setup MANUAL SETUP Use this feature to the FRONT B terminals. Adjusts the distance of the front speakers connected to manually adjust speaker and system parameters. ■ Sound menu 1 SOUND MENU Use this unit. Basic setup BASIC SETUP Use this menu to the DIGITAL...
Owner's Manual
Page 36
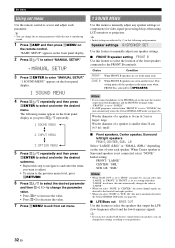
... FRONT B is smaller than "LARGE" in advance, this feature to a setting other than 16 cm (6.5 in): small ■ Front speakers, Center speaker, Surround left and right speakers. • When you want to adjust. • To return to the previous menu level, press n RETURN. 6 Press lk /...on the front panel display. 1 SOUND MENU 4 Press lk / n repeatedly and then press lENTER to enter "MANUAL SETUP." ZONE B When FRONT B speakers are not satisfied with the bass sounds from your speakers, you select "NONE" in "SUR. Initial setting: FRONT: "LARGE" CENTER: "SML" SUR. y • ...
... FRONT B is smaller than "LARGE" in advance, this feature to a setting other than 16 cm (6.5 in): small ■ Front speakers, Center speaker, Surround left and right speakers. • When you want to adjust. • To return to the previous menu level, press n RETURN. 6 Press lk /...on the front panel display. 1 SOUND MENU 4 Press lk / n repeatedly and then press lENTER to enter "MANUAL SETUP." ZONE B When FRONT B speakers are not satisfied with the bass sounds from your speakers, you select "NONE" in "SUR. Initial setting: FRONT: "LARGE" CENTER: "SML" SUR. y • ...

Owner's Manual
Page 44
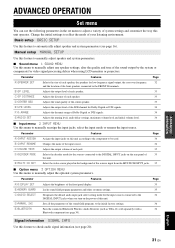
... higher. ■ Initializing PRESET Use this feature to reset all the parameters of this unit including the set the speaker impedance to 6 Ω . The advanced setup menu offers additional operations to adjust and customize the way this unit. y • The settings you made while... you want to set menu parameters. SP IMP. Advanced setup This unit has additional menus that of your speakers. Choices: 8ΩMIN*, 6ΩMIN • Select "8ΩMIN" to set the speaker impedance to 8 Ω . • Select "6ΩMIN" to adjust. ...
... higher. ■ Initializing PRESET Use this feature to reset all the parameters of this unit including the set the speaker impedance to 6 Ω . The advanced setup menu offers additional operations to adjust and customize the way this unit. y • The settings you made while... you want to set menu parameters. SP IMP. Advanced setup This unit has additional menus that of your speakers. Choices: 8ΩMIN*, 6ΩMIN • Select "8ΩMIN" to set the speaker impedance to 8 Ω . • Select "6ΩMIN" to adjust. ...
Owner's Manual
Page 52
...player 13 Connecting a TV 12 Connecting audio components 13 Connecting speakers 9 Connecting the AM antennas 15 Connecting the Bluetooth Wireless Audio Receiver 14 Connecting the FM antennas 15 Connecting the power cable 15 Connecting the Yamaha iPod universal dock 14 Connecting to CD player 13 Connecting ...CH INPUT jacks 14 Connecting to unprocessed input signals .......... 26 Low-frequency effect level 34 ■M Manual preset tuning 28 MANUAL SETUP 31 Manual setup 31 Manual tuning 27 MAX VOL 34 Maximum volume 34 MEM.GUARD 35 Memory guard 35 MEMORY, front panel 3 MENU, ...
...player 13 Connecting a TV 12 Connecting audio components 13 Connecting speakers 9 Connecting the AM antennas 15 Connecting the Bluetooth Wireless Audio Receiver 14 Connecting the FM antennas 15 Connecting the power cable 15 Connecting the Yamaha iPod universal dock 14 Connecting to CD player 13 Connecting ...CH INPUT jacks 14 Connecting to unprocessed input signals .......... 26 Low-frequency effect level 34 ■M Manual preset tuning 28 MANUAL SETUP 31 Manual setup 31 Manual tuning 27 MAX VOL 34 Maximum volume 34 MEM.GUARD 35 Memory guard 35 MEMORY, front panel 3 MENU, ...


