
Owner's Manual
Page 5
English Contents Introduction 3 About this manual 3 Supplied accessories 3 Region codes 3 Playable disc formats 4 Cleaning discs 4 Patent information 5 Functional Overview 6 Front panel 6 Rear panel 7 Remote control 8 Connections 9 General notes on connections 9 Audio connections 9 Digital connection 9 Analog connection 9 Video connections 10 Component video jacks
English Contents Introduction 3 About this manual 3 Supplied accessories 3 Region codes 3 Playable disc formats 4 Cleaning discs 4 Patent information 5 Functional Overview 6 Front panel 6 Rear panel 7 Remote control 8 Connections 9 General notes on connections 9 Audio connections 9 Digital connection 9 Analog connection 9 Video connections 10 Component video jacks
Owner's Manual
Page 6
... Locking/Unlocking the disc for viewing...........28 Recording CD tracks onto your USB device ....28 Programming disc tracks (except MP3/WMA/WMV/JPEG/DivX®)........30 Dimming the front panel display 30 OSD language 30 Setting the screen saver 31 Setting the sleep timer 31 Displaying the DivX® VOD registration code 31 Audio setup menu 31 Setting the analog output 31 Setting the digital output 32 Turning the HDMI audio on/off 32 Turning the night mode on/off 33 Video setup menu 33 TV type...
... Locking/Unlocking the disc for viewing...........28 Recording CD tracks onto your USB device ....28 Programming disc tracks (except MP3/WMA/WMV/JPEG/DivX®)........30 Dimming the front panel display 30 OSD language 30 Setting the screen saver 31 Setting the sleep timer 31 Displaying the DivX® VOD registration code 31 Audio setup menu 31 Setting the analog output 31 Setting the digital output 32 Turning the HDMI audio on/off 32 Turning the night mode on/off 33 Video setup menu 33 TV type...

Owner's Manual
Page 8
... • Up to 298 folders per disc/USB device and up to 648 files per folder with up to function. • Some discs cannot be played. • Discs without logos shown left . • Do not use any other type of DVD-R/RW/R DL and DVD+R/R DL can play: • DVD-R/RW/R DL and DVD+R/RW/R DL discs recorded in DVD-Video compatible format • DVD-R/RW discs recorded in a circular motion. • Do not...
... • Up to 298 folders per disc/USB device and up to 648 files per folder with up to function. • Some discs cannot be played. • Discs without logos shown left . • Do not use any other type of DVD-R/RW/R DL and DVD+R/R DL can play: • DVD-R/RW/R DL and DVD+R/RW/R DL discs recorded in DVD-Video compatible format • DVD-R/RW discs recorded in a circular motion. • Do not...
Owner's Manual
Page 15
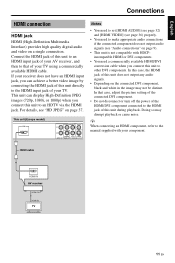
... "Audio connections" on page 37. y When connecting an HDMI component, refer to make appropriate audio connections if the connected component does not output audio signals (see "HD JPEG" on page 9). • This unit is not compatible with HDCPincompatible HDMI or DVI components. • You need to the manual supplied with your TV using a commercially available HDMI cable. English Connections HDMI connection HDMI jack HDMI (High-Definition Multimedia Interface) provides high quality digital audio and video on the connected DVI component, black and white in...
... "Audio connections" on page 37. y When connecting an HDMI component, refer to make appropriate audio connections if the connected component does not output audio signals (see "HD JPEG" on page 9). • This unit is not compatible with HDCPincompatible HDMI or DVI components. • You need to the manual supplied with your TV using a commercially available HDMI cable. English Connections HDMI connection HDMI jack HDMI (High-Definition Multimedia Interface) provides high quality digital audio and video on the connected DVI component, black and white in...
Owner's Manual
Page 16
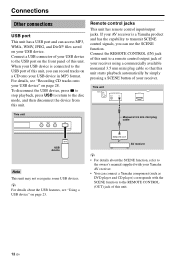
Connections Other connections USB port This unit has a USB port and can use the SCENE function. To disconnect the USB device, press 7 to stop playback, press USB to return to transmit SCENE control signals, you can connect a Yamaha component (such as DVD player and CD player) corresponds with your Yamaha AV receiver. • You can record tracks on page 23. y For details about the SCENE function, refer to a remote control output jack of your USB device in MP3 format. REMOTE OUT...
Connections Other connections USB port This unit has a USB port and can use the SCENE function. To disconnect the USB device, press 7 to stop playback, press USB to return to transmit SCENE control signals, you can connect a Yamaha component (such as DVD player and CD player) corresponds with your Yamaha AV receiver. • You can record tracks on page 23. y For details about the SCENE function, refer to a remote control output jack of your USB device in MP3 format. REMOTE OUT...
Owner's Manual
Page 20
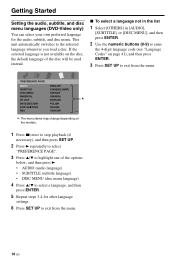
... language settings. 6 Press SET UP to exit from the menu. If the selected language is not available on the disc, the default language of the disc will be used instead. ■ To select a language not in the list 1 Select [OTHERS] in [AUDIO], [SUBTITLE], or [DISC MENU], and then press ENTER. 2 Use the numeric buttons (0-9) to enter the 4-digit language code (see "Language Codes" on the models. 1 Press 7 twice to stop playback (if necessary), and then press SET UP. 2 Press 3 repeatedly to select...
... language settings. 6 Press SET UP to exit from the menu. If the selected language is not available on the disc, the default language of the disc will be used instead. ■ To select a language not in the list 1 Select [OTHERS] in [AUDIO], [SUBTITLE], or [DISC MENU], and then press ENTER. 2 Use the numeric buttons (0-9) to enter the 4-digit language code (see "Language Codes" on the models. 1 Press 7 twice to stop playback (if necessary), and then press SET UP. 2 Press 3 repeatedly to select...

Owner's Manual
Page 23
... mode When playback is not available. Using the on the TV screen. A number of operations are playing. 1 Press 5/a to select [AUDIO], [SUBTITLE], or [ANGLE]. 2 Press ENTER. 19 En Note For DVD VR format, resume playback is stopped, press 7 again. English Playback Operation 1 Load one of the last ten discs. ➜ "LOADING" appears on the TV screen. 2 Press 3/ 8 while "LOADING" is displayed on the TV screen. ➜ "RESUME PLAY" appears on the TV screen and the disc is played...
... mode When playback is not available. Using the on the TV screen. A number of operations are playing. 1 Press 5/a to select [AUDIO], [SUBTITLE], or [ANGLE]. 2 Press ENTER. 19 En Note For DVD VR format, resume playback is stopped, press 7 again. English Playback Operation 1 Load one of the last ten discs. ➜ "LOADING" appears on the TV screen. 2 Press 3/ 8 while "LOADING" is displayed on the TV screen. ➜ "RESUME PLAY" appears on the TV screen and the disc is played...

Owner's Manual
Page 29
... SETUP PAGE AUDIO SETUP PAGE VIDEO SETUP PAGE Menu item DISC LOCK MP3 RECORD PROGRAM DISPLAY DIM OSD LANGUAGE SCREEN SAVER SLEEP DIVX(R) VOD CODE ANALOG OUTPUT DIGITAL AUDIO HDMI AUDIO NIGHT MODE TV TYPE TV DISPLAY PROGRESSIVE PICTURE SETTING BLACK LEVEL CLOSED CAPTION COMPONENT (Europe and Russia models only) HDMI SETUP Setting Item/Submenu LOCK, UNLOCK (SETUP is displayed) (INPUT MENU is displayed) 100%, 70%, 40% (See "OSD LANGUAGE setting items" on the models. and Canada models), OFF (Other models) YUV, RGB WIDE SCREEN FORMAT HDMI VIDEO HD JPEG Setting item/Parameter OFF, ALL, PCM...
... SETUP PAGE AUDIO SETUP PAGE VIDEO SETUP PAGE Menu item DISC LOCK MP3 RECORD PROGRAM DISPLAY DIM OSD LANGUAGE SCREEN SAVER SLEEP DIVX(R) VOD CODE ANALOG OUTPUT DIGITAL AUDIO HDMI AUDIO NIGHT MODE TV TYPE TV DISPLAY PROGRESSIVE PICTURE SETTING BLACK LEVEL CLOSED CAPTION COMPONENT (Europe and Russia models only) HDMI SETUP Setting Item/Submenu LOCK, UNLOCK (SETUP is displayed) (INPUT MENU is displayed) 100%, 70%, 40% (See "OSD LANGUAGE setting items" on the models. and Canada models), OFF (Other models) YUV, RGB WIDE SCREEN FORMAT HDMI VIDEO HD JPEG Setting item/Parameter OFF, ALL, PCM...
Owner's Manual
Page 32
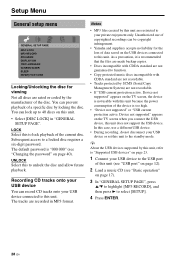
... En LOCK Select this unit does not support the USB device. Subsequent access to lock playback of the device is too high. • "Device not supported" or "USB current protection active. Setup Menu General setup menu GENERAL SETUP PAGE DISC LOCK MP3 RECORD PROGRAM DISPLAY DIM OSD LANGUAGE SCREEN SAVER SLEEP DIVX(R) VOD CODE Locking/Unlocking the disc for the loss of data saved on the USB devices connected to this unit. The default password is recommended that the files are made backup copies. • Discs incompatible...
... En LOCK Select this unit does not support the USB device. Subsequent access to lock playback of the device is too high. • "Device not supported" or "USB current protection active. Setup Menu General setup menu GENERAL SETUP PAGE DISC LOCK MP3 RECORD PROGRAM DISPLAY DIM OSD LANGUAGE SCREEN SAVER SLEEP DIVX(R) VOD CODE Locking/Unlocking the disc for the loss of data saved on the USB devices connected to this unit. The default password is recommended that the files are made backup copies. • Discs incompatible...
Owner's Manual
Page 35
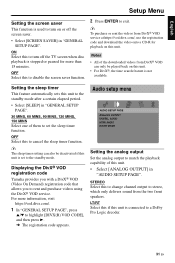
.... • Select [ANALOG OUTPUT] in "AUDIO SETUP PAGE". Audio setup menu AUDIO SETUP PAGE ANALOG OUTPUT DIGITAL AUDIO HDMI AUDIO NIGHT MODE Setting the analog output Set the analog output to turn on this unit. • For DivX®, the time search feature is set the sleep timer function. Notes • All of this to match the playback capability of the downloaded videos from DivX® VOD can also be played back on or off the TV screen when disc playback is stopped or...
.... • Select [ANALOG OUTPUT] in "AUDIO SETUP PAGE". Audio setup menu AUDIO SETUP PAGE ANALOG OUTPUT DIGITAL AUDIO HDMI AUDIO NIGHT MODE Setting the analog output Set the analog output to turn on this unit. • For DivX®, the time search feature is set the sleep timer function. Notes • All of this to match the playback capability of the downloaded videos from DivX® VOD can also be played back on or off the TV screen when disc playback is stopped or...

Owner's Manual
Page 36
... digital audio output jack to turn off the HDMI audio output. Discs are recorded at the coaxial jack of decoding multi-channel audio signals. Turning the HDMI audio on/off When you may need to play back discs recorded at the sampling rate of 96 kHz. PCM ONLY Select this unit, PCM signals are still output if the monitor and receiver only support the PCM format. y • Even if "ALL" is selected, this to the connected component. • When "PCM ONLY" is selected, DTS digital signal...
... digital audio output jack to turn off the HDMI audio output. Discs are recorded at the coaxial jack of decoding multi-channel audio signals. Turning the HDMI audio on/off When you may need to play back discs recorded at the sampling rate of 96 kHz. PCM ONLY Select this unit, PCM signals are still output if the monitor and receiver only support the PCM format. y • Even if "ALL" is selected, this to the connected component. • When "PCM ONLY" is selected, DTS digital signal...

Owner's Manual
Page 37
... 14. For details, see "Setting a color system for Europe and Russia models. English Setup Menu y This unit can output the following audio signals using HDMI: 32/44.1/48 kHz, 2ch linear PCM signals and bitstream signals (Dolby Digital and DTS). Video setup menu VIDEO SETUP PAGE TV TYPE TV DISPLAY PROGRESSIVE PICTURE SETTING BLACK LEVEL CLOSED CAPTION *....... In this case, a wide picture with the Dolby Digital mode. OFF Select this unit to watch your TV. Setting the TV display Set the aspect ratio of surround sound. It is brought upward...
... 14. For details, see "Setting a color system for Europe and Russia models. English Setup Menu y This unit can output the following audio signals using HDMI: 32/44.1/48 kHz, 2ch linear PCM signals and bitstream signals (Dolby Digital and DTS). Video setup menu VIDEO SETUP PAGE TV TYPE TV DISPLAY PROGRESSIVE PICTURE SETTING BLACK LEVEL CLOSED CAPTION *....... In this case, a wide picture with the Dolby Digital mode. OFF Select this unit to watch your TV. Setting the TV display Set the aspect ratio of surround sound. It is brought upward...

Owner's Manual
Page 38
... to make the TV picture softer. Adjusting picture settings This unit comes with progressive scan. • Connect using the setup mode if no picture is displayed when you cannot select [PROGRESSIVE]. • You can define yourself. 1 In "VIDEO SETUP PAGE", press 5/a to disable the progressive scan function. See "No picture is displayed. BRIGHT Select this to highlight [PICTURE SETTING], and then press 3. ON Select this to enable the progressive scan function. SOFT Select this to make the TV picture brighter. Setup Menu When the aspect ratio of...
... to make the TV picture softer. Adjusting picture settings This unit comes with progressive scan. • Connect using the setup mode if no picture is displayed when you cannot select [PROGRESSIVE]. • You can define yourself. 1 In "VIDEO SETUP PAGE", press 5/a to disable the progressive scan function. See "No picture is displayed. BRIGHT Select this to highlight [PICTURE SETTING], and then press 3. ON Select this to enable the progressive scan function. SOFT Select this to make the TV picture brighter. Setup Menu When the aspect ratio of...

Owner's Manual
Page 40
... progressive-scan video 1080I 1080 interlaced video 1080P 1080 progressive-scan video AUTO The resolution is 480p or 576p, you connect this for the component video connection. Note When the video signal is automatically selected to toggle the output of the video signal between YUV (on the 16:9 screen without pillar boxes. YUV Select this option is made when this for SCART connection. Setting the HDMI video When you cannot select [WIDE SCREEN FORMAT], and no aspect ratio adjustment is selected. WIDE SCREEN FORMAT Set the aspect ratio...
... progressive-scan video 1080I 1080 interlaced video 1080P 1080 progressive-scan video AUTO The resolution is 480p or 576p, you connect this for the component video connection. Note When the video signal is automatically selected to toggle the output of the video signal between YUV (on the 16:9 screen without pillar boxes. YUV Select this option is made when this for SCART connection. Setting the HDMI video When you cannot select [WIDE SCREEN FORMAT], and no aspect ratio adjustment is selected. WIDE SCREEN FORMAT Set the aspect ratio...

Owner's Manual
Page 41
... PAGE AUDIO SUBTITLE DISC MENU PARENTAL VR LIST DATA DISC NAV *.......DIVX SUBTITLE PBC *: [DIVX SUBTITLE] is available for your children or play certain discs in "Troubleshooting" on page 43 to open the disc tray. 2 Press 2. 3 Press SUBTITLE. • You cannot set [TV TYPE], [PROGRESSIVE], and [COMPONENT] (Europe and Russia models) when making HDMI connections. • When disconnecting the HDMI cable, the setting of [TV TYPE] may be displayed properly if a resolution output setting is not output correctly, see "Setting the audio, subtitle, and disc menu languages (DVD-Video only...
... PAGE AUDIO SUBTITLE DISC MENU PARENTAL VR LIST DATA DISC NAV *.......DIVX SUBTITLE PBC *: [DIVX SUBTITLE] is available for your children or play certain discs in "Troubleshooting" on page 43 to open the disc tray. 2 Press 2. 3 Press SUBTITLE. • You cannot set [TV TYPE], [PROGRESSIVE], and [COMPONENT] (Europe and Russia models) when making HDMI connections. • When disconnecting the HDMI cable, the setting of [TV TYPE] may be displayed properly if a resolution output setting is not output correctly, see "Setting the audio, subtitle, and disc menu languages (DVD-Video only...
Owner's Manual
Page 44
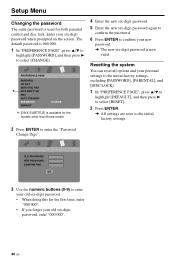
... this for both parental control and disc lock. Setup Menu Changing the password The same password is used for the first time, enter "000 000". • If you forget your old six-digit password, enter "000 000". 40 En Resetting the system You can reset all options and your new password. ➜ The new six-digit password is now valid. PREFERENCE PAGE PARENTAL VR LIST DATA DISC NAV *.......DIVX SUBTITLE PBC AUTO STANDBY PASSWORD DEFAULT CHANGE *: [DIVX SUBTITLE] is 000...
... this for both parental control and disc lock. Setup Menu Changing the password The same password is used for the first time, enter "000 000". • If you forget your old six-digit password, enter "000 000". 40 En Resetting the system You can reset all options and your new password. ➜ The new six-digit password is now valid. PREFERENCE PAGE PARENTAL VR LIST DATA DISC NAV *.......DIVX SUBTITLE PBC AUTO STANDBY PASSWORD DEFAULT CHANGE *: [DIVX SUBTITLE] is 000...
Owner's Manual
Page 46
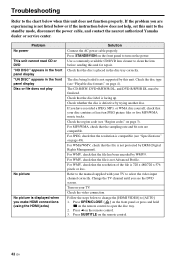
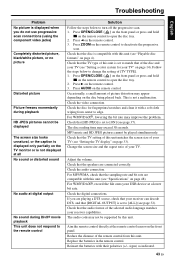
... change the [HDMI VIDEO] to select the video input channel correctly. TTrrooubulesbholoetinsg hooting Refer to open the disc tray. 2. Check the disc type (see "Region codes" on page 4). Press OPEN/CLOSE ( ) on the front panel or press and hold 7 on the front panel to the standby mode, disconnect the power cable, and contact the nearest authorized Yamaha dealer or service center. For MP3/WMA, check that the disc label is not listed below or if the instruction...
... change the [HDMI VIDEO] to select the video input channel correctly. TTrrooubulesbholoetinsg hooting Refer to open the disc tray. 2. Check the disc type (see "Region codes" on page 4). Press OPEN/CLOSE ( ) on the front panel or press and hold 7 on the front panel to the standby mode, disconnect the power cable, and contact the nearest authorized Yamaha dealer or service center. For MP3/WMA, check that the disc label is not listed below or if the instruction...
Owner's Manual
Page 47
Check that [DIGITAL OUTPUT] is set to [ALL] (see page 32). Change the screen size and the aspect ratio of your receiver can decode DTS, and that the disc is compatible with this unit matches the screen size of your USB device at the remote control sensor on page 4). Adjust the volume. For WMV/DivX®, record the file onto your TV (see "Setting the TV display" on page 33). Aim the remote control directly at...
Check that [DIGITAL OUTPUT] is set to [ALL] (see page 32). Change the screen size and the aspect ratio of your receiver can decode DTS, and that the disc is compatible with this unit matches the screen size of your USB device at the remote control sensor on page 4). Adjust the volume. For WMV/DivX®, record the file onto your TV (see "Setting the TV display" on page 33). Aim the remote control directly at...

Owner's Manual
Page 50
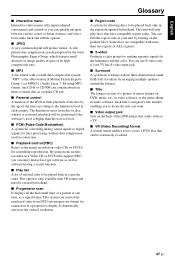
... two channels as multi-channel digital audio using your own using a single cable. These jacks send audio through two channels, the left and right, center and subwoofer). ■ DTS Digital Theatre Systems. This is a surround sound system, but it is a popular media technology created by the DivX® Media Format. For further information on the back of the DVD player that send highquality video to a TV that has component video input...
... two channels as multi-channel digital audio using your own using a single cable. These jacks send audio through two channels, the left and right, center and subwoofer). ■ DTS Digital Theatre Systems. This is a surround sound system, but it is a popular media technology created by the DivX® Media Format. For further information on the back of the DVD player that send highquality video to a TV that has component video input...
Owner's Manual
Page 51
... subtitle options. ■ JPEG A very common digital still picture format. By using MP3 format, one CD-R or CD-RW can contain about ten times as much data as a regular CD can. ■ Parental control A function of the DVD to limit playback of its high compression ratio. ■ MP3 A file format with more than the user-set level. ■ PCM (Pulse Code Modulation) A system for converting analog sound signals to digital signals for connection to a progressive display...
... subtitle options. ■ JPEG A very common digital still picture format. By using MP3 format, one CD-R or CD-RW can contain about ten times as much data as a regular CD can. ■ Parental control A function of the DVD to limit playback of its high compression ratio. ■ MP3 A file format with more than the user-set level. ■ PCM (Pulse Code Modulation) A system for converting analog sound signals to digital signals for connection to a progressive display...


