Owner's Manual
Page 4
... easily. 18 The batteries shall not be opened for any service is called the standby mode. in them, as sunshine, fire or the like. Keep it in standby mode, then disconnect the AC power plug from use this unit for future reference. 2 Install this unit, and/or personal injury. The cabinet should remove the cover or attempt to set the unit in...
... easily. 18 The batteries shall not be opened for any service is called the standby mode. in them, as sunshine, fire or the like. Keep it in standby mode, then disconnect the AC power plug from use this unit for future reference. 2 Install this unit, and/or personal injury. The cabinet should remove the cover or attempt to set the unit in...
Owner's Manual
Page 5
... receiver with 6ch/ multi-channel input 10 Video connections 11 HDMI connection 12 Connecting the power cable 14 GETTING STARTED 15 Step 1: Inserting batteries into the remote control 15 Using the remote control 15 Step 2: Turning on the power 15 Step 3: Setting a TV type 16 Step 4: Setting a language preference ..... 17 Setting the OSD (On-Screen Display) language 17 Setting the audio, subtitle and disc menu languages 17 DISC OPERATION 18 Basic operation 18 Pausing playback 18 Selecting a track/chapter 18 Searching backward/forward 19 Repeat playback 19 Repeating playback...
... receiver with 6ch/ multi-channel input 10 Video connections 11 HDMI connection 12 Connecting the power cable 14 GETTING STARTED 15 Step 1: Inserting batteries into the remote control 15 Using the remote control 15 Step 2: Turning on the power 15 Step 3: Setting a TV type 16 Step 4: Setting a language preference ..... 17 Setting the OSD (On-Screen Display) language 17 Setting the audio, subtitle and disc menu languages 17 DISC OPERATION 18 Basic operation 18 Pausing playback 18 Selecting a track/chapter 18 Searching backward/forward 19 Repeat playback 19 Repeating playback...
Owner's Manual
Page 6
... SETUP MENU 27 LANGUAGE CODE LIST 39 Menu overview 27 Setup menu operation 28 TROUBLESHOOTING 40 General setup menu 29 Selecting DVD-Audio mode 29 GLOSSARY 42 Selecting SA-CD mode 29 Setting the OSD language 29 Restricting playback with parental control ....... 29 SPECIFICATIONS 44 Changing the parental password 29 Setting the screen saver 30 Setting the auto power function 30 Setting the sleep timer 30 Resetting the system 30 Displaying the DivX® VOD registration code 30 Audio setup menu 31 Setting the analog output 31 Setting the digital output...
... SETUP MENU 27 LANGUAGE CODE LIST 39 Menu overview 27 Setup menu operation 28 TROUBLESHOOTING 40 General setup menu 29 Selecting DVD-Audio mode 29 GLOSSARY 42 Selecting SA-CD mode 29 Setting the OSD language 29 Restricting playback with parental control ....... 29 SPECIFICATIONS 44 Changing the parental password 29 Setting the screen saver 30 Setting the auto power function 30 Setting the sleep timer 30 Resetting the system 30 Displaying the DivX® VOD registration code 30 Audio setup menu 31 Setting the analog output 31 Setting the digital output...
Owner's Manual
Page 10
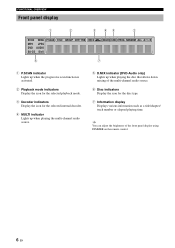
... progressive scan function is activated. 2 Playback mode indicators Display the icon for the selected playback mode. 3 Decoder indicators Display the icon for the selected internal decoder. 4 MULTI indicator Lights up when playing the multi-channel audio source. 5 D.MIX indicator (DVD-Audio only) Lights up when playing the disc that allows down mixing of the front panel display using DIMMER on the remote control. 6 En FUNCTIONAL OVERVIEW Front panel display 1 2 3 45 2 SVCD WMA P.SCAN TITLE GROUP CHP/ TRK MP3 JPEG DVD AUDIO SA-CD DivX 6 D MULTI...
... progressive scan function is activated. 2 Playback mode indicators Display the icon for the selected playback mode. 3 Decoder indicators Display the icon for the selected internal decoder. 4 MULTI indicator Lights up when playing the multi-channel audio source. 5 D.MIX indicator (DVD-Audio only) Lights up when playing the disc that allows down mixing of the front panel display using DIMMER on the remote control. 6 En FUNCTIONAL OVERVIEW Front panel display 1 2 3 45 2 SVCD WMA P.SCAN TITLE GROUP CHP/ TRK MP3 JPEG DVD AUDIO SA-CD DivX 6 D MULTI...
Owner's Manual
Page 13
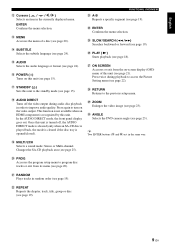
... disc (see page 23). ; y POWER ( l ) Turns on the video output. Once this unit (see page 22). j ON SCREEN Accesses or exit from its menu (see page 21). FUNCTIONAL OVERVIEW d A-B Repeats a specific segment (see page 24). e MENU Accesses the menu of this unit (see page 20). r SUBTITLE Selects the subtitle language (see page 19). f ENTER Confirms the menu selection. Press twice during audio disc playback in random order (see page 23). o MULTI / 2CH Selects a sound mode: Stereo or Multi-channel...
... disc (see page 23). ; y POWER ( l ) Turns on the video output. Once this unit (see page 22). j ON SCREEN Accesses or exit from its menu (see page 21). FUNCTIONAL OVERVIEW d A-B Repeats a specific segment (see page 24). e MENU Accesses the menu of this unit (see page 20). r SUBTITLE Selects the subtitle language (see page 19). f ENTER Confirms the menu selection. Press twice during audio disc playback in random order (see page 23). o MULTI / 2CH Selects a sound mode: Stereo or Multi-channel...

Owner's Manual
Page 15
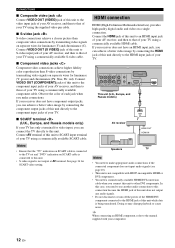
... use one that supports these formats. CENTER COAXIAL IN L L AV R R MIXED 2CH FRONT SUBWOOFER SURROUND AUDIO OUT OPTICAL DIGITAL OUT ON OFF RS 232C REMOTE CONTROL HDMI This unit (U.K., Europe, and Russia models) CONNECTIONS Video connections This unit has SCART, composite video, S-video, and component video output jacks. Pressing AUDIO on the remote control once or more may change not only the audio languages but also the audio format. • SA-CD audio signals are not output from the menu screen...
... use one that supports these formats. CENTER COAXIAL IN L L AV R R MIXED 2CH FRONT SUBWOOFER SURROUND AUDIO OUT OPTICAL DIGITAL OUT ON OFF RS 232C REMOTE CONTROL HDMI This unit (U.K., Europe, and Russia models) CONNECTIONS Video connections This unit has SCART, composite video, S-video, and component video output jacks. Pressing AUDIO on the remote control once or more may change not only the audio languages but also the audio format. • SA-CD audio signals are not output from the menu screen...
Owner's Manual
Page 16
... output any audio signals. • Do not disconnect or turn off the power of the HDMI/DVI component connected to the HDMI jack of your TV using a commercially available SCART cable. HDMI connection HDMI (High-Definition Multimedia Interface) provides high quality digital audio and video on SCART cable is not output at AV terminal. If your receiver does not have an HDMI input jack, you connect this unit directly to make connections. Doing so may disrupt playback...
... output any audio signals. • Do not disconnect or turn off the power of the HDMI/DVI component connected to the HDMI jack of your TV using a commercially available SCART cable. HDMI connection HDMI (High-Definition Multimedia Interface) provides high quality digital audio and video on SCART cable is not output at AV terminal. If your receiver does not have an HDMI input jack, you connect this unit directly to make connections. Doing so may disrupt playback...
Owner's Manual
Page 17
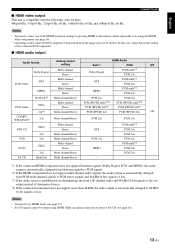
...-bit signals or less are output instead of the HDMI resolution settings by pressing HDMI on the connected DVI component, black and white in the image may not be output using the HDMI Video setup menu (see page 36). • Depending on the remote control repeatedly or by using HDMI. In this case, adjust the picture setting of the connected DVI component. ■ HDMI audio output Audio format Analog output setting Auto*1 HDMI Audio PCM Off Dolby Digital Multi-channel Stereo Dolby Digital PCM multi*2 PCM 2ch Multi-channel DTS DTS DVD-Video Stereo PCM multi*2 PCM 2ch...
...-bit signals or less are output instead of the HDMI resolution settings by pressing HDMI on the connected DVI component, black and white in the image may not be output using the HDMI Video setup menu (see page 36). • Depending on the remote control repeatedly or by using HDMI. In this case, adjust the picture setting of the connected DVI component. ■ HDMI audio output Audio format Analog output setting Auto*1 HDMI Audio PCM Off Dolby Digital Multi-channel Stereo Dolby Digital PCM multi*2 PCM 2ch Multi-channel DTS DTS DVD-Video Stereo PCM multi*2 PCM 2ch...

Owner's Manual
Page 19
... exhausted batteries immediately with your TV and AV receiver. 3 Select the appropriate input source of the AV receiver connected to this unit. ➜ The front panel display lights up. 5 Set the TV to the polarity markings (+/-). For details, see "Resetting the system" on the TV. 15 En dusty places Step 2: Turning on the power 1 Make sure that the power cable is not used for details). ➜ The default screen...
... exhausted batteries immediately with your TV and AV receiver. 3 Select the appropriate input source of the AV receiver connected to this unit. ➜ The front panel display lights up. 5 Set the TV to the polarity markings (+/-). For details, see "Resetting the system" on the TV. 15 En dusty places Step 2: Turning on the power 1 Make sure that the power cable is not used for details). ➜ The default screen...
Owner's Manual
Page 20
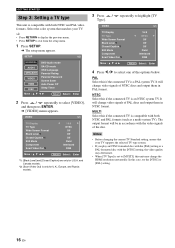
... output format will change the HDMI resolution unwantedly. Select the color system that your TV. PAL Select this if the connected TV is an NTSC system TV. GETTING STARTED Step 3: Setting a TV type This unit is compatible with the video signals of the disc. SETUP 1/2 GENERAL AUDIO SPEAKER VIDEO HDMI DISC Move : DVD-Audio mode SA-CD mode OSD Language Parental Rating Parental Password Screen Saver Auto Power Off Sleep Timer Return Select : Enter 2 Press / repeatedly to exit from the setup menu. 1 Press SETUP. ➜ The setup menu appears. VIDEO 1/1 TV Display...
... output format will change the HDMI resolution unwantedly. Select the color system that your TV. PAL Select this if the connected TV is an NTSC system TV. GETTING STARTED Step 3: Setting a TV type This unit is compatible with the video signals of the disc. SETUP 1/2 GENERAL AUDIO SPEAKER VIDEO HDMI DISC Move : DVD-Audio mode SA-CD mode OSD Language Parental Rating Parental Password Screen Saver Auto Power Off Sleep Timer Return Select : Enter 2 Press / repeatedly to exit from the setup menu. 1 Press SETUP. ➜ The setup menu appears. VIDEO 1/1 TV Display...
Owner's Manual
Page 26
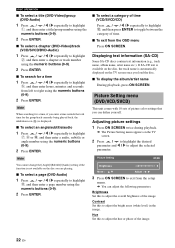
... SCREEN. Adjusting picture settings 1 Press ON SCREEN twice during playback. ➜ The Picture Setting menu appears on the disc you load the disc. ■ To display the album/artist name During playback, press ON SCREEN. If SA-CD text is available on the disc, the track name is displayed. ■ To select an angle/subtitle/audio 1 Press / / / repeatedly to highlight 7, 8 or 0, and then enter a audio, subtitle or angle number using the numeric buttons (0-9). 2 Press ENTER. Brightness Set...
... SCREEN. Adjusting picture settings 1 Press ON SCREEN twice during playback. ➜ The Picture Setting menu appears on the disc you load the disc. ■ To display the album/artist name During playback, press ON SCREEN. If SA-CD text is available on the disc, the track name is displayed. ■ To select an angle/subtitle/audio 1 Press / / / repeatedly to highlight 7, 8 or 0, and then enter a audio, subtitle or angle number using the numeric buttons (0-9). 2 Press ENTER. Brightness Set...

Owner's Manual
Page 27
... disc contains sequences recorded from a number of picture settings varies according to the connection and settings. Press ANGLE repeatedly to the operating instructions in the DVD menu or on the TV screen and to pan through the enlarged picture. 3 Press ZOOM repeatedly to return to the original size. Sharpness High Set this to adjust the density of the color. Note All picture settings are not available for progressive scan (using the component video jacks) and HDMI output...
... disc contains sequences recorded from a number of picture settings varies according to the connection and settings. Press ANGLE repeatedly to the operating instructions in the DVD menu or on the TV screen and to pan through the enlarged picture. 3 Press ZOOM repeatedly to return to the original size. Sharpness High Set this to adjust the density of the color. Note All picture settings are not available for progressive scan (using the component video jacks) and HDMI output...

Owner's Manual
Page 28
... analog output" on its jacket. Notes • Some discs cannot be played depending on page 17). DIMMER HDMI AUDIODIRECT STANDBY PAGE (+/ ) GROUP PAGE MULTI 2CH PROG 24 En DISC OPERATION Audio and Subtitle languages (DVD-Video/VCD) If the disc contains multi-language options, you can display information pages for the disc. if the function is set the default subtitle language setting in the setup menu (see "Setting the audio, subtitle and disc menu languages" on disc characteristics or recording conditions. • Some external subtitle files...
... analog output" on its jacket. Notes • Some discs cannot be played depending on page 17). DIMMER HDMI AUDIODIRECT STANDBY PAGE (+/ ) GROUP PAGE MULTI 2CH PROG 24 En DISC OPERATION Audio and Subtitle languages (DVD-Video/VCD) If the disc contains multi-language options, you can display information pages for the disc. if the function is set the default subtitle language setting in the setup menu (see "Setting the audio, subtitle and disc menu languages" on disc characteristics or recording conditions. • Some external subtitle files...

Owner's Manual
Page 33
English SETUP MENU General setup menu SETUP GENERAL AUDIO SPEAKER VIDEO HDMI DISC Move : 1/2 DVD-Audio mode SA-CD mode OSD Language Parental Rating Parental Password Screen Saver Auto Power Off Sleep Timer Return Select : Enter Selecting DVD-Audio mode Some DVD-Audio discs contain the DVD-Video content in [GENERAL] menu. Notes • This setting is only available when no disc is played back, the DVD AUDIO indicator lights up. • When you close the setup menu. • When you set a playback limitation level. y • When a DVD-Audio disc is loaded in the disc tray. •...
English SETUP MENU General setup menu SETUP GENERAL AUDIO SPEAKER VIDEO HDMI DISC Move : 1/2 DVD-Audio mode SA-CD mode OSD Language Parental Rating Parental Password Screen Saver Auto Power Off Sleep Timer Return Select : Enter Selecting DVD-Audio mode Some DVD-Audio discs contain the DVD-Video content in [GENERAL] menu. Notes • This setting is only available when no disc is played back, the DVD AUDIO indicator lights up. • When you close the setup menu. • When you set a playback limitation level. y • When a DVD-Audio disc is loaded in the disc tray. •...

Owner's Manual
Page 39
... progressive scan. • Connect using a component video cable. 35 En In this to enjoy accurate color reproduction and high quality images. English SETUP MENU Selecting the black level (U.S.A. Subtitles rarely show sound effects (e.g., "phone ringing" and "footsteps"), while subtitles do not. and Canada models only) Closed captions are data hidden in [VIDEO] menu. Setting the still mode You can also change the aspect ratio settings in [VIDEO] menu. You can select the picture quality for pausing or frame-byframe playback. • Select...
... progressive scan. • Connect using a component video cable. 35 En In this to enjoy accurate color reproduction and high quality images. English SETUP MENU Selecting the black level (U.S.A. Subtitles rarely show sound effects (e.g., "phone ringing" and "footsteps"), while subtitles do not. and Canada models only) Closed captions are data hidden in [VIDEO] menu. Setting the still mode You can also change the aspect ratio settings in [VIDEO] menu. You can select the picture quality for pausing or frame-byframe playback. • Select...
Owner's Manual
Page 40
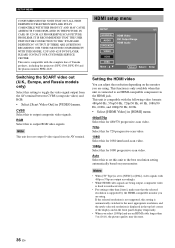
... SERVICE CENTER. HDMI setup menu SETUP GENERAL AUDIO SPEAKER VIDEO HDMI DISC Move : 1/1 HDMI Video DVI Output Range HDMI Audio Return Select : Enter Setting the HDMI video You can adjust the resolution depending on your monitor. SETUP MENU CONSUMERS SHOULD NOTE THAT NOT ALL HIGH DEFINITION TELEVISION SETS ARE FULLY COMPATIBLE WITH THIS PRODUCT AND MAY CAUSE ARTIFACTS TO BE DISPLAYED IN THE PICTURE. IN CASE OF 525 OR 625 PROGRESSIVE SCAN PICTURE PROBLEMS, IT IS RECOMMENDED THAT THE USER SWITCH THE CONNECTION...
... SERVICE CENTER. HDMI setup menu SETUP GENERAL AUDIO SPEAKER VIDEO HDMI DISC Move : 1/1 HDMI Video DVI Output Range HDMI Audio Return Select : Enter Setting the HDMI video You can adjust the resolution depending on your monitor. SETUP MENU CONSUMERS SHOULD NOTE THAT NOT ALL HIGH DEFINITION TELEVISION SETS ARE FULLY COMPATIBLE WITH THIS PRODUCT AND MAY CAUSE ARTIFACTS TO BE DISPLAYED IN THE PICTURE. IN CASE OF 525 OR 625 PROGRESSIVE SCAN PICTURE PROBLEMS, IT IS RECOMMENDED THAT THE USER SWITCH THE CONNECTION...
Owner's Manual
Page 41
... remote control repeatedly. For details about the relationship between the audio format and the setting, see "Setting the audio, subtitle and disc menu languages" on or off the HDMI audio output. Notes • SA-CD signals cannot be output using HDMI. • When [HDMI Audio] is connected to an DVI-D-compatible component via the HDMI jack. • Select [DVI Output Range] in the image is connected to output the decoded multi-channel or 2ch linear PCM audio signals via the HDMI jack. Selecting an angle mark display...
... remote control repeatedly. For details about the relationship between the audio format and the setting, see "Setting the audio, subtitle and disc menu languages" on or off the HDMI audio output. Notes • SA-CD signals cannot be output using HDMI. • When [HDMI Audio] is connected to an DVI-D-compatible component via the HDMI jack. • Select [DVI Output Range] in the image is connected to output the decoded multi-channel or 2ch linear PCM audio signals via the HDMI jack. Selecting an angle mark display...

Owner's Manual
Page 44
... your TV for three seconds. Press AUDIO on the remote control. 3. Press CLEAR on the remote control. Check the video connection. Problem Solution No power Connect the AC power cable properly. Completely distorted picture or black/white picture Check that the video signal output setting matches the video connection. Press s twice on the front panel or STOP ( 7 ) twice on the remote control to stop playback. 2. If the problem you see the DVD screen. TROUBLESHOOTING TROUBLESHOOTING Refer to the table below when this unit...
... your TV for three seconds. Press AUDIO on the remote control. 3. Press CLEAR on the remote control. Check the video connection. Problem Solution No power Connect the AC power cable properly. Completely distorted picture or black/white picture Check that the video signal output setting matches the video connection. Press s twice on the front panel or STOP ( 7 ) twice on the remote control to stop playback. 2. If the problem you see the DVD screen. TROUBLESHOOTING TROUBLESHOOTING Refer to the table below when this unit...

Owner's Manual
Page 45
... be supported by trying another disc. The audio code may not be finalized. Check that the speakers are playing a DTS source, check that your receiver can decode MPEG-2. Check that the disc format is facing up. Replace the batteries in the setup menu. No audio signals via the HDMI jack, connect an HDMI component to the instructions of the remote control from the center to [PCM]. To output audio signals via the HDMI jack are playing an...
... be supported by trying another disc. The audio code may not be finalized. Check that the speakers are playing a DTS source, check that your receiver can decode MPEG-2. Check that the disc format is facing up. Replace the batteries in the setup menu. No audio signals via the HDMI jack, connect an HDMI component to the instructions of the remote control from the center to [PCM]. To output audio signals via the HDMI jack are playing an...
Owner's Manual
Page 47
... owner can reduce audio data sizes to provide highquality video during playback or recording. ■ Super Audio CD Audio format based upon the current CD standards but includes a greater amount of scanning used on a larger screen and creating a sharp and smooth image. 43 En English ■ Interlace The most common type of information that provides higher quality sound. GLOSSARY ■ Region code Many DVD discs include a region code so that player plays...
... owner can reduce audio data sizes to provide highquality video during playback or recording. ■ Super Audio CD Audio format based upon the current CD standards but includes a greater amount of scanning used on a larger screen and creating a sharp and smooth image. 43 En English ■ Interlace The most common type of information that provides higher quality sound. GLOSSARY ■ Region code Many DVD discs include a region code so that player plays...


