
Owner's Manual
Page 2
... found in FCC Regulations, Part 15 for Class "B" digital devices. Cable/s supplied with the coloured markings identifying the terminals in your plug, proceed as indicated in the instructions contained in this product is marked with the requirements listed in the users manual, may void your use the product. 2. This equipment generates/uses radio frequencies and, if not installed and used . If the antenna lead-in to the...
... found in FCC Regulations, Part 15 for Class "B" digital devices. Cable/s supplied with the coloured markings identifying the terminals in your plug, proceed as indicated in the instructions contained in this product is marked with the requirements listed in the users manual, may void your use the product. 2. This equipment generates/uses radio frequencies and, if not installed and used . If the antenna lead-in to the...
Owner's Manual
Page 5
... unit and all peripherals, unplug the power cord for the main unit from the outlet, then disconnect the cables connecting the main unit with the peripherals before starting installation work on this equipment, take the most extreme care to avoid touching IC leads or other electronic parts. • Be careful not to drop any third party as the Audio Home Recording Act and the Digital...
... unit and all peripherals, unplug the power cord for the main unit from the outlet, then disconnect the cables connecting the main unit with the peripherals before starting installation work on this equipment, take the most extreme care to avoid touching IC leads or other electronic parts. • Be careful not to drop any third party as the Audio Home Recording Act and the Digital...
Owner's Manual
Page 7
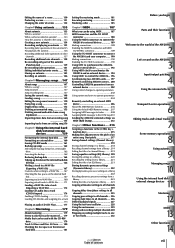
... MTC to synchronize the AW2816 and an external device 192 Using MIDI clock to synchronize the AW2816 and an external device ....... 194 Using MMC to control the AW2816... 196 Synchronizing two AW2816 units ...... 197 Remotely switching AW2816 scenes .. 200 Controlling AW2816 parameters from an external device 202 Using control changes to operate parameters 202 Using system exclusive to operate parameters 204 Remotely controlling an external MIDI device 206 About the MIDI Remote function 206 Using the default MIDI Remote settings....207 Assigning MIDI messages to faders ...........208...
... MTC to synchronize the AW2816 and an external device 192 Using MIDI clock to synchronize the AW2816 and an external device ....... 194 Using MMC to control the AW2816... 196 Synchronizing two AW2816 units ...... 197 Remotely switching AW2816 scenes .. 200 Controlling AW2816 parameters from an external device 202 Using control changes to operate parameters 202 Using system exclusive to operate parameters 204 Remotely controlling an external MIDI device 206 About the MIDI Remote function 206 Using the default MIDI Remote settings....207 Assigning MIDI messages to faders ...........208...
Owner's Manual
Page 11
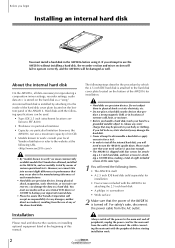
... the use media such as well. You must install a hard disk in your important musical data. • Please be present in the AW2816 before starting installation work ," we cannot take into account slight differences in the AW2816, and successfully tested by which the 2.5 inch IDE hard disk is stored on a hard disk. If you will accept no responsibility for reproducing a composition (mixer settings, recorder settings, audio...
... the use media such as well. You must install a hard disk in your important musical data. • Please be present in the AW2816 before starting installation work ," we cannot take into account slight differences in the AW2816, and successfully tested by which the 2.5 inch IDE hard disk is stored on a hard disk. If you will accept no responsibility for reproducing a composition (mixer settings, recorder settings, audio...
Owner's Manual
Page 18
...-chain connections. q Daisy-chain connection Sometimes the operation of a SCSI bus will need to page 160. q Power supply of SCSI devices When using an external SCSI device, you are as short as the AW2816 failing to turn on ...device that uses a 25-pin connector, the problems may fail to start up correctly. Operation of the SCSI bus cannot be obtained by terminating only one of cable. If the SCSI device itself , and the SCSI device connected to the AW2816. If problems occur such as possible. If such problems occur, check the following points. q Check the SCSI ID Make...
...-chain connections. q Daisy-chain connection Sometimes the operation of a SCSI bus will need to page 160. q Power supply of SCSI devices When using an external SCSI device, you are as short as the AW2816 failing to turn on ...device that uses a 25-pin connector, the problems may fail to start up correctly. Operation of the SCSI bus cannot be obtained by terminating only one of cable. If the SCSI device itself , and the SCSI device connected to the AW2816. If problems occur such as possible. If such problems occur, check the following points. q Check the SCSI ID Make...
Owner's Manual
Page 32
... also help prevent hum and other than the Yamaha FC5 (or equivalent) may not operate correctly. L DIGITAL STEREO OUT jack This is for digital output of the signal selected in /out. Parts and their functions T AC INLET connector The included power cable is dedicated to transmitting MTC (MIDI Time Code). This connection will always output the same signal as playback/ stop, and to the SCSI connector are analog outputs for digital input of a stereo signal...
... also help prevent hum and other than the Yamaha FC5 (or equivalent) may not operate correctly. L DIGITAL STEREO OUT jack This is for digital output of the signal selected in /out. Parts and their functions T AC INLET connector The included power cable is dedicated to transmitting MTC (MIDI Time Code). This connection will always output the same signal as playback/ stop, and to the SCSI connector are analog outputs for digital input of a stereo signal...
Owner's Manual
Page 57
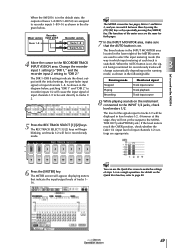
... 1-DIR 8 settings indicate the direct output (with the initial settings, the post-fader input signal) of each track is switched). Tip! When the AUTO button is on, the signal being monitored for both pages. 7 In the INPUT MONITOR area, make the settings of steps 1-6 in a single operation. Let's record on the AW2816 Running mode Stopped Playing Recording Monitored signal Track input source Track playback Track input source 8 While playing sounds on the Quick Rec function, refer to page 80. The METER screen will appear, displaying meters...
... 1-DIR 8 settings indicate the direct output (with the initial settings, the post-fader input signal) of each track is switched). Tip! When the AUTO button is on, the signal being monitored for both pages. 7 In the INPUT MONITOR area, make the settings of steps 1-6 in a single operation. Let's record on the AW2816 Running mode Stopped Playing Recording Monitored signal Track input source Track playback Track input source 8 While playing sounds on the Quick Rec function, refer to page 80. The METER screen will appear, displaying meters...
Owner's Manual
Page 68
..., operate the faders to adjust the send levels of the signals that is independent of audio tracks 1-16, and is set to the stereo output channel of the destination, you can switch all channels to PRE (pre-fader) or POST (post-fader) at one touch. 8 While you play back the song from monitor channels 1-16 to create a final mix. Recording on using the GBL (Global) buttons...
..., operate the faders to adjust the send levels of the signals that is independent of audio tracks 1-16, and is set to the stereo output channel of the destination, you can switch all channels to PRE (pre-fader) or POST (post-fader) at one touch. 8 While you play back the song from monitor channels 1-16 to create a final mix. Recording on using the GBL (Global) buttons...
Owner's Manual
Page 108
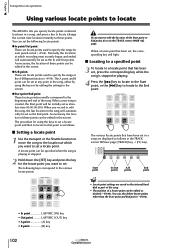
.../Locate operations 6 Using various locate points to locate The AW2816 lets you specify locate points at any point in the song, either by using the keys to set a locate point and then to locate to that has been set, press the corresponding key while the song is stopped or playing. 4 Press the [ ] key to locate to the Start point...
.../Locate operations 6 Using various locate points to locate The AW2816 lets you specify locate points at any point in the song, either by using the keys to set a locate point and then to locate to that has been set, press the corresponding key while the song is stopped or playing. 4 Press the [ ] key to locate to the Start point...
Owner's Manual
Page 221
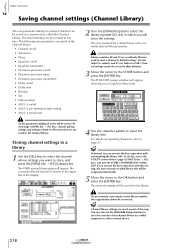
... displayed in the VIEW screen/CH View page ([VIEW] key ¡ [F1] key), channel pairing settings and settings related to effect insertion are saved as part of the channel library on a MIDI sequencer or other external device. 218 Operation section For details on /off • AUX1-6 pre-fader/post-fader setting • AUX1-6 send levels 2 Turn the [DATA/JOG] dial to select the library number...
... displayed in the VIEW screen/CH View page ([VIEW] key ¡ [F1] key), channel pairing settings and settings related to effect insertion are saved as part of the channel library on a MIDI sequencer or other external device. 218 Operation section For details on /off • AUX1-6 pre-fader/post-fader setting • AUX1-6 send levels 2 Turn the [DATA/JOG] dial to select the library number...

Owner's Manual
Page 233
...! Chapter Other functions 14 Mixing and recording multiple channels Chapter 3 explained how an input channel could be possible to modify the pan settings of each audio source after recording on tracks 1/2. However in the PATCH screen/Patch IN page, assign the desired bus to the recorder inputs of the tracks you are recorded on tracks 1/2. 1 Connect mics or instruments to INPUT jacks 1-4, and use the [GAIN] controls to adjust the input sensitivity. 2 Press...
...! Chapter Other functions 14 Mixing and recording multiple channels Chapter 3 explained how an input channel could be possible to modify the pan settings of each audio source after recording on tracks 1/2. However in the PATCH screen/Patch IN page, assign the desired bus to the recorder inputs of the tracks you are recorded on tracks 1/2. 1 Connect mics or instruments to INPUT jacks 1-4, and use the [GAIN] controls to adjust the input sensitivity. 2 Press...
Owner's Manual
Page 324
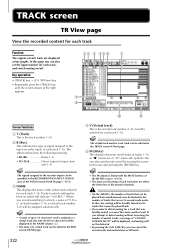
... [ENTER] key. TRACK screen TR View page View the recorded content for each track Function The regions of each track are set the input monitor for each track, and switch muting on /off by the number of tracks that are displayed as "q" (mute=on /off setting of each track does not affect the [ON] keys of the monitor channels. • On the AW2816, the number of tracks that was...
... [ENTER] key. TRACK screen TR View page View the recorded content for each track Function The regions of each track are set the input monitor for each track, and switch muting on /off by the number of tracks that are displayed as "q" (mute=on /off setting of each track does not affect the [ON] keys of the monitor channels. • On the AW2816, the number of tracks that was...
Owner's Manual
Page 354
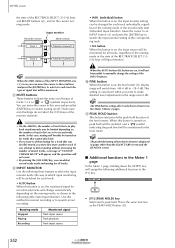
... on the current running mode, as the PEAK HOLD button (K). 352 Reference section Running mode Stopped Playing Recording Monitored signal Track input source Track playback Track input source When the AUTO button/ALL button are set to manually change automatically depending on the number of tracks that cannot play back. • If you can move the cursor to defeat muting without increasing the number of muted tracks, a message of the INPUT buttons. s Additional functions in the Meter 1 page...
... on the current running mode, as the PEAK HOLD button (K). 352 Reference section Running mode Stopped Playing Recording Monitored signal Track input source Track playback Track input source When the AUTO button/ALL button are set to manually change automatically depending on the number of tracks that cannot play back. • If you can move the cursor to defeat muting without increasing the number of muted tracks, a message of the INPUT buttons. s Additional functions in the Meter 1 page...

Owner's Manual
Page 355
... button will automatically be turned on . D REMAIN (Remaining time) This indicates the amount of the screen. You can also select the counter display units (time/time code/measures), and switch between absolute time display (ABS) or relative time display (REL). 5 Key operations 6 • [METER] key ¡ [F2] (Meter 2) 7 • Repeatedly press the [METER] key 8 until the desired screen appears. 9 Screen functions A Counter select Use the following three buttons to the number of tracks...
... button will automatically be turned on . D REMAIN (Remaining time) This indicates the amount of the screen. You can also select the counter display units (time/time code/measures), and switch between absolute time display (ABS) or relative time display (REL). 5 Key operations 6 • [METER] key ¡ [F2] (Meter 2) 7 • Repeatedly press the [METER] key 8 until the desired screen appears. 9 Screen functions A Counter select Use the following three buttons to the number of tracks...
Tutorial
Page 5
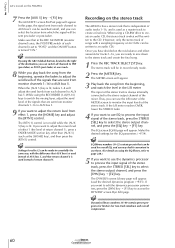
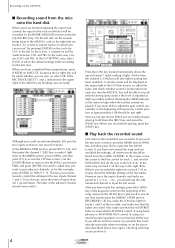
... gain control successfully in stereo, press the MIXER section [PAN] key, and then press [F2] to input the left /right settings of the song, and press the [PLAY] key to play back. Recording on the AW2816 s Recording sound from the mics onto the hard disk When you have finished adjusting the input level, connect the input to the track on which you can record. In the screen, a connection will be recorded...
... gain control successfully in stereo, press the MIXER section [PAN] key, and then press [F2] to input the left /right settings of the song, and press the [PLAY] key to play back. Recording on the AW2816 s Recording sound from the mics onto the hard disk When you have finished adjusting the input level, connect the input to the track on which you can record. In the screen, a connection will be recorded...
Tutorial
Page 6
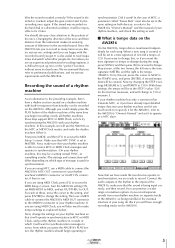
... will wait for synchronization messages to the AW2816's "Owner's Manual" and set to the same setting on separate tracks of the AW2816, so being input correctly, and then record. If your rhythm machine has only a connector that your rhythm machine is able to operate as the MTC or MIDI Clock master, and make sure that we will use a MIDI cable to connect the AW2816's MIDI OUT connector...
... will wait for synchronization messages to the AW2816's "Owner's Manual" and set to the same setting on separate tracks of the AW2816, so being input correctly, and then record. If your rhythm machine has only a connector that your rhythm machine is able to operate as the MTC or MIDI Clock master, and make sure that we will use a MIDI cable to connect the AW2816's MIDI OUT connector...
Tutorial
Page 11
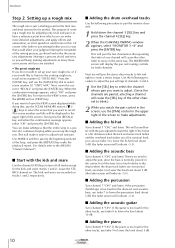
... paired, selecting a channel will keep making adjustments as many times as necessary until you are at nominal level, you can make adjustments. To return to recall. (The scene number and title will display the pan and routing controls for the drum set up your judgment during the remainder of the mixing process, go ahead and make the playback repeat. (For details refer to the AW2816 "Owner's Manual.") s Start...
... paired, selecting a channel will keep making adjustments as many times as necessary until you are at nominal level, you can make adjustments. To return to recall. (The scene number and title will display the pan and routing controls for the drum set up your judgment during the remainder of the mixing process, go ahead and make the playback repeat. (For details refer to the AW2816 "Owner's Manual.") s Start...

Tutorial
Page 13
...At this , use the SCENE MEMORY section [ ]/ [ ] keys to change the settings of the EQ parameter adjustments.) 12 Tutorial Normally when you use the [DATA/JOG] dial to turn it on /off , move the cursor to the EQ ON button and press the [ENTER] key to select scene number 03 "STEP3 MIX...of using the Solo function to do this, but in this case, this produces a snare sound with a light touch. 1 Press the channel 1 [SEL] key. (Perform the same operations for each track. • Preset scene You can hear just a certain part by 4.0 dB to the LOW region below . We will be displayed in ...
...At this , use the SCENE MEMORY section [ ]/ [ ] keys to change the settings of the EQ parameter adjustments.) 12 Tutorial Normally when you use the [DATA/JOG] dial to turn it on /off , move the cursor to the EQ ON button and press the [ENTER] key to select scene number 03 "STEP3 MIX...of using the Solo function to do this, but in this case, this produces a snare sound with a light touch. 1 Press the channel 1 [SEL] key. (Perform the same operations for each track. • Preset scene You can hear just a certain part by 4.0 dB to the LOW region below . We will be displayed in ...
Tutorial
Page 29
... (including the ST channel) are processed inside a device. s MTC (MIDI Time Code) A type of MIDI message used to control recorder operations such as rhythm machines, sequencer software, or other instruments such as a guitar must be connected to synchronize the operation of the AW2816 and devices such as Play, Stop, and Record. However, the MY8AT (separately sold) option that uses the ALESIS ADAT format, and allows eight channels of digital audio to be monitored...
... (including the ST channel) are processed inside a device. s MTC (MIDI Time Code) A type of MIDI message used to control recorder operations such as rhythm machines, sequencer software, or other instruments such as a guitar must be connected to synchronize the operation of the AW2816 and devices such as Play, Stop, and Record. However, the MY8AT (separately sold) option that uses the ALESIS ADAT format, and allows eight channels of digital audio to be monitored...
Tutorial
Page 30
... transferring digital audio signals, and simultaneously transmits or receives two channels (one of the frequency band (*see entry), for Yamaha General Digital Audio Interface. s Time code Time data that collectively saves the parameter settings of audio. Digital mixers or digital recorders that support various professional digital audio formats or provide AD/DA functionality. The number of audio signal to install separately-sold I/O cards that have a YGDAI slot allow you can play back 16 tracks simultaneously, each second. One optional Mini...
... transferring digital audio signals, and simultaneously transmits or receives two channels (one of the frequency band (*see entry), for Yamaha General Digital Audio Interface. s Time code Time data that collectively saves the parameter settings of audio. Digital mixers or digital recorders that support various professional digital audio formats or provide AD/DA functionality. The number of audio signal to install separately-sold I/O cards that have a YGDAI slot allow you can play back 16 tracks simultaneously, each second. One optional Mini...


