
Owner's Manual
Page 2
...cables. Compliance with other electronic devices. If these requirements provides a reasonable level of assurance that your authority, granted by Yamaha Corporation of uninsulated "dangerous voltage" within an equilateral triangle is intended to alert the user to comply with the requirements...interference, relocate/reorient the antenna. This equipment generates/uses radio frequencies and, if not installed and used . In the case of Graphical Symbols The lightning flash with these corrective measures do not produce satisfactory results, please contact the local retailer authorized ...
...cables. Compliance with other electronic devices. If these requirements provides a reasonable level of assurance that your authority, granted by Yamaha Corporation of uninsulated "dangerous voltage" within an equilateral triangle is intended to alert the user to comply with the requirements...interference, relocate/reorient the antenna. This equipment generates/uses radio frequencies and, if not installed and used . In the case of Graphical Symbols The lightning flash with these corrective measures do not produce satisfactory results, please contact the local retailer authorized ...
Owner's Manual
Page 5
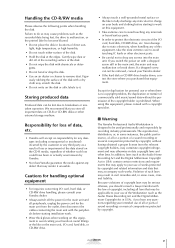
...protected by copyright. light, high temperature, or high humidity. • Do not touch either surface of direct sun- s Warning The Yamaha Professional Audio Workstation is no responsibility for the main unit from the outlet, then disconnect the cables connecting the main unit with a ...dropped screw still in some cases, criminal liability. Because violations of copyright laws may otherwise violate copyright laws and other electronic parts. • Be careful not ...
...protected by copyright. light, high temperature, or high humidity. • Do not touch either surface of direct sun- s Warning The Yamaha Professional Audio Workstation is no responsibility for the main unit from the outlet, then disconnect the cables connecting the main unit with a ...dropped screw still in some cases, criminal liability. Because violations of copyright laws may otherwise violate copyright laws and other electronic parts. • Be careful not ...
Owner's Manual
Page 13
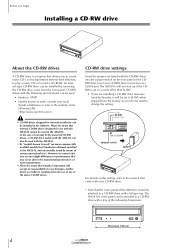
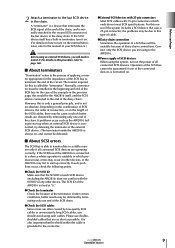
... switch on this setting, refer to the manual that came with your CD-RW drive. * Note that the cover panel of the AW2816 cannot be aware that Yamaha has obtained, installed in performance that may occur due to the manufacturing tolerances of external SCSI-connected CD-RW drives, a CD-RW ...will be set your local Yamaha distributor or refer to the website at the following URL. • CD-RW drives designed for internal installation can be used with the AW2816. • By "models known to work : consult your CD-RW drive to function as a SLAVE unit. In the case of each manufacturer. &#...
... switch on this setting, refer to the manual that came with your CD-RW drive. * Note that the cover panel of the AW2816 cannot be aware that Yamaha has obtained, installed in performance that may occur due to the manufacturing tolerances of external SCSI-connected CD-RW drives, a CD-RW ...will be set your local Yamaha distributor or refer to the website at the following URL. • CD-RW drives designed for internal installation can be used with the AW2816. • By "models known to work : consult your CD-RW drive to function as a SLAVE unit. In the case of each manufacturer. &#...
Owner's Manual
Page 16
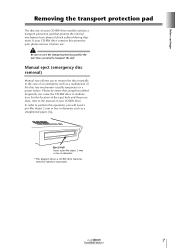
... order to perform this method frequently can cause the CD-RW drive to malfunction. Before you need a pin-like object 2 mm or less in the case of your CD-RW drive contains this protective pad, please remove it before use. Operation section 7 If your CD-RW drive. Eject Hall Insert a pin... the location of the eject hole and the procedure, refer to remove the disc manually in diameter. * This diagram shows a CD-RW drive manufactured by Yamaha Corporation. Please be aware that protects the internal mechanism from physical shock suffered during shipment.
... order to perform this method frequently can cause the CD-RW drive to malfunction. Before you need a pin-like object 2 mm or less in the case of your CD-RW drive contains this protective pad, please remove it before use. Operation section 7 If your CD-RW drive. Eject Hall Insert a pin... the location of the eject hole and the procedure, refer to remove the disc manually in diameter. * This diagram shows a CD-RW drive manufactured by Yamaha Corporation. Please be aware that protects the internal mechanism from physical shock suffered during shipment.
Owner's Manual
Page 18
... to start up correctly. If problems occur such as possible. The SCSI ID of the terminator. Under certain conditions, better results may be cases in which produces noise, errors may occur in the chain. q Power supply of SCSI devices When using to terminate the end of any... Check the SCSI cables Since errors are often caused by low-quality SCSI cables or unnecessarily long SCSI cables, you are as short as the AW2816 failing to the manual of the connected devices is connected, try defeating the terminator of the daisy chain). s About terminators "Termination" refers to...
... to start up correctly. If problems occur such as possible. The SCSI ID of the terminator. Under certain conditions, better results may be cases in which produces noise, errors may occur in the chain. q Power supply of SCSI devices When using to terminate the end of any... Check the SCSI cables Since errors are often caused by low-quality SCSI cables or unnecessarily long SCSI cables, you are as short as the AW2816 failing to the manual of the connected devices is connected, try defeating the terminator of the daisy chain). s About terminators "Termination" refers to...
Owner's Manual
Page 42
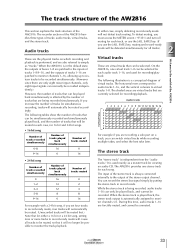
...illustration is being recorded simultaneously. To defeat muting, you must access the METER screen (¡P.351) and turn off muting for either case, simply defeating record-ready mode will no longer be selected. The horizontal rows correspond to audio tracks 1-16, and the vertical columns... to record-ready mode will be defeated simultaneously for recording/playback. The AW2816 provides one virtual track 1-8 can be muted accordingly. During this time, audio tracks 1-16 are being recorded, audio tracks 1-16 can...
...illustration is being recorded simultaneously. To defeat muting, you must access the METER screen (¡P.351) and turn off muting for either case, simply defeating record-ready mode will no longer be selected. The horizontal rows correspond to audio tracks 1-16, and the vertical columns... to record-ready mode will be defeated simultaneously for recording/playback. The AW2816 provides one virtual track 1-8 can be muted accordingly. During this time, audio tracks 1-16 are being recorded, audio tracks 1-16 can...
Owner's Manual
Page 53
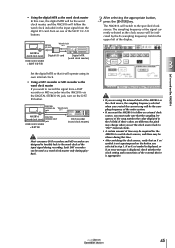
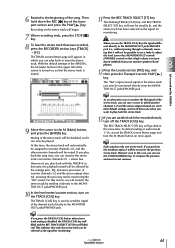
...recording. Let's record on the D.ST IN button. Turn on the button you want to the specified clock source. OPTION I/O SLOT Word clock AW2816 (word clock slave) WORD CLOCK SOURCE = SLOT 1/2-7/8 Digital I /O card. If these values are different, the pitch may change when you set the clock... back to "INT" (internal clock). • A certain amount of time may be silence during this case, the digital MTR will be the word clock master, and the AW2816 will be required for the AW2816 to the word clock of the SLOT 1/2-7/8 buttons. If an X or/symbol is displayed, or if ...
...recording. Let's record on the D.ST IN button. Turn on the button you want to the specified clock source. OPTION I/O SLOT Word clock AW2816 (word clock slave) WORD CLOCK SOURCE = SLOT 1/2-7/8 Digital I /O card. If these values are different, the pitch may change when you set the clock... back to "INT" (internal clock). • A certain amount of time may be silence during this case, the digital MTR will be the word clock master, and the AW2816 will be required for the AW2816 to the word clock of the SLOT 1/2-7/8 buttons. If an X or/symbol is displayed, or if ...
Owner's Manual
Page 66
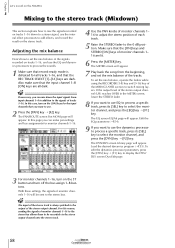
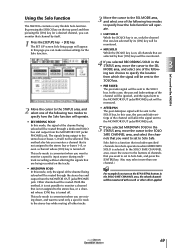
In this case, turn on tracks 1-16, and use the EQ and dynamics processors to process the sounds. 1 Make sure that you want to use . 2 Press the [PAN] ...] keys are all tracks 1-16, and that the [ON] keys and STEREO [ON] keys of monitor channels 1- 16 are dark. Chapter Let's record on the AW2816 3 Mixing to the stereo track (Mixdown) This section explains how to mix the signals recorded on tracks 1-16 down the input signals from the beginning...
In this case, turn on tracks 1-16, and use the EQ and dynamics processors to process the sounds. 1 Make sure that you want to use . 2 Press the [PAN] ...] keys are all tracks 1-16, and that the [ON] keys and STEREO [ON] keys of monitor channels 1- 16 are dark. Chapter Let's record on the AW2816 3 Mixing to the stereo track (Mixdown) This section explains how to mix the signals recorded on tracks 1-16 down the input signals from the beginning...
Owner's Manual
Page 69
...) of the stereo track, you can save a scene in this scene when you want to play back or erase the stereo track. Recording on the AW2816 3 Operation section 61 When you perform the mixdown again, it can be monitoring the "flat the same time. 6 Rewind to the beginning of .../PHONES jack. To defeat muting of the stereo track can use a fader to their default settings, and recall this case, you are satisfied with the AW2816 in the upper left of the AW2816, the M (Mute) button in this state, the playback sound will appear, in which monitor channels 1/2 and the ...
...) of the stereo track, you can save a scene in this scene when you want to play back or erase the stereo track. Recording on the AW2816 3 Operation section 61 When you perform the mixdown again, it can be monitoring the "flat the same time. 6 Rewind to the beginning of .../PHONES jack. To defeat muting of the stereo track can use a fader to their default settings, and recall this case, you are satisfied with the AW2816 in the upper left of the AW2816, the M (Mute) button in this state, the playback sound will appear, in which monitor channels 1/2 and the ...
Owner's Manual
Page 77
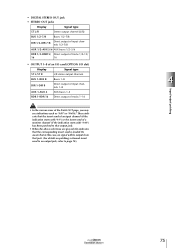
... the MONITOR OUT jacks/ PHONES jack. This solo mode is on, all other effect applied. With this case, the pan and fader settings of the channel will be ignored, and the signal sent to Solo Safe....tracks. • MIXDOWN SOLO In this mode, only the signal of the channel being recorded on the AW2816 • PRE FADER The pre-fader signal will be sent to the SOLO bus, In this page ...jack will be monaural. • AFTER PAN The post-fader/pan signal will be affected. In this case, the pan and fader settings of the follow- In the SOLO SAFE CHANNEL area, move the cursor...
... the MONITOR OUT jacks/ PHONES jack. This solo mode is on, all other effect applied. With this case, the pan and fader settings of the channel will be ignored, and the signal sent to Solo Safe....tracks. • MIXDOWN SOLO In this mode, only the signal of the channel being recorded on the AW2816 • PRE FADER The pre-fader signal will be sent to the SOLO bus, In this page ...jack will be monaural. • AFTER PAN The post-fader/pan signal will be affected. In this case, the pan and fader settings of the follow- In the SOLO SAFE CHANNEL area, move the cursor...
Owner's Manual
Page 83
Be aware that in this case, no signal will be output from that jack. (For details on patching a channel insert send to an output jack, refer to that output jack. • ...
Be aware that in this case, no signal will be output from that jack. (For details on patching a channel insert send to an output jack, refer to that output jack. • ...
Owner's Manual
Page 106
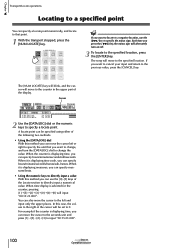
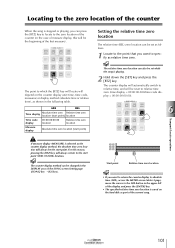
... the upper part of the Locate section to specify the minus sign. You can use the [ ] key to directly input a numerical value. Tip! In this case, the values to the right of the following two methods. • Using the [DATA/JOG] dial With this method you can be set to specify...
... the upper part of the Locate section to specify the minus sign. You can use the [ ] key to directly input a numerical value. Tip! In this case, the values to the right of the following two methods. • Using the [DATA/JOG] dial With this method you can be set to specify...
Owner's Manual
Page 107
... counter When the song is stopped or playing, you can press the [RTZ] key to locate to the zero location of the counter (in the case of measure display, this reason, pressing the [RTZ] key will depend on the counter display unit (time, time code, measures) or display method (absolute time...
... counter When the song is stopped or playing, you can press the [RTZ] key to locate to the zero location of the counter (in the case of measure display, this reason, pressing the [RTZ] key will depend on the counter display unit (time, time code, measures) or display method (absolute time...
Owner's Manual
Page 111
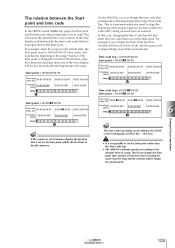
... location of the time display is set the Start point earlier than the Time Code Top. • The AW2816's automix operates according to Measure display, the location that corresponds to a specific location of the time code...:00:00:000 (ABS) Song S 00:00:10:00.00 00:00:05:000 Tip! On the AW2816, you can be five seconds after automix events have been recorded, be aware that has been speci...point will no longer be the first beat of the song (Time Code Top). In this case, changing the Time Code Top will also affect the time code that is determined by the time code...
... location of the time display is set the Start point earlier than the Time Code Top. • The AW2816's automix operates according to Measure display, the location that corresponds to a specific location of the time code...:00:00:000 (ABS) Song S 00:00:10:00.00 00:00:05:000 Tip! On the AW2816, you can be five seconds after automix events have been recorded, be aware that has been speci...point will no longer be the first beat of the song (Time Code Top). In this case, changing the Time Code Top will also affect the time code that is determined by the time code...
Owner's Manual
Page 112
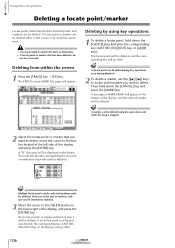
... selected for deletion. Tip! Multiple locate points can be deleted using key operations only while the song is not possible to delete. However in the case of the display, and press the [ENTER] key. A locate point or marker can - If an In/Out point or A/B point was deleted, the corresponding key...
... selected for deletion. Tip! Multiple locate points can be deleted using key operations only while the song is not possible to delete. However in the case of the display, and press the [ENTER] key. A locate point or marker can - If an In/Out point or A/B point was deleted, the corresponding key...
Owner's Manual
Page 118
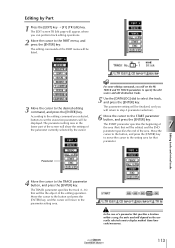
... will depend on the type of command or parameter. The following illustration shows the example of the operation. 112 Operation section Parameter Tip! For some cases you to confirm execution of an editing command, move the cursor to the highlighted editing command button, and press the [ENTER] key. 4 To...
... will depend on the type of command or parameter. The following illustration shows the example of the operation. 112 Operation section Parameter Tip! For some cases you to confirm execution of an editing command, move the cursor to the highlighted editing command button, and press the [ENTER] key. 4 To...
Owner's Manual
Page 119
...fies the end of the PART menu will be listed. 3 Move the cursor to the PART menu, and press the [ENTER] key. In the case of the area (Part) that specifies a location within a song, the units used will set the execution parameters will be displayed. According to the...
...fies the end of the PART menu will be listed. 3 Move the cursor to the PART menu, and press the [ENTER] key. In the case of the area (Part) that specifies a location within a song, the units used will set the execution parameters will be displayed. According to the...
Owner's Manual
Page 120
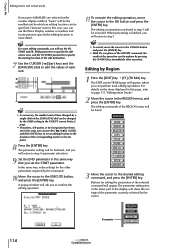
... to specify the edit source area, and the TO START parameter to specify the starting location of time changed by the GRID setting in this case, you can use the [ ]/[ ], [A]/[B], and [IN]/[OUT] keys to set an editing location to the OK button and press the [ENTER] key. When processing is...
... to specify the edit source area, and the TO START parameter to specify the starting location of time changed by the GRID setting in this case, you can use the [ ]/[ ], [A]/[B], and [IN]/[OUT] keys to set an editing location to the OK button and press the [ENTER] key. When processing is...
Owner's Manual
Page 142
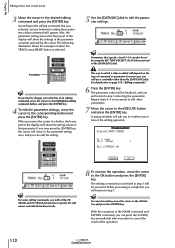
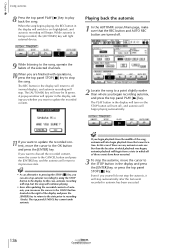
... section While automix is being recorded, the [AUTOMIX] key will now be lit green. The top panel [UNDO] key cannot undo automix. In this case, automix recording will stop, but the song will stop the song. Chapter Using automix 9 8 Press the top panel PLAY [ ] key to its ...stop the automix, it will continue playing. • Even after the last event recorded in the display will switch to recording (Undo). In this case if there are finished with operations, press the top panel STOP [ ] key to stop automatically after updating the recorded contents of the selected ...
... section While automix is being recorded, the [AUTOMIX] key will now be lit green. The top panel [UNDO] key cannot undo automix. In this case, automix recording will stop, but the song will stop the song. Chapter Using automix 9 8 Press the top panel PLAY [ ] key to its ...stop the automix, it will continue playing. • Even after the last event recorded in the display will switch to recording (Undo). In this case if there are finished with operations, press the top panel STOP [ ] key to stop automatically after updating the recorded contents of the selected ...
Owner's Manual
Page 146
... page, move the cursor to the OK button and press the [ENTER] key. Chapter Using automix 9 12 If you can resume automix punch-in this case, record-ready mode will be defeated when automix is on, automix recordready mode will not be defeated even after the recorded contents have been updated...
... page, move the cursor to the OK button and press the [ENTER] key. Chapter Using automix 9 12 If you can resume automix punch-in this case, record-ready mode will be defeated when automix is on, automix recordready mode will not be defeated even after the recorded contents have been updated...