
Owner's Manual
Page 5
...8226; Be careful not to drop any terminals or board surface parts. • In order to your Yamaha dealer. • Always switch off of the recording surface of sound recordings or musical compositions protected by copyright. Cautions for handling optional equipment • For inquiries concerning I...touching IC leads or other laws. Responsibility for loss of data, etc. • Yamaha will accept no copyright problem, the duplication or transfer of commercially sold music/sound data without having obtained a proper license from the relevant copyright holders, may constitute ...
...8226; Be careful not to drop any terminals or board surface parts. • In order to your Yamaha dealer. • Always switch off of the recording surface of sound recordings or musical compositions protected by copyright. Cautions for handling optional equipment • For inquiries concerning I...touching IC leads or other laws. Responsibility for loss of data, etc. • Yamaha will accept no copyright problem, the duplication or transfer of commercially sold music/sound data without having obtained a proper license from the relevant copyright holders, may constitute ...
Owner's Manual
Page 36
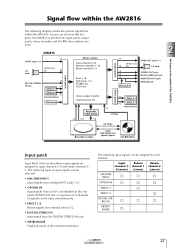
...simultaneously. • EFFECT 1/2 Return signals from internal effects 1/2. • DIGITAL STEREO IN Input signal from this diagram, the AW2816 is the section where input signals are assigned to input channels 1-8 and return channels 1/ 2. As you can be assigned to the ... The following diagram shows the general signal flow within the AW2816. Signal flow within the AW2816 The following input signals can see from the DIGITAL STEREO IN jack. • METRONOME Playback sound of the internal metronome. AW2816 ×8 INPUT jacks 1-8 I/O card OPTION I/O slot ×8...
...simultaneously. • EFFECT 1/2 Return signals from internal effects 1/2. • DIGITAL STEREO IN Input signal from this diagram, the AW2816 is the section where input signals are assigned to input channels 1-8 and return channels 1/ 2. As you can be assigned to the ... The following diagram shows the general signal flow within the AW2816. Signal flow within the AW2816 The following input signals can see from the DIGITAL STEREO IN jack. • METRONOME Playback sound of the internal metronome. AW2816 ×8 INPUT jacks 1-8 I/O card OPTION I/O slot ×8...
Owner's Manual
Page 54
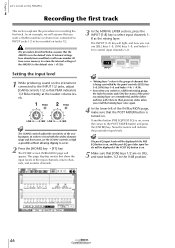
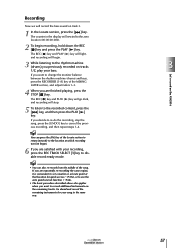
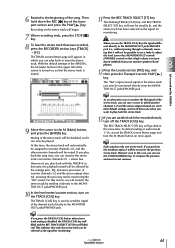
...that the POST FADER button is turned on. Setting the input level 1 While producing sound on the instrument connected to their previous status when you recall that mixing layer once ...key. Tip! • "Mixing layer" refers to the group of the previous mixing layer are on the AW2816 3 Recording the first track This section explains the procedure for recording the first track. If...In order to the default state (¡P.129). The [GAIN] controls adjust the sensitivity of the AW2816 to record with the widest dynamic range and least noise, set the [GAIN] controls as high as...
...that the POST FADER button is turned on. Setting the input level 1 While producing sound on the instrument connected to their previous status when you recall that mixing layer once ...key. Tip! • "Mixing layer" refers to the group of the previous mixing layer are on the AW2816 3 Recording the first track This section explains the procedure for recording the first track. If...In order to the default state (¡P.129). The [GAIN] controls adjust the sensitivity of the AW2816 to record with the widest dynamic range and least noise, set the [GAIN] controls as high as...
Owner's Manual
Page 55
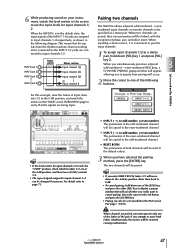
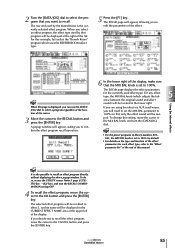
...INPUT jack 3 INPUT jack 8 Input patch Mixer section Input channel 1 Input channel 2 Input channel 3 Input channel 8 Pairing two channels The AW2816 allows adjacent odd-numbered ¡ evennumbered input channels or monitor channels to be strained, causing malfunctions. When you simultaneously press two adjacent odd-numbered ... that will ask whether you to specify how pairing will appear, allowing you really want to cancel pairing. 6 While producing sound on the AW2816 For this example, raise the faders of input channels 1/2 to the 0 dB position, and watch the level meters in ...
...INPUT jack 3 INPUT jack 8 Input patch Mixer section Input channel 1 Input channel 2 Input channel 3 Input channel 8 Pairing two channels The AW2816 allows adjacent odd-numbered ¡ evennumbered input channels or monitor channels to be strained, causing malfunctions. When you simultaneously press two adjacent odd-numbered ... that will ask whether you to specify how pairing will appear, allowing you really want to cancel pairing. 6 While producing sound on the AW2816 For this example, raise the faders of input channels 1/2 to the 0 dB position, and watch the level meters in ...
Owner's Manual
Page 57
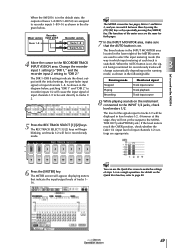
When the AW2816 is in the default state, the outputs of input channels 1/2 to be sent directly to tracks 1/ 2. 5 Press the REC TRACK SELECT [1]/[2] keys. Mixer section Buses 1-8 ... the Quick Rec screen to page 80. The functions of input channels 1-8. Let's record on the AW2816 Running mode Stopped Playing Recording Monitored signal Track input source Track playback Track input source 8 While playing sounds on the Quick Rec function, refer to make sure that indicate the input/output levels of each...
When the AW2816 is in the default state, the outputs of input channels 1/2 to be sent directly to tracks 1/ 2. 5 Press the REC TRACK SELECT [1]/[2] keys. Mixer section Buses 1-8 ... the Quick Rec screen to page 80. The functions of input channels 1-8. Let's record on the AW2816 Running mode Stopped Playing Recording Monitored signal Track input source Track playback Track input source 8 While playing sounds on the Quick Rec function, refer to make sure that indicate the input/output levels of each...
Owner's Manual
Page 58
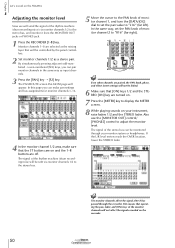
... channels affect the signal after it from the MONITOR OUT jacks or PHONES jack. 1 Press the RECORDER [1-8] key. Chapter Let's record on the AW2816 3 Adjusting the monitor level Now we will send the signal of the rhythm machine (drum recording mics) via monitor channels 1/2 to the stereo bus...that [ON] keys 1/2 and the STEREO [ON] key are turned on. 7 Press the [METER] key to display the METER screen. 8 While playing sounds on and the 1-8 buttons are selected as a stereo pair. The PAN/ROUTE screen Pan MONI page will not be monitored through the recorder. Monitor channels...
... channels affect the signal after it from the MONITOR OUT jacks or PHONES jack. 1 Press the RECORDER [1-8] key. Chapter Let's record on the AW2816 3 Adjusting the monitor level Now we will send the signal of the rhythm machine (drum recording mics) via monitor channels 1/2 to the stereo bus...that [ON] keys 1/2 and the STEREO [ON] key are turned on. 7 Press the [METER] key to display the METER screen. 8 While playing sounds on and the 1-8 buttons are selected as a stereo pair. The PAN/ROUTE screen Pan MONI page will not be monitored through the recorder. Monitor channels...
Owner's Manual
Page 59
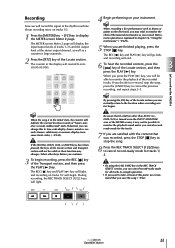
...be able to time code display (hours: minutes: seconds: frames. ticks) (¡P.238). Select other than AUTO (i.e., INDI./ALL) is turned on the AW2816 Tip! When recording a live performance such as you are satisfied with the content that if a button other keys before you continue. 3 To begin... The REC [ ] key and PLAY [ ] key will go dark, and recording will be valid (or their function may not be possible to monitor the playback sound unless you cancel recordready mode for the tracks. 7 If you are finished playing, press the STOP [ ] key. When you press the PLAY [ ] ...
...be able to time code display (hours: minutes: seconds: frames. ticks) (¡P.238). Select other than AUTO (i.e., INDI./ALL) is turned on the AW2816 Tip! When recording a live performance such as you are satisfied with the content that if a button other keys before you continue. 3 To begin... The REC [ ] key and PLAY [ ] key will go dark, and recording will be valid (or their function may not be possible to monitor the playback sound unless you cancel recordready mode for the tracks. 7 If you are finished playing, press the STOP [ ] key. When you press the PLAY [ ] ...
Owner's Manual
Page 60
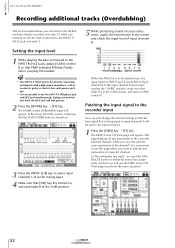
The HOME screen IN/Rtn/MON page will appear. When the AW2816 is in the default state, the input signal of INPUT jack 8 is patched to edit the mix parameters of a specific channel. If the input ... on tracks 1/2 while you overdub an electric bass connected to the 0 dB position. 5 While producing sound on your instrument, watch the level meters in the 0 dB position, and lower [GAIN] control 8. Chapter Let's record on the AW2816 3 Recording additional tracks (Overdubbing) This section explains how you can also edit the main parameters...
The HOME screen IN/Rtn/MON page will appear. When the AW2816 is in the default state, the input signal of INPUT jack 8 is patched to edit the mix parameters of a specific channel. If the input ... on tracks 1/2 while you overdub an electric bass connected to the 0 dB position. 5 While producing sound on your instrument, watch the level meters in the 0 dB position, and lower [GAIN] control 8. Chapter Let's record on the AW2816 3 Recording additional tracks (Overdubbing) This section explains how you can also edit the main parameters...
Owner's Manual
Page 62
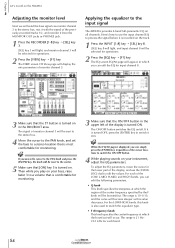
... ON. The range is 10-0.10, and the curve will send the bass signal via monitor channel 3 to switch the ON/OFF button. 4 While playing sounds on all channels. For the LOW/HIGH bands, this value decreases. The range is displayed, you can simply press the [ENTER] key (regardless of the... light, and monitor channel 3 will be boosted/cut will be selected for operations. 2 Press the [EQ] key ¡ [F1] key. If you play on the AW2816 3 Adjusting the monitor level Next we will become steeper as this knob is turned OFF, press the [ENTER] key to a stereo location that [ON] key...
... ON. The range is 10-0.10, and the curve will send the bass signal via monitor channel 3 to switch the ON/OFF button. 4 While playing sounds on all channels. For the LOW/HIGH bands, this value decreases. The range is displayed, you can simply press the [ENTER] key (regardless of the... light, and monitor channel 3 will be boosted/cut will be selected for operations. 2 Press the [EQ] key ¡ [F1] key. If you play on the AW2816 3 Adjusting the monitor level Next we will become steeper as this knob is turned OFF, press the [ENTER] key to a stereo location that [ON] key...
Owner's Manual
Page 63
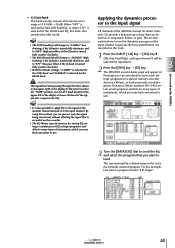
... the list is shown in a special memory area (the dynamics library), or load previously-saved pro- If this page you want to process the bass sound before it is selected for operations. 2 Press the [DYN] key ¡ [F2] key. The DYN/DLY screen Library page will be used as a ...default settings, "L.SHELF" is selected for the LOW band, and "H.SHELF" is turned fully clockwise, and to the input signal All channels of the AW2816 (except for many types of instruments, which you may find convenient to the input channel. tain preset programs suitable for the HIGH band. Tip...
... the list is shown in a special memory area (the dynamics library), or load previously-saved pro- If this page you want to process the bass sound before it is selected for operations. 2 Press the [DYN] key ¡ [F2] key. The DYN/DLY screen Library page will be used as a ...default settings, "L.SHELF" is selected for the LOW band, and "H.SHELF" is turned fully clockwise, and to the input signal All channels of the AW2816 (except for many types of instruments, which you may find convenient to the input channel. tain preset programs suitable for the HIGH band. Tip...
Owner's Manual
Page 65
... which recording was last begun. 6 If you want to cancel the previous recording, and then repeat steps 1-4. Recording Now we will record the bass sound on the AW2816 Operation section 3 57 Let's record on track 3. 1 In the Locate section, press the [ ] key. If you want to change the monitor balance between the...
... which recording was last begun. 6 If you want to cancel the previous recording, and then repeat steps 1-4. Recording Now we will record the bass sound on the AW2816 Operation section 3 57 Let's record on track 3. 1 In the Locate section, press the [ ] key. If you want to change the monitor balance between the...
Owner's Manual
Page 66
... of the signals recorded on the [ON] keys for the input channels that you want to use the EQ and dynamics processors to process the sounds. 1 Make sure that the REC TRACK SELECT [1]-[16] keys are dark. The DYN/DLY screen Library page will appear. 7 Play back the song from input... a specific track, press its [SEL] key to select the monitor channel, and press the [DYN] key ¡ [F2] key. Chapter Let's record on the AW2816 3 Mixing to the stereo track (Mixdown) This section explains how to mix the signals recorded on tracks 1-16 down the input signals from the beginning...
... of the signals recorded on the [ON] keys for the input channels that you want to use the EQ and dynamics processors to process the sounds. 1 Make sure that the REC TRACK SELECT [1]-[16] keys are dark. The DYN/DLY screen Library page will appear. 7 Play back the song from input... a specific track, press its [SEL] key to select the monitor channel, and press the [DYN] key ¡ [F2] key. Chapter Let's record on the AW2816 3 Mixing to the stereo track (Mixdown) This section explains how to mix the signals recorded on tracks 1-16 down the input signals from the beginning...
Owner's Manual
Page 69
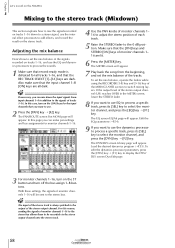
... most recent versions. The TRACK screen Stereo page will appear, in which monitor channels 1/2 and the stereo output channel are satisfied with the AW2816 in the upper left of monitor channels 1/2 and the stereo output channel, meaning that a high volume is disabled, the TRACK [CUE] key will blink and... the stereo track by the settings (pan, EQ, dynamics processor) of the screen is turned on the TRACK [CUE] key. For this state, the playback sound will not be possible to use the [UNDO]/[REDO] keys to adjust the level. The TRACK [CUE] key is muted. 9 Move the cursor to the...
... most recent versions. The TRACK screen Stereo page will appear, in which monitor channels 1/2 and the stereo output channel are satisfied with the AW2816 in the upper left of monitor channels 1/2 and the stereo output channel, meaning that a high volume is disabled, the TRACK [CUE] key will blink and... the stereo track by the settings (pan, EQ, dynamics processor) of the screen is turned on the TRACK [CUE] key. For this state, the playback sound will not be possible to use the [UNDO]/[REDO] keys to adjust the level. The TRACK [CUE] key is muted. 9 Move the cursor to the...

Owner's Manual
Page 73
...auto punch-in point, the REC [ ] key will change from blinking to the track playback sound. A The PLAY [ ] key will light, and playback will switch back to steadily lit...If you selected in step 1 (punch-in point, the REC [ ] key will begin from the track playback sound to rehearse again, press the PLAY [ ] once again while stopped. Let's record on the track you want ... ] key. A The PLAY [ ] key will light, the REC [ ] will blink, and playback will begin on the AW2816 Tip! B When you reach the auto punch-in ). D When you want to listen to the recorded result, press the [...
...auto punch-in point, the REC [ ] key will change from blinking to the track playback sound. A The PLAY [ ] key will light, and playback will switch back to steadily lit...If you selected in step 1 (punch-in point, the REC [ ] key will begin from the track playback sound to rehearse again, press the PLAY [ ] once again while stopped. Let's record on the track you want ... ] key. A The PLAY [ ] key will light, the REC [ ] will blink, and playback will begin on the AW2816 Tip! B When you reach the auto punch-in ). D When you want to listen to the recorded result, press the [...

Owner's Manual
Page 81
... you can choose either the pre-EQ signal or the pre-fader signal as shown in the diagram below . With the default settings of an AW2816 song, the bus 1-8 signals are assigned to recorder inputs 1-16 as the signal that are assigned to recorder inputs 1-16. 2 Move the cursor... of each track. Display Signal type BUS 1-BUS 8 Buses 1-8 DIR 1-DIR 8 Direct output of input channels 1-8 When you want to record the sounds of individual instruments directly on tracks without passing through buses 1-8) to tracks 1-8 as shown in the UTILITY screen Prefer.1 page (¡P.264). This method ...
... you can choose either the pre-EQ signal or the pre-fader signal as shown in the diagram below . With the default settings of an AW2816 song, the bus 1-8 signals are assigned to recorder inputs 1-16 as the signal that are assigned to recorder inputs 1-16. 2 Move the cursor... of each track. Display Signal type BUS 1-BUS 8 Buses 1-8 DIR 1-DIR 8 Direct output of input channels 1-8 When you want to record the sounds of individual instruments directly on tracks without passing through buses 1-8) to tracks 1-8 as shown in the UTILITY screen Prefer.1 page (¡P.264). This method ...
Owner's Manual
Page 90
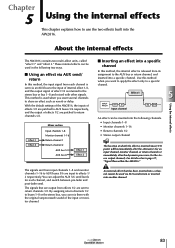
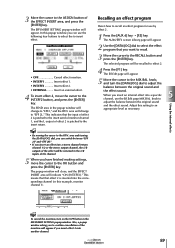
...1-8 and monitor channels 1-16 to AUX buses 5/6 are patched to the stereo bus or bus 1-8 and mixed with the original (unprocessed) sound of effect 1/2 is used via an AUX bus to return channels 1/2. Operation section 83 This method is returned to return channels 1/2. The ...to a specific channel. These internal effects can adjust the AUX 5/6 send levels for the stereo output channel). About the internal effects The AW2816 contains two multi-effect units, called "effect 1" and "effect 2." Chapter 5 Using the internal effects This chapter explains how to page 27, "...
...1-8 and monitor channels 1-16 to AUX buses 5/6 are patched to the stereo bus or bus 1-8 and mixed with the original (unprocessed) sound of effect 1/2 is used via an AUX bus to return channels 1/2. Operation section 83 This method is returned to return channels 1/2. The ...to a specific channel. These internal effects can adjust the AUX 5/6 send levels for the stereo output channel). About the internal effects The AW2816 contains two multi-effect units, called "effect 1" and "effect 2." Chapter 5 Using the internal effects This chapter explains how to page 27, "...
Owner's Manual
Page 92
... lower right. Tip! If you are using the effect via AUX send/return, you will need to set to 100% (so that only the effect sound will be displayed in library numbers 001- 041, the MIX BAL knob is also possible to recall. To do so, access the UTILITY screen Prefer...] key), and turn the [DATA/JOG] dial. When this example, let's select the "Reverb Room" program which adjusts the bal- 5 ance between the original sound and effect sound) will be displayed at the end of the display. It is set to the "Effect parameter list" at the right of the cursor. 3 Move...
... lower right. Tip! If you are using the effect via AUX send/return, you will need to set to 100% (so that only the effect sound will be displayed in library numbers 001- 041, the MIX BAL knob is also possible to recall. To do so, access the UTILITY screen Prefer...] key), and turn the [DATA/JOG] dial. When this example, let's select the "Reverb Room" program which adjusts the bal- 5 ance between the original sound and effect sound) will be displayed at the end of the display. It is set to the "Effect parameter list" at the right of the cursor. 3 Move...
Owner's Manual
Page 94
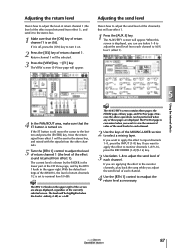
...Turn the [RTN 1] control to adjust the level of return channel 1 (the level of the effect sound returned from effect 1). Tip! The Pre/Post page is convenient when you want to view the numerical ... Adjusting the return level Here's how to adjust the level of return channel 1 (the level of the effect sound returned from effect 1), and send it on. 2 Press the [SEL] key of return channels 1/2 is set ... to turn it to the button and press the [ENTER] key. With the default settings of the AW2816, the level of return channel 1. The RTN 1/2 knobs in the upper right of the CH View ...
...Turn the [RTN 1] control to adjust the level of return channel 1 (the level of the effect sound returned from effect 1). Tip! The Pre/Post page is convenient when you want to view the numerical ... Adjusting the return level Here's how to adjust the level of return channel 1 (the level of the effect sound returned from effect 1), and send it on. 2 Press the [SEL] key of return channels 1/2 is set ... to turn it to the button and press the [ENTER] key. With the default settings of the AW2816, the level of return channel 1. The RTN 1/2 knobs in the upper right of the CH View ...
Owner's Manual
Page 96
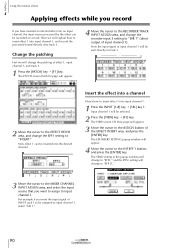
...the OK button and press the [ENTER] key. To cancel the insertion, turn the [DATA/JOG] dial to adjust the balance between the original sound and the effect sound. Tip! • By moving the cursor to the L/R inputs of effect 2 is inserted into a specific 5 channel, use by effect ... an internal effect into the corresponding channel (in the EFF.INSERT SETTING popup window. knob to adjust the balance between the original sound and the effect sound. The AUX6/EFF2 screen Library page will appear. 5 Move the cursor to the insert return. The Eff.Edit page will appear...
...the OK button and press the [ENTER] key. To cancel the insertion, turn the [DATA/JOG] dial to adjust the balance between the original sound and the effect sound. Tip! • By moving the cursor to the L/R inputs of effect 2 is inserted into a specific 5 channel, use by effect ... an internal effect into the corresponding channel (in the EFF.INSERT SETTING popup window. knob to adjust the balance between the original sound and the effect sound. The AUX6/EFF2 screen Library page will appear. 5 Move the cursor to the insert return. The Eff.Edit page will appear...
Owner's Manual
Page 97
... the EFF1 setting to the ASSIGN button of input channel 1 will appear. 4 Move the cursor to insert effect 1 into input channel 1, and record the processed sound directly onto track 3. Now the input signal of the EFFECT INSERT area, and press the [ENTER] key. Insert the effect into a channel Here's how to...
... the EFF1 setting to the ASSIGN button of input channel 1 will appear. 4 Move the cursor to insert effect 1 into input channel 1, and record the processed sound directly onto track 3. Now the input signal of the EFFECT INSERT area, and press the [ENTER] key. Insert the effect into a channel Here's how to...

