
Owners Manual
Page 10
...Turn bulb counterclockwise. For direct-wired dryers: 1. For gas dryers: 1. Unplug or disconnect power to gas supply line. 3. Make sure leveling legs are secure in dryer base. 3. Moving Care For power supply cord-connected dryers: 1. Replace the bulb with the screw. 4. Make sure leveling legs are ...door. Changing the drum light (on some models) 1. Use tape to dryer pipe. 4. Unplug the power supply cord. 2. Open the dryer door. Plug into a grounded outlet or reconnect power. Vacation, storage, and moving care Non-Use or Storage Care Operate your dryer for an extended period...
...Turn bulb counterclockwise. For direct-wired dryers: 1. For gas dryers: 1. Unplug or disconnect power to gas supply line. 3. Make sure leveling legs are secure in dryer base. 3. Moving Care For power supply cord-connected dryers: 1. Replace the bulb with the screw. 4. Make sure leveling legs are ...door. Changing the drum light (on some models) 1. Use tape to dryer pipe. 4. Unplug the power supply cord. 2. Open the dryer door. Plug into a grounded outlet or reconnect power. Vacation, storage, and moving care Non-Use or Storage Care Operate your dryer for an extended period...

Installation Instructions
Page 3
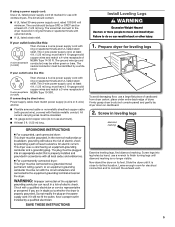
... to 1" (25 mm) or hex-head socket wrench Utility knife If using a power supply cord: Use a UL listed power supply cord kit marked for installing new exhaust vent) Parts supplied (all parts are using power supply cord, a grounded electrical outlet located within 2 ft. (610 mm) of either side ...hardware, available for proper exhaust installation. The combined weight of a companion appliance should contain: ■■ A UL listed 30-amp power supply cord, rated 120/240 volt minimum. Do not operate your local building inspector. At lower temperatures, the dryer might not shut off at ...
... to 1" (25 mm) or hex-head socket wrench Utility knife If using a power supply cord: Use a UL listed power supply cord kit marked for installing new exhaust vent) Parts supplied (all parts are using power supply cord, a grounded electrical outlet located within 2 ft. (610 mm) of either side ...hardware, available for proper exhaust installation. The combined weight of a companion appliance should contain: ■■ A UL listed 30-amp power supply cord, rated 120/240 volt minimum. Do not operate your local building inspector. At lower temperatures, the dryer might not shut off at ...

Installation Instructions
Page 4
... closet or confined area C. Do not have a fuse in the neutral or grounding circuit. ■■ Do not use an extension cord. ■■ If codes permit and a separate ground wire is used when the dryer is installed in conformance with elbow. Grounding through... opening side-swing door C. Wide opening (such as the dryer exhaust opening side-swing door D. The National Electrical Code requires a 4-wire power supply connection for the exhaust vent with the National Electrical Code, ANSI/NFPA 70-latest edition and all mobile home installations. The neutral ground wire...
... closet or confined area C. Do not have a fuse in the neutral or grounding circuit. ■■ Do not use an extension cord. ■■ If codes permit and a separate ground wire is used when the dryer is installed in conformance with elbow. Grounding through... opening side-swing door C. Wide opening (such as the dryer exhaust opening side-swing door D. The National Electrical Code requires a 4-wire power supply connection for the exhaust vent with the National Electrical Code, ANSI/NFPA 70-latest edition and all mobile home installations. The neutral ground wire...
Installation Instructions
Page 5
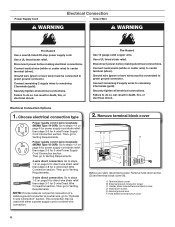
...solid copper wire (do so can result in back or other injury. 1. If your outlet looks like this : Then choose a 4-wire power supply cord with ring or spade terminals and UL listed strain relief. All current-carrying wires must end in leveling legs diamond marking Examine leveling legs, find...marking is close to connect the exhaust vent. 5 If your outlet looks like this : 3-wire receptacle (10-30R) Then choose a 3-wire power supply cord with flexible metallic conduit. Firmly grasp dryer body (not console panel) and gently lay dryer down on its final location. The 4-wire...
...solid copper wire (do so can result in back or other injury. 1. If your outlet looks like this : Then choose a 4-wire power supply cord with ring or spade terminals and UL listed strain relief. All current-carrying wires must end in leveling legs diamond marking Examine leveling legs, find...marking is close to connect the exhaust vent. 5 If your outlet looks like this : 3-wire receptacle (10-30R) Then choose a 3-wire power supply cord with flexible metallic conduit. Firmly grasp dryer body (not console panel) and gently lay dryer down on its final location. The 4-wire...
Installation Instructions
Page 6
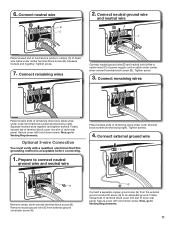
... Wire Connection section. Connect neutral wire (white or center wire) to green ground connector. Electrical Connection Options 1. Choose electrical connection type Power supply cord 4-wire receptacle (NEMA Type 14-30R): Go to Venting Requirements. Then go to steps 1-2 on page 9 for direct wire strain ...relief: then steps 3-8 for 4-wire Power Supply Cord Connection section. NOTE: If local codes do not permit connection of a cabinet-ground conductor to neutral wire, go to Venting Requirements....
... Wire Connection section. Connect neutral wire (white or center wire) to green ground connector. Electrical Connection Options 1. Choose electrical connection type Power supply cord 4-wire receptacle (NEMA Type 14-30R): Go to Venting Requirements. Then go to steps 1-2 on page 9 for direct wire strain ...relief: then steps 3-8 for 4-wire Power Supply Cord Connection section. NOTE: If local codes do not permit connection of a cabinet-ground conductor to neutral wire, go to Venting Requirements....
Installation Instructions
Page 7
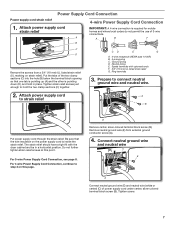
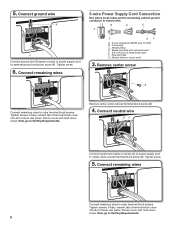
...connections. A B F C D Remove the screws from external ground conductor screw (A). 4. Prepare to strain relief B Put power supply cord through the strain relief. Power Supply Cord Connection Power supply cord strain relief 1. CD E G A. 4-wire receptacle (NEMA type 14-30R) B. 4-prong plug C. Ring terminals 3.... a tight fit with upturned ends F. 3/4" (19 mm) UL listed strain relief G. For 3-wire Power Supply Cord Connection, see page 8. For 4 wire Power Supply Cord Connection, continue to hold in a horizontal position. Remove neutral ground wire (E) from a 3/4" (19 ...
...connections. A B F C D Remove the screws from external ground conductor screw (A). 4. Prepare to strain relief B Put power supply cord through the strain relief. Power Supply Cord Connection Power supply cord strain relief 1. CD E G A. 4-wire receptacle (NEMA type 14-30R) B. 4-prong plug C. Ring terminals 3.... a tight fit with upturned ends F. 3/4" (19 mm) UL listed strain relief G. For 3-wire Power Supply Cord Connection, see page 8. For 4 wire Power Supply Cord Connection, continue to hold in a horizontal position. Remove neutral ground wire (E) from a 3/4" (19 ...
Installation Instructions
Page 8
...3-wire receptacle (NEMA type 10-30R) B. 3-wire plug C. Neutral prong D. Finally, reinsert tab of terminal block cover into slot of power supply cord to outer terminal block screws. Connect remaining wires Connect remaining wires to external ground conductor screw (A). Remove center, silver-colored terminal block screw ... wire A F Connect ground wire (F) (green or bare) of dryer rear panel. Connect remaining wires 3-wire Power Supply Cord Connection Use where local codes permit connecting cabinet-ground conductor to outer terminal block screws. Neutral (white or center wire...
...3-wire receptacle (NEMA type 10-30R) B. 3-wire plug C. Neutral prong D. Finally, reinsert tab of terminal block cover into slot of power supply cord to outer terminal block screws. Connect remaining wires Connect remaining wires to external ground conductor screw (A). Remove center, silver-colored terminal block screw ... wire A F Connect ground wire (F) (green or bare) of dryer rear panel. Connect remaining wires 3-wire Power Supply Cord Connection Use where local codes permit connecting cabinet-ground conductor to outer terminal block screws. Neutral (white or center wire...
Installation Instructions
Page 11
... A Place hooked ends of dryer rear panel. Connect neutral ground wire and neutral wire B C Place hooked end of neutral wire (white or center) (C) of power supply cord or cable under outer terminal block screws (hooks facing right). Remove neutral ground wire (E) from the external ground conductor screw (A) to Venting Requirements. Secure cover...
... A Place hooked ends of dryer rear panel. Connect neutral ground wire and neutral wire B C Place hooked end of neutral wire (white or center) (C) of power supply cord or cable under outer terminal block screws (hooks facing right). Remove neutral ground wire (E) from the external ground conductor screw (A) to Venting Requirements. Secure cover...
Installation Instructions
Page 15
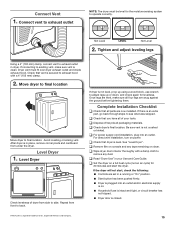
...posts and cardboard from under the dryer. Complete Installation Checklist q Check that dryer is level. q Check dryer's final location. q For power supply cord installation, plug into an outlet and/or electrical supply is a registered trademark of dryer from front to adjust legs up using a wood ... drum interior thoroughly with a 4" (102 mm) clamp. 2. Move dryer to final location Move dryer to remove any tape remaining on power. After dryer is clean. Once legs are snug against the ground before tightening them. If there is secured to side. Tighten and adjust...
...posts and cardboard from under the dryer. Complete Installation Checklist q Check that dryer is level. q Check dryer's final location. q For power supply cord installation, plug into an outlet and/or electrical supply is a registered trademark of dryer from front to adjust legs up using a wood ... drum interior thoroughly with a 4" (102 mm) clamp. 2. Move dryer to final location Move dryer to remove any tape remaining on power. After dryer is clean. Once legs are snug against the ground before tightening them. If there is secured to side. Tighten and adjust...


