
Installation Instructions
Page 4
... ground connector screw (green screw), and secured under the neutral terminal (center or white wire) of the terminal block, the dryer cabinet is suitable for the exhaust vent with vents *Additional spacing recommended 3"* (76 mm) Electrical Requirements It is your dryer, you will be considered. Large opening side-swing door D. Additional installation requirements This...
... ground connector screw (green screw), and secured under the neutral terminal (center or white wire) of the terminal block, the dryer cabinet is suitable for the exhaust vent with vents *Additional spacing recommended 3"* (76 mm) Electrical Requirements It is your dryer, you will be considered. Large opening side-swing door D. Additional installation requirements This...
Installation Instructions
Page 5
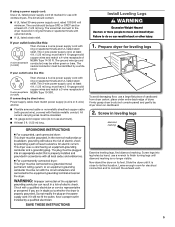
...supply cord, rated 120/240 volt minimum. Prepare dryer for electrical connection and to finish turning legs until it is no longer visible. Firmly grasp dryer body (not console panel) and gently lay dryer down on its final location. Leave enough room ...Use a UL listed power supply cord kit marked for use with flexible metallic conduit. The wires that connect to move and install dryer. The 4-wire power supply cord, at least 4 ft. (1.22 m) long, must be either green or bare. The ... or spade terminals and UL listed strain relief. Screw legs into leg holes by a white cover.
...supply cord, rated 120/240 volt minimum. Prepare dryer for electrical connection and to finish turning legs until it is no longer visible. Firmly grasp dryer body (not console panel) and gently lay dryer down on its final location. Leave enough room ...Use a UL listed power supply cord kit marked for use with flexible metallic conduit. The wires that connect to move and install dryer. The 4-wire power supply cord, at least 4 ft. (1.22 m) long, must be either green or bare. The ... or spade terminals and UL listed strain relief. Screw legs into leg holes by a white cover.


