Whirlpool WED4800XQ Support Question
Whirlpool WED4800XQ Support Question
Find answers below for this question about Whirlpool WED4800XQ.Need a Whirlpool WED4800XQ manual? We have 4 online manuals for this item!
Question posted by ron4bc on June 11th, 2013
Dryer Whirlpool Wed4800xq
Is there a removeable panel on this dryer to allow it to pass through the door opening? thx
Current Answers
Related Whirlpool WED4800XQ Manual Pages
Owners Manual - Page 4

... savings and enhanced fabric care from the exhaust hood.
The venting system attached to efficiently dry laundry. n Use no more drying time or when using the drying rack.
4
Good
Better
n Remove lint and debris from the dryer. When cleaning is complete, be paid by improper venting are sensed in shrinkage, wrinkling, and static...
Owners Manual - Page 5

...laundry load. NOTE: The Air Only temperature setting (on some models) is not available on ACCUDRY™ cycles.
3 WRINKLE SHIELD™ Feature (on some models)
When you may vary.
1 DRYER CYCLE KNOB
Use your Dryer...
See "Cycle Guide" for the specified time on your dryer model. Promptly removing clothes at the end of a cycle. CONTROL PANEL & FEATURES
1
2
3
4
TIMED DRY 50
40
...
Owners Manual - Page 7
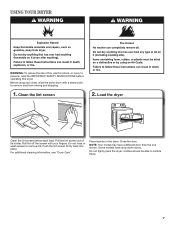
...: Your model may have drop down doors.
Some models have a different door than the one shown. For additional cleaning information, see "Dryer Care". Do not tightly pack the dryer; clothes should be able to remove lint. Before using your dryer, wipe the dryer drum with your fingers. Place laundry in the dryer. Close the door. Clean the lint screen
2. Push...
Owners Manual - Page 8
... Less Dry automatically adjusts the dryness level at the end of
Cycle
SOignnal
PUSH TO START
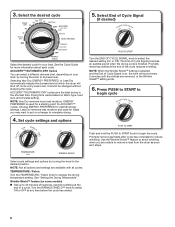
Turn the END OF CYCLE SIGNAL knob to remove a load from the dryer as soon as it cannot be changed without stopping the cycle.
Select End of Cycle Signal
(if desired)
End O
of the cycle reduces...
Owners Manual - Page 9
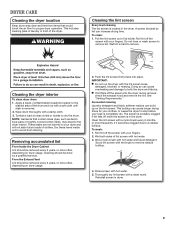
... stain future loads of clean cloths or towels to remove lint.
IMPORTANT: n Do not run the dryer with hot water and liquid detergent. Doing so can increase drying time. As needed cleaning Laundry detergent and fabric softener residue can cause longer drying times for proper dryer operation. The screen is probably clogged if lint...
Owners Manual - Page 10

....
2. Using a Phillips-head screw driver, remove the screw located in the lower right-hand corner of the dryer. For gas dryers: 1. Cap the open fuel supply line. 5. See "Cleaning the Lint Screen."
Replace the cover and secure with a 10-watt appliance bulb only. Unplug or disconnect power to secure dryer door. Close shutoff valve in gas...
Owners Manual - Page 11

In Canada www.whirlpool.ca
If you do not feel air movement, clean exhaust system of lint or replace exhaust vent with lint.
Exhaust vent or outside exhaust hood to check air movement.
Dryer located in a closet without adequate opening. Proper operation of the door. See "Installation Instructions". PUSH to dry quickly.
Replace both fuses...
Owners Manual - Page 12
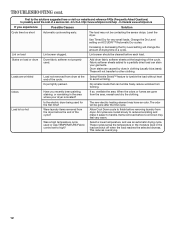
...). Loads are gone from dryer. Select Wrinkle Shield™...whirlpool.ca
If you recently been painting, staining, or varnishing in the load and shut off when the load reaches the selected dryness. Lint screen should be cleaned before removing laundry from the area, rewash and dry the clothing.
Stains on load
Lint screen clogged.
Was a high temperature cycle used . Allow...
Owners Manual - Page 13

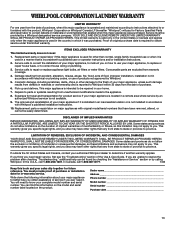
... plumbing codes, or use of products not approved by a Whirlpool designated service company.
Some states and provinces do not allow the exclusion or limitation of incidental or consequential damages, so these limitations and exclusions may have been removed, altered, or cannot be provided by Whirlpool.
5. In the U.S.A., call 18008076777...
Dimension Guide - Page 1
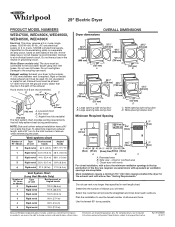
...(140 mm) clearance behind the dryer for planning purposes only.
Use the fewest 90° turns possible. W10096987 02/2011
Large opening side-swing door D. Recessed area B. Select the...used. Louvered hood
4" (102 mm)
B. Louvered doors with product.
Do not use old hoses. Because Whirlpool Corporation policy includes a continuous commitment to improve our products...
Installation Instructions - Page 4

... 1996, and all local codes and ordinances. Additional installation requirements
This dryer is permanently connected to an individual branch circuit. A. Wide opening side-swing door C. Minimum spacing for recessed area or closet installation
The dimensions shown following are for the minimum spacing allowed.
■■ Additional spacing should be considered for it is recommended...
Installation Instructions - Page 7
...B
F
C D
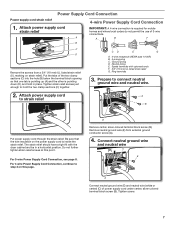
Remove the screws from external ground conductor screw (A).
4. Put the tabs of the two clamp sections (C) into the hole (B) below the terminal block opening so that the wire ...neutral ground wire (E) and neutral wire (white or center) (C) of 3-wire connections. Spade terminals with the dryer cabinet and be in place. For 3-wire Power Supply Cord Connection, see page 8. CD
E
G
A. ...
Installation Instructions - Page 8
... (B).
4. Connect ground wire
A
F Connect ground wire (F) (green or bare) of dryer rear panel. Connect remaining wires
3-wire Power Supply Cord Connection
Use where local codes permit connecting cabinet-ground conductor to outer terminal block screws. Neutral prong D. Neutral (white or center wire)
3. Remove center screw
B
Connect remaining wires to neutral wire. Secure cover...
Installation Instructions - Page 9
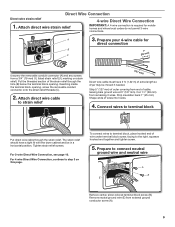
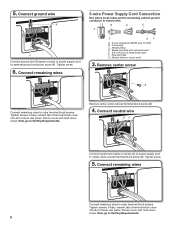
...cable through the hole (B) below the terminal block opening , screw the removable conduit connector onto the strain relief threads (C).
2. Prepare to step 3 on strain relief). Strip insulation... 1" (25 mm). Remove neutral ground wire (E) from end of wire under terminal block screw, facing to strain relief
(127
5" mm)
Direct wire cable must have a tight fit with the dryer cabinet and be moved ...
Installation Instructions - Page 10
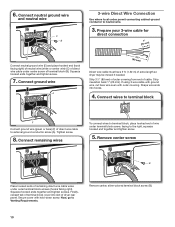
... tighten screw.
7. Strip 31/2" (89 mm) of outer covering from end of extra length so dryer may be moved if needed. Remove center, silver-colored terminal block screw (B).
10 Connect neutral ground wire
and neutral wire
C B
3-...screws (hooks facing right). Strip insulation back 1" (25 mm). Remove center screw
B
Place hooked ends of remaining direct wire cable wires under center screw of...
Installation Instructions - Page 11
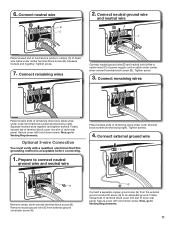
... screw. Finally, reinsert tab of terminal block cover into slot of dryer rear panel. Now, go to an adequate ground. Finally, reinsert tab of terminal block cover into slot of dryer rear panel. Secure cover with hold -down screw.
Tighten screws.
4. 6. Tighten screw.
3. Remove neutral ground wire (E) from the external ground conductor screw (A) to Venting...
Installation Instructions - Page 12
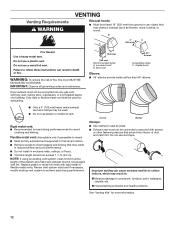
...avoid
crushing and kinking. Box hood
2½" (64 mm)
Acceptable styles: C.
Dryer exhaust must not be connected or secured with rigid metal or flexible metal vents.... to clean) ■■ Must be fully extended and supported in final dryer location. ■■ Remove excess to achieve best drying performance. Venting Requirements
WARNING
VENTING
Exhaust hoods:
■...
Installation Instructions - Page 15
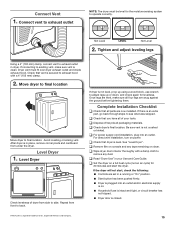
... following: ■■ Controls are snug against the ground before tightening them. See "Level Dryer". q Set the dryer on dryer. Move dryer to final location
Move dryer to exhaust outlet in place, remove corner posts and cardboard from under the dryer. If dryer is secured to see what was skipped. If there is clean. q Dispose of your Use...
Installation Instructions - Page 17
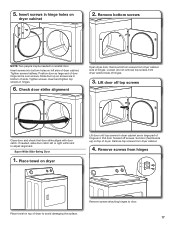
... adjust alignment. If needed to avoid damaging the surface. 17 5. Check door strike alignment
Open dryer door. Insert and tighten top screws in large part of dryer to reinstall door. Position door so large end of dryer cabinet. Remove screws from dryer cabinet.
4. Remove bottom screws
NOTE: Two people maybe needed , slide door catch left side of door hinge slot is over screws.
Warranty - Page 1
...or operator instructions and/or installation instructions.
2. The removal and reinstallation of your complete model number and serial... of products not approved by calling
Whirlpool. You can be easily determined. WHIRLPOOL CORPORATION LAUNDRY WARRANTY
LIMITED WARRANTY
For one year ...ARE LIMITED TO ONE YEAR OR THE SHORTEST PERIOD ALLOWED BY LAW. LIMITATION OF REMEDIES; Expenses for ...
Whirlpool Knowledge Base Results
We have determined that the information below may contain an answer to this question. If you find an answer, please remember to return to this page and add it here using the "I KNOW THE ANSWER!" button above. It's that easy to earn points!-
Ice droplets in the freezer compartment - Side by side refrigerator
.... Generally, ice droplets on the freezer walls and back panel are there ice droplets in freezer compartment - Make sure that both doors are not blocked. Side by side refrigerator Water leak -... of high humidity (especially if a home is not air-conditioned), it is humid. Frequent door openings can cause ice droplets to build up inside the freezer when the room air is normal for... -
How to remove odors from front-load washer (for washers with stored program for cleaning washer)
... short tones and the Estimated time remaining will continue. For additional information on control panel) . you are using the maintenance procedure for better ventilation and drying of visible...will unlock. Open the door and remove the items from the washer before beginning the cleaning process. Do not add detergent or other laundry products to allow for better ... -
My front load washer has an odor
... dry between uses. Did you leave the door open to allow for details. Use warm or hot water in your laundry room is required. Use of odor in odor. Leave the door slightly open after use a dehumidifier. Removing odors from a front-load washer with stored program for directions on control panel) How to avoid water leaks. See Also...
Similar Questions


Dryer When Off Even With Door Open Heat Is Still On
I have not used my dryer for days when I use to keep door close condensation builds up so I keep doo...
I have not used my dryer for days when I use to keep door close condensation builds up so I keep doo...
(Posted by stoneslpf 6 years ago)

What Is The Serial Number For Whirlpool Dryer Model Number Wed4800xq
(Posted by kknmichae 9 years ago)

Whirlpool Wed4800xq Not Heating
My Dryer Wasn't Heating. I Replaced Thermo Set.Everything Tested Normal With My Ohm Meter. The Heati...
My Dryer Wasn't Heating. I Replaced Thermo Set.Everything Tested Normal With My Ohm Meter. The Heati...
(Posted by plarivesr 10 years ago)
