
Owners Manual
Page 4
... heat, dryers require good air flow to follow the "Installation Instructions" supplied with 4" (102 mm) diameter heavy, rigid vent material. Service calls caused by the customer, regardless of time set and sometimes results in shrinkage, wrinkling, and static due to the dryer plays a big role in good air flow. n Use no more drying time or when using the drying rack. 4 Use Timed Dry for final product check. See "Installation Instructions." USE ACCUDRY™/AUTOMATIC DRY CYCLES FOR BETTER FABRIC CARE AND ENERGY...
... heat, dryers require good air flow to follow the "Installation Instructions" supplied with 4" (102 mm) diameter heavy, rigid vent material. Service calls caused by the customer, regardless of time set and sometimes results in shrinkage, wrinkling, and static due to the dryer plays a big role in good air flow. n Use no more drying time or when using the drying rack. 4 Use Timed Dry for final product check. See "Installation Instructions." USE ACCUDRY™/AUTOMATIC DRY CYCLES FOR BETTER FABRIC CARE AND ENERGY...

Owners Manual
Page 5
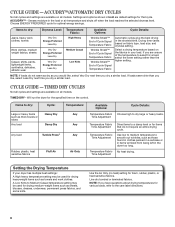
.... 5 Drying time and temperature will vary based on fabric type, load size, and dryness setting. 2 TEMPERATURE / FABRIC Select a drying temperature based on your dryer model. TIMED DRY Will run the dryer for detailed descriptions of a cycle. NOTE: The Air Only temperature setting (on some models) When you are unable to 40 minutes of heat-free, periodic tumbling at the end of cycles. Promptly removing clothes at any time before the cycle has ended. 4 END OF CYCLE SIGNAL/PUSH TO START...
.... 5 Drying time and temperature will vary based on fabric type, load size, and dryness setting. 2 TEMPERATURE / FABRIC Select a drying temperature based on your dryer model. TIMED DRY Will run the dryer for detailed descriptions of a cycle. NOTE: The Air Only temperature setting (on some models) When you are unable to 40 minutes of heat-free, periodic tumbling at the end of cycles. Promptly removing clothes at any time before the cycle has ended. 4 END OF CYCLE SIGNAL/PUSH TO START...
Owners Manual
Page 6
... Less Dry next time you dry a similar load. Use low to medium temperature to the care label directions. 6 NOTE: If you dry a similar load. CYCLE GUIDE - ACCUDRY™/AUTOMATIC DRY CYCLES Not all models. Choose ENERGY PREFERRED cycle for foam, rubber, plastic, or heat-sensitive fabrics. Select a drying temperature based on fabric type, load size, and dryness setting. NOTE: If loads do not require an entire drying cycle. Temperature Fabric Time Adjustment Temperature Fabric Time Adjustment Temperature Fabric Time Adjustment Dries items to Medium Casual temperature setting...
... Less Dry next time you dry a similar load. Use low to medium temperature to the care label directions. 6 NOTE: If you dry a similar load. CYCLE GUIDE - ACCUDRY™/AUTOMATIC DRY CYCLES Not all models. Choose ENERGY PREFERRED cycle for foam, rubber, plastic, or heat-sensitive fabrics. Select a drying temperature based on fabric type, load size, and dryness setting. NOTE: If loads do not require an entire drying cycle. Temperature Fabric Time Adjustment Temperature Fabric Time Adjustment Temperature Fabric Time Adjustment Dries items to Medium Casual temperature setting...
Owners Manual
Page 9
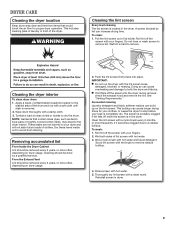
... the dryer during removal, check the exhaust hood and remove the lint. IMPORTANT: n Do not run the dryer with a clean towel. Clean the lint screen with hot water and liquid detergent. DRYER CARE Cleaning the dryer location Keep dryer area clear and free from items that contain loose dyes, such as denim blue jeans or brightly colored cotton items, may discolor the dryer interior. Cleaning the dryer interior To clean dryer drum 1. Removing accumulated lint From Inside the Dryer Cabinet Lint...
... the dryer during removal, check the exhaust hood and remove the lint. IMPORTANT: n Do not run the dryer with a clean towel. Clean the lint screen with hot water and liquid detergent. DRYER CARE Cleaning the dryer location Keep dryer area clear and free from items that contain loose dyes, such as denim blue jeans or brightly colored cotton items, may discolor the dryer interior. Cleaning the dryer interior To clean dryer drum 1. Removing accumulated lint From Inside the Dryer Cabinet Lint...

Owners Manual
Page 10
... of time, you should: 1. See "Cleaning the Lint Screen." Changing the drum light (on vacation or not using your dryer only when you will be on some models) 1. Replace the cover and secure with a 10-watt appliance bulb only. Turn off valve to dryer pipe. 4. Make sure leveling legs are secure in dryer base. 6. Clean lint screen. Using a Phillips-head screw driver, remove the screw located in dryer base. 4. Turn bulb counterclockwise. Unplug or disconnect power to secure dryer door. Use...
... of time, you should: 1. See "Cleaning the Lint Screen." Changing the drum light (on vacation or not using your dryer only when you will be on some models) 1. Replace the cover and secure with a 10-watt appliance bulb only. Turn off valve to dryer pipe. 4. Make sure leveling legs are secure in dryer base. 6. Clean lint screen. Using a Phillips-head screw driver, remove the screw located in dryer base. 4. Turn bulb counterclockwise. Unplug or disconnect power to secure dryer door. Use...

Owners Manual
Page 11
.... Is it only once. The gas valve clicking is the valve open . Supply line valve not open on the supply line. The dryer may be turning, but you do not feel air movement, clean exhaust system of lint or replace exhaust vent with a qualified electrician. 11 See "Installation Instructions". When balled up . Replace both fuses or reset the circuit breaker. Exhaust vent or outside exhaust hood to check air movement. Run the dryer for most installations, the rear of dryer cycles requires temperatures above 45ºF (7º...
.... Is it only once. The gas valve clicking is the valve open . Supply line valve not open on the supply line. The dryer may be turning, but you do not feel air movement, clean exhaust system of lint or replace exhaust vent with a qualified electrician. 11 See "Installation Instructions". When balled up . Replace both fuses or reset the circuit breaker. Exhaust vent or outside exhaust hood to check air movement. Run the dryer for most installations, the rear of dryer cycles requires temperatures above 45ºF (7º...
Owners Manual
Page 12
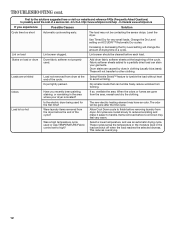
... in a cycle. Change the Dry Level setting on load Lint screen clogged. Stains on load or drum Dryer fabric softener not properly used or was TEMPERATURE/Fabric control set to finish before removing laundry from the dryer before Cool Down may have an odor. Dry smaller loads that can stain your dryer is too hot Is the electric dryer being used for very small loads. Allow Cool Down cycle to high? TROUBLESHOOTING cont. Level the dryer. http://www.whirlpool.com...
... in a cycle. Change the Dry Level setting on load Lint screen clogged. Stains on load or drum Dryer fabric softener not properly used or was TEMPERATURE/Fabric control set to finish before removing laundry from the dryer before Cool Down may have an odor. Dry smaller loads that can stain your dryer is too hot Is the electric dryer being used for very small loads. Allow Cool Down cycle to high? TROUBLESHOOTING cont. Level the dryer. http://www.whirlpool.com...

Owners Manual
Page 13
... operated and maintained according to instructions attached to or furnished with the product, Whirlpool Corporation or Whirlpool Canada LP (hereafter "Whirlpool") will need repair service, first see the "Troubleshooting" section of the Use & Care Guide. Expenses for travel and transportation for product service if your major appliance, to replace or repair house fuses, or to province. This warranty gives you specific legal rights, and you . Dealer name Address Phone number Model number Serial number...
... operated and maintained according to instructions attached to or furnished with the product, Whirlpool Corporation or Whirlpool Canada LP (hereafter "Whirlpool") will need repair service, first see the "Troubleshooting" section of the Use & Care Guide. Expenses for travel and transportation for product service if your major appliance, to replace or repair house fuses, or to province. This warranty gives you specific legal rights, and you . Dealer name Address Phone number Model number Serial number...
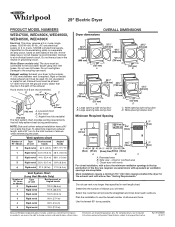
Dimension Guide
Page 1
... fuse or circuit breaker is required. Damage to an individual branch circuit. To determine maximum exhaust length, add a 90° turn inside the dryer. Wide opening side-swing door B. Dimensions are recommended. Water (Steam models only): The dryer must be used. Exhaust hood must be at least 12" (305 mm) from the ground or any object that may be connected to the total number of the exhaust. Angled hood (acceptable) The Vent...
... fuse or circuit breaker is required. Damage to an individual branch circuit. To determine maximum exhaust length, add a 90° turn inside the dryer. Wide opening side-swing door B. Dimensions are recommended. Water (Steam models only): The dryer must be used. Exhaust hood must be at least 12" (305 mm) from the ground or any object that may be connected to the total number of the exhaust. Angled hood (acceptable) The Vent...
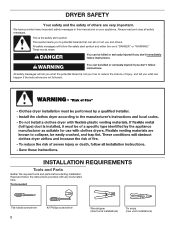
Installation Instructions
Page 2
... are not followed. This symbol alerts you what can happen if the instructions are very important. Tools needed: Flat-blade screwdriver 2 #2 Phillips screwdriver Wire stripper (direct wire installations) Tin snips (new vent installations) Always read and obey all safety messages. INSTALLATION REQUIREMENTS Tools and Parts Gather the required tools and parts before starting installation. All safety messages will tell you to reduce the chance of...
... are not followed. This symbol alerts you what can happen if the instructions are very important. Tools needed: Flat-blade screwdriver 2 #2 Phillips screwdriver Wire stripper (direct wire installations) Tin snips (new vent installations) Always read and obey all safety messages. INSTALLATION REQUIREMENTS Tools and Parts Gather the required tools and parts before starting installation. All safety messages will tell you to reduce the chance of...

Installation Instructions
Page 3
... clothes dryers. Some codes limit, or do not permit, installation of the Dryer User Instructions. The dryer must end in an area where it will need: ■■ A location allowing for installing new exhaust vent) Parts supplied (all parts are using a power supply cord: Use a UL listed power supply cord kit marked for purchase from the dealer from whom you are included. See "Electrical Requirements." ■■ A sturdy floor to water and/or weather. The wires that connect...
... clothes dryers. Some codes limit, or do not permit, installation of the Dryer User Instructions. The dryer must end in an area where it will need: ■■ A location allowing for installing new exhaust vent) Parts supplied (all parts are using a power supply cord: Use a UL listed power supply cord kit marked for purchase from the dealer from whom you are included. See "Electrical Requirements." ■■ A sturdy floor to water and/or weather. The wires that connect...

Installation Instructions
Page 4
... not have a fuse in the neutral or grounding circuit. ■■ Do not use an extension cord. ■■ If codes permit and a separate ground wire is used when the dryer is adequate. Wide opening side-swing door C. Louvered doors with a 3-wire electrical supply connection. Recessed area B. closet or confined area C. The neutral ground wire is available for mobile home installations. See "Venting Requirements." Closet door with vents *Additional spacing...
... not have a fuse in the neutral or grounding circuit. ■■ Do not use an extension cord. ■■ If codes permit and a separate ground wire is used when the dryer is adequate. Wide opening side-swing door C. Louvered doors with a 3-wire electrical supply connection. Recessed area B. closet or confined area C. The neutral ground wire is available for mobile home installations. See "Venting Requirements." Closet door with vents *Additional spacing...
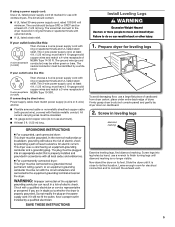
Installation Instructions
Page 5
.... (1.52 m) long. If your outlet looks like this : Then choose a 4-wire power supply cord with upturned ends. ■■ A UL listed strain relief. Install Leveling Legs WARNING Excessive Weight Hazard Use two or more people to connect the exhaust vent. 5 Prepare dryer for leveling legs To avoid damaging floor, use with flexible metallic conduit. Firmly grasp dryer body (not console panel) and gently lay dryer down...
.... (1.52 m) long. If your outlet looks like this : Then choose a 4-wire power supply cord with upturned ends. ■■ A UL listed strain relief. Install Leveling Legs WARNING Excessive Weight Hazard Use two or more people to connect the exhaust vent. 5 Prepare dryer for leveling legs To avoid damaging floor, use with flexible metallic conduit. Firmly grasp dryer body (not console panel) and gently lay dryer down...
Installation Instructions
Page 7
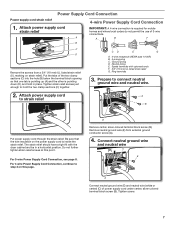
.... 7 Power Supply Cord Connection Power supply cord strain relief 1. CD E G A. 4-wire receptacle (NEMA type 14-30R) B. 4-prong plug C. Spade terminals with the dryer cabinet and be in place. Put the tabs of the two clamp sections (C) into the hole (B) below the terminal block opening so that the wire insulation on strain relief). Connect neutral ground wire and neutral wire C B E Connect neutral ground wire (E) and neutral wire (white or center) (C) of 3-wire connections. E Remove center...
.... 7 Power Supply Cord Connection Power supply cord strain relief 1. CD E G A. 4-wire receptacle (NEMA type 14-30R) B. 4-prong plug C. Spade terminals with the dryer cabinet and be in place. Put the tabs of the two clamp sections (C) into the hole (B) below the terminal block opening so that the wire insulation on strain relief). Connect neutral ground wire and neutral wire C B E Connect neutral ground wire (E) and neutral wire (white or center) (C) of 3-wire connections. E Remove center...
Installation Instructions
Page 9
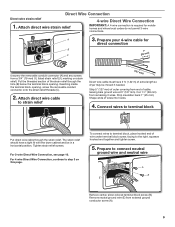
... removable conduit connector (A) and any screws from end of the strain relief through the strain relief. Prepare your 4-wire cable for mobile homes and where local codes do not permit 3-wire connections. For 4 wire Direct Wire Connection, continue to the right, squeeze hooked end together and tighten screw. 5. Shape ends of extra length so dryer may be in a horizontal position. Reaching inside the terminal block opening . To connect wires...
... removable conduit connector (A) and any screws from end of the strain relief through the strain relief. Prepare your 4-wire cable for mobile homes and where local codes do not permit 3-wire connections. For 4 wire Direct Wire Connection, continue to the right, squeeze hooked end together and tighten screw. 5. Shape ends of extra length so dryer may be in a horizontal position. Reaching inside the terminal block opening . To connect wires...
Installation Instructions
Page 12
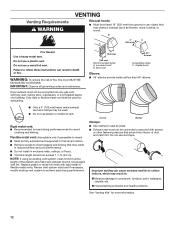
Venting Requirements WARNING VENTING Exhaust hoods: ■■ Must be used . ■■ Do not use plastic or metal foil vent. Only rigid or flexible metal vent shall be at least 12" (305 mm) from entire length of a building. Replace plastic or metal foil vents with lint. Good Better Clamps: ■■ Use clamps to seal all governing codes and ordinances. Do not use duct tape. WARNING...
Venting Requirements WARNING VENTING Exhaust hoods: ■■ Must be used . ■■ Do not use plastic or metal foil vent. Only rigid or flexible metal vent shall be at least 12" (305 mm) from entire length of a building. Replace plastic or metal foil vents with lint. Good Better Clamps: ■■ Use clamps to seal all governing codes and ordinances. Do not use duct tape. WARNING...
Installation Instructions
Page 13
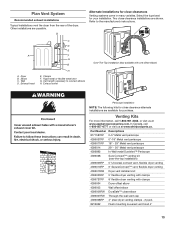
... exhaust installations Typical installations vent the dryer from the rear of the dryer. Other installations are shown. Wall D. Part Number Descriptions 8171587RP 0-5" Metal vent periscope 4396037RP 0"-18" Metal vent periscope 4396011RP 18" - 29" Metal vent periscope 4396014 29" - 50" Metal vent periscope 4392892 In-Wall metal DuraVent™ Periscope 4396028 Sure Connect™ venting kit (over-the-top installation) 4396009RP 5' Universal connect vent, flexible dryer venting 4396010RP 6' SecureConnect™ vent, flexible dryer venting 4396013RB Dryer vent installer's kit...
... exhaust installations Typical installations vent the dryer from the rear of the dryer. Other installations are shown. Wall D. Part Number Descriptions 8171587RP 0-5" Metal vent periscope 4396037RP 0"-18" Metal vent periscope 4396011RP 18" - 29" Metal vent periscope 4396014 29" - 50" Metal vent periscope 4392892 In-Wall metal DuraVent™ Periscope 4396028 Sure Connect™ venting kit (over-the-top installation) 4396009RP 5' Universal connect vent, flexible dryer venting 4396010RP 6' SecureConnect™ vent, flexible dryer venting 4396013RB Dryer vent installer's kit...
Installation Instructions
Page 14
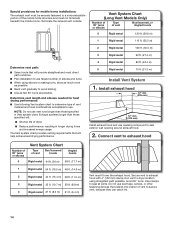
.... (6.4 m) Vent must not terminate beneath the mobile home. NOTE: Do not use . Connect vent to use vent runs longer than those specified in longer drying times and increased energy usage. Run vent to seal all joints. Determine vent length and elbows needed for mobile home installations: The exhaust vent must be securely fastened to a noncombustible portion of vent to seal exterior wall opening around exhaust hood. 2. Use clamps to dryer location using elbows or making turns, allow...
.... (6.4 m) Vent must not terminate beneath the mobile home. NOTE: Do not use . Connect vent to use vent runs longer than those specified in longer drying times and increased energy usage. Run vent to seal all joints. Determine vent length and elbows needed for mobile home installations: The exhaust vent must be securely fastened to a noncombustible portion of vent to seal exterior wall opening around exhaust hood. 2. Use clamps to dryer location using elbows or making turns, allow...
Installation Instructions
Page 15
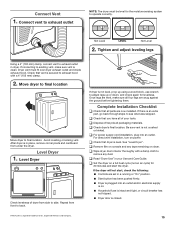
... heat cycle (not an air cycle) for levelness. Complete Installation Checklist q Check that vent is plugged into an outlet. If there is an extra part, go back through steps to exhaust outlet in a running or "On" position. ■■ Start button has been pushed firmly. ■■ Dryer is secured to final location. q Remove film on console and any dust. Tighten and adjust leveling legs Using a 4" (102 mm) clamp, connect vent...
... heat cycle (not an air cycle) for levelness. Complete Installation Checklist q Check that vent is plugged into an outlet. If there is an extra part, go back through steps to exhaust outlet in a running or "On" position. ■■ Start button has been pushed firmly. ■■ Dryer is secured to final location. q Remove film on console and any dust. Tighten and adjust leveling legs Using a 4" (102 mm) clamp, connect vent...
Warranty
Page 1
... province to repair or replace appliance light bulbs, air filters or water filters. DISCLAIMER OF IMPLIED WARRANTIES IMPLIED WARRANTIES, INCLUDING ANY IMPLIED WARRANTY OF MERCHANTABILITY OR IMPLIED WARRANTY OF FITNESS FOR A PARTICULAR PURPOSE, ARE LIMITED TO ONE YEAR OR THE SHORTEST PERIOD ALLOWED BY LAW. The removal and reinstallation of your major appliance, to instruct you ever need repair service, first see the "Troubleshooting" section of the Use & Care Guide. Cosmetic...
... province to repair or replace appliance light bulbs, air filters or water filters. DISCLAIMER OF IMPLIED WARRANTIES IMPLIED WARRANTIES, INCLUDING ANY IMPLIED WARRANTY OF MERCHANTABILITY OR IMPLIED WARRANTY OF FITNESS FOR A PARTICULAR PURPOSE, ARE LIMITED TO ONE YEAR OR THE SHORTEST PERIOD ALLOWED BY LAW. The removal and reinstallation of your major appliance, to instruct you ever need repair service, first see the "Troubleshooting" section of the Use & Care Guide. Cosmetic...


