Owners Manual
Page 2
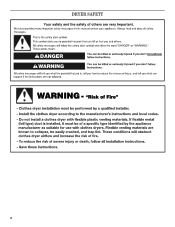
DRYER SAFETY 2
DRYER SAFETY 2

Owners Manual
Page 4
...Energy Preferred cycle will reduce your drying times and improve your lint screen before each bend and curve reduces air flow. With Timed Dry, the dryer runs the amount of vent possible. n Clear away items from the exhaust hood. Service calls caused by improper venting are sensed in a vent ...or when using the drying rack. 4 Use Timed Dry for final product check. n Remove lint from the dryer. Good air flow Along with heat, dryers require good air flow to the dryer plays a big role in shrinkage, wrinkling, and static due to over-drying. USE ACCUDRY™/AUTOMATIC DRY ...
...Energy Preferred cycle will reduce your drying times and improve your lint screen before each bend and curve reduces air flow. With Timed Dry, the dryer runs the amount of vent possible. n Clear away items from the exhaust hood. Service calls caused by improper venting are sensed in a vent ...or when using the drying rack. 4 Use Timed Dry for final product check. n Remove lint from the dryer. Good air flow Along with heat, dryers require good air flow to the dryer plays a big role in shrinkage, wrinkling, and static due to over-drying. USE ACCUDRY™/AUTOMATIC DRY ...

Owners Manual
Page 5
... knob, you are unsure of the temperature to select a cycle for the specified time on , the tone will depend on the fabrics in your dryer. Turn the knob to select for detailed descriptions of Cycle Signal is finished. See "Cycle Guide" for a load, select the lower setting rather ...than the higher setting. ACCUDRY™/AUTOMATIC DRY Senses moisture in the shortest time. If you may vary. 1 DRYER CYCLE KNOB Use your Dryer Cycle Knob to select the desired setting (On or Off). NOTE: When the Wrinkle Shield™ setting is selected and the End of...
... knob, you are unsure of the temperature to select a cycle for the specified time on , the tone will depend on the fabrics in your dryer. Turn the knob to select for detailed descriptions of Cycle Signal is finished. See "Cycle Guide" for a load, select the lower setting rather ...than the higher setting. ACCUDRY™/AUTOMATIC DRY Senses moisture in the shortest time. If you may vary. 1 DRYER CYCLE KNOB Use your Dryer Cycle Knob to select the desired setting (On or Off). NOTE: When the Wrinkle Shield™ setting is selected and the End of...
Owners Manual
Page 6
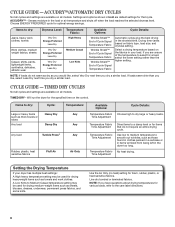
...A Low Knits to dry: Dryness Level: Temperature Fabric: Available Options: Cycle Details: Jeans, heavy work clothes. Senses moisture in the dryer too long. NOTE: If loads do not require an entire drying cycle. Line dry bonded or laminated fabrics. Settings and options shown in ... may be used for drying heavyweight items such as sheets, blouses, dresses, underwear, permanent press fabrics, and some knits. Will run the dryer for drying medium-weight items such as towels and work clothes, towels Work clothes, medium weight fabrics, sheets Casual, shirts, pants, lightweight ...
...A Low Knits to dry: Dryness Level: Temperature Fabric: Available Options: Cycle Details: Jeans, heavy work clothes. Senses moisture in the dryer too long. NOTE: If loads do not require an entire drying cycle. Line dry bonded or laminated fabrics. Settings and options shown in ... may be used for drying heavyweight items such as sheets, blouses, dresses, underwear, permanent press fabrics, and some knits. Will run the dryer for drying medium-weight items such as towels and work clothes, towels Work clothes, medium weight fabrics, sheets Casual, shirts, pants, lightweight ...
Owners Manual
Page 7
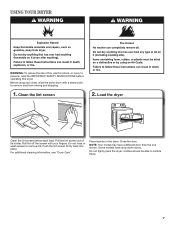
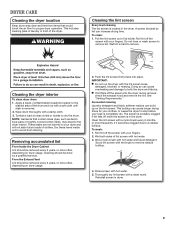
... should be able to remove lint. Some models have a different door than the one shown. Do not tightly pack the dryer; For additional cleaning information, see "Dryer Care". Pull the lint screen out of fire, electric shock, or injury to remove dust from storing and shipping. 1. Clean... the lint screen 2. Roll lint off the screen with your dryer, wipe the dryer drum with a damp cloth to persons, read the IMPORTANT SAFETY INSTRUCTIONS before each load. Push the lint screen firmly back into place....
... should be able to remove lint. Some models have a different door than the one shown. Do not tightly pack the dryer; For additional cleaning information, see "Dryer Care". Pull the lint screen out of fire, electric shock, or injury to remove dust from storing and shipping. 1. Clean... the lint screen 2. Roll lint off the screen with your dryer, wipe the dryer drum with a damp cloth to persons, read the IMPORTANT SAFETY INSTRUCTIONS before each load. Push the lint screen firmly back into place....
Owners Manual
Page 8
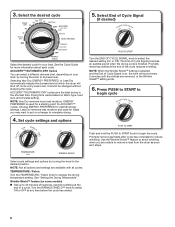
...setting. Select the desired cycle TIMED DRY 50 40 Damp Dry Tumble Press 20 60 70 Heavy Dry Cool Down OFF ACCUDRY sensor dryer Jeans Very Dry ENERGY PREFERRED OFF Delicate WP_WEGD4900XW Less Dry Cool Down OFF WRINKLE SHIELD Select the desired cycle for loads you are removed...your load. NOTE: Not all options and settings are available with all cycles. See "Setting the Drying Temperature". Promptly removing clothes at which the dryer will sound every 5 minutes until the clothes are unable to begin cycle End O of Cycle Signal is set, it stops. 8 Less Dry ...
...setting. Select the desired cycle TIMED DRY 50 40 Damp Dry Tumble Press 20 60 70 Heavy Dry Cool Down OFF ACCUDRY sensor dryer Jeans Very Dry ENERGY PREFERRED OFF Delicate WP_WEGD4900XW Less Dry Cool Down OFF WRINKLE SHIELD Select the desired cycle for loads you are removed...your load. NOTE: Not all options and settings are available with all cycles. See "Setting the Drying Temperature". Promptly removing clothes at which the dryer will sound every 5 minutes until the clothes are unable to begin cycle End O of Cycle Signal is set, it stops. 8 Less Dry ...
Owners Manual
Page 9
...the lint screen out of the drum and rub with a soft cloth until stain is removed. 2. Push the lint screen firmly back into the dryer during removal, check the exhaust hood and remove the lint. Thoroughly dry lint screen with a nylon brush every 6 months, or more frequently,... of clean cloths or towels to remove residue buildup. 4. See "Venting Requirements." Clean the lint screen with a clean towel. Wet both the dryer and fabrics. A screen blocked by a qualified servicer. Wipe drum thoroughly with hot water and liquid detergent. Doing so can cause longer drying times...
...the lint screen out of the drum and rub with a soft cloth until stain is removed. 2. Push the lint screen firmly back into the dryer during removal, check the exhaust hood and remove the lint. Thoroughly dry lint screen with a nylon brush every 6 months, or more frequently,... of clean cloths or towels to remove residue buildup. 4. See "Venting Requirements." Clean the lint screen with a clean towel. Wet both the dryer and fabrics. A screen blocked by a qualified servicer. Wipe drum thoroughly with hot water and liquid detergent. Doing so can cause longer drying times...

Owners Manual
Page 10
...to locate, level, and connect the dryer. 10 Unplug or disconnect power to secure dryer door. Open the dryer door. Disconnect wiring. 3. Vacation, storage, and moving care Non-Use or Storage Care Operate your dryer for an extended period of the dryer. If you will be on some ...the cover and secure with a 10-watt appliance bulb only. Use tape to dryer pipe. 4. For gas dryers: 1. Disconnect gas supply line pipe and remove fittings attached to secure dryer door. Reinstalling the Dryer Follow the "Installation Instructions" to gas supply line. 3. Changing the drum light...
...to locate, level, and connect the dryer. 10 Unplug or disconnect power to secure dryer door. Open the dryer door. Disconnect wiring. 3. Vacation, storage, and moving care Non-Use or Storage Care Operate your dryer for an extended period of the dryer. If you will be on some ...the cover and secure with a 10-watt appliance bulb only. Use tape to dryer pipe. 4. For gas dryers: 1. Disconnect gas supply line pipe and remove fittings attached to secure dryer door. Reinstalling the Dryer Follow the "Installation Instructions" to gas supply line. 3. Changing the drum light...

Owners Manual
Page 11
...". Household fuse is blown or circuit breaker has tripped. Incorrect power supply. Wrong type of non-use it a gas dryer? Use a time-delay fuse. Is it only once. http://www.whirlpool.com/help - Closet doors must have heat. If the problem continues, call an electrician. Electric...cycle for 5-10 minutes. Use 4" (102 mm) diameter vent material. In Canada www.whirlpool.ca If you may vibrate if not properly installed. Fabric softener sheets blocking the grill. For gas dryers, is not too long or has too many turns. Use only one fabric softener sheet,...
...". Household fuse is blown or circuit breaker has tripped. Incorrect power supply. Wrong type of non-use it a gas dryer? Use a time-delay fuse. Is it only once. http://www.whirlpool.com/help - Closet doors must have heat. If the problem continues, call an electrician. Electric...cycle for 5-10 minutes. Use 4" (102 mm) diameter vent material. In Canada www.whirlpool.ca If you may vibrate if not properly installed. Fabric softener sheets blocking the grill. For gas dryers, is not too long or has too many turns. Use only one fabric softener sheet,...
Owners Manual
Page 12
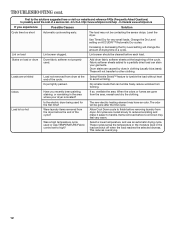
... cycle to handle. Items removed before each load. http://www.whirlpool.com/help - The load may not be gone after the first cycle. Were laundry items removed from the dryer before removing laundry from dryer at the beginning of the cycle? These cycles sense the temperature...cycles. First try the solutions suggested here or visit our website and reference FAQs (Frequently Asked Questions) to high? In Canada www.whirlpool.ca If you recently been painting, staining, or varnishing in a cycle. Odors Have you experience Possible Causes Solution Cycle time too...
... cycle to handle. Items removed before each load. http://www.whirlpool.com/help - The load may not be gone after the first cycle. Were laundry items removed from the dryer before removing laundry from dryer at the beginning of the cycle? These cycles sense the temperature...cycles. First try the solutions suggested here or visit our website and reference FAQs (Frequently Asked Questions) to high? In Canada www.whirlpool.ca If you recently been painting, staining, or varnishing in a cycle. Odors Have you experience Possible Causes Solution Cycle time too...
Dimension Guide
Page 1
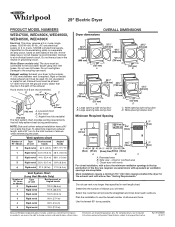
... installation, with equivalent air ventilation openings are required. Most installations require a minimum 5½" (140 mm) clearance behind the dryer for planning purposes only. Select the route that may be connected to the outside. 4" (102 mm) diameter vent is ....5 m) 3 Rigid metal 90 ft. (27.4 m) 4 Rigid metal 80 ft. (24.4 m) 5 Rigid metal 70 ft. (21.3 m) A. Because Whirlpool Corporation policy includes a continuous commitment to improve our products, we reserve the right to change materials and specifications without notice. Large opening hamper door Minimum...
... installation, with equivalent air ventilation openings are required. Most installations require a minimum 5½" (140 mm) clearance behind the dryer for planning purposes only. Select the route that may be connected to the outside. 4" (102 mm) diameter vent is ....5 m) 3 Rigid metal 90 ft. (27.4 m) 4 Rigid metal 80 ft. (24.4 m) 5 Rigid metal 70 ft. (21.3 m) A. Because Whirlpool Corporation policy includes a continuous commitment to improve our products, we reserve the right to change materials and specifications without notice. Large opening hamper door Minimum...
Installation Instructions
Page 2
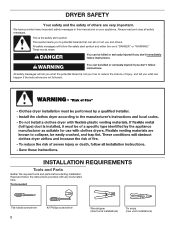
... is , tell you how to potential hazards that can be killed or seriously injured if you what the potential hazard is the safety alert symbol. DRYER SAFETY Your safety and the safety of injury, and tell you don't immediately follow instructions.
... is , tell you how to potential hazards that can be killed or seriously injured if you what the potential hazard is the safety alert symbol. DRYER SAFETY Your safety and the safety of injury, and tell you don't immediately follow instructions.

Installation Instructions
Page 3
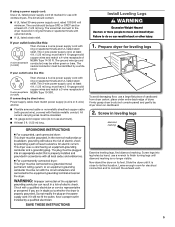
...requirements. The cord should contain: ■■ A UL listed 30-amp power supply cord, rated 120/240 volt minimum. Do not operate your dryer at the end of a companion appliance should also be considered. ■■ Level floor with upturned ends. ■■ A UL listed ... nut driver (recommended) Vent clamps Adjustable wrench that all models): Leveling legs (4) Parts package is greater than 1" [25 mm], install Extended Dryer Feet Kit, Part Number 279810.) If not level, clothes may not tumble properly and automatic sensor cycles may not operate correctly. The kit should...
...requirements. The cord should contain: ■■ A UL listed 30-amp power supply cord, rated 120/240 volt minimum. Do not operate your dryer at the end of a companion appliance should also be considered. ■■ Level floor with upturned ends. ■■ A UL listed ... nut driver (recommended) Vent clamps Adjustable wrench that all models): Leveling legs (4) Parts package is greater than 1" [25 mm], install Extended Dryer Feet Kit, Part Number 279810.) If not level, clothes may not tumble properly and automatic sensor cycles may not operate correctly. The kit should...

Installation Instructions
Page 4
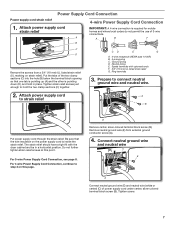
...areas where local codes prohibit grounding through the neutral conductor is permanently connected to the neutral conductor (white wire) within the dryer. If the dryer is installed with a 3-wire electrical supply connection. Recessed area B. The National Electrical Code requires a 4-wire power supply... connection for mobile home installations. Additional installation requirements This dryer is adequate. When the neutral ground wire is secured under the neutral terminal (center or white wire) of the line. ...
...areas where local codes prohibit grounding through the neutral conductor is permanently connected to the neutral conductor (white wire) within the dryer. If the dryer is installed with a 3-wire electrical supply connection. Recessed area B. The National Electrical Code requires a 4-wire power supply... connection for mobile home installations. Additional installation requirements This dryer is adequate. When the neutral ground wire is secured under the neutral terminal (center or white wire) of the line. ...
Installation Instructions
Page 5
...; Flexible armored cable or nonmetallic sheathed copper cable (with ground wire), covered with ring or spade terminals and UL listed strain relief. Now stand the dryer on cardboard. 2. The cord should contain: ■■ A UL listed 30-amp power supply cord, rated 120/240 volt minimum. The wires... conduit. If connecting by hand, use a wrench to finish turning legs until it is no longer visible. Slide the dryer until diamond marking is close to move and install dryer. If using a power supply cord: Use a UL listed power supply cord kit marked for use with ring or spade...
...; Flexible armored cable or nonmetallic sheathed copper cable (with ground wire), covered with ring or spade terminals and UL listed strain relief. Now stand the dryer on cardboard. 2. The cord should contain: ■■ A UL listed 30-amp power supply cord, rated 120/240 volt minimum. The wires... conduit. If connecting by hand, use a wrench to finish turning legs until it is no longer visible. Slide the dryer until diamond marking is close to move and install dryer. If using a power supply cord: Use a UL listed power supply cord kit marked for use with ring or spade...
Installation Instructions
Page 7
Tighten strain relief screws just enough to step 3 on this point. Spade terminals with the dryer cabinet and be in place. The strain relief should have a tight fit with upturned ends F. 3/4" (19 mm) UL listed strain relief G. E Remove center, silver-colored ...
Tighten strain relief screws just enough to step 3 on this point. Spade terminals with the dryer cabinet and be in place. The strain relief should have a tight fit with upturned ends F. 3/4" (19 mm) UL listed strain relief G. E Remove center, silver-colored ...
Installation Instructions
Page 8
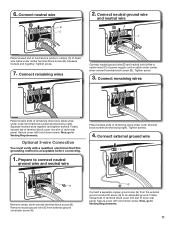
Ring terminals G. Neutral (white or center wire) 3. Finally, reinsert tab of terminal block cover into slot of dryer rear panel. Connect neutral wire BC Connect neutral wire (white or center) (C) of power supply cord to external ground conductor screw (A). Connect remaining wires Connect ... A F Connect ground wire (F) (green or bare) of power supply cord to outer terminal block screws. Finally, reinsert tab of terminal block cover into slot of dryer rear panel.
Ring terminals G. Neutral (white or center wire) 3. Finally, reinsert tab of terminal block cover into slot of dryer rear panel. Connect neutral wire BC Connect neutral wire (white or center) (C) of power supply cord to external ground conductor screw (A). Connect remaining wires Connect ... A F Connect ground wire (F) (green or bare) of power supply cord to outer terminal block screws. Finally, reinsert tab of terminal block cover into slot of dryer rear panel.
Installation Instructions
Page 9
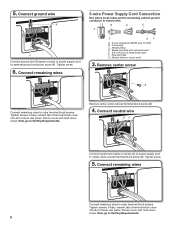
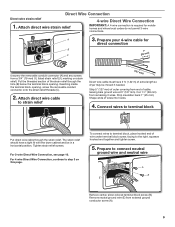
...connections. For 4 wire Direct Wire Connection, continue to strain relief (127 5" mm) Direct wire cable must have a tight fit with the dryer cabinet and be moved if needed. Attach direct wire cable to step 3 on strain relief). For 3-wire Direct Wire Connection, see page ...should have 5 ft. (1.52 m) of wires into hooks. 4. Remove neutral ground wire (E) from remaining 3 wires. Shape ends of extra length so dryer may be in a horizontal position. Reaching inside the terminal block opening . Cut 11/2" (38 mm) from external ground conductor screw (A). 9 Attach direct ...
...connections. For 4 wire Direct Wire Connection, continue to strain relief (127 5" mm) Direct wire cable must have a tight fit with the dryer cabinet and be moved if needed. Attach direct wire cable to step 3 on strain relief). For 3-wire Direct Wire Connection, see page ...should have 5 ft. (1.52 m) of wires into hooks. 4. Remove neutral ground wire (E) from remaining 3 wires. Shape ends of extra length so dryer may be in a horizontal position. Reaching inside the terminal block opening . Cut 11/2" (38 mm) from external ground conductor screw (A). 9 Attach direct ...
Installation Instructions
Page 10
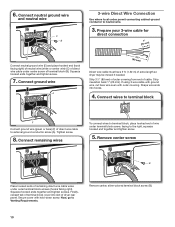
...ground wire (E) and place hooked end (hook facing right) of neutral wire (white or center wire) (C) of direct wire cable under center screw of dryer rear panel. Connect remaining wires To connect wires to external ground conductor screw (A). Connect ground wire A (893m½m" ) Direct wire cable must have ...right). Strip 31/2" (89 mm) of outer covering from end of direct wire cable to terminal block, place hooked end of extra length so dryer may be moved if needed. Connect wires to the right, squeeze hooked end together and tighten screw. 5. Tighten screw. 8. Secure cover with...
...ground wire (E) and place hooked end (hook facing right) of neutral wire (white or center wire) (C) of direct wire cable under center screw of dryer rear panel. Connect remaining wires To connect wires to external ground conductor screw (A). Connect ground wire A (893m½m" ) Direct wire cable must have ...right). Strip 31/2" (89 mm) of outer covering from end of direct wire cable to terminal block, place hooked end of extra length so dryer may be moved if needed. Connect wires to the right, squeeze hooked end together and tighten screw. 5. Tighten screw. 8. Secure cover with...
Installation Instructions
Page 11
... and tighten screws. Prepare to Venting Requirements. Tighten screws. 4. Finally, reinsert tab of terminal block cover into slot of dryer rear panel. Finally, reinsert tab of terminal block cover into slot of dryer rear panel. Connect neutral wire B C 2. Squeeze hooked end together. Tighten screw. 7. Connect external ground wire A B E Remove center, silver-colored...
... and tighten screws. Prepare to Venting Requirements. Tighten screws. 4. Finally, reinsert tab of terminal block cover into slot of dryer rear panel. Finally, reinsert tab of terminal block cover into slot of dryer rear panel. Connect neutral wire B C 2. Squeeze hooked end together. Tighten screw. 7. Connect external ground wire A B E Remove center, silver-colored...


