
Owners Manual
Page 13
... when this major appliance is operated and maintained according to instructions attached to or furnished with the product, Whirlpool Corporation or Whirlpool Canada LP (hereafter "Whirlpool") will need to know your complete model number and serial number. This major appliance is inconsistent to published... resulting from state to state or province to determine if another warranty applies. Replacement parts or repair labor on how to use of products not approved by calling Whirlpool. Dealer name Address Phone number Model number Serial number Purchase date 13 This warranty ...
... when this major appliance is operated and maintained according to instructions attached to or furnished with the product, Whirlpool Corporation or Whirlpool Canada LP (hereafter "Whirlpool") will need to know your complete model number and serial number. This major appliance is inconsistent to published... resulting from state to state or province to determine if another warranty applies. Replacement parts or repair labor on how to use of products not approved by calling Whirlpool. Dealer name Address Phone number Model number Serial number Purchase date 13 This warranty ...
Installation Instructions
Page 2
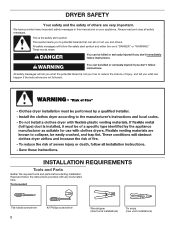
.... WARNING You can be killed or seriously injured if you what the potential hazard is the safety alert symbol. INSTALLATION REQUIREMENTS Tools and Parts Gather the required tools and parts before starting installation. This symbol alerts you to reduce the chance of others . We have provided many important safety messages in this...
.... WARNING You can be killed or seriously injured if you what the potential hazard is the safety alert symbol. INSTALLATION REQUIREMENTS Tools and Parts Gather the required tools and parts before starting installation. This symbol alerts you to reduce the chance of others . We have provided many important safety messages in this...

Installation Instructions
Page 3
... or SRDT and be installed or stored in an area where it will need: ■■ A location allowing for installing new exhaust vent) Parts supplied (all parts are using a power supply cord: Use a UL listed power supply cord kit marked for purchase from the dealer from whom you are included. ...not shut off at the end of 1" (25 mm) under entire dryer. (If slope is located in garages, closets, mobile homes, or sleeping quarters. Parts needed: Check local codes. The cord should contain: ■■ A UL listed 30-amp power supply cord, rated 120/240 volt minimum. The wires ...
... or SRDT and be installed or stored in an area where it will need: ■■ A location allowing for installing new exhaust vent) Parts supplied (all parts are using a power supply cord: Use a UL listed power supply cord kit marked for purchase from the dealer from whom you are included. ...not shut off at the end of 1" (25 mm) under entire dryer. (If slope is located in garages, closets, mobile homes, or sleeping quarters. Parts needed: Check local codes. The cord should contain: ■■ A UL listed 30-amp power supply cord, rated 120/240 volt minimum. The wires ...

Installation Instructions
Page 4
... the neutral ground wire is manufactured ready to the Manufactured Home Construction and Safety Standard, Title 24 CFR, Part 3280 (formerly the Federal Standard for Mobile Home Construction and Safety, Title 24, HUD Part 280). ■■ Metal exhaust system hardware, which is suitable for wall, door, and floor moldings. ■■...
... the neutral ground wire is manufactured ready to the Manufactured Home Construction and Safety Standard, Title 24 CFR, Part 3280 (formerly the Federal Standard for Mobile Home Construction and Safety, Title 24, HUD Part 280). ■■ Metal exhaust system hardware, which is suitable for wall, door, and floor moldings. ■■...
Installation Instructions
Page 13
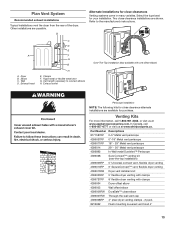
... of the dryer. Two close elbow 4396007RW Through-the-wall vent cap 4396008RP 4" steel dryer venting clamps - 2 pack 8212662 Flush mounting louvered vent hood 4" 13 Part Number Descriptions 8171587RP 0-5" Metal vent periscope 4396037RP 0"-18" Metal vent periscope 4396011RP 18" - 29" Metal vent periscope 4396014 29" - 50" Metal vent periscope 4392892 In...
... of the dryer. Two close elbow 4396007RW Through-the-wall vent cap 4396008RP 4" steel dryer venting clamps - 2 pack 8212662 Flush mounting louvered vent hood 4" 13 Part Number Descriptions 8171587RP 0-5" Metal vent periscope 4396037RP 0"-18" Metal vent periscope 4396011RP 18" - 29" Metal vent periscope 4396014 29" - 50" Metal vent periscope 4392892 In...
Installation Instructions
Page 15
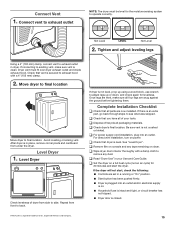
...If the dryer will not start the dryer. Dryer vent must be level for the moisture sensing system to side. Check that you have all parts are set in place, remove corner posts and cardboard from front to remove any tape remaining on dryer. After dryer is level. Repeat from ...9632; Household fuse is intact and tight, or circuit breaker has not tripped. ■■ Dryer door is closed. †®TEFLON is an extra part, go back through steps to exhaust outlet in your tools. Dupont De Nemours and Company. 15 Connect Vent 1. q Remove film on a full heat cycle...
...If the dryer will not start the dryer. Dryer vent must be level for the moisture sensing system to side. Check that you have all parts are set in place, remove corner posts and cardboard from front to remove any tape remaining on dryer. After dryer is level. Repeat from ...9632; Household fuse is intact and tight, or circuit breaker has not tripped. ■■ Dryer door is closed. †®TEFLON is an extra part, go back through steps to exhaust outlet in your tools. Dupont De Nemours and Company. 15 Connect Vent 1. q Remove film on a full heat cycle...
Installation Instructions
Page 16
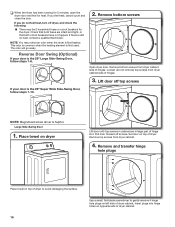
... gently remove 4 hinge hole plugs on dryer Lift door until top screws in cabinet are intact and tight, or that both fuses are in large part of dryer cabinet. If you do not remove) top screws from dryer cabinet side of hinges. If there is helpful. NOTE: You may be 2 household...
... gently remove 4 hinge hole plugs on dryer Lift door until top screws in cabinet are intact and tight, or that both fuses are in large part of dryer cabinet. If you do not remove) top screws from dryer cabinet side of hinges. If there is helpful. NOTE: You may be 2 household...
Installation Instructions
Page 17
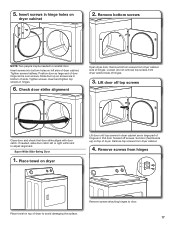
... ) on top of hinges. 3. Insert and tighten top screws in hinge holes on dryer Lift door until top screws in dryer cabinet are in large part of hinges. Pull door forward off top screws Close door and check that door strike aligns with door catch. 5. Remove bottom screws from dryer cabinet...
... ) on top of hinges. 3. Insert and tighten top screws in hinge holes on dryer Lift door until top screws in dryer cabinet are in large part of hinges. Pull door forward off top screws Close door and check that door strike aligns with door catch. 5. Remove bottom screws from dryer cabinet...
Warranty
Page 1
..., single-family household use or when it was purchased. This major appliance is intended to Whirlpool within 30 days from the date of purchase. 6. Repairs to parts or systems resulting from unauthorized modifications made to province. DISCLAIMER OF IMPLIED WARRANTIES IMPLIED WARRANTIES, ...this limited warranty. Service calls to correct the installation of your sales slip together for in accordance with Whirlpool's published installation instructions. 10. Replacement parts or repair labor on how to use of original purchase date is not installed in -warranty service. If...
..., single-family household use or when it was purchased. This major appliance is intended to Whirlpool within 30 days from the date of purchase. 6. Repairs to parts or systems resulting from unauthorized modifications made to province. DISCLAIMER OF IMPLIED WARRANTIES IMPLIED WARRANTIES, ...this limited warranty. Service calls to correct the installation of your sales slip together for in accordance with Whirlpool's published installation instructions. 10. Replacement parts or repair labor on how to use of original purchase date is not installed in -warranty service. If...


