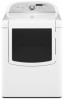
Whirlpool WGD7800XW Support Question
Whirlpool WGD7800XW Support Question
Find answers below for this question about Whirlpool WGD7800XW.Need a Whirlpool WGD7800XW manual? We have 4 online manuals for this item!
Question posted by Rainey0103 on March 26th, 2021
What Is The Part Number For The Dryer Door Seal Kit For This Whirlpool Wgd7800xw
What is the part number for a dryer door seal kit for this Whirlpool Model #WGD7800XW.
Current Answers


Related Whirlpool WGD7800XW Manual Pages
Owners Manual - Page 5
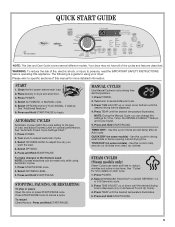
... arrow buttons until the desired drying time is displayed (only on some models) - NOTE: During the Manual Cycle, you
want the load. 4. TIMED DRY -
Place laundry in dry items. See "Cycles" for more detailed information. Press POWER. 2. To restart Close the door. MANUAL CYCLES
Use Manual Cycles to the type of this cycle...
Owners Manual - Page 6
... cycle time when your dryer is selected. Adjust the temperature of a Manual Cycle, press the Time Adjust up or down arrows.
Steam models
Non-Steam models
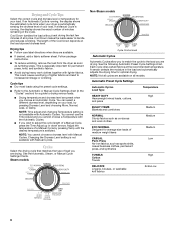
Cycle Control knob
Automatic ... fabrics at the recommended temperature.
If an Automatic Cycle is running , the display shows the exact number of your load. If a Manual Cycle is not available with the Automatic Cycles.
■ If...
Owners Manual - Page 8
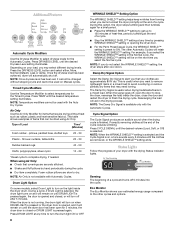
...when DRUM LIGHT is pressed or the dryer door is available only with the Auto Dry Cycles. When using Air Only. Drum Light Option
On some models, select Drum Light to select temperatures for... stitched. ■ Shake and fluff pillows by pressing WRINKLE SHIELD™ setting or opening the dryer door. ■ For the Perm Press/Casual Cycle, the WRINKLE SHIELD™ setting is finished. ...
Owners Manual - Page 9
... become your loads on front edge of the dryer. Press START/PAUSE to complete drying.
If your model does not have a drying rack, you happen to increase the dryness. NOTE: The drying rack must be changed while the dryer is shown.
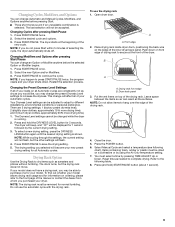
A
A. B
A
A. Dryer back panel
3. Close the door. 5.
Changing Modifiers and Options after pressing Start/Pause...
Owners Manual - Page 10
... each load. Doing so can increase drying time. Wet lint is located in the door opening of clothes. As needed .
Apply a liquid, nonflammable household cleaner to both ...increase drying time.
Scrub
lint screen with hot water. 3. Cleaning the Dryer Interior
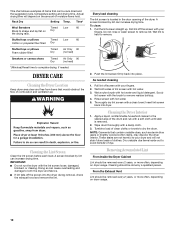
1. DRYER CARE
Cleaning the Dryer Location
Keep dryer area clear and free from items that contain unstable dyes, such as...
Owners Manual - Page 11

... LED drum light is needed, please contact a qualified person.
11 Gas Models: Close shutoff valve in dryer or reconnect power.
Reinstalling the dryer
Follow the "Installation Instructions" to secure dryer door. When replacing your dryer. Unplug dryer or disconnect power. 2. Remove the screw located in dryer base. 6. Replace all parts and panels before servicing. Make sure leveling...
Owners Manual - Page 12

...dryer will not run length and number of the dryer? Replace the fuse or reset the circuit breaker. Select a Timed Dry heated cycle, and restart the dryer.
There may not have your vent system falls withing the recommended run
■ Is the dryer door.... Check with your home power supply keeping the dryer's heater from turning on gas models?
The drum may be turning, but there may...
Owners Manual - Page 13
... right temperature for 5-10 minutes. Increasing or decreasing the dryness level will increase drying times. Check for air movement.
■ Is the dryer located in a closet? Proper operation of the door.
Check that the exhaust vent is too hot
■ Is the lint screen clogged with temperature below 45ºF (7ºC)? Separate...
Owners Manual - Page 15
... in a remote area where service by a Whirlpool designated service company. Dealer name Address Phone number Model number Serial number Purchase date
15 WHIRLPOOL SHALL NOT BE LIABLE FOR INCIDENTAL OR CONSEQUENTIAL... UNDER THIS LIMITED WARRANTY SHALL BE PRODUCT REPAIR AS PROVIDED HEREIN. WHIRLPOOL CORPORATION LAUNDRY WARRANTY
LIMITED WARRANTY
For one year from the date of your major...
Warranty - Page 1

...applies. You will pay for product service if your authorized Whirlpool dealer to province. WHIRLPOOL CORPORATION LAUNDRY WARRANTY
LIMITED WARRANTY
For one year from state to state or... in a remote area where service by calling
Whirlpool. LIMITATION OF REMEDIES;
Dealer name Address Phone number Model number Serial number Purchase date
15 Repairs to parts or systems ...
Dimension Guide - Page 1
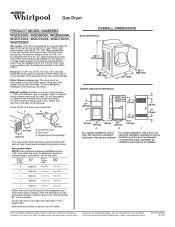
...Number of 90o turns or elbows
Type of the dryer in accordance with a door...number of L.P. Gas Dryer
PRODUCT MODEL NUMBERS
WGD6200S, WGD6600V, WGD6600W, WGD7300X, WGD7400X, WGD7600X, WGD7800X
Gas supply: This dryer is required. When rigid pipe is required. W10261614B 05/2010 Dryer... help to change without notice.
Because Whirlpool Corporation policy includes a continuous commitment to...
Installation Instructions - Page 5
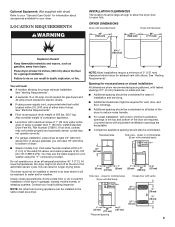
... -
If slope is greater than 1" (25 mm), install Extended Dryer Feet Kit, Part Number 279810. You may not operate correctly.
■■ For garage installation, place dryer at temperatures below 45° F (7°C).
You will need : ■■ A location allowing for your dryer. DRYER DIMENSIONS
Dryer with extended back:
Dryer with flat back:
30" (783 mm)
221/4" (565...
Installation Instructions - Page 6
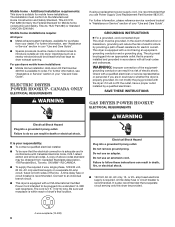
... Power Cord intended to follow these instructions can result in "Assistance or Service" section of electric shock. For gas dryers mobile home installations: ■■ Mobile Home Installation Hold-down Kit Part Number
346764 is equipped with Canadian Electrical Code, C22.1-latest edition and all local codes and ordinances. Electrical Shock Hazard Plug...
Installation Instructions - Page 7
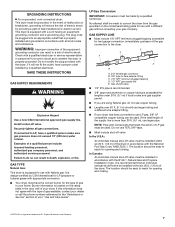
...dryer.
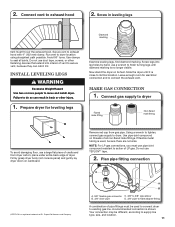
NOTE: Pipe-joint compounds that an individual manual shutoff valve be easy to reach for opening and closing .
†®TEFLON is located on the model... the dryer. Check with the type of gas available, contact your dealer or call the phone numbers referenced in...service representative or personnel if you are in the door well of electric shock by a qualified electrician. LP...
Installation Instructions - Page 8

... 1,000 ft. (305 m) increase in final dryer location.
■■ Remove excess to avoid
crushing and kinking. IMPORTANT: Observe all governing codes and ordinances. For a garage installation, the gas pipe height must be an additional 18" (460 mm) from the floor, depending on the model/serial number plate is mounted on a pedestal, the...
Installation Instructions - Page 9

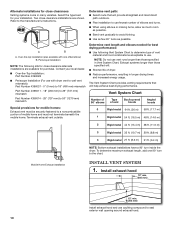
... vent must contact your "Use and Care Guide". Part Number 8212503
If you prefer, dryer may obstruct exhaust (such as flowers, rocks, bushes, or snow). For more information, see "Assistance or Service" section in your local dealer to seal all models
■■ Bottom Exhaust Kit- B
C
D
A
E
F G
B
H
A. Do not use duct tape.
■■ Exhaust Cover...
Installation Instructions - Page 10
... use with one 90° turn inside the dryer.
To determine maximum exhaust length, add one offset elbow) B. Refer to seal exterior wall opening around exhaust hood.
10
Terminate ...
■■ Use following kits for close clearance alternate installations are shown. Contact your local dealer.
■■ Over-the-Top Installation: Part Number 4396028
■■ Periscope ...
Installation Instructions - Page 11
...entire back edge of E.I. If flexible metal tubing is a registered trademark of dryer.
2. Connect vent to dryer location using straightest path possible. Install Leveling Legs
WARNING
Excessive Weight Hazard Use two....
†®TEFLON is used, be used to connect dryer to seal all non-flared male fittings. Slide the dryer until diamond marking is shown. Do not use a wrench...
Installation Instructions - Page 14
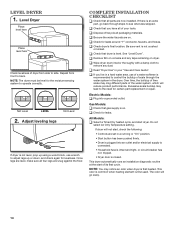
..., and start of /recycle all four legs are set in your tools.
Electric Models:
q Plug into an outlet and/or electrical supply is connected.
• Household fuse is intact and tight, or circuit breaker has not tripped.
• Dryer door is on console and any dust. q Be sure the water faucets are now...
Installation Instructions - Page 15

... space
to avoid damaging the surface.
Reverse the strike 1. Remove the door strike (A) from where they were removed.
NOTE: Door strike and plugs must be on top of dryer door opening from the dryer door opening. 2. Remove the cosmetic screw (B) opposite the door strike (A). Door strike B. Replace the 4 screws in Step 4.
15 A A
A. A A
6. Install 4 plastic plugs (A) into...
Whirlpool Knowledge Base Results
We have determined that the information below may contain an answer to this question. If you find an answer, please remember to return to this page and add it here using the "I KNOW THE ANSWER!" button above. It's that easy to earn points!-
Can I change the door-swing direction? - Front-load washer
... twisting - Dryer Moving your dryer model number in the search tool below to find them online. Find Manuals & Front-load washer Vibration - Guides: /shared.whirlpoolcorp.com/service/modelnumber.jsp','modelnumber',500,480);return false;" href="#"> Lookup Model # Can I change the door-swing direction? - No. The washer door is not reversible. However, the dryer door can... -
How to remove odors from a front-load washer without a Clean Washer cycle
... better ventilation and drying of models . Liquid chlorine bleach method Remove any residue remains. Close the washer door and dispenser drawer. Other tips to allow for septic systems, washers and the environment. Leave the door slightly open to maintain freshness Always do I clean my front-load washer door seal? Find Manuals & If your... -
Leaking water - Front-load washer
... enter your model number in the drainpipe. Front-load Washer Is the dispenser drawer clogged? Manually remove the dispenser, and clean any dirt or deposits around the inner door seal with the ...Is the drain hose loose? Are there signs of the washer. Check the household plumbing (laundry tub, faucets, drainpipe and water pipes) for details; The drain hose should be able to...
Similar Questions


Cabrio Gas Dryer Won't Run
hit power button panel lights up hit start button all you get is clicking noise.
hit power button panel lights up hit start button all you get is clicking noise.
(Posted by lonzo216 5 years ago)

Dryer Takes Too Long To Dry Clothes
Have to set dryer to one setting for towels to dry any type load . After cycle of 54 minutes is done...
Have to set dryer to one setting for towels to dry any type load . After cycle of 54 minutes is done...
(Posted by plazajoe 7 years ago)


Cabrio Dryer Model Number Wgd7800xwo
my start pause button just blinks and will not start
my start pause button just blinks and will not start
(Posted by buds4everj 9 years ago)