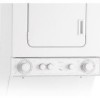
Whirlpool LTE5243DQ Support Question
Whirlpool LTE5243DQ Support Question
Find answers below for this question about Whirlpool LTE5243DQ - Stack Washer Electric Dryer.Need a Whirlpool LTE5243DQ manual? We have 6 online manuals for this item!
Question posted by Tonyra on September 26th, 2014
How To Change Whirlpool Stackable Washer Dryer Lid Switch For Model Lte5243dq2
The person who posted this question about this Whirlpool product did not include a detailed explanation. Please use the "Request More Information" button to the right if more details would help you to answer this question.
Current Answers
Related Whirlpool LTE5243DQ Manual Pages
Owners Manual - Page 1
... to know your complete model number and serial number.
In Canada, for assistance, installation or service, call us at www.whirlpool.com.
You must provide proof of Contents / Table des matières
ASSISTANCE OR SERVICE 1 ACCESSORIES 2 WASHER/DRYER SAFETY 2 WASHER USE 6 DRYER USE 7 WASHER/DRYER CARE 8 TROUBLESHOOTING WASHER 10 TROUBLESHOOTING DRYER 12 WARRANTY 14...
Owners Manual - Page 2
... www.whirlpoolparts.ca. m) - WASHER/DRYER SAFETY
Your safety and the safety...
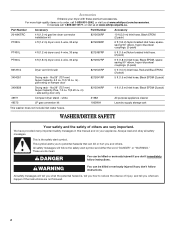
LP gas conversion kit
1903WH
Laundry supply storage cart
This washer does not include inlet water hoses...dryer stand -
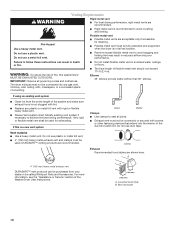
WARNING
You can kill or hurt you don't immediately follow the safety alert symbol and either the word "DANGER" or "WARNING." In Canada call 1-800-901-2042, or visit us at www.whirlpool...
Owners Manual - Page 4
... use an open flame during this time. ■ Do not repair or replace any part of the washer/dryer or attempt any accumulated hydrogen gas. IMPORTANT SAFETY INSTRUCTIONS
WARNING: To reduce the risk of fire, electric shock, or injury to dry articles containing foam rubber or similarly textured rubber-like materials. ■ Keep...
Owners Manual - Page 8
... . 2. Whirlpool Corporation recommends use to reduce the risk of replacement on the cover at the same time. 3. Wet lint is probably clogged if lint falls off the screen with the brush to remove lint. Apply a nonflammable household cleaner to the stained area
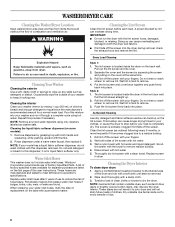
of Factory Specified Parts. WASHER/DRYER CARE
Cleaning the Washer/Dryer Location
Keep washer/dryer...
Owners Manual - Page 9
...in death or electrical shock.
■ Plug in washer/dryer or reconnect power.
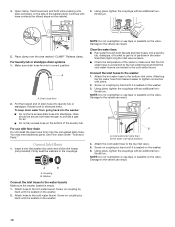
9 Flush water pipes and hoses. 2.
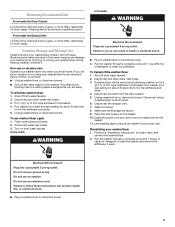
Unplug washer/dryer or disconnect power. Reinstalling your washer/dryer only when ... Instructions" to secure the washer lid and dryer door. Do not remove ground prong. From Inside the Exhaust Vent
Lint should : ■ Unplug washer/dryer or disconnect power. ■...
Owners Manual - Page 10
www.whirlpool.com/help - See the Installation Instructions.
■ Is the washer/dryer level? This is normal and necessary for about 2 minutes during operation.
The drain hose should be level. Dispenser clogged (on some models)? Do not remove ground prong. Turn the Cycle Control knob to the right slightly and pull to not fill completely...
Energy Guide - Page 1
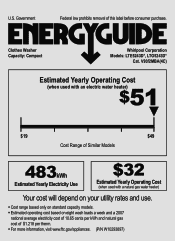
... and natural gas cost of this label before consumer purchase. Clothes Washer Capacity: Compact
Whirlpool Corporation Models: LTE5243D*, LTG5243D*
Cat. V93f2MBA(4C)
Estimated Yearly Operating Cost
(when used with an electric water heater)
$51 ▼
$19
$49
Cost Range of Similar Models
483kWh
Estimated Yearly Electricity Use
$32
Estimated Yearly Operating Cost
(when used with a natural...
Dimension Guide - Page 1
...the path of the laundry tub must be ...dryer for planning purposes only. Side view -
A 2" (5 cm) diameter to use an extension cord. Because Whirlpool Corporation policy includes a continuous commitment to change...washer/dryer. ®
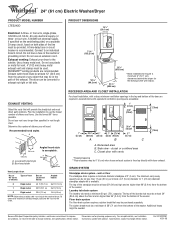
24" (61 cm) Electric Washer/Dryer
PRODUCT MODEL NUMBER
LTE5243D
Electrical: A three- or four-wire, single-phase, 120/240-volt, 60-Hz, AC-only electrical...
Installation Instructions - Page 1
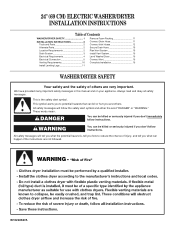
24" (69 CM) ELECTRIC WASHER/DRYER INSTALLATION INSTRUCTIONS
Table of Contents
WASHER/DRYER SAFETY 1
INSTALLATION INSTRUCTIONS 2 Tools and Parts 2 Alternate Parts 2 Location Requirements 2 Drain System 3 Electrical Requirements 4 Electrical Connection 5 Venting Requirements 10 Install Leveling Legs 11
Remove Foam Packing 11 Connect Drain Hose 11 Connect Inlet Hoses 12 Secure Drain ...
Installation Instructions - Page 2
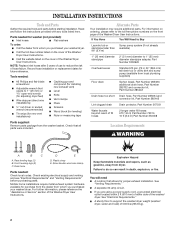
... "Electrical Requirements" and "Venting Requirements" before starting installation.
Call the toll-free number listed on the cover of hose failure. If You Have
You Will Need to Buy
Laundry tub or standpipe taller than 96" (2.4 m)
Sump pump system (if not already available)
1" (25 mm) diameter standpipe
2" (51 mm) diameter to support the washer/dryer...
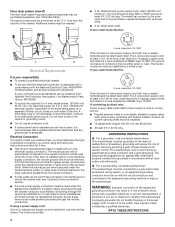
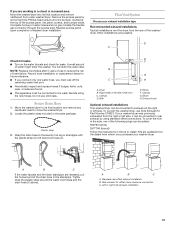
Installation Instructions - Page 3

... must be at or below 45°F (7°C). Some codes limit, or do not permit, installation of the washer/dryer in the top and bottom of the washer.
39" (991 mm)
A
B
Laundry tub drain system (view C)
The laundry tub needs a minimum 20 gal. (76 L) capacity.
Recessed area B. Mobile home installations require:
Metal exhaust system hardware...
Installation Instructions - Page 4
... be insulated.
10-gauge solid copper wire (do not permit the connection of the washer.
This washer/dryer uses a cord having an equipment-grounding conductor and a grounding plug. For a permanently connected washer/dryer: This washer/dryer must be connected to install with the National Electrical Code, ANSI/NFPA 70-latest edition and all local codes and ordinances. The...
Installation Instructions - Page 7
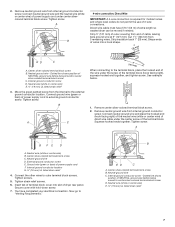
...electrical connection. Cut 11⁄2" (38 mm) from internal ground conductor screw. Strip insulation back 1" (25 mm). Neutral ground wire -
Tighten screw. Center silver-colored terminal block screw C. Ground wire (green or bare) of extra length so washer/dryer... Requirements." Tighten strain relief screws.
6. Insert tab of dryer rear panel. Now go to outer terminal block screws....
Installation Instructions - Page 9
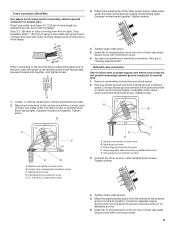
...of terminal block cover into slot of power supply cord/cable under the center screw of dryer rear panel. Loosen or remove center silver-colored terminal block screw.
2. Internal ground conductor ... cable must have completed your electrical connection.
Move the green painted screw from end of cable. Strip 31⁄2" (89 mm) of extra length so washer/dryer can be moved if needed...
Installation Instructions - Page 10
... or by calling Whirlpool Parts and Accessories. Review Vent system chart.
Do not use duct tape.
The dryer exhaust must be used . The total length of the Washer/Dryer User Instructions. For...its final location. Flexible metal vent
Flexible metal vents are recommended.
If this washer/dryer
MUST BE EXHAUSTED OUTDOORS. Exhaust vent must be purchased from the entire length of...
Installation Instructions - Page 11
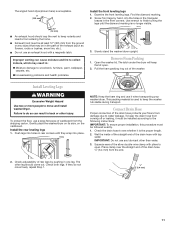
... exactly.
1. Gently place the washer/dryer on its side, on the cardboard. NOTE: Keep the foam ring and use an exhaust hood with tap water. To keep the lid open . Improper venting can result...from coming off or leaking, it must be installed according to do not move and install washer/dryer.
Connect Drain Hose
Proper connection of the drain hose with a magnetic latch. Wet the...
Installation Instructions - Page 12
...a new flat washer into a laundry tub, drainpipe, or bucket to get rid of the laundry tub. Clear the water lines Run water through both faucets and inlet hoses, into each end of the washer/dryer. Attaching
the ... the valve. To keep drain water from going back into the washer: Do not force excess drain hose into laundry tub or standpipe.
You may need additional parts. Connect Inlet Hoses...
Installation Instructions - Page 13
...washer/dryer can be added:
692790 (white)
3977784 (biscuit)
Follow the instructions in the kit to the laundry tub leg or standpipe with the plastic strap (A or B below) and secure. If your washer/dryer...models) the flexible gas connector through the access area. You will drain this water later. The apparatus must cap off the remaining water inlet port.
Wall
E. To convert the washer/dryer...
Installation Instructions - Page 14
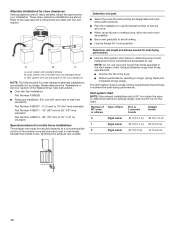
..., resulting in the Vent system chart. To determine maximum exhaust length, add one 90º turn inside the dryer. A
B
C
A.
Over-the-Top Installation:
Part Number 4396028
Periscope Installation (For use the fewest number of... are shown.
NOTE: Do not use . Number of Type of the Washer/Dryer User Instructions. Determine vent length and elbows needed for your installation.
Installation Instructions - Page 15
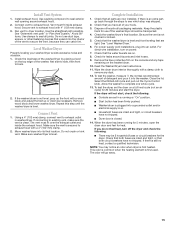
... vent to exhaust hood.
Level Washer/Dryer
Properly leveling your tools.
3. Remove wood block and lower washer/dryer. If there is clean. For power supply cord installations, plug into its final location. Read the Washer/Dryer User Instructions.
11. Wipe the dryer drum interior thoroughly with a 4" (102 mm) clamp.
2. Close the lid. Select the REGULAR cycle and pull...
Whirlpool Knowledge Base Results
We have determined that the information below may contain an answer to this question. If you find an answer, please remember to return to this page and add it here using the "I KNOW THE ANSWER!" button above. It's that easy to earn points!-
Braille overlays
... for visually impaired consumers who do not read Braille. Enlarged copies of washers, dryers, dishwashers, microwaves, ranges and refrigerators. Braille knobs are available for washers and dryers. Large print use and care manuals are available for most models for washers, dryers, microwaves and ranges. Product and order availability information To order Special Needs accessories... -
Poor drying performance - Electronic controls with digital display - Dryers
...models.) There are consistently not as dry as I can change the preset dryness level settings. You can do? This change will affect all your Automatic Dry or Accudry cycles and the drying time for slightly dryer...drying as well as you would have expected. The dryer will beep, and "CF" will increase. My dryer will flash. To change the dryness level setting: The dryness level settings ... -
Loads are damp; dryer does not dry
...Dryness button for possible causes and solutions. Electric Dryer Dryer does not heat - Changing this mode. Dryer Dryer does not heat - Dryer Poor drying performance - There are 3 drying ...Changing the Preset Dryness Level Settings (available on some models only) If all of your loads on all of your satisfaction. Check the following links for 5 seconds. The dryer...
Similar Questions

Kitchenade Stackable Washer And Dryer Model # Lte5243dq3
I need to replace the drum springs on my washer (so it keeps balance) but first I need to know how t...
I need to replace the drum springs on my washer (so it keeps balance) but first I need to know how t...
(Posted by sonnycuster2 7 years ago)

Location Of Washer Filter On Whirlpool Stackable Washer
Thank you. Can you please tell me where the washer filter is on this stackable washer so I can clean...
Thank you. Can you please tell me where the washer filter is on this stackable washer so I can clean...
(Posted by lindakroe 8 years ago)

How To Replace Lid Switch On Whirlpool Lte5243dq
(Posted by talamdadm 9 years ago)

Video How To Change A Washer Belt Whirlpool Lte5243dq3
(Posted by sbja 9 years ago)
How To Replace A Lid Switch On A Whirlpool Stackable Washer Lte5243dq
(Posted by jowel 10 years ago)