Whirlpool WED5605MW Support and Manuals
Get Help and Manuals for this Whirlpool item

View All Support Options Below
Free Whirlpool WED5605MW manuals!
Problems with Whirlpool WED5605MW?
Ask a Question
Free Whirlpool WED5605MW manuals!
Problems with Whirlpool WED5605MW?
Ask a Question
Most Recent Whirlpool WED5605MW Questions

Can't Unlock The Dryer Door!
(Posted by Anonymous-173446 1 year ago)
Popular Whirlpool WED5605MW Manual Pages
Dimension Guide - Page 2
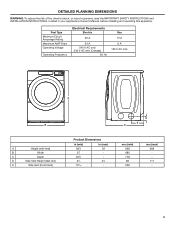
... reduce the risk of fire, electric shock, or injury to persons, read the IMPORTANT SAFETY INSTRUCTIONS and INSTALLATION INSTRUCTIONS, located in (max) 39 43∕8 -
Fuel Type Minimum Circuit Amperage Rating Maximum AMP...8725;8 31∕2 103∕16
in your appliance's Owner's Manual, before installing and operating this appliance. D E C
mm (min) 968 686 778 89 258
mm (max) 989 111 -
2
Dimension Guide - Page 4
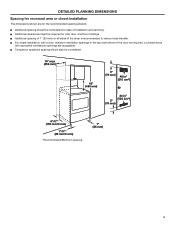
... recommended spacing allowed.
Ƀ Additional spacing should be considered for wall, door, and floor moldings. Ƀ Additional spacing of 1" (25 mm) on all sides of installation and servicing. Ƀ Additional clearances might be considered.
14" max (356 mm)
18" (460 mm)
3" (76 mm) 48 in2
(310 cm²)
242"42/i2n42 "2 3" (155...
Owners Manual - Page 2
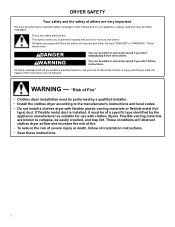
...mean:
DANGER
You can happen if the instructions are known to the manufacturer's instructions and local codes. − Do not install a clothes dryer with clothes dryers.
We have provided many important safety messages in this manual and on your appliance. Always read and obey all installation instructions. − Save these instructions.
2 All safety messages will obstruct clothes...
Owners Manual - Page 3
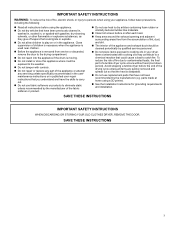
..., the final part of the drying cycle unless all instructions before using a 3D printer).
� See the Installation Instructions for grounding requirements and installation. Avoid stopping...; Do not repair or replace any part of the appliance or attempt any servicing unless specifically recommended in the usermaintenance instructions or in published user-repair instructions that you understand...
Owners Manual - Page 4
...instructions.
� The router to be on , the user is encouraged to try to change. You will be guided through the steps to set...code is either printed on a label on the appliance or found on a circuit different from that may cause undesired operation.
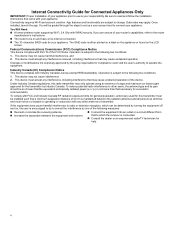
Industry Canada (IC) Compliance Notice This Device complies with Part... installation instructions ... home wireless router supporting Wi-Fi, ...
Owners Manual - Page 5

...during removal, check the exhaust hood and remove the lint. Reinstall screen
in the Installation Instructions. � Clean space where lint screen is in the door opening or the ... items, may be removed every 2 years, or more often, depending on model. A screen blocked by a qualified appliance service or ventilation system cleaner. Using a vacuum, gently remove any lint that contain...
Owners Manual - Page 6
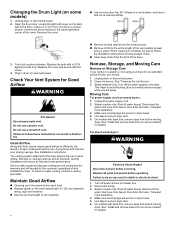
... off water faucet. then drain the hose. See "Install and remove base trim (on some models)
1. Steam Models Only: Turn off power at least
every 2 years.
Open the dryer door. To clean or repair venting, contact a venting specialist. Unplug dryer or disconnect power. 2. Replace all parts and panels before servicing. Transport hose separately. 4. Use tape to the...
Owners Manual - Page 7
... use the dryer again:
1. Reconnect water inlet hose to the manufacturer's instructions and local codes. INSTALLATION REQUIREMENTS
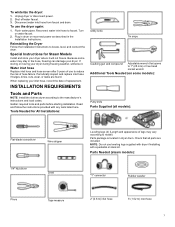
Tools and Parts
NOTE: Install the clothes dryer according to faucet. Shut off water faucet. 3. Flush water pipes.
Because some models):
Putty knife
Parts Supplied (all parts are found. Water inlet hose
Replace inlet hose and hose screen after 5 years of...
Owners Manual - Page 8

... space for your model. Add spacing on all sides of automatic sensor cycles, resulting in longer drying times. Louvered doors with a door, minimum ventilation
openings in an area where it (even after washing). Available Accessories:
Accessories and replacement parts are acceptable. � Companion appliance spacing should be considered for ease of
installation and servicing. �...
Owners Manual - Page 9
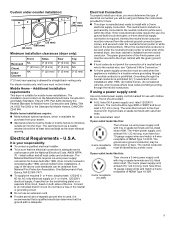
..., HUD Part 280) or the Standard for straight-back venting only. The neutral bond conductor is adequate and in ring terminals or spade terminals with ring or spade terminals and UL-listed strain relief.
If using and follow the instructions provided for (1) new branch-circuit installations after 1996, and all local codes and ordinances...
Owners Manual - Page 16
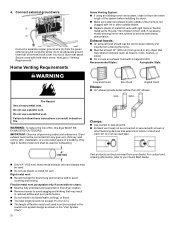
...follow these instructions can be...installing the dryer.
� Make sure external exhaust hoods outside debris.
� Replace...Must be fully extended and supported in final dryer location....Guide.
� Only a 4" (102 mm) heavy metal exhaust vent and clamps may result
in reduced airflow and poor performance. � Do not install...system to seal all governing codes and ordinances. Do not...
Owners Manual - Page 17
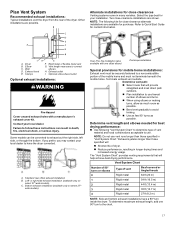
Select the type best for contact information. Refer to Quick Start Guide for your installation.
A. Dryer B. Clamps
F. Rigid metal or flexible metal vent G.
If you prefer, you may contact your local dealer. wide models). Determine vent length and elbows needed for close clearances
Venting systems come in longer drying times and increased energy usage...
Owners Manual - Page 18

...cases in which the Installation Instructions do not address the vent length for the specific number of vent
Box...model has a long vent system, refer to male end of length. Then attach "Y" connector to the type code...Model would be used. (The total vent system length includes all joints.
Record hose installation or replacement dates on faucet.
Periodically inspect and replace...
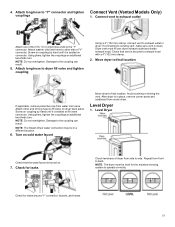
Owners Manual - Page 19
...
If applicable, remove protective cap from side to the "Y" connector. Dryer vent must be in dryer. Move dryer to "Y" connector and tighten Connect Vent (Vented Models Only)
couplings
1. Using pliers, tighten the couplings an additional two-thirds turn .
Avoid crushing or kinking the vent.
Screw on coupling by hand until it...
Owners Manual - Page 20
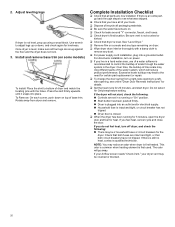
... you do not feel heat, turn on some models)
To Install: Place the skirt to remove any tape remaining on dryer.
� Wipe dryer drum interior thoroughly with the holes. Excessive scale buildup may lead to a leftside opening to the need for certain part replacement or repair.
� To change the door swing from dryer...
Whirlpool WED5605MW Reviews
We have not received any reviews for Whirlpool yet.