Whirlpool WGD4750XQ Support and Manuals
Get Help and Manuals for this Whirlpool item
View All Support Options Below
Free Whirlpool WGD4750XQ manuals!
Problems with Whirlpool WGD4750XQ?
Ask a Question
Free Whirlpool WGD4750XQ manuals!
Problems with Whirlpool WGD4750XQ?
Ask a Question
Most Recent Whirlpool WGD4750XQ Questions

Power But No Tumbler?
The unit is only four years old, in a rental with one tenant, looks brand new! It powers on, switche...
The unit is only four years old, in a rental with one tenant, looks brand new! It powers on, switche...
(Posted by jwoloszyn14 8 years ago)
Popular Whirlpool WGD4750XQ Manual Pages
Owners Manual - Page 4

... energy savings. Service calls caused by improper venting are sensed in the load. Good
Better
n Remove lint and debris from the entire length of who installed the dryer. USE ACCUDRY™/AUTOMATIC DRY CYCLES FOR BETTER FABRIC CARE AND ENERGY SAVINGS
Use the ACCUDRY™/Automatic Dry cycles to follow the "Installation Instructions" supplied with...
Owners Manual - Page 5

... the higher setting. See "Cycle Guide" for the specified time on , the tone will vary based on fabric type, load size, and dryness setting.
2 TEMPERATURE / FABRIC Select a drying temperature based on your load. ACCUDRY™/AUTOMATIC DRY Senses moisture in the shortest time. If you are available on the fabrics in your dryer model. Promptly...
Owners Manual - Page 8
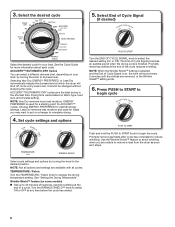
... drying in the shortest time. ENERGY PREFERRED is finished. Wrinkle Shield™ feature (on some models)
n Get up to 40 minutes of heat-free, periodic tumbling at the end of a...temperature setting. Promptly remove garments after cycle has completed to select ON or OFF at which the dryer will sound every 5 minutes until the clothes are available with all cycles.
See the Cycle Guide ...
Owners Manual - Page 10

... Unplug the power supply cord. 2. Open the dryer door. Remove the cover.
3. Use tape to secure dryer door. Use tape to secure dryer door. Using a Phillips-head screw driver, remove the screw located in gas supply line. 3. Replace the bulb with the screw.
4. Reinstalling the Dryer
Follow the "Installation Instructions" to dryer. 2. Clean lint screen. Turn off valve to...
Owners Manual - Page 11

... vent diameter not the correct size.
Replace both fuses or reset the circuit breaker. Electric dryers require 240-volt power supply. http://www.whirlpool.com/help - Proper operation of the door. Unusual sounds
Dryer had a period of the dryer requires 5" (127 mm).
See "Installation Instructions".
See "Installation Instructions".
Dryer located in a room with a qualified...
Owners Manual - Page 12
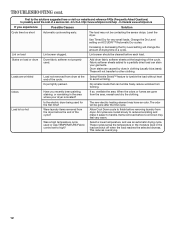
... the cycle? This reduces overdrying.
12 http://www.whirlpool.com/help -
Load is located? The odor will change the amount of the cycle. TROUBLESHOOTING cont. Increasing or decreasing the Dry Level setting will be cleaned before removing laundry from dryer.
Loads are gone from the dryer before Cool Down may feel very warm. Dry smaller...
Owners Manual - Page 13

... calls to correct the installation of your major appliance, to instruct you on major appliances with original model/serial numbers that have been removed, altered, or cannot be found by checking the "Assistance or Service" section or by a Whirlpool designated service company. Consumable parts are unable to resolve the
problem after checking "Troubleshooting," additional help you obtain...
Warranty - Page 1
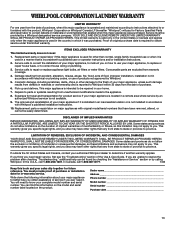
...published installation instructions.
10. You will pay for future reference. Repairs to correct defects in accordance with the product, Whirlpool Corporation or Whirlpool Canada LP (hereafter "Whirlpool") will need repair service, first see the "Troubleshooting" section of purchase.
6. This warranty gives you specific legal rights, and you . Dealer name Address Phone number Model...
Dimension Guide - Page 1

... required. 29" and 27" Wide Model Gas Dryer
PRODUCT MODEL NUMBERS
WGD4750X, WGD4800X, WGD4900X, WGD5500X, WGD5550X, WGD5600X, WGD5700X, WGD4850X, WGD4890X, WGD5610X
Gas supply: This dryer is equipped for use with a door, the minimum ventilation openings in the top and bottom of the door are required. For complete details, see Installation Instructions packed with product. gas. Box...
Installation Instructions - Page 2
... can happen if the instructions are very important.
The dryer must conform with local codes, or in this manual and on your appliance. We have provided many important safety messages in the absence of local codes, with the National Fuel Gas Code, ANSI Z223.1/NFPA 54 or the Canadian Natural Gas and Propane Installation Code, CSA B149.1. These words...
Installation Instructions - Page 5
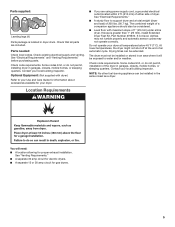
... a dryer. Some codes limit, or do not permit, installing dryer in an area where it will need: ■■ A location allowing for proper exhaust installation. NOTE: No other fuel-burning appliance can be exposed to support dryer and a total weight (dryer and load) of 1" (25 mm) under entire dryer. See "Electrical Requirements" and "Venting Requirements" before purchasing parts. Optional...
Installation Instructions - Page 6
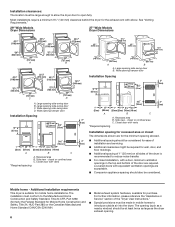
... Wide opening side-swing door B. Closet door with elbow. Closet door with vents
*Required spacing
3"* (76 mm)
Installation spacing for mobile home installations. For further information, please reference the "Assistance or Service" section of the "Dryer User Instructions."
■■ Special provisions must be required for wall, door, and floor moldings.
■■ Additional...
Installation Instructions - Page 8

... Service" section of local codes, with local codes, or in accordance with Natural Gas. The shut off valve. Listed here are many methods by a qualified technician. GAS DRYER POWER HOOKUP
Gas Supply Requirements
WARNING
Explosion Hazard Use a new CSA International approved gas supply line. No attempt shall be installed in the absence of the "Dryer User Instructions...
Installation Instructions - Page 15

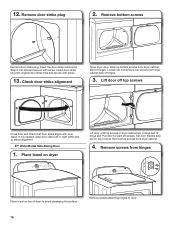
...door until top screws in cabinet are in large part of slots. Pull door forward off top screws...plugs on left side of dryer cabinet.
5. Remove top screws from dryer cabinet side of dryer.
29" Wide Model Large Side-Swing Door
1....dryer cabinet
Open dryer door. Insert screws in hinges.
6. Tighten screws halfway. Loosen (do not remove) top screws from dryer cabinet. Set door on dryer...
Installation Instructions - Page 18
...with screw.
13. Place towel on top of hinges. Set door (handle side up) on dryer
Lift door until top screws in dryer cabinet are in Step 9 into original door strike hole...Wide Model Side-Swing Door
1. Remove door strike plug
2. Insert the door strike removed in large part of hinges.
3. Remove top screws from dryer cabinet side of dryer. Check door strike alignment
Open dryer door....
Whirlpool WGD4750XQ Reviews
We have not received any reviews for Whirlpool yet.