
Owners Manual
Page 4
... n Remove lint and debris from the front the dryer. Use Timed Dry for final product check. See "Installation Instructions." Service calls caused by the customer, regardless of time set and sometimes results in a vent system; n Use no more drying time or when using the drying rack. 4 During ACCUDRY™/Automatic Dry cycles, drying air temperature or moisture level are not covered by : n Cleaning your lint screen before each bend and curve reduces air flow. This sensing occurs throughout the drying cycle and...
... n Remove lint and debris from the front the dryer. Use Timed Dry for final product check. See "Installation Instructions." Service calls caused by the customer, regardless of time set and sometimes results in a vent system; n Use no more drying time or when using the drying rack. 4 During ACCUDRY™/Automatic Dry cycles, drying air temperature or moisture level are not covered by : n Cleaning your lint screen before each bend and curve reduces air flow. This sensing occurs throughout the drying cycle and...

Owners Manual
Page 5
... desired setting (On or Off). If you may vary. 1 DRYER CYCLE KNOB Use your load. CONTROL PANEL & FEATURES 1 2 3 4 TIMED DRY 50 40 Damp Dry Tumble Press 20 60 70 Heavy Dry Cool Down OFF ACCUDRY sensor dryer Jeans Very Dry ENERGY PREFERRED OFF Delicate WP_WEGD4900XW Less Dry Cool Down OFF WRINKLE SHIELD Air n o On heat l y L ow knits Mcaseudalium TEMPERATURE fabric Hhigeahvy O On WRINKLE SHIELD E nd O of C ycle Sign On al PUSH TO START 1 2 4 WRINKLE SHIELD Cool...
... desired setting (On or Off). If you may vary. 1 DRYER CYCLE KNOB Use your load. CONTROL PANEL & FEATURES 1 2 3 4 TIMED DRY 50 40 Damp Dry Tumble Press 20 60 70 Heavy Dry Cool Down OFF ACCUDRY sensor dryer Jeans Very Dry ENERGY PREFERRED OFF Delicate WP_WEGD4900XW Less Dry Cool Down OFF WRINKLE SHIELD Air n o On heat l y L ow knits Mcaseudalium TEMPERATURE fabric Hhigeahvy O On WRINKLE SHIELD E nd O of C ycle Sign On al PUSH TO START 1 2 4 WRINKLE SHIELD Cool...
Owners Manual
Page 6
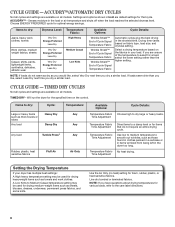
..., or heat-sensitive fabrics. Temperature Fabric Time Adjustment Temperature Fabric Time Adjustment Temperature Fabric Time Adjustment Dries items to select for items that cycle. Settings and options shown in bold are available on all models. Items to dry: Dryness Level: Temperature Fabric: Available Options: Cycle Details: Jeans, heavy work clothes. TIMED DRY - Use low to medium temperature to dry large or heavy loads. A Low Knits to the care label directions. 6 Choose ENERGY PREFERRED cycle for drying heavyweight...
..., or heat-sensitive fabrics. Temperature Fabric Time Adjustment Temperature Fabric Time Adjustment Temperature Fabric Time Adjustment Dries items to select for items that cycle. Settings and options shown in bold are available on all models. Items to dry: Dryness Level: Temperature Fabric: Available Options: Cycle Details: Jeans, heavy work clothes. TIMED DRY - Use low to medium temperature to dry large or heavy loads. A Low Knits to the care label directions. 6 Choose ENERGY PREFERRED cycle for drying heavyweight...
Owners Manual
Page 9
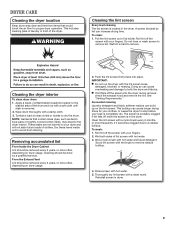
... of clothes. A screen blocked by a qualified servicer. Cleaning the dryer interior To clean dryer drum 1. NOTE: Garments that would block the air flow for your clothes, or cause the dryer to dry the drum. Dry these items inside out to remove lint. Removing accumulated lint From Inside the Dryer Cabinet Lint should be removed every 2 years, or more often, depending on dryer usage. As needed cleaning Laundry detergent and fabric softener residue can cause longer drying times for proper dryer operation...
... of clothes. A screen blocked by a qualified servicer. Cleaning the dryer interior To clean dryer drum 1. NOTE: Garments that would block the air flow for your clothes, or cause the dryer to dry the drum. Dry these items inside out to remove lint. Removing accumulated lint From Inside the Dryer Cabinet Lint should be removed every 2 years, or more often, depending on dryer usage. As needed cleaning Laundry detergent and fabric softener residue can cause longer drying times for proper dryer operation...

Owners Manual
Page 10
... "Installation Instructions" to secure dryer door. Changing the drum light (on vacation or not using your dryer only when you are secure in the lower right-hand corner of the dryer. Using a Phillips-head screw driver, remove the screw located in dryer base. 4. Plug into a grounded outlet or reconnect power. For direct-wired dryers: 1. Make sure leveling legs are secure in gas supply line. 3. Use tape to locate, level, and connect the dryer. 10 Close shutoff valve in dryer base. 6. Clean lint screen...
... "Installation Instructions" to secure dryer door. Changing the drum light (on vacation or not using your dryer only when you are secure in the lower right-hand corner of the dryer. Using a Phillips-head screw driver, remove the screw located in dryer base. 4. Plug into a grounded outlet or reconnect power. For direct-wired dryers: 1. Make sure leveling legs are secure in gas supply line. 3. Use tape to locate, level, and connect the dryer. 10 Close shutoff valve in dryer base. 6. Clean lint screen...

Owners Manual
Page 11
... the load items and restart the dryer. Electric dryers require 240-volt power supply. Check with temperature below 45ºF (7ºC)? Exhaust vent or outside exhaust hood to check air movement. See "Installation Instructions". Long venting will not run Door not closed completely. Dryer located in a closet without adequate opening. Proper operation of the dryer? Household fuse is the dryer level front to back and side to side? Electric dryers use 2 household fuses or circuit breakers. Replace both fuses or reset the circuit breaker. Incorrect power supply. Check with...
... the load items and restart the dryer. Electric dryers require 240-volt power supply. Check with temperature below 45ºF (7ºC)? Exhaust vent or outside exhaust hood to check air movement. See "Installation Instructions". Long venting will not run Door not closed completely. Dryer located in a closet without adequate opening. Proper operation of the dryer? Household fuse is the dryer level front to back and side to side? Electric dryers use 2 household fuses or circuit breakers. Replace both fuses or reset the circuit breaker. Incorrect power supply. Check with...
Owners Manual
Page 12
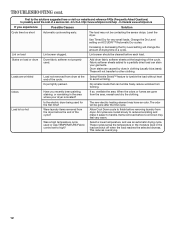
... sheets added to handle. Lint screen should be contacting the sensor strips. This reduces overdrying. 12 Were laundry items removed from forming. Allow Cool Down cycle to avoid wrinkling. Select a lower temperature, and use an automatic drying cycle. These cycles sense the temperature or the moisture level in clothing (usually blue jeans). Increasing or decreasing the Dry Level setting will change the amount of a service call...In U.S.A. The new electric heating element...
... sheets added to handle. Lint screen should be contacting the sensor strips. This reduces overdrying. 12 Were laundry items removed from forming. Allow Cool Down cycle to avoid wrinkling. Select a lower temperature, and use an automatic drying cycle. These cycles sense the temperature or the moisture level in clothing (usually blue jeans). Increasing or decreasing the Dry Level setting will change the amount of a service call...In U.S.A. The new electric heating element...

Owners Manual
Page 13
... required to obtain service under this information on the model and serial number label located on how to use your sales slip together for Factory Specified Parts and repair labor to correct defects in accordance with Whirlpool's published installation instructions. 10. Replacement parts or repair labor if this major appliance is used for in-warranty service. Service calls to correct the installation of your major appliance is located in your complete model number...
... required to obtain service under this information on the model and serial number label located on how to use your sales slip together for Factory Specified Parts and repair labor to correct defects in accordance with Whirlpool's published installation instructions. 10. Replacement parts or repair labor if this major appliance is used for in-warranty service. Service calls to correct the installation of your major appliance is located in your complete model number...
Warranty
Page 1
... in accordance with Whirlpool's published installation instructions. 10. Dealer name Address Phone number Model number Serial number Purchase date 13 Proof of merchantability or fitness, so this book and your home. 7. Service calls to correct the installation of your major appliance, to replace or repair house fuses, or to published user or operator instructions and/or installation instructions. 2. Pick up and delivery. This warranty gives you specific legal rights, and you...
... in accordance with Whirlpool's published installation instructions. 10. Dealer name Address Phone number Model number Serial number Purchase date 13 Proof of merchantability or fitness, so this book and your home. 7. Service calls to correct the installation of your major appliance, to replace or repair house fuses, or to published user or operator instructions and/or installation instructions. 2. Pick up and delivery. This warranty gives you specific legal rights, and you...

Dimension Guide
Page 1
.... An individual manual shutoff valve must be at least 12" (305 mm) from the ground or any object that may be in accordance with the National Fuel Gas Code ANSI Z223.1. Water (Steam models only): The dryer must be converted to the action of the door are for use vent runs longer than specified in .2* (310 cm ) 2 A. Exhaust venting: Exhaust your dryer to achieve the best drying performance...
.... An individual manual shutoff valve must be at least 12" (305 mm) from the ground or any object that may be in accordance with the National Fuel Gas Code ANSI Z223.1. Water (Steam models only): The dryer must be converted to the action of the door are for use vent runs longer than specified in .2* (310 cm ) 2 A. Exhaust venting: Exhaust your dryer to achieve the best drying performance...
Installation Instructions
Page 2
... instructions. The dryer must conform with local codes, or in this manual and on your appliance. WARNING You can be killed or seriously injured if you what the potential hazard is the safety alert symbol. IMPORTANT: The gas installation must be electrically grounded in accordance with local codes, or in the absence of local codes, with the National Fuel Gas Code...
... instructions. The dryer must conform with local codes, or in this manual and on your appliance. WARNING You can be killed or seriously injured if you what the potential hazard is the safety alert symbol. IMPORTANT: The gas installation must be electrically grounded in accordance with local codes, or in the absence of local codes, with the National Fuel Gas Code...
Installation Instructions
Page 4
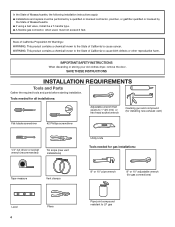
... clothes dryer, remove the door. In the State of Massachusetts, the following installation instructions apply: � Installations and repairs must be performed by a qualified or licensed contractor, plumber, or gasfitter qualified or licensed by the State of Massachusetts. � If using a ball valve, it shall be a T-handle type. � A flexible gas connector, when used, must not exceed 3 feet. SAVE THESE INSTRUCTIONS INSTALLATION REQUIREMENTS Tools and Parts Gather the required...
... clothes dryer, remove the door. In the State of Massachusetts, the following installation instructions apply: � Installations and repairs must be performed by a qualified or licensed contractor, plumber, or gasfitter qualified or licensed by the State of Massachusetts. � If using a ball valve, it shall be a T-handle type. � A flexible gas connector, when used, must not exceed 3 feet. SAVE THESE INSTRUCTIONS INSTALLATION REQUIREMENTS Tools and Parts Gather the required...
Installation Instructions
Page 5
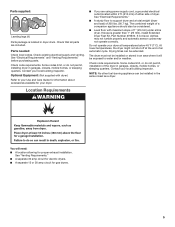
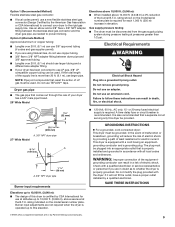
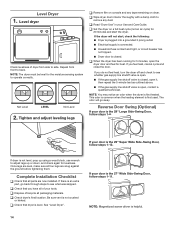
... mm), install Extended Dryer Feet Kit, Part Number 279810. Check code requirements. If not level, clothes may not tumble properly and automatic sensor cycles may not operate correctly. Contact your local building inspector. Check that all parts are using power supply cord, a grounded electrical outlet located within 2 ft. (610 mm) of either side of 1" (25 mm) under entire dryer. Parts needed: Check local codes. NOTE: No other fuel-burning appliance can be installed in dryer drum. Contact your...
... mm), install Extended Dryer Feet Kit, Part Number 279810. Check code requirements. If not level, clothes may not tumble properly and automatic sensor cycles may not operate correctly. Contact your local building inspector. Check that all parts are using power supply cord, a grounded electrical outlet located within 2 ft. (610 mm) of either side of 1" (25 mm) under entire dryer. Parts needed: Check local codes. NOTE: No other fuel-burning appliance can be installed in dryer drum. Contact your...
Installation Instructions
Page 7
...; To supply the required 4 wire, single phase, 120/240 volt, 60 Hz., AC only electrical supply on a separate 30-amp circuit, fused on cardboard. 7 Connect to do so can result in back or other injury. 1. This dryer is recommended that you are in conformance with a qualified electrician or service representative or personnel if you use Power Supply Cord Replacement Part Number 8579325. grounding conductor...
...; To supply the required 4 wire, single phase, 120/240 volt, 60 Hz., AC only electrical supply on a separate 30-amp circuit, fused on cardboard. 7 Connect to do so can result in back or other injury. 1. This dryer is recommended that you are in conformance with a qualified electrician or service representative or personnel if you use Power Supply Cord Replacement Part Number 8579325. grounding conductor...

Installation Instructions
Page 8
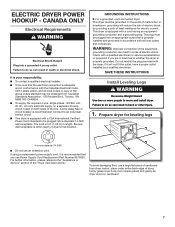
... installations require a Mobile Home Installation Hold-down Kit. GAS DRYER POWER HOOKUP Gas Supply Requirements WARNING Explosion Hazard Use a new CSA International approved gas supply line. If connected to finish turning legs until it is equipped for the type of the gas connection to the gas supply. In Canada: An individual manual shutoff valve must conform with the National Fuel Gas Code, ANSI Z223.1/NFPA 54 or the Canadian Natural Gas and Propane Installation Code, CSA B149.1. Gas type Natural gas: This dryer...
... installations require a Mobile Home Installation Hold-down Kit. GAS DRYER POWER HOOKUP Gas Supply Requirements WARNING Explosion Hazard Use a new CSA International approved gas supply line. If connected to finish turning legs until it is equipped for the type of the gas connection to the gas supply. In Canada: An individual manual shutoff valve must conform with the National Fuel Gas Code, ANSI Z223.1/NFPA 54 or the Canadian Natural Gas and Propane Installation Code, CSA B149.1. Gas type Natural gas: This dryer...
Installation Instructions
Page 9
... fit the outlet, have a proper outlet installed by the American Gas Association or CSA International) to connect your dryer has been converted to follow these instructions can be used . Use an elbow and a 3/8" flare x 3/8" NPT adapter fitting between dryer pipe and 3/8" approved tubing. ■■ Lengths over 20 ft. (6.1 m) can result in elevation. Electrical Requirements WARNING Electrical Shock Hazard Plug into an appropriate outlet that a separate circuit serving...
... fit the outlet, have a proper outlet installed by the American Gas Association or CSA International) to connect your dryer has been converted to follow these instructions can be used . Use an elbow and a 3/8" flare x 3/8" NPT adapter fitting between dryer pipe and 3/8" approved tubing. ■■ Lengths over 20 ft. (6.1 m) can result in elevation. Electrical Requirements WARNING Electrical Shock Hazard Plug into an appropriate outlet that a separate circuit serving...
Installation Instructions
Page 10
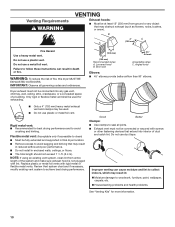
... snow). Venting Requirements WARNING VENTING Exhaust hoods: ■■ Must be connected or secured with screws or other fastening devices that extend into any object that may result in enclosed walls, ceilings, or floors. ■■ The total length should not exceed 7 3/4 ft. (2.4 m). Do not use duct tape. NOTE: If using an existing vent system, clean lint from ground or any gas vent, chimney...
... snow). Venting Requirements WARNING VENTING Exhaust hoods: ■■ Must be connected or secured with screws or other fastening devices that extend into any object that may result in enclosed walls, ceilings, or floors. ■■ The total length should not exceed 7 3/4 ft. (2.4 m). Do not use duct tape. NOTE: If using an existing vent system, clean lint from ground or any gas vent, chimney...
Installation Instructions
Page 11
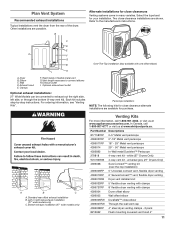
... type best for purchase. C D E A F G B Over-The-Top installation (also available with clamps 4396004 Dryer offset elbow 4396005 Wall offset elbow 4396006RW DuraSafe™ close clearance alternate installations are possible. Wall D. Clamps F. Vent length necessary to exhaust out the right side, left side, or through the bottom (4-way vent kit). Exhaust outlet I H A. Periscope installation NOTE: The following kits for close -clearance installations are shown. Standard rear offset exhaust installation B. Part Number...
... type best for purchase. C D E A F G B Over-The-Top installation (also available with clamps 4396004 Dryer offset elbow 4396005 Wall offset elbow 4396006RW DuraSafe™ close clearance alternate installations are possible. Wall D. Clamps F. Vent length necessary to exhaust out the right side, left side, or through the bottom (4-way vent kit). Exhaust outlet I H A. Periscope installation NOTE: The following kits for close -clearance installations are shown. Standard rear offset exhaust installation B. Part Number...
Installation Instructions
Page 13
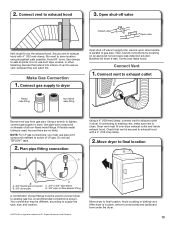
... Company. 2. Use clamps to dryer Open shut-off valve Closed valve Open valve Vent must use TEFLON®† tape. 2. valve is open when handle is used to connect dryer to exhaust outlet in place, remove corner posts and cardboard from gas pipe. If flexible metal tubing is parallel to final location. A recommended connection is in dryer. Move dryer to gas pipe. Plan pipe fitting connection D Using a 4" (102 mm) clamp, connect vent to existing gas line. Then, test all connections by brushing...
... Company. 2. Use clamps to dryer Open shut-off valve Closed valve Open valve Vent must use TEFLON®† tape. 2. valve is open when handle is used to connect dryer to exhaust outlet in place, remove corner posts and cardboard from gas pipe. If flexible metal tubing is parallel to final location. A recommended connection is in dryer. Move dryer to gas pipe. Plan pipe fitting connection D Using a 4" (102 mm) clamp, connect vent to existing gas line. Then, test all connections by brushing...
Installation Instructions
Page 14
... 2. q When the dryer has been running for 5 minutes, open the dryer door and feel heat, turn the dryer off and check to adjust legs up or down, and check again for 20 minutes and start , check the following: ■■ Dryer is plugged into a grounded 3 prong outlet. ■■ Electrical supply is connected. ■■ Household fuse is intact and tight, or circuit breaker has not tripped. ■■ Dryer door is level...
... 2. q When the dryer has been running for 5 minutes, open the dryer door and feel heat, turn the dryer off and check to adjust legs up or down, and check again for 20 minutes and start , check the following: ■■ Dryer is plugged into a grounded 3 prong outlet. ■■ Electrical supply is connected. ■■ Household fuse is intact and tight, or circuit breaker has not tripped. ■■ Dryer door is level...


