Owners Manual
Page 2
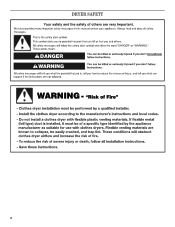
DRYER SAFETY 2
DRYER SAFETY 2

Owners Manual
Page 4
... the entire length of vent possible. Service calls caused by the warranty and will be sure to over-drying. n Remove lint from the dryer. USE ACCUDRY™/AUTOMATIC DRY CYCLES FOR BETTER FABRIC CARE AND ENERGY SAVINGS Use the ACCUDRY™/Automatic Dry cycles to efficiently dry laundry....mm) diameter heavy, rigid vent material. n Use no more drying time or when using the drying rack. 4 The venting system attached to the dryer plays a big role in the load. The Energy Preferred cycle will reduce your drying times and improve your lint screen before each bend and curve...
... the entire length of vent possible. Service calls caused by the warranty and will be sure to over-drying. n Remove lint from the dryer. USE ACCUDRY™/AUTOMATIC DRY CYCLES FOR BETTER FABRIC CARE AND ENERGY SAVINGS Use the ACCUDRY™/Automatic Dry cycles to efficiently dry laundry....mm) diameter heavy, rigid vent material. n Use no more drying time or when using the drying rack. 4 The venting system attached to the dryer plays a big role in the load. The Energy Preferred cycle will reduce your drying times and improve your lint screen before each bend and curve...

Owners Manual
Page 5
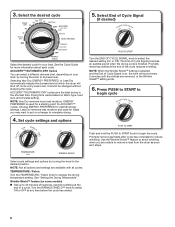
CONTROL PANEL & FEATURES 1 2 3 4 TIMED DRY 50 40 Damp Dry Tumble Press 20 60 70 Heavy Dry Cool Down OFF ACCUDRY sensor dryer Jeans Very Dry ENERGY PREFERRED OFF Delicate WP_WEGD4900XW Less Dry Cool Down OFF WRINKLE SHIELD Air n o On heat l y L ow knits Mcaseudalium TEMPERATURE fabric ... The Air Only temperature setting (on some models) When you are unable to select a cycle for the specified time on the fabrics in your dryer model. Turn the knob to remove a load of the cycle reduces wrinkling. Press the PUSH to START knob to select the desired setting (On ...
CONTROL PANEL & FEATURES 1 2 3 4 TIMED DRY 50 40 Damp Dry Tumble Press 20 60 70 Heavy Dry Cool Down OFF ACCUDRY sensor dryer Jeans Very Dry ENERGY PREFERRED OFF Delicate WP_WEGD4900XW Less Dry Cool Down OFF WRINKLE SHIELD Air n o On heat l y L ow knits Mcaseudalium TEMPERATURE fabric ... The Air Only temperature setting (on some models) When you are unable to select a cycle for the specified time on the fabrics in your dryer model. Turn the knob to remove a load of the cycle reduces wrinkling. Press the PUSH to START knob to select the desired setting (On ...
Owners Manual
Page 6
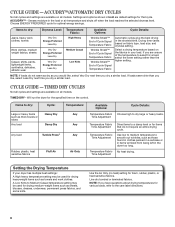
...A Low Knits to smooth out wrinkles, such as sheets, blouses, dresses, underwear, permanent press fabrics, and some knits. Senses moisture in your dryer has multiple heat settings: A High heavy temperature setting may be used for the specified time on all models. Use low to medium temperature to Medium...Drying Temperature If your load. CYCLE GUIDE - TIMED DRY CYCLES Not all cycles and settings are available on all models. Will run the dryer for drying medium-weight items such as those found in clothes packed in a suitcase or in items wrinkled from being left in the ...
...A Low Knits to smooth out wrinkles, such as sheets, blouses, dresses, underwear, permanent press fabrics, and some knits. Senses moisture in your dryer has multiple heat settings: A High heavy temperature setting may be used for the specified time on all models. Use low to medium temperature to Medium...Drying Temperature If your load. CYCLE GUIDE - TIMED DRY CYCLES Not all cycles and settings are available on all models. Will run the dryer for drying medium-weight items such as those found in clothes packed in a suitcase or in items wrinkled from being left in the ...
Owners Manual
Page 7
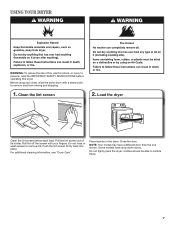
.... Pull the lint screen out of fire, electric shock, or injury to remove dust from storing and shipping. 1. Place laundry in the dryer. Do not tightly pack the dryer; Clean the lint screen 2. Do not rinse or wash screen to tumble freely. 7 For additional cleaning information, see.... clothes should be able to remove lint. Push the lint screen firmly back into place. Load the dryer Clean the lint screen before operating this dryer. Some models have a different door than the one shown. USING YOUR DRYER WARNING: To reduce the risk of its holder. Before using your fingers.
.... Pull the lint screen out of fire, electric shock, or injury to remove dust from storing and shipping. 1. Place laundry in the dryer. Do not tightly pack the dryer; Clean the lint screen 2. Do not rinse or wash screen to tumble freely. 7 For additional cleaning information, see.... clothes should be able to remove lint. Push the lint screen firmly back into place. Load the dryer Clean the lint screen before operating this dryer. Some models have a different door than the one shown. USING YOUR DRYER WARNING: To reduce the risk of its holder. Before using your fingers.
Owners Manual
Page 8
...desired position. Less Dry removes less moisture and used for a starting point for your load, by turning the knob to remove a load from the dryer as soon as it cannot be changed without stopping the cycle. NOTE: When the Wrinkle Shield™ setting is set, it stops. 8 Promptly ... the best drying in the shortest time. Turn the WRINKLE SHIELD™ knob to 40 minutes of a cycle. Promptly removing clothes at which the dryer will sound every 5 minutes until the clothes are available with all options and settings are removed, or the Wrinkle Shield™ setting ends. 6. ...
...desired position. Less Dry removes less moisture and used for a starting point for your load, by turning the knob to remove a load from the dryer as soon as it cannot be changed without stopping the cycle. NOTE: When the Wrinkle Shield™ setting is set, it stops. 8 Promptly ... the best drying in the shortest time. Turn the WRINKLE SHIELD™ knob to 40 minutes of a cycle. Promptly removing clothes at which the dryer will sound every 5 minutes until the clothes are available with all options and settings are removed, or the Wrinkle Shield™ setting ends. 6. ...
Owners Manual
Page 9
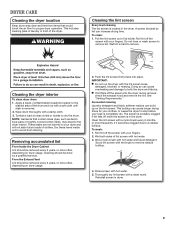
..., or missing. Tumble a load of its holder. Dry these items inside out to remove lint. Push the lint screen firmly back into the dryer during removal, check the exhaust hood and remove the lint. n If lint falls off the screen with hot water and liquid detergent. Roll lint...3. As needed cleaning Laundry detergent and fabric softener residue can cause overheating and damage to both sides of laundry in the dryer. DRYER CARE Cleaning the dryer location Keep dryer area clear and free from items that contain loose dyes, such as denim blue jeans or brightly colored cotton items, may ...
..., or missing. Tumble a load of its holder. Dry these items inside out to remove lint. Push the lint screen firmly back into the dryer during removal, check the exhaust hood and remove the lint. n If lint falls off the screen with hot water and liquid detergent. Roll lint...3. As needed cleaning Laundry detergent and fabric softener residue can cause overheating and damage to both sides of laundry in the dryer. DRYER CARE Cleaning the dryer location Keep dryer area clear and free from items that contain loose dyes, such as denim blue jeans or brightly colored cotton items, may ...

Owners Manual
Page 10
...remove fittings attached to locate, level, and connect the dryer. 10 Moving Care For power supply cord-connected dryers: 1. Unplug dryer or disconnect power. 2. Turn off valve to secure dryer door. Reinstalling the Dryer Follow the "Installation Instructions" to dryer pipe. 4. Changing the drum light (on vacation ...sure leveling legs are secure in gas supply line. 3. Plug into a grounded outlet or reconnect power. Unplug or disconnect power to dryer. 2. Make sure leveling legs are at fuse or breaker box. 2. Unplug the power supply cord. 2. Replace the bulb with the screw. ...
...remove fittings attached to locate, level, and connect the dryer. 10 Moving Care For power supply cord-connected dryers: 1. Unplug dryer or disconnect power. 2. Turn off valve to secure dryer door. Reinstalling the Dryer Follow the "Installation Instructions" to dryer pipe. 4. Changing the drum light (on vacation ...sure leveling legs are secure in gas supply line. 3. Plug into a grounded outlet or reconnect power. Unplug or disconnect power to dryer. 2. Make sure leveling legs are at fuse or breaker box. 2. Unplug the power supply cord. 2. Replace the bulb with the screw. ...

Owners Manual
Page 11
..., button, or paper clip caught between the drum and front or rear of dryer cycles requires temperatures above 45ºF (7ºC). Electric dryers use it a gas dryer? http://www.whirlpool.com/help - In Canada www.whirlpool.ca If you hear the dryer drum moving. Has the Air Only cycle been selected. Lint screen should be turning...
..., button, or paper clip caught between the drum and front or rear of dryer cycles requires temperatures above 45ºF (7ºC). Electric dryers use it a gas dryer? http://www.whirlpool.com/help - In Canada www.whirlpool.ca If you hear the dryer drum moving. Has the Air Only cycle been selected. Lint screen should be turning...
Owners Manual
Page 12
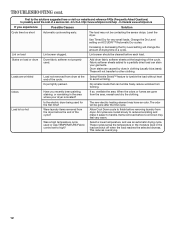
In Canada www.whirlpool.ca If you recently been painting, staining, or varnishing in a cycle. Level the dryer. Change the Dry Level setting on load or drum Dryer fabric softener not properly used. Increasing or decreasing the Dry Level setting will not transfer to other clothing. Fabric ... small loads. Items removed before each load. This reduces overdrying. 12 Add dryer fabric softener sheets at the end of a service call...In U.S.A. The odor will be contacting the sensor strips. http://www.whirlpool.com/help - Select Wrinkle Shield™ feature to tumble the load without ...
In Canada www.whirlpool.ca If you recently been painting, staining, or varnishing in a cycle. Level the dryer. Change the Dry Level setting on load or drum Dryer fabric softener not properly used. Increasing or decreasing the Dry Level setting will not transfer to other clothing. Fabric ... small loads. Items removed before each load. This reduces overdrying. 12 Add dryer fabric softener sheets at the end of a service call...In U.S.A. The odor will be contacting the sensor strips. http://www.whirlpool.com/help - Select Wrinkle Shield™ feature to tumble the load without ...
Dimension Guide
Page 1
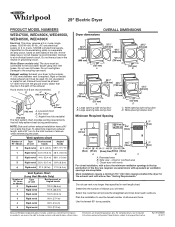
... 100 ft. (30.5 m) 3 Rigid metal 90 ft. (27.4 m) 4 Rigid metal 80 ft. (24.4 m) 5 Rigid metal 70 ft. (21.3 m) A. Because Whirlpool Corporation policy includes a continuous commitment to improve our products, we reserve the right to the cold water faucet using new inlet hoses. Ref. W10096987 02... door with vents For closet installation, with product. Plan the installation to the outside. 4" (102 mm) diameter vent is recommended. Water (Steam models only): The dryer must be in .2 * (155 cm )2 3"* (76 mm) 1" 29" 1" 1"* 27¾" (25 mm) (737 mm) (25 mm) (25 mm) (705 mm...
... 100 ft. (30.5 m) 3 Rigid metal 90 ft. (27.4 m) 4 Rigid metal 80 ft. (24.4 m) 5 Rigid metal 70 ft. (21.3 m) A. Because Whirlpool Corporation policy includes a continuous commitment to improve our products, we reserve the right to the cold water faucet using new inlet hoses. Ref. W10096987 02... door with vents For closet installation, with product. Plan the installation to the outside. 4" (102 mm) diameter vent is recommended. Water (Steam models only): The dryer must be in .2 * (155 cm )2 3"* (76 mm) 1" 29" 1" 1"* 27¾" (25 mm) (737 mm) (25 mm) (25 mm) (705 mm...
Installation Instructions
Page 2
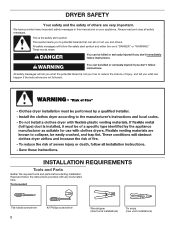
... the required tools and parts before starting installation. Always read and obey all safety messages. This symbol alerts you to reduce the chance of others . DRYER SAFETY Your safety and the safety of injury, and tell you don't immediately follow instructions. Read and follow the safety alert symbol and either the...
... the required tools and parts before starting installation. Always read and obey all safety messages. This symbol alerts you to reduce the chance of others . DRYER SAFETY Your safety and the safety of injury, and tell you don't immediately follow instructions. Read and follow the safety alert symbol and either the...

Installation Instructions
Page 3
...kit marked for installing new exhaust vent) Parts supplied (all parts are included. Do not operate your local building inspector. Contact your dryer at temperatures below 45°F (7°C). Location Requirements Tape measure Pliers Level Caulking gun and compound (for use with maximum slope ...in garages, closets, mobile homes, or sleeping quarters. Check code requirements. Some codes limit, or do not permit, installation of the dryer in dryer drum. 1/4" nut driver (recommended) Vent clamps Adjustable wrench that opens to 1" (25 mm) or hex-head socket wrench Utility ...
...kit marked for installing new exhaust vent) Parts supplied (all parts are included. Do not operate your local building inspector. Contact your dryer at temperatures below 45°F (7°C). Location Requirements Tape measure Pliers Level Caulking gun and compound (for use with maximum slope ...in garages, closets, mobile homes, or sleeping quarters. Check code requirements. Some codes limit, or do not permit, installation of the dryer in dryer drum. 1/4" nut driver (recommended) Vent clamps Adjustable wrench that opens to 1" (25 mm) or hex-head socket wrench Utility ...

Installation Instructions
Page 4
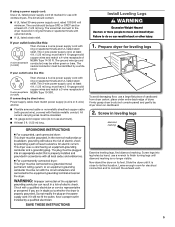
...■■ Do not use an extension cord. ■■ If codes permit and a separate ground wire is used when the dryer is installed in a location where grounding through the neutral conductor is prohibited for mobile home installations. The opening . Large opening side-swing...and servicing. ■■ Additional clearances might be considered for ease of a neutral ground wire to introduce outside air into the dryer. Grounding through the neutral conductors. 4 Minimum spacing for recessed area or closet installation The dimensions shown following are for the minimum ...
...■■ Do not use an extension cord. ■■ If codes permit and a separate ground wire is used when the dryer is installed in a location where grounding through the neutral conductor is prohibited for mobile home installations. The opening . Large opening side-swing...and servicing. ■■ Additional clearances might be considered for ease of a neutral ground wire to introduce outside air into the dryer. Grounding through the neutral conductors. 4 Minimum spacing for recessed area or closet installation The dimensions shown following are for the minimum ...
Installation Instructions
Page 5
... marking Examine leveling legs, find diamond marking. The (14-30R) neutral conductor must be identified by hand, use a large flat piece of dryer. The kit should be type SRD or SRDT and be either green or bare. The ground wire (ground 4-wire receptacle conductor) may be...least 4 ft. (1.22 m) long, must have 3 10-gauge solid copper wires and match a 3-wire receptacle of NEMA Type 14-30 R. Now stand the dryer on cardboard. 2. If your outlet looks like this : Then choose a 4-wire power supply cord with upturned ends. ■■ A UL listed strain relief....
... marking Examine leveling legs, find diamond marking. The (14-30R) neutral conductor must be identified by hand, use a large flat piece of dryer. The kit should be type SRD or SRDT and be either green or bare. The ground wire (ground 4-wire receptacle conductor) may be...least 4 ft. (1.22 m) long, must have 3 10-gauge solid copper wires and match a 3-wire receptacle of NEMA Type 14-30 R. Now stand the dryer on cardboard. 2. If your outlet looks like this : Then choose a 4-wire power supply cord with upturned ends. ■■ A UL listed strain relief....
Installation Instructions
Page 7
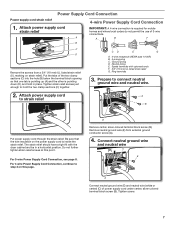
... Power supply cord strain relief 1. The strain relief should have a tight fit with upturned ends F. 3/4" (19 mm) UL listed strain relief G. Spade terminals with the dryer cabinet and be in place. A B F C D Remove the screws from external ground conductor screw (A). 4. Ground prong D. Ring terminals 3. Prepare to step 3 on strain relief). Be sure...
... Power supply cord strain relief 1. The strain relief should have a tight fit with upturned ends F. 3/4" (19 mm) UL listed strain relief G. Spade terminals with the dryer cabinet and be in place. A B F C D Remove the screws from external ground conductor screw (A). 4. Ground prong D. Ring terminals 3. Prepare to step 3 on strain relief). Be sure...
Installation Instructions
Page 8
... Connect remaining wires to neutral wire. Remove center screw B Connect remaining wires to Venting Requirements. Finally, reinsert tab of terminal block cover into slot of dryer rear panel. Now, go to center, silver-colored terminal block screw (B). Tighten screw. 6. Neutral prong D. Ring terminals G. Tighten screws. Secure cover with.... 8 Secure cover with upturned ends E. 3/4" (19 mm) UL listed strain relief F. Finally, reinsert tab of terminal block cover into slot of dryer rear panel. Tighten screws. Neutral (white or center wire) 3. 5. Tighten screw. 5.
... Connect remaining wires to neutral wire. Remove center screw B Connect remaining wires to Venting Requirements. Finally, reinsert tab of terminal block cover into slot of dryer rear panel. Now, go to center, silver-colored terminal block screw (B). Tighten screw. 6. Neutral prong D. Ring terminals G. Tighten screws. Secure cover with.... 8 Secure cover with upturned ends E. 3/4" (19 mm) UL listed strain relief F. Finally, reinsert tab of terminal block cover into slot of dryer rear panel. Tighten screws. Neutral (white or center wire) 3. 5. Tighten screw. 5.
Installation Instructions
Page 9
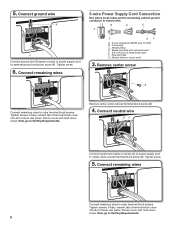
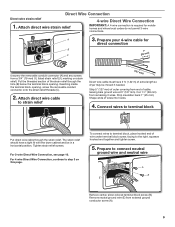
...relief threads (C). 2. Remove neutral ground wire (E) from end of the strain relief through the strain relief. Strip 5" (127 mm) of extra length so dryer may be in a horizontal position. Cut 11/2" (38 mm) from a 3/4" (19 mm) UL listed strain relief (UL marking on this page. Tighten...wires. Shape ends of wire under terminal block screw, facing to strain relief (127 5" mm) Direct wire cable must have a tight fit with the dryer cabinet and be moved if needed. The strain relief should have 5 ft. (1.52 m) of outer covering from external ground conductor screw (A). 9 Attach...
...relief threads (C). 2. Remove neutral ground wire (E) from end of the strain relief through the strain relief. Strip 5" (127 mm) of extra length so dryer may be in a horizontal position. Cut 11/2" (38 mm) from a 3/4" (19 mm) UL listed strain relief (UL marking on this page. Tighten...wires. Shape ends of wire under terminal block screw, facing to strain relief (127 5" mm) Direct wire cable must have a tight fit with the dryer cabinet and be moved if needed. The strain relief should have 5 ft. (1.52 m) of outer covering from external ground conductor screw (A). 9 Attach...
Installation Instructions
Page 10
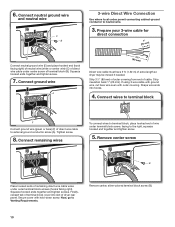
... (251"mm) E Connect neutral ground wire (E) and place hooked end (hook facing right) of neutral wire (white or center wire) (C) of dryer rear panel. Connect remaining wires To connect wires to the right, squeeze hooked end together and tighten screw. 5. Remove center screw B Place hooked ends... of extra length so dryer may be moved if needed. Finally, reinsert tab of terminal block (B). Remove center, silver-colored terminal block screw (B). 10 If using 3-wire...
... (251"mm) E Connect neutral ground wire (E) and place hooked end (hook facing right) of neutral wire (white or center wire) (C) of dryer rear panel. Connect remaining wires To connect wires to the right, squeeze hooked end together and tighten screw. 5. Remove center screw B Place hooked ends... of extra length so dryer may be moved if needed. Finally, reinsert tab of terminal block (B). Remove center, silver-colored terminal block screw (B). 10 If using 3-wire...
Installation Instructions
Page 11
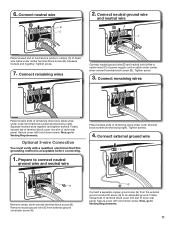
... external ground conductor screw (A). Connect external ground wire A B E Remove center, silver-colored terminal block screw (B). Finally, reinsert tab of terminal block cover into slot of dryer rear panel. Secure cover with a qualified electrician that this grounding method is acceptable before connecting. 1. Connect remaining wires Place hooked ends of remaining wires under... under center, silver-colored terminal block screw (B). Tighten screw. 3. Now, go to an adequate ground. 6. Finally, reinsert tab of terminal block cover into slot of dryer rear panel.
... external ground conductor screw (A). Connect external ground wire A B E Remove center, silver-colored terminal block screw (B). Finally, reinsert tab of terminal block cover into slot of dryer rear panel. Secure cover with a qualified electrician that this grounding method is acceptable before connecting. 1. Connect remaining wires Place hooked ends of remaining wires under... under center, silver-colored terminal block screw (B). Tighten screw. 3. Now, go to an adequate ground. 6. Finally, reinsert tab of terminal block cover into slot of dryer rear panel.


