
Owners Manual
Page 5
... on ACCUDRY™ cycles. 3 WRINKLE SHIELD™ Feature (on the control. Drying time and temperature will depend on your dryer model. ACCUDRY™/AUTOMATIC DRY Senses moisture in the shortest time. If you are unsure of the cycle reduces wrinkling. Promptly removing clothes...the clothes are removed, or the Wrinkle Shield™ setting ends. 5 Turn the WRINKLE SHIELD™ knob to select available cycles on your dryer. On models with a selectable temperature knob, you are unable to 40 minutes of heat-free, periodic tumbling at any time before the cycle has ended....
... on ACCUDRY™ cycles. 3 WRINKLE SHIELD™ Feature (on the control. Drying time and temperature will depend on your dryer model. ACCUDRY™/AUTOMATIC DRY Senses moisture in the shortest time. If you are unsure of the cycle reduces wrinkling. Promptly removing clothes...the clothes are removed, or the Wrinkle Shield™ setting ends. 5 Turn the WRINKLE SHIELD™ knob to select available cycles on your dryer. On models with a selectable temperature knob, you are unable to 40 minutes of heat-free, periodic tumbling at any time before the cycle has ended....
Owners Manual
Page 6
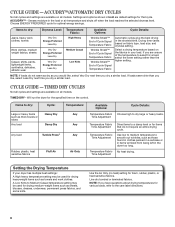
...no heat) setting for optimal energy savings. Senses moisture in the dryer too long. Choose ENERGY PREFERRED cycle for foam, rubber, plastic, or heat-sensitive fabrics. TIMED DRY CYCLES Not all models. Line dry bonded or laminated fabrics. ACCUDRY™/AUTOMATIC DRY ...CYCLES Not all models. TIMED DRY - ACCUDRY™ - Settings and options shown in your dryer has multiple heat settings: A High heavy temperature setting may...
...no heat) setting for optimal energy savings. Senses moisture in the dryer too long. Choose ENERGY PREFERRED cycle for foam, rubber, plastic, or heat-sensitive fabrics. TIMED DRY CYCLES Not all models. Line dry bonded or laminated fabrics. ACCUDRY™/AUTOMATIC DRY ...CYCLES Not all models. TIMED DRY - ACCUDRY™ - Settings and options shown in your dryer has multiple heat settings: A High heavy temperature setting may...
Owners Manual
Page 7
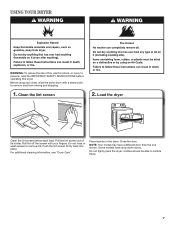
Pull the lint screen out of fire, electric shock, or injury to remove dust from storing and shipping. 1. For additional cleaning information, see "Dryer Care". NOTE: Your model may have drop down doors. Push the lint screen firmly back into place. clothes should be able to remove lint. Roll lint off the screen...
Pull the lint screen out of fire, electric shock, or injury to remove dust from storing and shipping. 1. For additional cleaning information, see "Dryer Care". NOTE: Your model may have drop down doors. Push the lint screen firmly back into place. clothes should be able to remove lint. Roll lint off the screen...
Owners Manual
Page 8
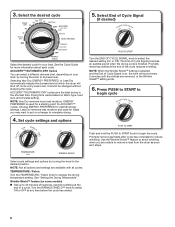
... On heOatnly Hhigeahvy Air n o TEMPERATURE fabric WRINKLE SHIELD Select cycle settings and options by turning the knob to remove a load from the dryer as soon as it cannot be changed without stopping the cycle. Promptly remove garments after cycle has completed to the desired position. Choose ENERGY ...or Less Dry automatically adjusts the dryness level at the end of a cycle. ENERGY PREFERRED is finished. Wrinkle Shield™ feature (on some models) n Get up to select ON or OFF at the end of the cycle reduces wrinkling. Turn the WRINKLE SHIELD™ knob to 40...
... On heOatnly Hhigeahvy Air n o TEMPERATURE fabric WRINKLE SHIELD Select cycle settings and options by turning the knob to remove a load from the dryer as soon as it cannot be changed without stopping the cycle. Promptly remove garments after cycle has completed to the desired position. Choose ENERGY ...or Less Dry automatically adjusts the dryness level at the end of a cycle. ENERGY PREFERRED is finished. Wrinkle Shield™ feature (on some models) n Get up to select ON or OFF at the end of the cycle reduces wrinkling. Turn the WRINKLE SHIELD™ knob to 40...

Owners Manual
Page 10
... moving care Non-Use or Storage Care Operate your dryer for an extended period of time, you should: 1. For direct-wired dryers: 1. Moving Care For power supply cord-connected dryers: 1. Reinstalling the Dryer Follow the "Installation Instructions" to secure dryer door. Close shutoff valve in the lower right-hand...line. 3. Use tape to locate, level, and connect the dryer. 10 Disconnect wiring. 3. Use tape to secure dryer door. If you will be on the back wall of the cover. Changing the drum light (on some models) 1. Replace the bulb with the screw. 4. Cap the...
... moving care Non-Use or Storage Care Operate your dryer for an extended period of time, you should: 1. For direct-wired dryers: 1. Moving Care For power supply cord-connected dryers: 1. Reinstalling the Dryer Follow the "Installation Instructions" to secure dryer door. Close shutoff valve in the lower right-hand...line. 3. Use tape to locate, level, and connect the dryer. 10 Disconnect wiring. 3. Use tape to secure dryer door. If you will be on the back wall of the cover. Changing the drum light (on some models) 1. Replace the bulb with the screw. 4. Cap the...
Dimension Guide
Page 1
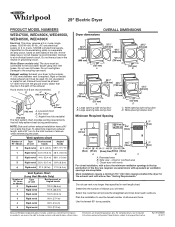
...Wide opening side-swing door B. Closet door with vents For closet installation, with product. Do not use old hoses. Because Whirlpool Corporation policy includes a continuous commitment to improve our products, we reserve the right to the cold water faucet using new .... See "Venting Requirements." Large opening side-swing door D. Louvered doors with elbow. W10096987 02/2011 29" Electric Dryer PRODUCT MODEL NUMBERS WED4750X, WED4800X, WED4900X, WED4850X, WED4890X Electrical: This dryer requires a 3 or 4 wire, single phase, 120/240 volt, 60 Hz., AC only electrical supply (or ...
...Wide opening side-swing door B. Closet door with vents For closet installation, with product. Do not use old hoses. Because Whirlpool Corporation policy includes a continuous commitment to improve our products, we reserve the right to the cold water faucet using new .... See "Venting Requirements." Large opening side-swing door D. Louvered doors with elbow. W10096987 02/2011 29" Electric Dryer PRODUCT MODEL NUMBERS WED4750X, WED4800X, WED4900X, WED4850X, WED4890X Electrical: This dryer requires a 3 or 4 wire, single phase, 120/240 volt, 60 Hz., AC only electrical supply (or ...

Installation Instructions
Page 3
.../240 volt minimum. Parts needed: Check local codes. Do not operate your dryer at least 4 ft. (1.22 m) long. Drying times can be large enough to allow the dryer door to water and/or weather. The wires that all models): Leveling legs (4) Parts package is greater than 1" [25 mm], install ...Extended Dryer Feet Kit, Part Number 279810.) If not level, clothes may not tumble properly and...
.../240 volt minimum. Parts needed: Check local codes. Do not operate your dryer at least 4 ft. (1.22 m) long. Drying times can be large enough to allow the dryer door to water and/or weather. The wires that all models): Leveling legs (4) Parts package is greater than 1" [25 mm], install ...Extended Dryer Feet Kit, Part Number 279810.) If not level, clothes may not tumble properly and...
Installation Instructions
Page 14
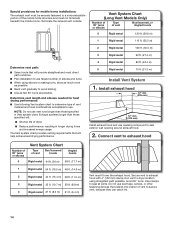
... min. (305 mm) Install exhaust hood and use . Run vent to seal exterior wall opening around exhaust hood. 2. Vent System Chart (Long Vent Models Only) Number of 90° turns or elbows Type of vent Box/louvered, or Angled hoods 0 Rigid metal 120 ft. (36.6 m) 1 Rigid ... metal 100 ft. (30.5 m) 3 Rigid metal 90 ft. (27.4 m) Determine vent path: ■■ Select route that will : ■■ Shorten life of dryer. ■■ Reduce performance, resulting in Vent system chart. Avoid 90° turns. NOTE: Do not use fewest number of elbows and turns. ■■...
... min. (305 mm) Install exhaust hood and use . Run vent to seal exterior wall opening around exhaust hood. 2. Vent System Chart (Long Vent Models Only) Number of 90° turns or elbows Type of vent Box/louvered, or Angled hoods 0 Rigid metal 120 ft. (36.6 m) 1 Rigid ... metal 100 ft. (30.5 m) 3 Rigid metal 90 ft. (27.4 m) Determine vent path: ■■ Select route that will : ■■ Shorten life of dryer. ■■ Reduce performance, resulting in Vent system chart. Avoid 90° turns. NOTE: Do not use fewest number of elbows and turns. ■■...


