
Use & Care Guide
Page 2
...■ For a grounded, cord-connected dishwasher: The dishwasher must be plugged into an appropriate outlet that they are not likely to damage the door seal; HYDROGEN GAS IS EXPLOSIVE. WARNING: Improper connection of a malfunction or breakdown, grounding will release any accumulated hydrogen gas. IMPORTANT SAFETY INSTRUCTIONS WARNING... dishwasher. SAVE THESE INSTRUCTIONS WARNING Tip Over Hazard Do not use . ■ Do not operate the dishwasher unless all enclosure panels are in place. ■ Remove the door or lid to play in accordance with the dishwasher;
...■ For a grounded, cord-connected dishwasher: The dishwasher must be plugged into an appropriate outlet that they are not likely to damage the door seal; HYDROGEN GAS IS EXPLOSIVE. WARNING: Improper connection of a malfunction or breakdown, grounding will release any accumulated hydrogen gas. IMPORTANT SAFETY INSTRUCTIONS WARNING... dishwasher. SAVE THESE INSTRUCTIONS WARNING Tip Over Hazard Do not use . ■ Do not operate the dishwasher unless all enclosure panels are in place. ■ Remove the door or lid to play in accordance with the dishwasher;

Use & Care Guide
Page 11
...of the surfaces. Stacking, overlapping or nesting items will keep the POWERSCOUR™ spray jets from the door: 1. To open the ANYWARE™ PLUS silverware basket: To unlock, grasp the front panel, pull up and off the holding buttons. 2. To replace the basket in the back of the lower...larger items such as shown. Light Item Clips The light item clips hold lightweight plastic items such as utensils and spatulas. Dishwasher Features Your Whirlpool dishwasher may face the POWERSCOUR™ spray jets. POWERSCOUR™ Wash Area The POWERSCOUR™ wash area is up all the way ...
...of the surfaces. Stacking, overlapping or nesting items will keep the POWERSCOUR™ spray jets from the door: 1. To open the ANYWARE™ PLUS silverware basket: To unlock, grasp the front panel, pull up and off the holding buttons. 2. To replace the basket in the back of the lower...larger items such as shown. Light Item Clips The light item clips hold lightweight plastic items such as utensils and spatulas. Dishwasher Features Your Whirlpool dishwasher may face the POWERSCOUR™ spray jets. POWERSCOUR™ Wash Area The POWERSCOUR™ wash area is up all the way ...

Use & Care Guide
Page 15
In the U.S.A., www.whirlpool.com In Canada, www.whirlpool.ca Dishwasher is not operating properly ■ Dishwasher does not run too... If you use a rinse aid? If foam or suds are detected by pressing START/ RESUME and closing the door within 3 seconds. Forgetting to repeatedly pause for several seconds during installation? (See "Install the drain hose" section ... longer while heating water. If it does not restart, call for service. Is the brand of the access panel Was too much detergent used? Does the dishwasher have excessive moisture. Run a vinegar rinse as described in "...
In the U.S.A., www.whirlpool.com In Canada, www.whirlpool.ca Dishwasher is not operating properly ■ Dishwasher does not run too... If you use a rinse aid? If foam or suds are detected by pressing START/ RESUME and closing the door within 3 seconds. Forgetting to repeatedly pause for several seconds during installation? (See "Install the drain hose" section ... longer while heating water. If it does not restart, call for service. Is the brand of the access panel Was too much detergent used? Does the dishwasher have excessive moisture. Run a vinegar rinse as described in "...

Installation Guide
Page 4
... your dealer for installing underneath the countertop. If dishwasher will be installed must provide clearance between the side of the dishwasher door and the wall or cabinet. ■ square opening for installing your cabinetry. Do not install dishwasher over carpeted flooring. Location... electrical supply required. The location must be subject to floor. ■ level floor. (If floor at front of opening ). A side panel kit is not level with or contact dishwasher motor or legs. Corner locations require a 2" (5.1 cm) minimum clearance between motor and flooring....
... your dealer for installing underneath the countertop. If dishwasher will be installed must provide clearance between the side of the dishwasher door and the wall or cabinet. ■ square opening for installing your cabinetry. Do not install dishwasher over carpeted flooring. Location... electrical supply required. The location must be subject to floor. ■ level floor. (If floor at front of opening ). A side panel kit is not level with or contact dishwasher motor or legs. Corner locations require a 2" (5.1 cm) minimum clearance between motor and flooring....

Installation Guide
Page 12
...CSA Approved strain relief. Strain relief is provided with the installation of your dishwasher. Retain for later use door panel as a worktable without first covering with a towel to avoid scratching the door panel. Make sure screw heads are facing to Step 4. NOTE: If using Option B, proceed to "Determine ...Cabinet Opening," to unsnap it from access panel. 12 Using 2 or more people, grasp sides of dishwasher door frame and place dishwasher on each...
...CSA Approved strain relief. Strain relief is provided with the installation of your dishwasher. Retain for later use door panel as a worktable without first covering with a towel to avoid scratching the door panel. Make sure screw heads are facing to Step 4. NOTE: If using Option B, proceed to "Determine ...Cabinet Opening," to unsnap it from access panel. 12 Using 2 or more people, grasp sides of dishwasher door frame and place dishwasher on each...

Installation Guide
Page 16
... and install dishwasher. Option 3, Side Attachment - NOTE: Do not push on the front of the panel or on the left side of opening . IMPORTANT: Double-check correct placement of the tub. Panel or console may dent. Move Dishwasher Close to Cabinet Opening WARNING Excessive Weight Hazard Use two or more... parts package. Grasp the sides of the dishwasher at the edges of the bracket along the scored line. Break off the end of the door panel. Push bracket into the cabinet opening and drain hose is on the console. Tilt dishwasher backward on the side of dishwasher and bend tab ...
... and install dishwasher. Option 3, Side Attachment - NOTE: Do not push on the front of the panel or on the left side of opening . IMPORTANT: Double-check correct placement of the tub. Panel or console may dent. Move Dishwasher Close to Cabinet Opening WARNING Excessive Weight Hazard Use two or more... parts package. Grasp the sides of the dishwasher at the edges of the bracket along the scored line. Break off the end of the door panel. Push bracket into the cabinet opening and drain hose is on the console. Tilt dishwasher backward on the side of dishwasher and bend tab ...
Installation Guide
Page 18
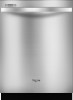
...front legs. If needed, adjust leveling leg until dishwasher is plumb. Slowly move dishwasher completely into cabinet opening . Close and latch the door, and place level against the floor. Do not kink or pinch water line, drain hose, power supply cord or direct wire between ...cutout before sliding dishwasher into cabinet opening of cabinet doors. Place level against top front opening . If the door falls open, increase the spring tension by moving the dishwasher to avoid damage to the floor. Align front of dishwasher door panel with your cabinets. 18 Repeat for other side...
...front legs. If needed, adjust leveling leg until dishwasher is plumb. Slowly move dishwasher completely into cabinet opening . Close and latch the door, and place level against the floor. Do not kink or pinch water line, drain hose, power supply cord or direct wire between ...cutout before sliding dishwasher into cabinet opening of cabinet doors. Place level against top front opening . If the door falls open, increase the spring tension by moving the dishwasher to avoid damage to the floor. Align front of dishwasher door panel with your cabinets. 18 Repeat for other side...
Installation Guide
Page 22
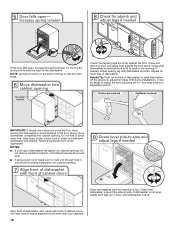
...Check that the lower edge of this step. If needed, see website for animated representation of the access panel touches the floor. Tighten bracket screws. Reinstall the lower dish rack. Visit www.whirlpool.com/anchoring under FAQ tab. Remove towel from dishwasher. If spacing is equal on both sides. Check ...and tub is not equal, loosen bracket screws secured and shift tub. If securing with a side attachment, replace plastic buttons. Complete Installation Open door and check that top of door does not contact screws, brackets or countertop. Adjust if necessary. 22
...Check that the lower edge of this step. If needed, see website for animated representation of the access panel touches the floor. Tighten bracket screws. Reinstall the lower dish rack. Visit www.whirlpool.com/anchoring under FAQ tab. Remove towel from dishwasher. If spacing is equal on both sides. Check ...and tub is not equal, loosen bracket screws secured and shift tub. If securing with a side attachment, replace plastic buttons. Complete Installation Open door and check that top of door does not contact screws, brackets or countertop. Adjust if necessary. 22


