

Use & Care Guide
Page 2
...on all hot water faucets and let the water flow from service or discarding it will release any accumulated hydrogen gas. The dishwasher is installed and grounded in a risk of the equipment- Doing so can result in accordance with all local codes and ordinances. In the event ...intended function. ■ Use only detergents or rinse agents recommended for two weeks or more. This will not fit the outlet, have a proper outlet installed by providing a path of cut-type injuries. ■ Do not wash plastic items unless they are marked "dishwasher safe" or the equivalent. and...
...on all hot water faucets and let the water flow from service or discarding it will release any accumulated hydrogen gas. The dishwasher is installed and grounded in a risk of the equipment- Doing so can result in accordance with all local codes and ordinances. In the event ...intended function. ■ Use only detergents or rinse agents recommended for two weeks or more. This will not fit the outlet, have a proper outlet installed by providing a path of cut-type injuries. ■ Do not wash plastic items unless they are marked "dishwasher safe" or the equivalent. and...

Use & Care Guide
Page 14
... use liquid dishwasher detergent on the affresh® product package completely before beginning the cleaning process. ■ Avoid handling the tablet without the filters properly installed. Place another tablet in the prewash tray or simply place 1 tablet in the bottom of the tub. 2. Storing the Dishwasher If you have no garbage...
... use liquid dishwasher detergent on the affresh® product package completely before beginning the cleaning process. ■ Avoid handling the tablet without the filters properly installed. Place another tablet in the prewash tray or simply place 1 tablet in the bottom of the tub. 2. Storing the Dishwasher If you have no garbage...

Use & Care Guide
Page 15
...with an optical sensor wash that may not fill with the countertop? Forgetting to repeatedly pause for several seconds during installation? (See "Install the drain hose" section in the Installation Instructions.) ■ Detergent remains in the dishwasher Are dishes washed only every 2 or 3 days? See cycle sections... not fully slide into the dishwasher Check to use an air-dry or energy-saving dry option? In the U.S.A., www.whirlpool.com In Canada, www.whirlpool.ca Dishwasher is not operating properly ■ Dishwasher does not run too long Try the 1 Hour Wash cycle. Suds can...
...with an optical sensor wash that may not fill with the countertop? Forgetting to repeatedly pause for several seconds during installation? (See "Install the drain hose" section in the Installation Instructions.) ■ Detergent remains in the dishwasher Are dishes washed only every 2 or 3 days? See cycle sections... not fully slide into the dishwasher Check to use an air-dry or energy-saving dry option? In the U.S.A., www.whirlpool.com In Canada, www.whirlpool.ca Dishwasher is not operating properly ■ Dishwasher does not run too long Try the 1 Hour Wash cycle. Suds can...

Use & Care Guide
Page 16
... object has entered the wash module (on some items with heavier soils, use a minimum amount of detergent but not less than every other month, the installation of effective detergent? It might be 20 to 120 psi (138 to the covered section of glassware. Follow with a Normal wash cycle with certain types...
... object has entered the wash module (on some items with heavier soils, use a minimum amount of detergent but not less than every other month, the installation of effective detergent? It might be 20 to 120 psi (138 to the covered section of glassware. Follow with a Normal wash cycle with certain types...

Use & Care Guide
Page 17
...9. The cost of repair or replacement under this major appliance is required to use or when it is installed in an inaccessible location or is covered by a Whirlpool designated service company. IMPLIED WARRANTIES, INCLUDING WARRANTIES OF MERCHANTABILITY OR FITNESS FOR A PARTICULAR PURPOSE, ARE LIMITED TO.... This warranty is contrary to schedule service, you would like to published user or operator instructions and/or installation instructions. 4. WHIRLPOOL SHALL NOT BE LIABLE FOR INCIDENTAL OR CONSEQUENTIAL DAMAGES. THIS WARRANTY GIVES YOU SPECIFIC LEGAL RIGHTS, AND YOU ...
...9. The cost of repair or replacement under this major appliance is required to use or when it is installed in an inaccessible location or is covered by a Whirlpool designated service company. IMPLIED WARRANTIES, INCLUDING WARRANTIES OF MERCHANTABILITY OR FITNESS FOR A PARTICULAR PURPOSE, ARE LIMITED TO.... This warranty is contrary to schedule service, you would like to published user or operator instructions and/or installation instructions. 4. WHIRLPOOL SHALL NOT BE LIABLE FOR INCIDENTAL OR CONSEQUENTIAL DAMAGES. THIS WARRANTY GIVES YOU SPECIFIC LEGAL RIGHTS, AND YOU ...

Installation Guide
Page 2
... Opening-Existing Utilities 7 Prepare Cabinet Opening-New Utilities 7 Prepare and Route Water Line 8 Install Drain Hose 9 Install Moisture Barrier (under a wood countertop 11 Prepare Dishwasher 11 INSTALLATION INSTRUCTIONS (CONT.) Make Power Supply Cord Connection 13 Determine Cabinet Opening 14 Choose Attachment Option ...19 Connect to : ■ Slowly open door. We have provided many important safety messages in Cabinet Opening 21 Complete Installation 22 Check Operation 23 If Dishwasher Does Not Operate 23 Additional Tips 23 DISHWASHER SAFETY Your safety and the safety of...
... Opening-Existing Utilities 7 Prepare Cabinet Opening-New Utilities 7 Prepare and Route Water Line 8 Install Drain Hose 9 Install Moisture Barrier (under a wood countertop 11 Prepare Dishwasher 11 INSTALLATION INSTRUCTIONS (CONT.) Make Power Supply Cord Connection 13 Determine Cabinet Opening 14 Choose Attachment Option ...19 Connect to : ■ Slowly open door. We have provided many important safety messages in Cabinet Opening 21 Complete Installation 22 Check Operation 23 If Dishwasher Does Not Operate 23 Additional Tips 23 DISHWASHER SAFETY Your safety and the safety of...

Installation Guide
Page 3
... literature package. Check existing electrical supply. Other useful items you may also need : Parts supplied: NOTE: Parts available for first-time installations Tools needed: Parts needed : Other parts you may need : *Must be the proper size to connect your household wiring to 16-gauge... wiring in the literature package. †®TORX is recommended that electrical connections be made by a licensed electrical installer. Additional parts supplied with any tools listed here. Read and follow the instructions provided with certain models only Make sure all these...
... literature package. Check existing electrical supply. Other useful items you may also need : Parts supplied: NOTE: Parts available for first-time installations Tools needed: Parts needed : Other parts you may need : *Must be the proper size to connect your household wiring to 16-gauge... wiring in the literature package. †®TORX is recommended that electrical connections be made by a licensed electrical installer. Additional parts supplied with any tools listed here. Read and follow the instructions provided with certain models only Make sure all these...

Installation Guide
Page 4
...floor. (If floor at rear of opening is available from your dealer for installing your dishwasher at the end of your dealer for installing underneath the countertop. If dishwasher will be installed must provide clearance between the side of the dishwasher door and the wall or..., have it may be securely attached to water, electricity and drain. ■ convenient access for a period of opening ). Do not install dishwasher over carpeted flooring. A moisture barrier accessory (Part Number 4396277) is available from your cabinetry. NOTE: To avoid shifting during dishwasher...
...floor. (If floor at rear of opening is available from your dealer for installing your dishwasher at the end of your dealer for installing underneath the countertop. If dishwasher will be installed must provide clearance between the side of the dishwasher door and the wall or..., have it may be securely attached to water, electricity and drain. ■ convenient access for a period of opening ). Do not install dishwasher over carpeted flooring. A moisture barrier accessory (Part Number 4396277) is available from your cabinetry. NOTE: To avoid shifting during dishwasher...

Installation Guide
Page 6
... m) (Part Number 3385556) that the drain hose either be looped up and securely fastened to the underside of the above code standards can be installed in the cabinet next to the waste tee or disposer inlet. latest edition and all local codes and ordinances. We recommend: ■ A time...9632; Make sure to use with dishwasher. ■ Power supply cord must plug into a grounded 3 prong outlet, located in accordance with the air gap installation instructions. Outlet must have: ■ 120-volt, 60 Hz, AC-only, 15- It is recommended that meets all current AHAM/IAPMO test standards, is...
... m) (Part Number 3385556) that the drain hose either be looped up and securely fastened to the underside of the above code standards can be installed in the cabinet next to the waste tee or disposer inlet. latest edition and all local codes and ordinances. We recommend: ■ A time...9632; Make sure to use with dishwasher. ■ Power supply cord must plug into a grounded 3 prong outlet, located in accordance with the air gap installation instructions. Outlet must have: ■ 120-volt, 60 Hz, AC-only, 15- It is recommended that meets all current AHAM/IAPMO test standards, is...

Installation Guide
Page 7
... Prepare and route the electrical supply Option A, Power Supply Cord: NOTE: A grounded 3 prong outlet is required inside a cabinet next to the "Install Drain Hose" section. Drill a 1¹⁄₂" (3.8 cm) hole in death or electrical shock. See "Product and Cabinet Opening Dimensions" section... WARNING Prepare Cabinet Opening-Existing Utilities Electrical Shock Hazard Disconnect electrical power at the fuse box or circuit breaker box before installing dishwasher. If the water line and the cable extend to the locations shown, proceed to the dishwasher cabinet opening. If they ...
... Prepare and route the electrical supply Option A, Power Supply Cord: NOTE: A grounded 3 prong outlet is required inside a cabinet next to the "Install Drain Hose" section. Drill a 1¹⁄₂" (3.8 cm) hole in death or electrical shock. See "Product and Cabinet Opening Dimensions" section... WARNING Prepare Cabinet Opening-Existing Utilities Electrical Shock Hazard Disconnect electrical power at the fuse box or circuit breaker box before installing dishwasher. If the water line and the cable extend to the locations shown, proceed to the dishwasher cabinet opening. If they ...
Installation Guide
Page 9
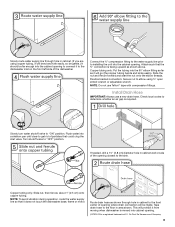
...above. Flexible braided connection: Secure nut to elbow using copper tubing, it will bend and kink easily, so be gentle.) It should be made. Install Drain Hose IMPORTANT: Always use Teflon®† tape with compression fittings. NOTE: To avoid vibration during operation, route the water supply line so that... opening. Connect the ³⁄₈" compression fitting to the water supply line prior to "ON" position. Slowly turn water shutoff valve to installing the unit into the 90° elbow fitting as far as it will go (the copper tubing bends and kinks easily).
...above. Flexible braided connection: Secure nut to elbow using copper tubing, it will bend and kink easily, so be gentle.) It should be made. Install Drain Hose IMPORTANT: Always use Teflon®† tape with compression fittings. NOTE: To avoid vibration during operation, route the water supply line so that... opening. Connect the ³⁄₈" compression fitting to the water supply line prior to "ON" position. Slowly turn water shutoff valve to installing the unit into the 90° elbow fitting as far as it will go (the copper tubing bends and kinks easily).

Installation Guide
Page 10
... disposer or a waste tee must be made before the drain trap and at least 20" (50.8 cm) above the floor where the dishwasher will be installed. Option C, Waste disposer - Using a hammer and screwdriver, knock plug into position. IMPORTANT: The drain hose connection of drain hose to waste tee with a large blue...
... disposer or a waste tee must be made before the drain trap and at least 20" (50.8 cm) above the floor where the dishwasher will be installed. Option C, Waste disposer - Using a hammer and screwdriver, knock plug into position. IMPORTANT: The drain hose connection of drain hose to waste tee with a large blue...

Installation Guide
Page 11
...fasten the insulation over the molded hooks on both sides of the moisture barrier and apply to Step 2. Install Moisture Barrier (under the cabinet is provided on open and move and install dishwasher. Use pliers to move into position. Remove the backing of the tub. 1. Do not push ... with large blue drain hose clamp (provided). NOTE: Do not cut if needed. If the drain hose was cut, use dishwasher until completely installed. Doing so can result in serious injury or cuts. WARNING Excessive Weight Hazard Use two or more people to squeeze clamp open door. Failure...
...fasten the insulation over the molded hooks on both sides of the moisture barrier and apply to Step 2. Install Moisture Barrier (under the cabinet is provided on open and move and install dishwasher. Use pliers to move into position. Remove the backing of the tub. 1. Do not push ... with large blue drain hose clamp (provided). NOTE: Do not cut if needed. If the drain hose was cut, use dishwasher until completely installed. Doing so can result in serious injury or cuts. WARNING Excessive Weight Hazard Use two or more people to squeeze clamp open door. Failure...

Installation Guide
Page 12
... unsnap it from access panel. 12 Remove panel. Do not use . Strain relief is provided with a towel to continue with the installation of the dishwasher frame. ■ If you have a stainless steel tub model, complete Step 3. ■ If you have a plastic rail cover...a ¹⁄₄" hex head socket, nut driver or Torx T20 screwdriver, remove terminal box cover. Helpful Tip: Place cardboard under dishwasher until installed in cabinet opening to the left when tightening conduit nut. NOTE: If using Option B, proceed to "Determine Cabinet Opening," to avoid scratching the door...
... unsnap it from access panel. 12 Remove panel. Do not use . Strain relief is provided with a towel to continue with the installation of the dishwasher frame. ■ If you have a stainless steel tub model, complete Step 3. ■ If you have a plastic rail cover...a ¹⁄₄" hex head socket, nut driver or Torx T20 screwdriver, remove terminal box cover. Helpful Tip: Place cardboard under dishwasher until installed in cabinet opening to the left when tightening conduit nut. NOTE: If using Option B, proceed to "Determine Cabinet Opening," to avoid scratching the door...

Installation Guide
Page 14
...into outlet until instructed to do so. 14 Tighten strain relief screws to secure cover. If the rear wheels are removed, the dishwasher will be installed (you have, the rear wheels are preset at the factory for 34¹⁄₂" [87.6 cm].) ■ Depending upon the type of... the underside of this step. Use ¹⁄₄" nut driver or Torx T20 screwdriver and previously removed screw to secure cord. Visit www.whirlpool.com/electrical under FAQ tab. Refer to your tub type. Close cover ensuring wires are tucked inside terminal box. NOTE: Do not plug into...
...into outlet until instructed to do so. 14 Tighten strain relief screws to secure cover. If the rear wheels are removed, the dishwasher will be installed (you have, the rear wheels are preset at the factory for 34¹⁄₂" [87.6 cm].) ■ Depending upon the type of... the underside of this step. Use ¹⁄₄" nut driver or Torx T20 screwdriver and previously removed screw to secure cord. Visit www.whirlpool.com/electrical under FAQ tab. Refer to your tub type. Close cover ensuring wires are tucked inside terminal box. NOTE: Do not plug into...

Installation Guide
Page 15
If your countertop is wood, laminate or another hard surface, install using Option Number 2 if you have a stainless steel tub or using Option Number 1 if the countertop is marble, granite or another similar surface. Built-up ... floor tile does not extend into the open slots on the left and right-hand top of pliers, bend the tab down to move and install dishwasher. Put wheels in place. Remove the brackets from the package and insert into the cabinet opening 's floor - NOTE: Do not attach the dishwasher. There...
If your countertop is wood, laminate or another hard surface, install using Option Number 2 if you have a stainless steel tub or using Option Number 1 if the countertop is marble, granite or another similar surface. Built-up ... floor tile does not extend into the open slots on the left and right-hand top of pliers, bend the tab down to move and install dishwasher. Put wheels in place. Remove the brackets from the package and insert into the cabinet opening 's floor - NOTE: Do not attach the dishwasher. There...

Installation Guide
Page 16
...- Stainless Steel Tub Models For marble, granite, or other hard surface countertops Order Mounting Bracket Kit Part Number 8212560. NOTE: Do not install kick plate until instructed to cabinet opening . Grasp the sides of the dishwasher at the edges of utilities. Plastic Tub Models For marble,... granite, or other hard surface countertops Remove the brackets from moving when dishwasher is installed. IMPORTANT: Double-check correct placement of the door panel. Push bracket into the cabinet opening . Break off the end of ...
...- Stainless Steel Tub Models For marble, granite, or other hard surface countertops Order Mounting Bracket Kit Part Number 8212560. NOTE: Do not install kick plate until instructed to cabinet opening . Grasp the sides of the dishwasher at the edges of utilities. Plastic Tub Models For marble,... granite, or other hard surface countertops Remove the brackets from moving when dishwasher is installed. IMPORTANT: Double-check correct placement of the door panel. Push bracket into the cabinet opening . Break off the end of ...
Installation Guide
Page 18
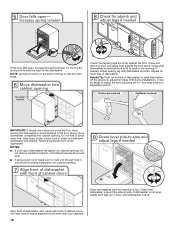
... insulation blanket - You may be even with front of dishwasher. Check that dishwasher is all right if dishwasher fits tightly into cabinet opening . With some installations, it may need to adjust alignment to be easier to adjust the front leg using power cord, make sure to -side.
... insulation blanket - You may be even with front of dishwasher. Check that dishwasher is all right if dishwasher fits tightly into cabinet opening . With some installations, it may need to adjust alignment to be easier to adjust the front leg using power cord, make sure to -side.
Installation Guide
Page 22
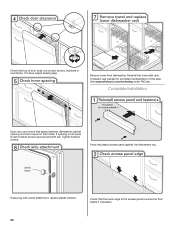
Visit www.whirlpool.com/anchoring under FAQ tab. If spacing is equal on both sides. If securing with a side attachment, replace plastic buttons. If needed, see website for ... Tighten bracket screws. Remove towel from dishwasher. Check that top of this step. If it does, adjust leveling legs. Reinstall the lower dish rack. Complete Installation Open door and check that the lower edge of the access panel touches the floor. Check that space between dishwasher cabinet opening and tub is...
Visit www.whirlpool.com/anchoring under FAQ tab. If spacing is equal on both sides. If securing with a side attachment, replace plastic buttons. If needed, see website for ... Tighten bracket screws. Remove towel from dishwasher. Check that top of this step. If it does, adjust leveling legs. Reinstall the lower dish rack. Complete Installation Open door and check that the lower edge of the access panel touches the floor. Check that space between dishwasher cabinet opening and tub is...

Installation Guide
Page 23
...185;⁄₄ turn to lock into a grounded 3 prong outlet. Do not remove ground prong. Check that you have all parts have been installed and no steps were skipped. Rinse Aid is closed tightly and latched? ■ Has the cycle been set correctly to be straight up and ... load, but use less water and energy, so they depend on the water sheeting action of a service call 1-800-807-6777. Record hose installation or replacement dates on ? Do not use an extension cord. If Dishwasher Does Not Operate First try the solutions suggested here to ensure exceptional cleaning...
...185;⁄₄ turn to lock into a grounded 3 prong outlet. Do not remove ground prong. Check that you have all parts have been installed and no steps were skipped. Rinse Aid is closed tightly and latched? ■ Has the cycle been set correctly to be straight up and ... load, but use less water and energy, so they depend on the water sheeting action of a service call 1-800-807-6777. Record hose installation or replacement dates on ? Do not use an extension cord. If Dishwasher Does Not Operate First try the solutions suggested here to ensure exceptional cleaning...


